Unityでスプライトアニメーションを作る際の手順をまとめました。
[アニメーションシートを作る]
・ アニメーションさせる絵を縦横同じサイズのマスに並べたpngを用意する

2パターン以上のアニメーションパターンを使用する場合は左上〜右下にパターンが流れるように配置します
・ InspectorでTextureTypeをSprite,SpriteModeをMultipleに変更
・ Inspector一番下のApplyをクリックして変更を反映
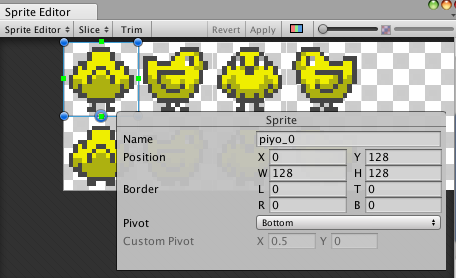
・ Inspector真ん中あたりのSpriteEditorボタンをクリック

・ SpriteEditorウインドウが現れるのでSlice>TypeをGridByCellSizeにする
・ 分割サイズをアニメーションの1フレーム分のサイズに設定(128x128の画像を並べる、など)
・ Pivotは回転させたりするときの中心になるので人型なら足元(Bottom)にしておくと良い
・ 変更が終わったらSpriteEditorウインドウ右上の方にあるApplyを押す
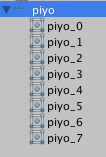
・ 画像の階層下に作ったアニメーションパターンが並んで入ればOK

[アニメーションコントローラー&アニメーションを作る]
・ アニメーションさせたいパターンをcommand(Ctrl)+クリックで複数選択
・ 選択したアニメーションパターンをまとめてSceneにドラッグ&ドロップ
・ Animationファイル保存ダイアログが出るので名前をつけて保存
・ HierarchyにGameObjectが、ProjectにAnimatorControllerが自動で生成される
・ AnimatorControllerがアニメーションパターンの名前になっているので適当な名前に変更
・ GameObjectもアニメーションパターンの名前になっているので変更(Playerとか)
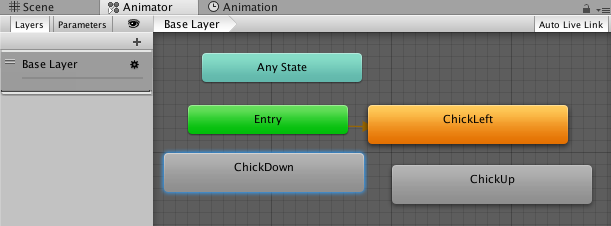
・ AnimatorControllerをダブルクリックして確認
・ 中にAnimationと同じ名前のオレンジ色のステートが追加されていればOK

[アニメーションを調整する]
・ 再生するとアニメーションが再生される
・ Projectで作成したアニメーションを選択
・ 一回再生して終了してしまう場合はInspector>LoopTimeをチェック

・ アニメーションスピードが速い/遅い場合はAnimationウインドウ>Samplesの値を変更

[アニメーションを追加する]
・ 追加したいアニメーション用の[アニメーションシートを作る]
・ アニメーションさせたいパターンをcommand(Ctrl)+クリックで複数選択
・ 選択したアニメーションパターンをまとめてSceneにドラッグ&ドロップ
・ Animationファイル保存ダイアログが出るので名前をつけて保存
・ HierarchyにGameObjectが、ProjectにAnimatorControllerが自動で生成されるので削除
・ 残ったAnimationの名前を変更し、最初に作ったAnimatorControllerにドラッグ&ドロップ
・ 最初に作ったAnimatorControllerをダブルクリックして確認
・ 中にAnimationと同じ名前の灰色のステートが追加されていればOK

アニメーション使用例。アニメーションはステートではなく Play()で直接動かしています。
using System.Collections;
using System.Collections.Generic;
using UnityEngine;

namespace chickSample{
	public class MyPlayerControl : MonoBehaviour {
		private readonly float maxSpeed = 3f; // 最大速度
		private readonly float moveForce = 10f; // 自分が加速するための力の大きさ
		Rigidbody2D rb; // 自分の物理挙動コンポーネント
		Animator anm; // 自分のアニメーションコンポーネント
		SpriteRenderer sprRend; // 自分の表示コンポーネント
		bool isJump;
		// Use this for initialization
		void Start () {
			rb = GetComponent<Rigidbody2D> ();
			anm = GetComponent<Animator> ();
			sprRend = GetComponent<SpriteRenderer> ();
		}

		// Update is called once per frame
		void FixedUpdate () {
			if (Input.GetKey (KeyCode.LeftArrow)) { // 左キーが押された
				rb.AddForce(Vector2.left * moveForce,ForceMode2D.Force); // 左へ加速
				anm.Play ("ChickLeft"); // 左向きアニメーション
				sprRend.flipX = false; // 左右反転オフ
			}
			if (Input.GetKey (KeyCode.RightArrow)) {
				rb.AddForce(Vector2.right * moveForce,ForceMode2D.Force);
				anm.Play ("ChickLeft"); // 左向きアニメーション
				sprRend.flipX = true; // 左右反転オン
			}
			if (Input.GetKey (KeyCode.UpArrow)) {
				rb.AddForce(Vector2.up * moveForce,ForceMode2D.Force);
				anm.Play ("ChickUp"); // 上向きアニメーション
				sprRend.flipX = false; // 左右反転オフ
			}
			if (Input.GetKey (KeyCode.DownArrow)) {
				rb.AddForce(Vector2.down * moveForce,ForceMode2D.Force);
				anm.Play ("ChickDown"); // 下向きアニメーション
				sprRend.flipX = false; // 左右反転オフ
			}

			// rb.velocity は現在の移動速度(向きと大きさ)
			// rb.velocity.magnitudeは大きさだけ取り出したもの。つまりスピード
			if (rb.velocity.magnitude > maxSpeed) { // スピードが早すぎたら
				// rb.velocity.normalizedは向きは変えずに大きさを1にしたもの
				// つまりmaxSpeedを掛けることで向いている方向の最高速度にすることができる
				rb.velocity = rb.velocity.normalized * maxSpeed;
			}
			// AnimationController内のステート(右向き、左向きアニメーションなど)
			AnimatorStateInfo stateInfo = anm.GetCurrentAnimatorStateInfo (0);
			// 現在の速度/最高速度 で、現在の速度を0-1までの値として計算する
			float speedRate = rb.velocity.magnitude / maxSpeed;
			// stateInfo.speedはステート内に書かれたスピード。つまり通常時のスピード
			// それにspeedRateを掛けることで、ゆっくり移動するほどアニメーションを遅くする
			anm.speed = stateInfo.speed * speedRate;
		}

		// プレイヤーが障害物に当たったときの処理
		// 相手にCollider2Dがあり、かつisKinematicのチェックがOFFの時呼ばれる
		void OnCollisionEnter2D(Collision2D other){
			if (other.gameObject.name == "Sphere") { // 名前が Sphere ならば
				// 自分からみた相手の方向
				Vector2 dir = other.gameObject.transform.position - gameObject.transform.position;
				dir = dir.normalized; // 向きを変えず大きさを1にする
				// 相手の物理挙動コンポーネントを取得
				Rigidbody2D otherRb = other.gameObject.GetComponent<Rigidbody2D> ();
				if (otherRb != null) { // 相手の物理挙動コンポーネントがあれば
					otherRb.AddForce (dir * moveForce, ForceMode2D.Impulse); //相手方向に弾き飛ばす
				}
			}
		}

		// プレイヤーがアイテム等に当たったときの処理
		// 相手にCollider2Dがあり、かつisKinematicのチェックがONの時呼ばれる
		void OnTriggerEnter2D(Collider2D other){
			if (other.gameObject.name == "Cube") { // 名前が Cube ならば
				// オブジェクト取得から削除までの一連の流れを表現するときなどに便利なコルーチン
				StartCoroutine(itemGetCo(other.gameObject));
			}
		}

		// オブジェクト取得から削除までの一連の流れ
		IEnumerator itemGetCo(GameObject otherObj){
			// 相手についている当たりを取得(オブジェクトにBoxCollider2Dを付けておく必要がある)
			BoxCollider2D coll = otherObj.GetComponent<BoxCollider2D> ();
			coll.enabled = false; // なんども当たってしまわないように当たりを削除しておく
			float timer = 1f;
			while (timer > 0f) { // timerが0以下になるまで繰り返す
				timer -= Time.deltaTime;
				otherObj.transform.localScale *= 0.9f; // サイズを0.9倍にする
				otherObj.transform.Rotate(Vector3.one*10f); // (10,10,10)で回転
				// 繰り返し途中で一旦戻る
				// コルーチンループ中はこれがないとフリーズしてしまうので注意
				yield return null;
			}
			Destroy (otherObj); // オブジェクトを削除
			yield break; // コルーチンを抜ける
		}
	}
}
スプライトアニメーションのスプライトだけを差し替えるにはこちら

