Datasmithインポートの処理をBlueprintまたはPythonによって組んでおくことで、ワークフローをさらに高効率化することができます。
Datasmithを使って普通にインポートすると、下の画像のように2段階のプロセスが実行されます。
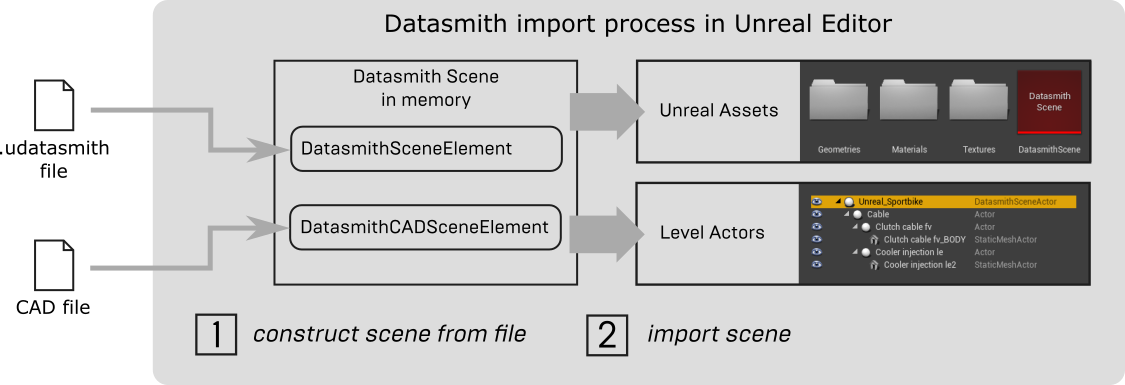
画像は公式ドキュメントから引用
http://api.unrealengine.com/JPN/Enterprise/Datasmith/Overview/CustomizingImportProcess/index.html
- ファイルの中身をメモリ内で読み込んでシーンを構築。
- Asset、Actorに変換してレベル上に生成。(インポート)
Blueprint/Pythonを使えばこの2つのプロセスを分解して別々に実行したり、その間に独自の処理を組んで実際にインポートされる前に実行することができます。
今回は一例として、バウンディングボックスの3辺の合計が一定以下のオブジェクトを除外してインポートしてみたいと思います。
ネジなど細かいパーツを除外するのに使えるかなと思います。
Blueprintの場合
Editor Scripting Utilitiesプラグインを有効にする必要があります。
エディタの編集>プラグインからEditor Scripting Utilitiesで検索して有効にしておいてください。

まずはコンテンツブラウザ内でブループリントクラスを作成します。
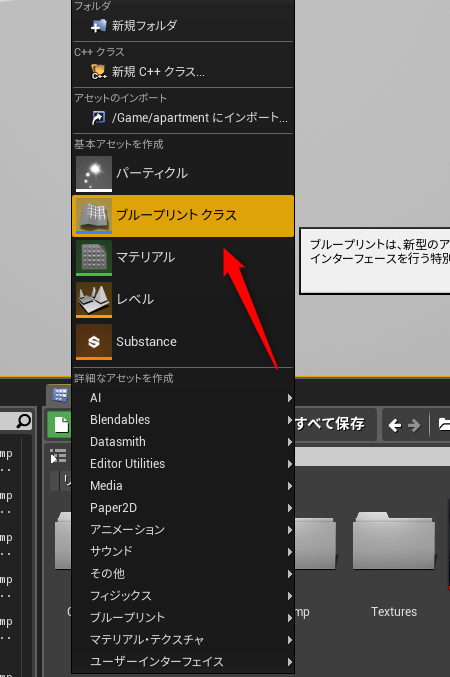
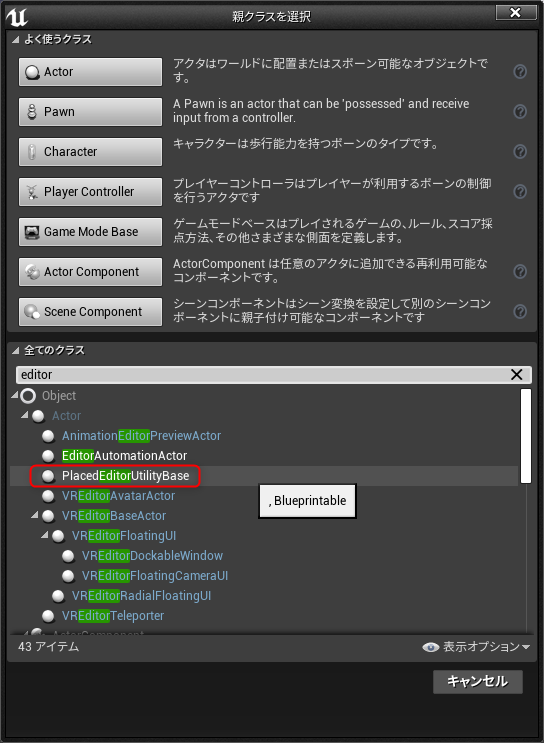
親クラスはPlaced Editor Utility Baseにします。
Blueprintグラフはこんな感じです。
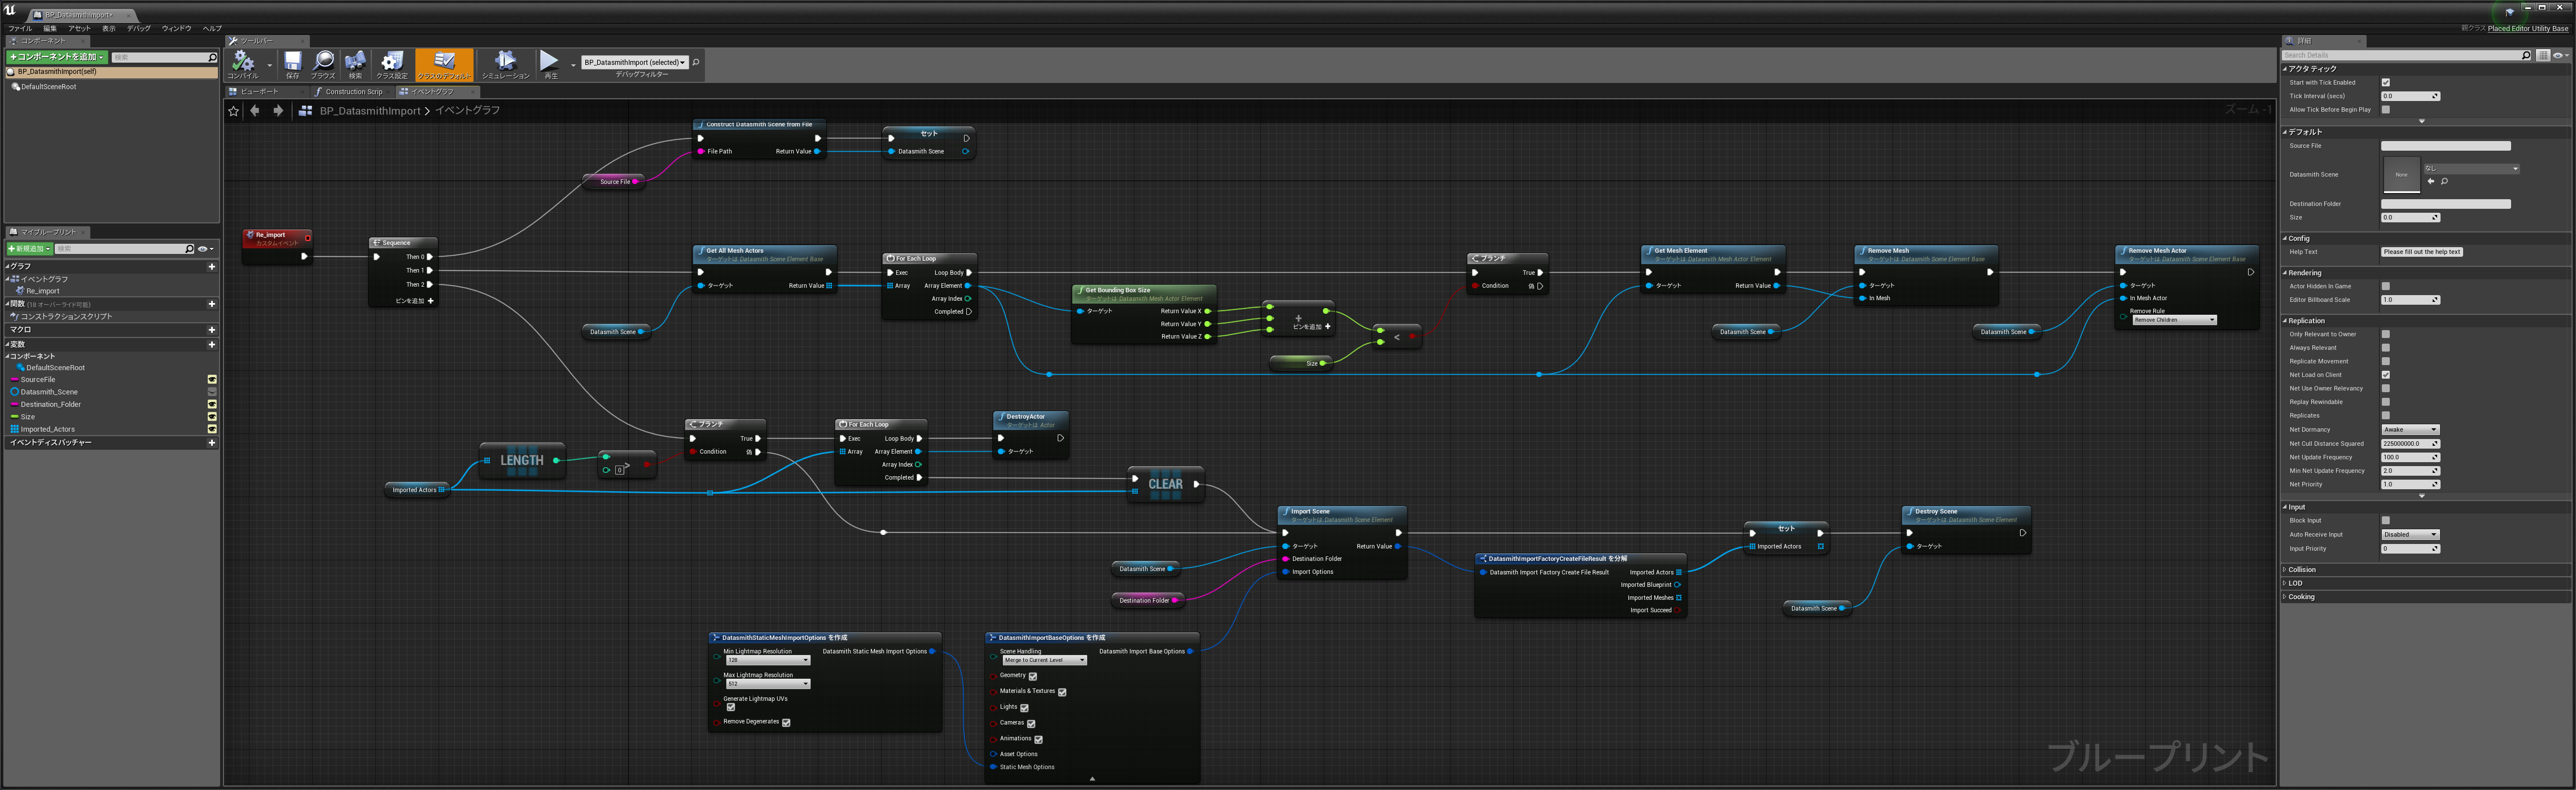
見やすいようにこちらのサイトにもアップしてあります。
https://blueprintue.com/blueprint/_exg-rid/
左端のイベントノードはカスタムイベントで、「エディタで呼び出す」にチェックを入れるとエディタ上で実行できるようになります。
こちらを参考に設定してみてください。
http://api.unrealengine.com/JPN/Engine/Editor/ScriptingAndAutomation/Blueprints/index.html
大まかな処理の流れを解説すると、
Datasmithファイルを参照してDatasmith Sceneを構築
↓
構築されたシーンのすべてのアクタを配列として取得し、For Each Loopで個別にバウンディングボックスの大きさを評価して一定以下ならシーンから削除
↓
前回インポートしたアクタがあれば削除
上で再構築したものをインポートし、最後にメモリ上のDatasmith Sceneをリセット
といった流れになっています。
Pythonの場合
Pythonプラグインを有効にする必要があります。
エディタの編集>プラグインからPythonプラグインを有効にしておいてください。
Unreal EngineでのPythonの使い方はこちらを参考にしてください。
http://api.unrealengine.com/JPN/Engine/Editor/ScriptingAndAutomation/Python/index.html
import unreal
# .udatasmithのファイルパスを指定。
ds_file_on_disk = ""
ds_scene_in_memory = unreal.DatasmithSceneElement.construct_datasmith_scene_from_file(ds_file_on_disk)

if ds_scene_in_memory is None:
    print "Scene loading failed."
    quit()


# バウンディングボックス3辺の和が一定以下のメッシュを取り除く。
remove_size = 500
for mesh in ds_scene_in_memory.get_meshes():
    mesh_size = mesh.get_bounding_box_height() + mesh.get_bounding_box_width() + mesh.get_bounding_box_depth()
    if remove_size > mesh_size:
        ds_scene_in_memory.remove_mesh(mesh)

# 上記で取り除いたメッシュを参照するメッシュ アクタをシーンから取り除く。
for mesh_actor in ds_scene_in_memory.get_all_mesh_actors():
    mesh_reference = mesh_actor.get_mesh_element()
    if mesh_reference is None:
        print("removing an actor with a missing mesh:" + mesh_actor.get_element_name())
        ds_scene_in_memory.remove_mesh_actor(mesh_actor)

# インポート オプションを設定する。
options = unreal.DatasmithImportBaseOptions()
options.scene_handling = unreal.DatasmithImportScene.NEW_LEVEL

# アセットとアクタを作成することでプロセスをファイナライズする。

# 宛先フォルダは /Game/ で始まる必要がある。
ds_scene_in_memory.import_scene("/Game/MyStudioScene", options)

# Datasmith シーンをクリーン アップする。
ds_scene_in_memory.destroy_scene()
print "Custom import process complete!"
こんな感じです。
公式ドキュメントにもあるように名前で判別して削除したり、ほかにもいろいろ応用できると思います。
参考リンク
- Datasmith インポート プロセスのカスタマイズ
http://api.unrealengine.com/JPN/Enterprise/Datasmith/Overview/CustomizingImportProcess/index.html - リアルタイムデザインツールの作成: McLaren による Unreal Studio での CAD インポートの自動化
https://www.unrealengine.com/ja/tech-blog/making-a-real-time-design-tool-mclaren-automates-cad-import-with-unreal-studio