プロジェクトデータはこちら
エンジンバージョン 4.22.3
https://1drv.ms/u/s!Au-8FqgREBKZiBzk_OTat62eShhY?e=p6zzHP
注意
UE4が生成するC++コードには以下のように
class AISENSESIGHTCUSTOM_API ABaseCharacter : public ACharacter, public IAISightTargetInterface
classキーワードの右隣に 作成したプロジェクト名_API というキーワードが付与される。上でのコード例を見ればわかるように、今回の記事はプロジェクト名を 「AISenseSightCustom」 としている。
もし自分で決めた名前や既にあるプロジェクトに組み込む場合は、この 作成したプロジェクト名_API の部分を適宜読み替える必要がある事に注意。
Characterクラスを親とした新しいキャラクタークラスをC++で作成する
C++クラスを追加するためのダイアログを開く
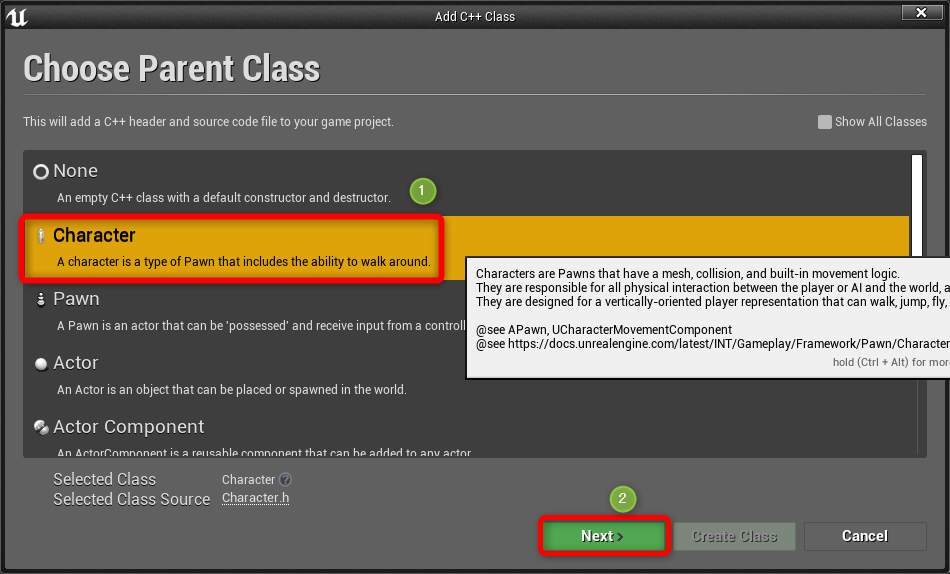
Content Browser の Add Newボタン を押して上から3番目にある New C++ Class... をクリックする。
親クラスを選択する
Choose Parent Class の画面から Character を選択し、Nextボタンを押す。
クラス名を変更する
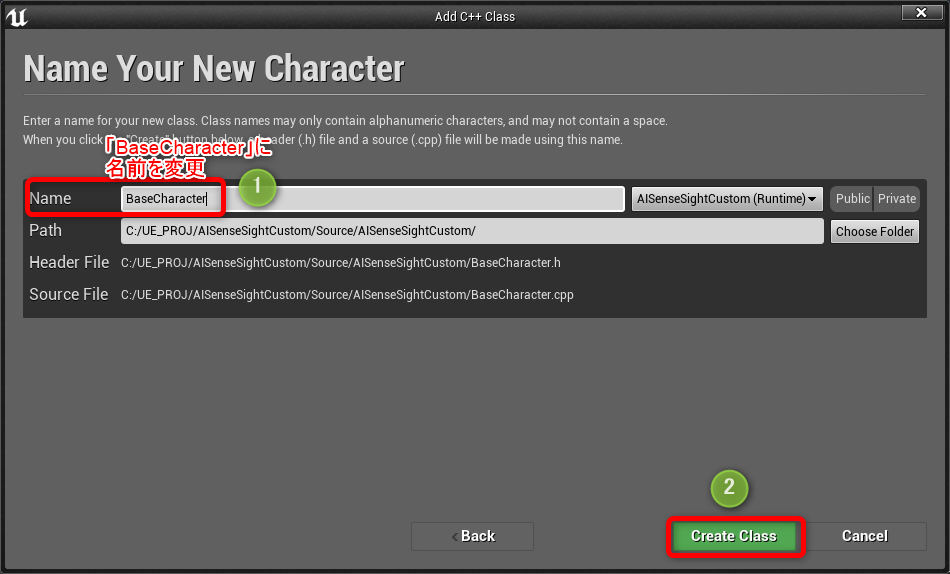
Name の欄を BaseCharacter に変更し、Create Classボタン をクリックする。
しばらく待機...
C++ファイルの追加処理やコンパイル処理が始まる。完了するまでしばらく待機。

エラーなくVisual Studioが無事に起動したら...
プロジェクト名.Build.cs を開く
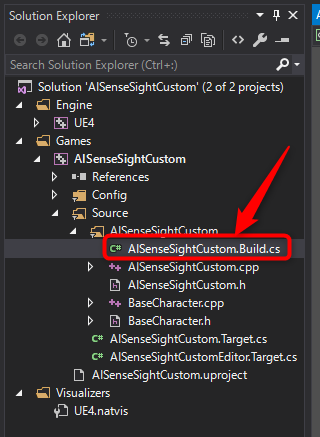
Visual StudioのSolution Explorerにある プロジェクト名.Build.cs を開く。
このファイルは作成したプロジェクト名によって変化するので適宜読み替える必要あり。
画像では AISenseSightCustom.Build.cs となっている。
PublicDependencyModuleNames に追記する
コード内に PublicDependencyModuleNames という部分があり、その末尾に ** "AIModule" ** を追記する。
// Fill out your copyright notice in the Description page of Project Settings.

using UnrealBuildTool;

public class AISenseSightCustom : ModuleRules
{
	public AISenseSightCustom(ReadOnlyTargetRules Target) : base(Target)
	{
		PCHUsage = PCHUsageMode.UseExplicitOrSharedPCHs;
	                                                                                                    // ~~追加~~
		PublicDependencyModuleNames.AddRange(new string[] { "Core", "CoreUObject", "Engine", "InputCore", "AIModule" });

		PrivateDependencyModuleNames.AddRange(new string[] {  });

		// Uncomment if you are using Slate UI
		// PrivateDependencyModuleNames.AddRange(new string[] { "Slate", "SlateCore" });

		// Uncomment if you are using online features
		// PrivateDependencyModuleNames.Add("OnlineSubsystem");

		// To include OnlineSubsystemSteam, add it to the plugins section in your uproject file with the Enabled attribute set to true
	}
}
BaseCharacter.h を開く
BaseCharacter.h を開くと、既にいくつか関数名やらが書かれているので、AISense_Sightを改良するために更に追記する。
// Fill out your copyright notice in the Description page of Project Settings.

# pragma once

# include "CoreMinimal.h"
# include "GameFramework/Character.h"
//////////////////////////////////////////////////////
# include "Perception/AISightTargetInterface.h" // ←追加
//////////////////////////////////////////////////////
# include "BaseCharacter.generated.h"

UCLASS()														// ~~~~~~~~ 追加 ~~~~~~~~
class AISENSESIGHTCUSTOM_API ABaseCharacter : public ACharacter, public IAISightTargetInterface
{
	GENERATED_BODY()

public:
	// Sets default values for this character's properties
	ABaseCharacter();

protected:
	// Called when the game starts or when spawned
	virtual void BeginPlay() override;

public:
	// Called every frame
	virtual void Tick(float DeltaTime) override;

	// Called to bind functionality to input
	virtual void SetupPlayerInputComponent(class UInputComponent* PlayerInputComponent) override;

	///////////////////////////////////////////////
	// 追加
	virtual bool CanBeSeenFrom(
		const FVector& ObserverLocation,
		FVector& OutSeenLocation,
		int32& NumberOfLoSChecksPerformed,
		float& OutSightStrength,
		const AActor* IgnoreActor = NULL
	) const;
	///////////////////////////////////////////////
};
BaseCharacter.cpp を開く
BaseCharacter.hに上に載せたコードを書いたら(もしくはコピペしたら)次にBaseCharacter.cppを開き、以下のように処理を追加する。
// Fill out your copyright notice in the Description page of Project Settings.


# include "BaseCharacter.h"

//////////////////////////////////////////////////////
# include "Engine/SkeletalMeshSocket.h" // ←追加
//////////////////////////////////////////////////////


// Sets default values
ABaseCharacter::ABaseCharacter()
{
 	// Set this character to call Tick() every frame.  You can turn this off to improve performance if you don't need it.
	PrimaryActorTick.bCanEverTick = true;

}

// Called when the game starts or when spawned
void ABaseCharacter::BeginPlay()
{
	Super::BeginPlay();

}

// Called every frame
void ABaseCharacter::Tick(float DeltaTime)
{
	Super::Tick(DeltaTime);

}

// Called to bind functionality to input
void ABaseCharacter::SetupPlayerInputComponent(UInputComponent* PlayerInputComponent)
{
	Super::SetupPlayerInputComponent(PlayerInputComponent);

}

/////////////////////////////////////////////////////////////////////////////////
// 追加
bool ABaseCharacter::CanBeSeenFrom(
	const FVector& ObserverLocation,
	FVector& OutSeenLocation,
	int32& NumberOfLoSChecksPerformed,
	float& OutSightStrength,
	const AActor* IgnoreActor
) const
{
	static const FName NAME_AILineOfSight = FName(TEXT("TestPawnLineOfSight"));

	FHitResult HitResult;

	//auto sockets = GetMesh()->GetAllSocketNames();
	TArray<USkeletalMeshSocket*> sockets = GetMesh()->SkeletalMesh->GetActiveSocketList();

	for (int i = 0; i < sockets.Num(); i++)
	{

		FVector socketLocation = GetMesh()->GetSocketLocation(sockets[i]->SocketName);

		const bool bHitSocket = GetWorld()->LineTraceSingleByObjectType(HitResult, ObserverLocation, socketLocation
			, FCollisionObjectQueryParams(ECC_TO_BITFIELD(ECC_WorldStatic) | ECC_TO_BITFIELD(ECC_WorldDynamic)) // << Changed this line
			, FCollisionQueryParams(NAME_AILineOfSight, true, IgnoreActor));

		NumberOfLoSChecksPerformed++;

		if (bHitSocket == false || (HitResult.Actor.IsValid() && HitResult.Actor->IsOwnedBy(this))) {
			OutSeenLocation = socketLocation;
			OutSightStrength = 1;

			return true;
		}
	}

	const bool bHit = GetWorld()->LineTraceSingleByObjectType(HitResult, ObserverLocation, GetActorLocation()
		, FCollisionObjectQueryParams(ECC_TO_BITFIELD(ECC_WorldStatic) | ECC_TO_BITFIELD(ECC_WorldDynamic)) // << Changed this line
		, FCollisionQueryParams(NAME_AILineOfSight, true, IgnoreActor));

	NumberOfLoSChecksPerformed++;

	if (bHit == false || (HitResult.Actor.IsValid() && HitResult.Actor->IsOwnedBy(this)))
	{
		OutSeenLocation = GetActorLocation();
		OutSightStrength = 1;

		return true;
	}

	OutSightStrength = 0;
	return false;
}
/////////////////////////////////////////////////////////////////////////////////
ここからはUE4エディターでの作業
上記の手順をすべて完了したら、コードをコンパイルする
UE4エディターへ戻り、画面上部のPlayボタンの左にある Compile ボタンを押してコードをコンパイルする。
ここでエラーが出てしまった場合、上記の手順で追記し忘れた部分があるはずなので見直すこと。
プレイヤーキャラクターのブループリントの親クラスを BaseCharacter に変更する
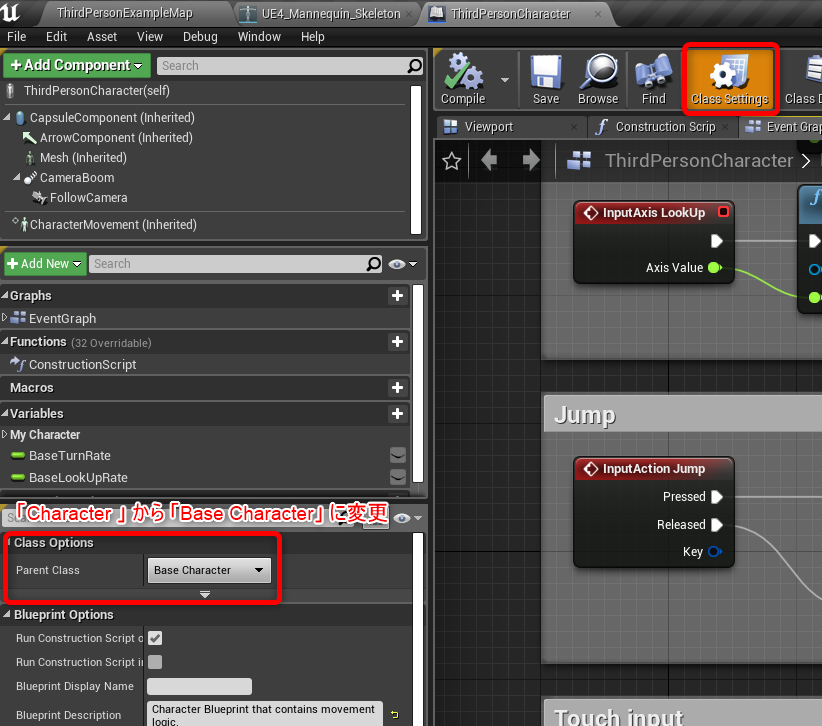
既にプレイヤーキャラクターをブループリントで作成している場合、親クラスを Characterクラス からこれまでで作成した BaseCharacterクラス に変更する必要がある。
プレイヤーキャラクターのブループリントを開き、画面上部にある Class Settingsボタン を押し、詳細パネルの一番上にある Parent Class を画像の通りに変更する。
プレイヤーキャラクターのスケルトンアセットを開く
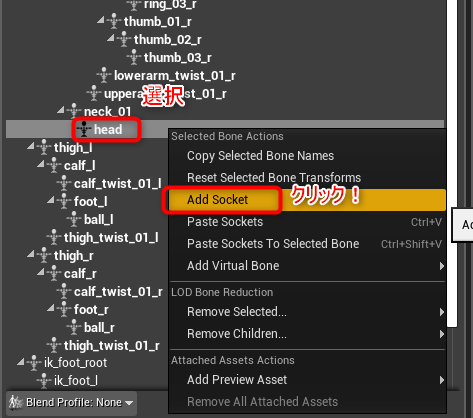
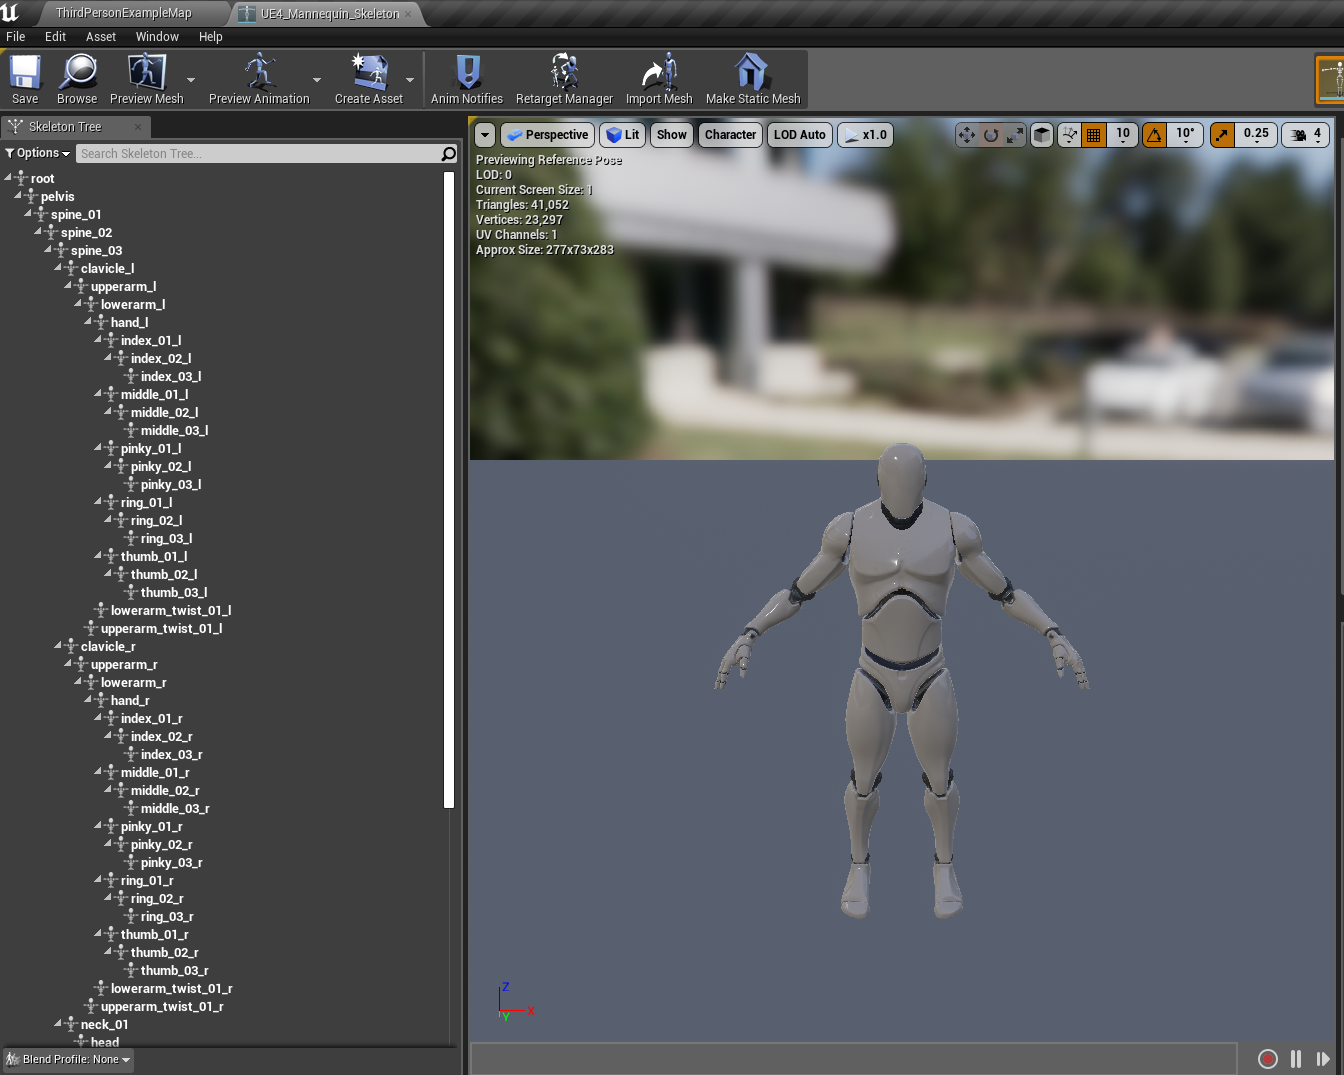
スケルタルメッシュソケットを追加するために、使用するプレイヤーキャラクターのスケルトンアセットを開く。
画像ではThird Person Templateを使用しているため、UE4_Mannequin_Skeletonを開いている。
スケルタルメッシュソケットを追加する
AIキャラクターブループリント&AI Controllerブループリントを作る
最初にAIキャラクター用ブループリントを作成する。
Content Browser の Add Newボタン を押し、上にある Blueprint Class をクリックする。
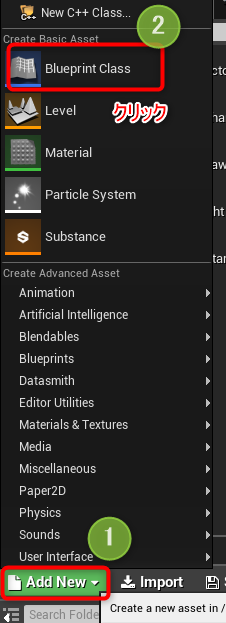
親クラスの選択画面が出るので、下部にあるAll Classesの欄に basecharacter と入力し、絞り込まれた候補の中からC++で作成した BaseCharacterクラス をクリックし、Selectボタン を押す。
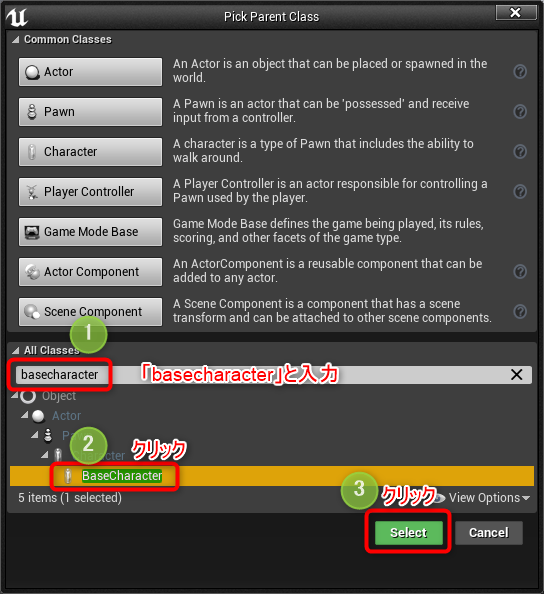
作成したブループリントの名前は BP_AI とする。
次にAI用のコントローラーブループリントを作成する。
Content Browser の Add Newボタン を押し、上にある Blueprint Class をクリックする。

親クラスの選択画面が出るので、下部にあるAll Classesの欄に aicontroller と入力し、絞り込まれた候補の中からC++で作成した AIControllerクラス をクリックし、Selectボタン を押す。
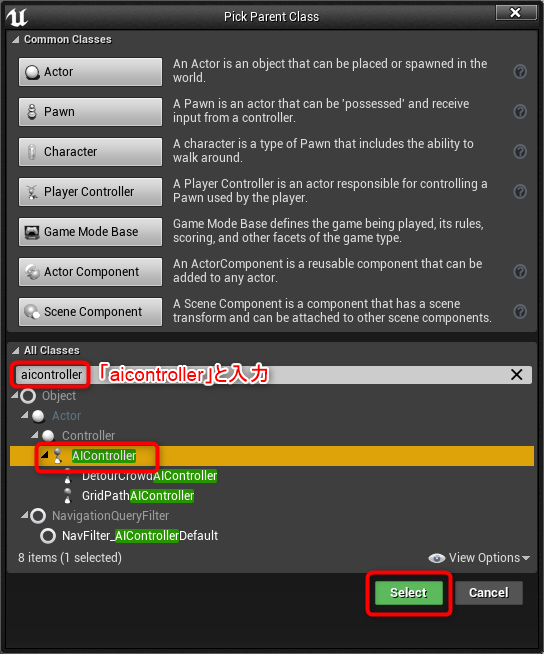
作成したブループリントの名前は AIC_AI とする。
BP_AIブループリントを開きメッシュを設定する
Meshコンポーネントをクリックし、SK_Mannequin を選択する。
Meshコンポーネントのトランスフォームを
Location X=0.0, Y=0.0, Z=-90.0
Rotation X=0.0, Y=0.0, Z=-90.0
に変更する。
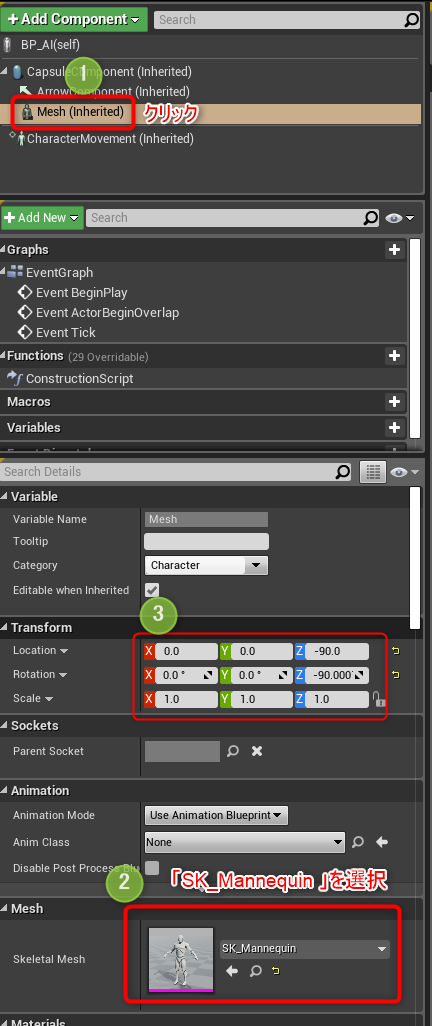
BP_AIブループリントのAI Controllerクラスを設定する
アタッチされているコンポーネント一覧の一番上にある BP_AI(self) をクリックする。
詳細パネルの中に AI Controller Class という項目があるので、その右側にあるプルダウンメニューから先ほど作成した AIC_AI を選択する。
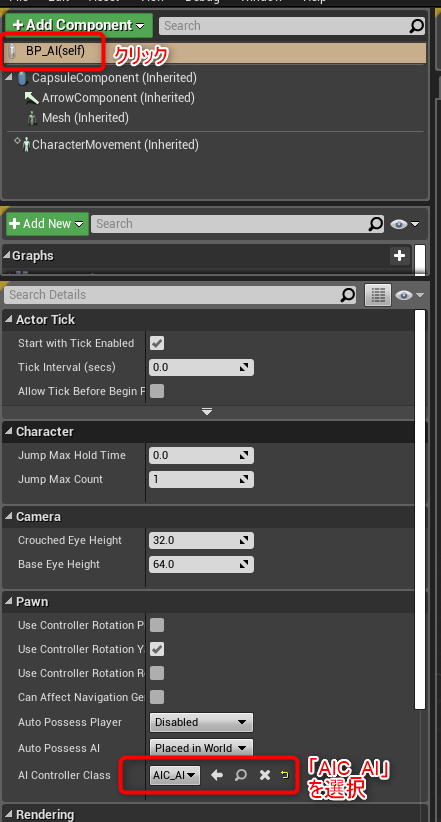
AI Controllerブループリントを開き AI Perceptionコンポーネントを追加
Add Componentボタンを押し、一覧の中から AI Perception をクリックする。
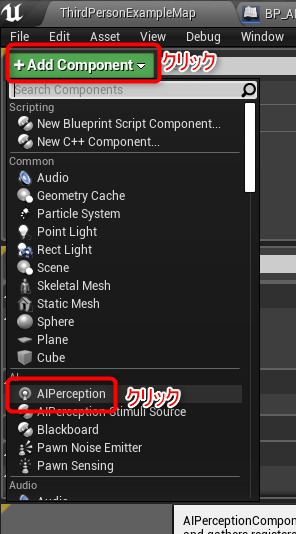
AI Perception に AI Sense Sight を設定する
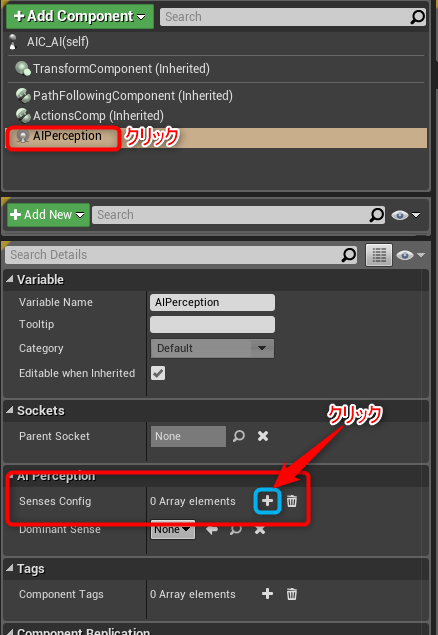
アタッチされているコンポーネント一覧から AI Perception を選択し、詳細パネルに表示される中から AI Perception のカテゴリを探す。
見つけたら Senses Config の右側にある +ボタン を押す。
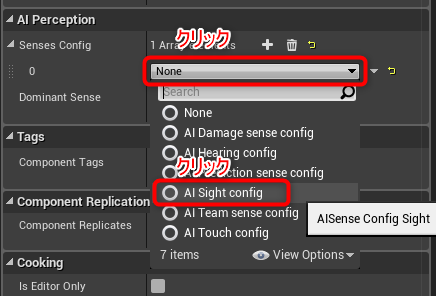
AI Sense を設定するためのプルダウンメニューが出現するのでクリックし、AI Sense Sight を選択する。
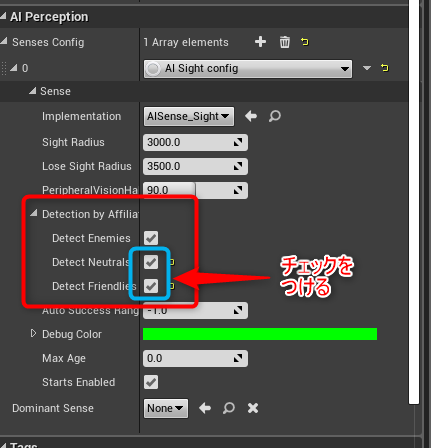
展開可能な項目が出現するので展開し、真ん中あたりにある Detection by Affiliation を展開し Detect Neutrals と Detect Friendlies にチェックを付ける。
動作確認を行う
その前に、AIのデバッグに便利なGameplay Debuggerを利用する準備をする
AIのデバッグを行うのにはGameplay Debuggerが非常に便利。しかしデフォルトでは アポストロフィーキー で起動するようになっており、日本語キーボード配列では起動することが難しい。
よって、Project SettingsからGameplay Debuggerの起動キーを変更することで、容易に起動できるようにする。
GameplayDebugger をプロジェクト用にカスタマイズして利用する
http://hogetatu.hatenablog.com/entry/2016/12/03/002946
一度プロジェクトを再起動する
なぜかはわからないが上記の手順をすべて完了し、Gameplay Debuggerで動作確認をしようとしてもAIが今まで通りプレイヤーの腰のみを視認対象としてしまう。
このときは一度プロジェクトを終了させ、再度立ち上げれば問題なくソケットの位置を視認するようになる。
Gameplay Debugger を利用してAI Sense Sightの状態を確認する
ゲームプレイ後に上で設定したGameplay Debuggerの起動キーを押すと画面に色々表示される。
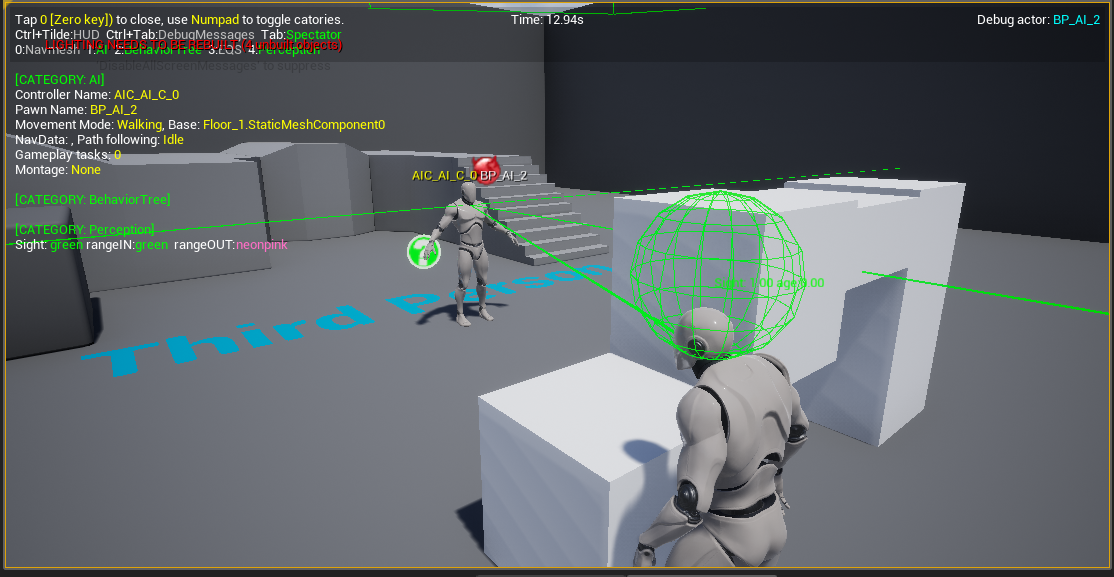
このとき テンキーの4 を押すと AI Perception をデバッグ表示できる。
下の画像のようにソケットを追加した位置に緑色のボールのようなものが表示されるはず。
トラブルシューティング
コンパイルするとLNKといったリンカエラーが発生した
プロジェクト名.Build.cs に AIModule の文字列を追加し忘れていませんか?
期待通りの動作をしていない
少し範囲が広いですがいくつかのチェック項目があります。
プロジェクトの再起動はしたか?
AIに視認させたいキャラクター(例えばプレイヤー)の親クラスはC++で作成したクラスになっているか?
AI Sense SightのDetect by affiliationにある3つの項目すべてにチェックが付いているか?
このDetect by affiliationは Team ID というパラメータを利用して、視認する対象を 「敵」、「中立」、「味方」 の3つに絞る事ができる。デフォルトは「敵」を視認するようになっているがキャラクターは生成時点でTeam IDが 「255」 に設定されている。
255 は 「中立」 を意味する数字なので、デフォルトの視認対象である「敵」では無いのでAIはプレイヤーを視認することが出来ない。
Detect by affiliation をきちんと機能させるにはC++が必須。これは以下のページで解説されているので興味のある方は是非。
AI Perception in Unreal Engine 4 – How to Setup

