ここ見ながら試す。
とりあえずランキングダウンロードして表示するような形を想定して、タイトル画面にWebで通信した結果を表示する。
RestAPIは天気を使う。
https://api.open-meteo.com/v1/forecast?latitude=35.6785&longitude=139.6823&daily=temperature_2m_max,temperature_2m_min&timezone=Asia%2FTokyo
で東京砂漠の最高気温、最低気温が取得できる。
GUI側の準備
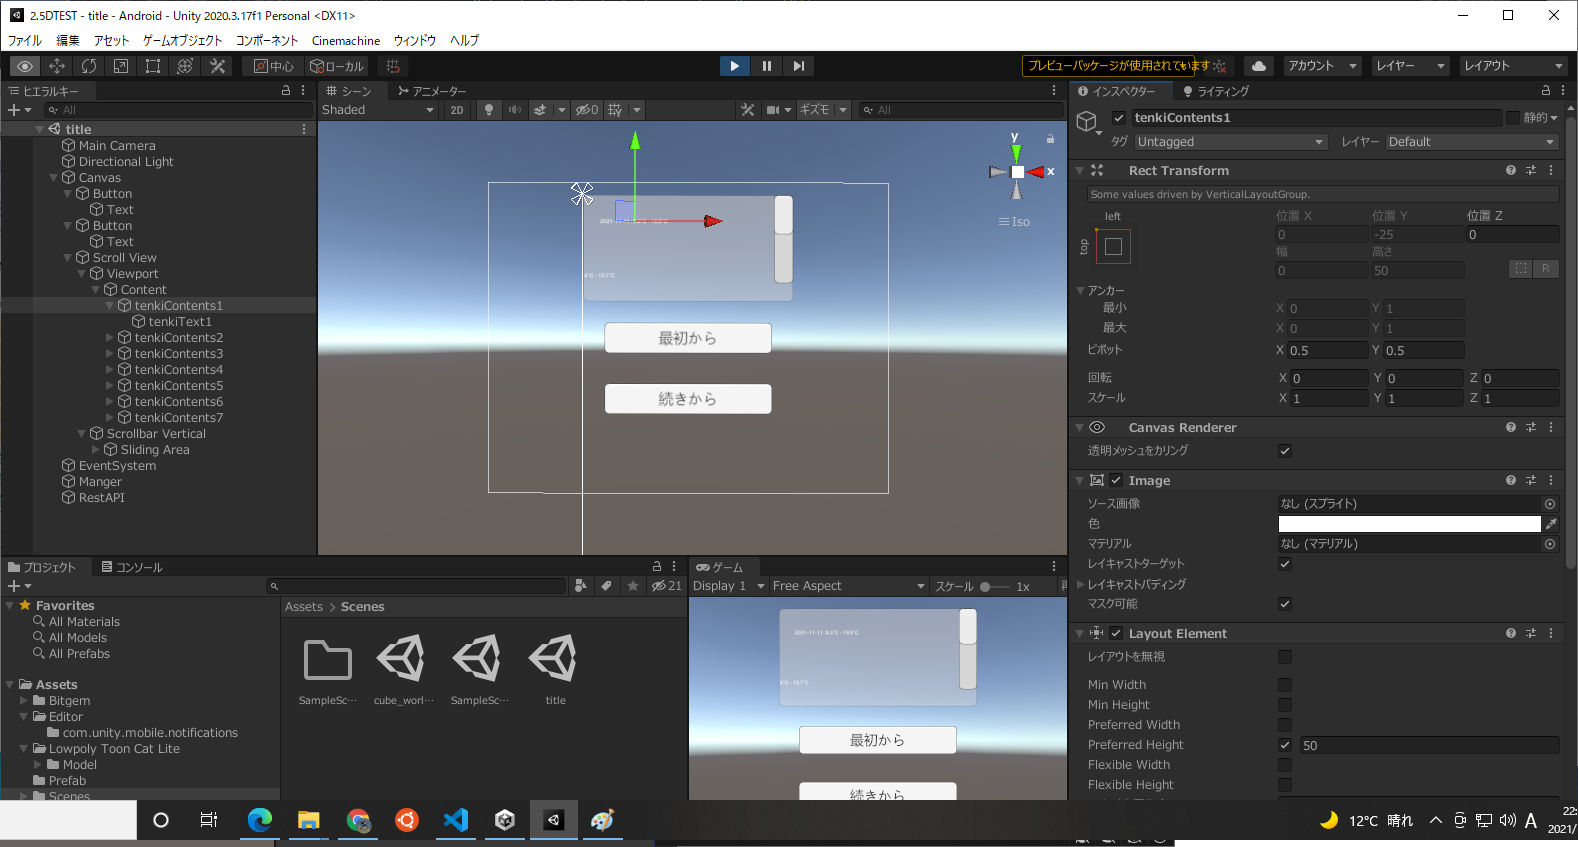
ScrollViewというものに取得した情報を表示しようと思ったのでこれを参考にする。正直下の設定は理解できていない。
画面に設置して、ScrollRectの水平チェックを外した。水平スクロールバーもnoneに変更した上で削除。
ビューポートの下のContentに
- Content Size Fitter
- Vertical Layout Group
を追加して設定。
ビューの大きさは100*200にしてみた。
通信処理
空のオブジェを作成して、start時にWebからGetするスクリプトを書く。
using UnityEngine.Networking;
でモジュールを読み込めるようにして、通信用メソッドを作成。
サンプルを見ると通信を行う際にはコルーチンというものを使っているが、Javaでは使ったことなかったので調べる。
コルーチンは処理を途中で一時停止可能な呼び出し。
yield retuen行で一時停止して、次のフレームになるまで処理を待機する。
IEnumerator型を戻り値とした関数を定義することで、その関数をコルーチンとして扱うことが出来る。
という理解で多分良さそう。ここを参照。
また、JSONの扱いについてはFromJson()というものが存在している。
公式
MSが標準で入れたSystem.Text.Jsonは現時点ではおそらくサポートしていない?(試してはいない)
結局のところクラスは作らないといけないので、JavaScriptのように好き勝手にアクセスは出来ない。
クラスを作るツールはあるが、微妙に求めているものとは違ったので自作。
今回のJSONはこんな形で取れてくるので
{
    "longitude": 139.625,
    "elevation": 20.84375,
    "utc_offset_seconds": 32400,
    "generationtime_ms": 0.2199411392211914,
    "latitude": 35.625,
    "daily": {
        "temperature_2m_max": [
            19.5,
            19.7,
            17.3,
            17,
            19.1,
            17.7,
            17.4
        ],
        "temperature_2m_min": [
            8.3,
            8.4,
            7.1,
            8.4,
            6.9,
            8.7,
            11.6
        ],
        "time": [
            "2021-11-11",
            "2021-11-12",
            "2021-11-13",
            "2021-11-14",
            "2021-11-15",
            "2021-11-16",
            "2021-11-17"
        ]
    },
    "daily_units": {
        "temperature_2m_max": "°C",
        "time": "iso8601",
        "temperature_2m_min": "°C"
    }
}
次のような内部クラスを作成
[System.Serializable]
private class Tenki {
    public float longitude;
    public float elevation;
    public long utc_offset_seconds;
    public float generationtime_ms;
    public float latitude;

    public Daily daily;
    public DailyUnit daily_units;
}

[System.Serializable]
private class Daily {
    public float[] temperature_2m_max;
    public float[] temperature_2m_min;
    public string[] time;
}

[System.Serializable]
private class DailyUnit {
    public string temperature_2m_max;
    public string temperature_2m_min;
    public string time;
}
これをこんな感じで実行する。
void Start() {
    string URL = "https://api.open-meteo.com/v1/forecast?latitude=35.6785&longitude=139.6823&daily=temperature_2m_max,temperature_2m_min&timezone=Asia%2FTokyo";
    StartCoroutine("GetJsonData", URL);
}

IEnumerator GetJsonData(string url) {
    UnityWebRequest request = UnityWebRequest.Get(url);
    yield return request.SendWebRequest();
    //エラーが出ていないかチェック
    if (request.result == UnityWebRequest.Result.ConnectionError) {
        Debug.Log(request.error); // err
    }
    else {
        //通信成功
        Tenki tenki = JsonUtility.FromJson<Tenki>(request.downloadHandler.text);
        Debug.Log(tenki.daily.temperature_2m_max[0]);
    }
}
ログに19.5と表示されたので取得そのものは問題なさそう。
画面への表示
取得出来た日付と気温情報を出力してやる。
Log出していた箇所をSetViewList(tenki);に変更して、viewメソッドを作成。
先ほど作ったScrollViewにオブジェクトとテキストを作成して追加するスクリプトを書く。
大きさとか位置がおかしいので修正。
・・・したいが、高さとか位置の調整難度が素人にはパッと見では分からなくて1日目はこんな感じでずれているところまでやって挫折。
一旦ここを見たりしつつ数日後に再度調整にチャレンジ。
最終的に以下のようなソースでリスト表示した。
void SetViewList(Tenki tenki) {
    var scrollView = GameObject.Find("Scroll View"); // タグの方が早いはずだが速度求める部分でもないのでOK
    var viewPort = scrollView.transform.Find("Viewport");
    Transform content = viewPort.transform.Find("Content");

    if (tenki == null) { return; }

    for (int i = 0; i < tenki.daily.time.Length; i++) {
        // 表示するテキストはJSONから取得したもの。日付と最低、最高気温を表示
        string newText = tenki.daily.time[i].ToString() +  " : "
            + tenki.daily.temperature_2m_min[i].ToString() + tenki.daily_units.temperature_2m_min + " - "
            + tenki.daily.temperature_2m_max[i].ToString() + tenki.daily_units.temperature_2m_max + " " ;


        // スクロールビューの内部にオブジェクトを作成してやる。まずはオブジェクトの生成
        GameObject Contents = new GameObject("tenkiContents" + (i + 1).ToString());

        // 親transformのセットでLayoutの相対位置を決める事が可能になる?
        Contents.transform.parent = content.transform;


        var Rect = Contents.AddComponent<RectTransform>(); // RectTransformがUI用のTransform
        Rect.transform.localPosition = new Vector3(0, 0, 0); // 相対位置。
        Rect.transform.localScale = new Vector3(1, 1, 1);
        Rect.sizeDelta = new Vector2(20, 20); // 「アンカー間の距離と比較した RectTransform のサイズ」正直よく分からん。

        // 生成したオブジェクトにコンポーネント追加。
        Contents.AddComponent<CanvasRenderer>();
        Contents.AddComponent<Image>();
        Contents.AddComponent<LayoutElement>().preferredHeight = 20; // 可能なら20pxの高さを取る?
        Contents.AddComponent<LayoutElement>().preferredWidth = 180;

        // ゼブラにするため&クリックイベントを仕込めるように?ボタンコンポーネント
        // 背景の色を変えて見やすくする
        var butttonState = Contents.AddComponent<Button>();
        var colors = butttonState.colors;
        if (i % 2 == 0) {
            colors.normalColor = new Color(0F, 0F, 0F, 50F / 255F);
            colors.highlightedColor = new Color(0F, 0F, 0F, 50F / 255F);
            colors.pressedColor = new Color(0F, 0F, 0F, 50F / 255F);
            colors.disabledColor = new Color(0F, 0F, 0F, 50F / 255F);
        }
        else {
            colors.normalColor = new Color(0.4F, 0.4F, 0.4F, 50F / 255F);
            colors.highlightedColor = new Color(0.4F, 0.4F, 0.4F, 50F / 255F);
            colors.pressedColor = new Color(0.4F, 0.4F, 0.4F, 50F / 255F);
            colors.disabledColor = new Color(0.4F, 0.4F, 0.4F, 50F / 255F);
        }
        butttonState.colors = colors;

        // その内部に実際のテキストを放り込む
        GameObject text = new GameObject("tenkiText" + (i + 1).ToString());
        text.transform.parent = Contents.transform;
        var rect = text.AddComponent<RectTransform>();
        rect.transform.localPosition = new Vector3(10, 0, 0);
        rect.transform.localScale = new Vector3(1, 1, 1);
        rect.sizeDelta = new Vector2(180, 40);
        rect.anchorMin = new Vector2(0.5f, 0.5f); // アンカーを0.5にしてテキストの描画位置を真ん中らへんに持ってきた
        rect.anchorMax = new Vector2(0.5f, 0.5f); // これでは文字量が変わった時にダメな気もする

        text.AddComponent<CanvasRenderer>();

        var textChild = text.AddComponent<Text>();
        textChild.text = newText;
        textChild.color = new Color(255f / 255f, 255f / 255f, 255f / 255f, 255f / 255f);
        textChild.fontSize = 10;
        textChild.alignment = TextAnchor.MiddleLeft; // テキストは左詰め
        textChild.font = Resources.GetBuiltinResource (typeof(Font), "Arial.ttf") as Font;
    }
}
レイアウトの解説なんかも見るとよい?
とりあえず、なんとなく調整は出来たので終わり。


