概要
だんだん暑くなってきて,サーバの温度が気になってくる季節ですね.
いつの間にか,zabbix-agentが温度情報の取得に対応していたので,とても簡単にCPUの温度情報を監視できるようになっていました.
ただし,デフォルトでは適切なテンプレートがなかったので,作成しました.
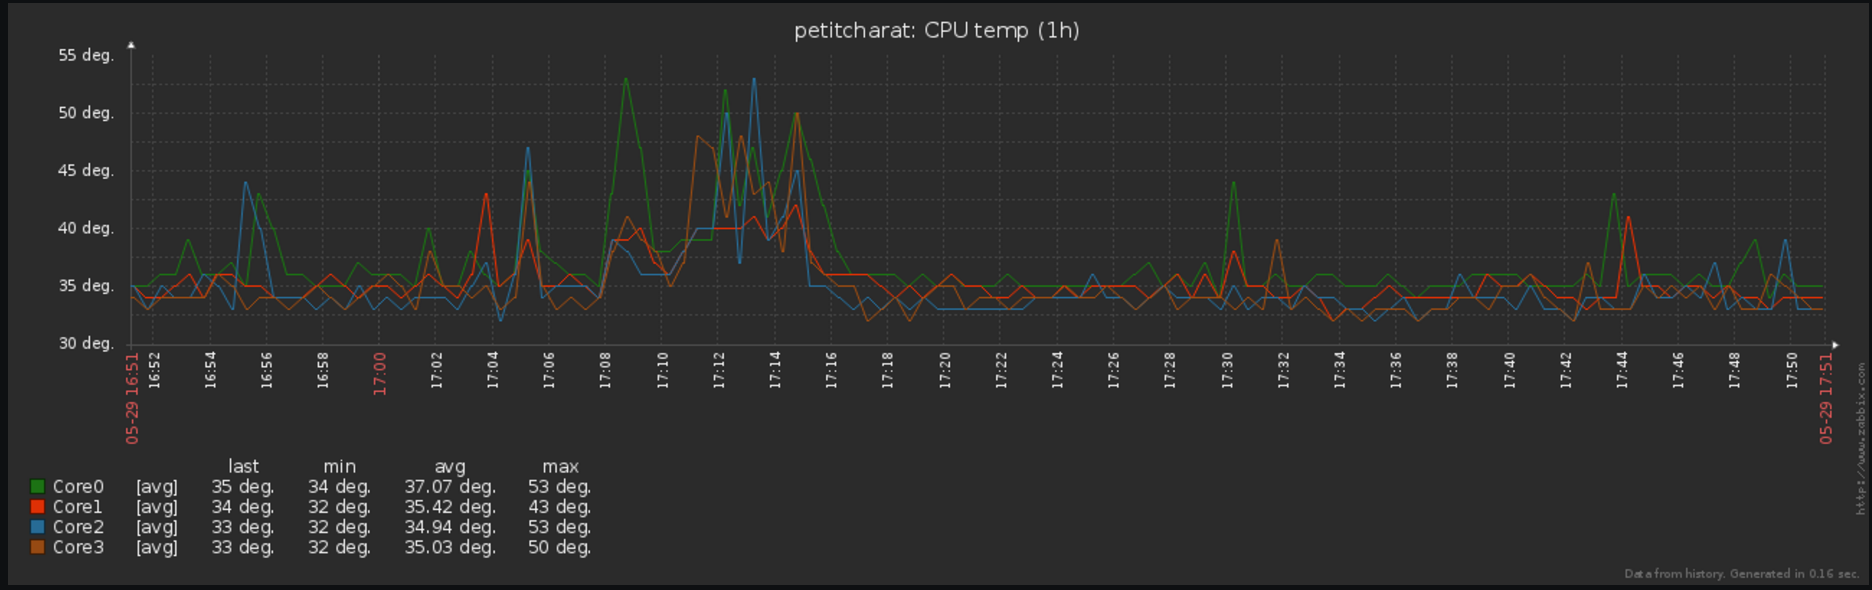
こんなグラフを作ります.
環境
- OS: Ubuntu 16.04LTS, Ubuntu 17.04, CentOS 6, CentOS 7等で確認
- Zabbix 3.0 または 3.2
- Intel Core i7 6700K, Intel Xeon E5-2680 v4など
温度監視用zabbix templateをインポート
こちらからテンプレートをダウンロードし,インポートしてください.
CPU_Temperature.xml
Intel CPUの場合は,このテンプレートをHostに関連付けするだけで,温度監視ができると思います.
(上記の方法でうまく行かなかった場合の)templateの編集の仕方
センサ情報が取得できない場合は,以下を参考にインポートしたテンプレートを編集してください.
CPUが違う,監視コア数を増やしたいなどの場合もこちらを参考に.
マシンの温度センサー名を調べる
lm-sensorsのインストール
- Ubuntu
$ sudo apt install lm-sensors
- CentOS
$ sudo yum install lm_sensors
センサー検出
sensors-detectコマンドで,内蔵センサーの一覧を取得します.
何度かYes/Noを聞かれますが,基本的にはすべてYesで問題ありません.
$ sudo sensors-detect
# sensors-detect revision 6284 (2015-05-31 14:00:33 +0200)
# Board: ASRock Z170 Extreme4
# Kernel: 4.4.0-78-generic x86_64
# Processor: Intel(R) Core(TM) i7-6700K CPU @ 4.00GHz (6/94/3)

This program will help you determine which kernel modules you need
to load to use lm_sensors most effectively. It is generally safe
and recommended to accept the default answers to all questions,
unless you know what you're doing.

Some south bridges, CPUs or memory controllers contain embedded sensors.
Do you want to scan for them? This is totally safe. (YES/no): yes
Module cpuid loaded successfully.
Silicon Integrated Systems SIS5595...                       No
VIA VT82C686 Integrated Sensors...                          No
VIA VT8231 Integrated Sensors...                            No
AMD K8 thermal sensors...                                   No
AMD Family 10h thermal sensors...                           No
AMD Family 11h thermal sensors...                           No
AMD Family 12h and 14h thermal sensors...                   No
AMD Family 15h thermal sensors...                           No
AMD Family 16h thermal sensors...                           No
AMD Family 15h power sensors...                             No
AMD Family 16h power sensors...                             No
Intel digital thermal sensor...                             Success!
    (driver `coretemp')
Intel AMB FB-DIMM thermal sensor...                         No
Intel 5500/5520/X58 thermal sensor...                       No
VIA C7 thermal sensor...                                    No
VIA Nano thermal sensor...                                  No
センサー名取得
sensorsコマンドでセンサー名を表示させます.
$ sensors -u
coretemp-isa-0000
Adapter: ISA adapter
Physical id 0:
  temp1_input: 35.000
  temp1_max: 80.000
  temp1_crit: 100.000
  temp1_crit_alarm: 0.000
Core 0:
  temp2_input: 33.000
  temp2_max: 80.000
  temp2_crit: 100.000
  temp2_crit_alarm: 0.000
Core 1:
  temp3_input: 33.000
  temp3_max: 80.000
  temp3_crit: 100.000
  temp3_crit_alarm: 0.000
Core 2:
  temp4_input: 30.000
  temp4_max: 80.000
  temp4_crit: 100.000
  temp4_crit_alarm: 0.000
Core 3:
  temp5_input: 30.000
  temp5_max: 80.000
  temp5_crit: 100.000
  temp5_crit_alarm: 0.000
この場合,zabbix-agent側では,coretemp-isa-0000と,temp1〜temp5という名前を使用することになります.
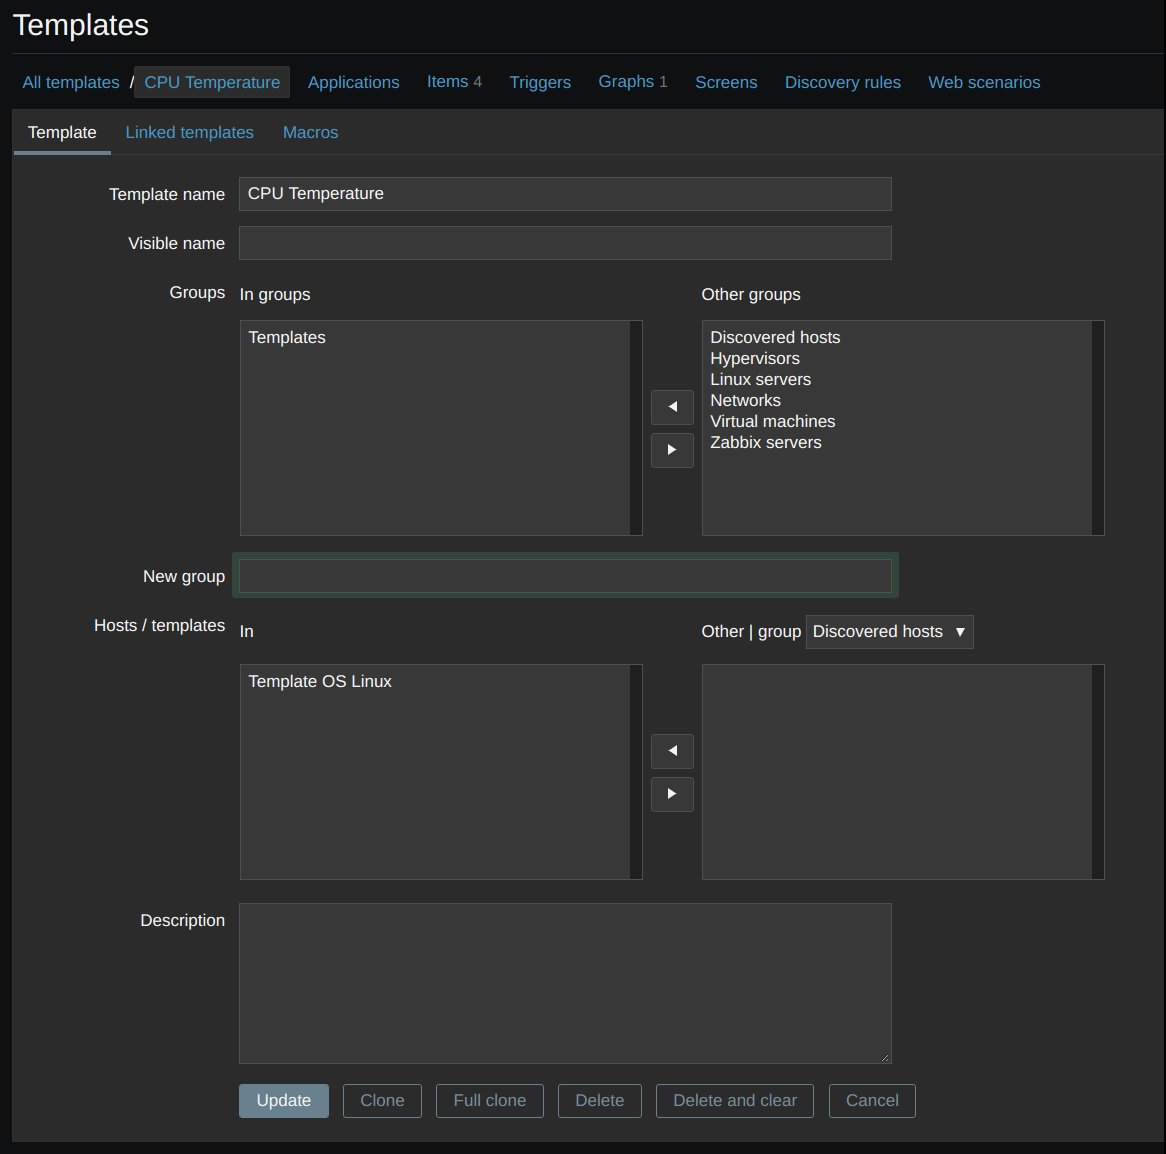
テンプレートの編集
Configuration -> Templates -> CPU Temperature より,テンプレートを編集します.
Itemの編集
テンプレート画面から,Itemsを選択し,編集します.
変えるべき場所は以下の項目です.
- Name: CPU core0 temp (なんでもよい)
- Type: Zabbix agent
- Key: sensor[センサー名, センサー番号]
この時,センサー名とセンサー番号には,先ほどsensorsコマンドで取得した,coretemp-isa-0000と,temp1〜temp5といった値を入れて下さい.
その他は時間間隔や保存期間など,任意で設定して,保存.
このItem編集・追加の作業を,必要なセンサーの数だけ繰り返します.
