はじめに
SoftetherVPNはオープンソースのVPNソフトウェアです。
非常に多機能で素晴らしいソフトウェアで、個人的に大好きです。
詳細については公式サイトを参照してください。
ここでは、SoftEther VPNを使用してPC 間接続 VPNを構築することを目的としたインストール手順、および、設定を書いていきます。
なお、インストール手順など公式のマニュアルが非常に詳しいので写経に近いです。
環境
・Amazon Linux(VPN Server側)
・Windows 10 Pro(VPN Server Manager(GUI) 実行用)
$ uname -a
Linux ip-XXX-XXX-XXX-XXX 4.4.44-39.55.amzn1.x86_64 #1 SMP Mon Jan 30 18:15:53 UTC 2017 x86_64 x86_64 x86_64 GNU/Linux
ダウンロード
SoftEther ダウンロード センターからダウンロードします。
今回の対象は以下の通りです。
**ダウンロードするソフトウェア:**SoftEther VPN (Freeware)
**コンポーネント:**SoftEther VPN Server
**プラットフォーム:**Linux
**CPU:**Intel x64 / AMD 64 (64bit)
インストール 下準備
yum update
$ sudo yum update
EPEL有効化
$ sudo yum-config-manager --enable epel
ダウンロードファイル配備
ここでは以下のように配備します。
$ mkdir ~/Installer
$ mv ~/softether-vpnserver-v4.22-9634-beta-2016.11.27-linux-x64-64bit.tar.gz ~/Installer/
インストール
インストールは公式のドキュメントを参考に進めます。
・7.3 Linux へのインストールと初期設定
必要なソフトウェアおよびライブラリの確認
gccをインストールしておきます。
$ sudo yum install gcc
パッケージの解凍
tarで解凍します。
$ tar xzvf softether-vpnserver-v4.22-9634-beta-2016.11.27-linux-x64-64bit.tar.gz
vpnserver/
vpnserver/Makefile
vpnserver/.install.sh
vpnserver/ReadMeFirst_License.txt
vpnserver/Authors.txt
vpnserver/ReadMeFirst_Important_Notices_ja.txt
vpnserver/ReadMeFirst_Important_Notices_en.txt
vpnserver/ReadMeFirst_Important_Notices_cn.txt
vpnserver/code/
vpnserver/code/vpnserver.a
vpnserver/code/vpncmd.a
vpnserver/lib/
vpnserver/lib/libcharset.a
vpnserver/lib/libcrypto.a
vpnserver/lib/libedit.a
vpnserver/lib/libiconv.a
vpnserver/lib/libintelaes.a
vpnserver/lib/libncurses.a
vpnserver/lib/libssl.a
vpnserver/lib/libz.a
vpnserver/lib/License.txt
vpnserver/hamcore.se2
実行可能ファイルの生成
makeを実行して、使用権許諾契約書を読むために1を選択します。
$ cd vpnserver/
$ make
--------------------------------------------------------------------

SoftEther VPN Server (Ver 4.22, Build 9634, Intel x64 / AMD64) for Linux Install Utility
Copyright (c) SoftEther Project at University of Tsukuba, Japan. All Rights Reserved.

--------------------------------------------------------------------


Do you want to read the License Agreement for this software ?

 1. Yes
 2. No

Please choose one of above number:
1
使用権許諾契約書を読んで承諾したら、それぞれ1をクリックします。
Did you read and understand the License Agreement ?
(If you couldn't read above text, Please read 'ReadMeFirst_License.txt'
 file with any text editor.)

 1. Yes
 2. No

Please choose one of above number:
1


Did you agree the License Agreement ?

1. Agree
2. Do Not Agree

Please choose one of above number:
1

make[1]: Entering directory `/home/ec2-user/Installer/vpnserver'
Preparing SoftEther VPN Server...
ranlib lib/libcharset.a
ranlib lib/libcrypto.a
ranlib lib/libedit.a
ranlib lib/libiconv.a
ranlib lib/libintelaes.a
ranlib lib/libncurses.a
ranlib lib/libssl.a
ranlib lib/libz.a
ranlib code/vpnserver.a
gcc code/vpnserver.a -O2 -fsigned-char -pthread -m64 -lm -ldl -lrt -lpthread -L./ lib/libssl.a lib/libcrypto.a lib/libiconv.a lib/libcharset.a lib/libedit.a lib/libncurses.a lib/libz.a lib/libintelaes.a -o vpnserver
ranlib code/vpncmd.a
gcc code/vpncmd.a -O2 -fsigned-char -pthread -m64 -lm -ldl -lrt -lpthread -L./ lib/libssl.a lib/libcrypto.a lib/libiconv.a lib/libcharset.a lib/libedit.a lib/libncurses.a lib/libz.a lib/libintelaes.a -o vpncmd
./vpncmd /tool /cmd:Check
vpncmd command - SoftEther VPN Command Line Management Utility
SoftEther VPN Command Line Management Utility (vpncmd command)
Version 4.22 Build 9634   (English)
Compiled 2016/11/27 15:23:56 by yagi at pc30
Copyright (c) SoftEther VPN Project. All Rights Reserved.

VPN Tools has been launched. By inputting HELP, you can view a list of the commands that can be used.

VPN Tools>Check
Check command - Check whether SoftEther VPN Operation is Possible
---------------------------------------------------
SoftEther VPN Operation Environment Check Tool

Copyright (c) SoftEther VPN Project.
All Rights Reserved.

If this operation environment check tool is run on a system and that system passes, it is most likely that SoftEther VPN software can operate on that system. This check may take a while. Please wait...

Checking 'Kernel System'...
              Pass
Checking 'Memory Operation System'...
              Pass
Checking 'ANSI / Unicode string processing system'...
              Pass
Checking 'File system'...
              Pass
Checking 'Thread processing system'...
              Pass
Checking 'Network system'...
              Pass

All checks passed. It is most likely that SoftEther VPN Server / Bridge can operate normally on this system.

The command completed successfully.


--------------------------------------------------------------------
The preparation of SoftEther VPN Server is completed !


*** How to switch the display language of the SoftEther VPN Server Service ***
SoftEther VPN Server supports the following languages:
  - Japanese
  - English
  - Simplified Chinese

You can choose your prefered language of SoftEther VPN Server at any time.
To switch the current language, open and edit the 'lang.config' file.


*** How to start the SoftEther VPN Server Service ***

Please execute './vpnserver start' to run the SoftEther VPN Server Background Service.
And please execute './vpncmd' to run the SoftEther VPN Command-Line Utility to configure SoftEther VPN Server.

Of course, you can use the VPN Server Manager GUI Application for Windows / Mac OS X on the other Windows / Mac OS X computers in order to configure the SoftEther VPN Server remotely.


*** For Windows users ***
You can download the SoftEther VPN Server Manager for Windows
from the http://www.softether-download.com/ web site.
This manager application helps you to completely and easily manage the VPN server services running in remote hosts.


*** For Mac OS X users ***
In April 2016 we released the SoftEther VPN Server Manager for Mac OS X.
You can download it from the http://www.softether-download.com/ web site.
VPN Server Manager for Mac OS X works perfectly as same as the traditional Windows versions. It helps you to completely and easily manage the VPN server services running in remote hosts.

--------------------------------------------------------------------

make[1]: Leaving directory `/home/ec2-user/Installer/vpnserver'
VPN Server の配置
makeしたファイルをそのまま移動させます。
$ cd ..
$ sudo mv vpnserver /usr/local
$ ls -l /usr/local/vpnserver/
total 10488
-rwxrwxr-x 1 ec2-user ec2-user    2784 Nov 27 07:03 Authors.txt
drwx------ 2 ec2-user ec2-user    4096 Mar 16 02:00 chain_certs
drwxrwxr-x 2 ec2-user ec2-user    4096 Mar 16 02:00 code
-rwxrwxr-x 1 ec2-user ec2-user 1296225 Nov 27 07:03 hamcore.se2
-rw------- 1 ec2-user ec2-user     867 Mar 16 02:00 lang.config
drwxrwxr-x 2 ec2-user ec2-user    4096 Mar 16 02:00 lib
-rwxrwxr-x 1 ec2-user ec2-user    2900 Nov 27 07:03 Makefile
-rwxrwxr-x 1 ec2-user ec2-user   30801 Nov 27 07:03 ReadMeFirst_Important_Notices_cn.txt
-rwxrwxr-x 1 ec2-user ec2-user   36296 Nov 27 07:03 ReadMeFirst_Important_Notices_en.txt
-rwxrwxr-x 1 ec2-user ec2-user   50695 Nov 27 07:03 ReadMeFirst_Important_Notices_ja.txt
-rwxrwxr-x 1 ec2-user ec2-user   58932 Nov 27 07:03 ReadMeFirst_License.txt
-rwxrwxr-x 1 ec2-user ec2-user 4612305 Mar 16 02:00 vpncmd
-rwxrwxr-x 1 ec2-user ec2-user 4612477 Mar 16 02:00 vpnserver
権限を変更しておきます。
$ sudo chown -R root:root /usr/local/vpnserver/
$ cd /usr/local/vpnserver/
$ sudo chmod 600 *
$ sudo chmod 700 vpncmd
$ sudo chmod 700 vpnserver
$ ls -l
total 10488
-rw------- 1 root root    2784 Nov 27 07:03 Authors.txt
drw------- 2 root root    4096 Mar 16 02:00 chain_certs
drw------- 2 root root    4096 Mar 16 02:00 code
-rw------- 1 root root 1296225 Nov 27 07:03 hamcore.se2
-rw------- 1 root root     867 Mar 16 02:00 lang.config
drw------- 2 root root    4096 Mar 16 02:00 lib
-rw------- 1 root root    2900 Nov 27 07:03 Makefile
-rw------- 1 root root   30801 Nov 27 07:03 ReadMeFirst_Important_Notices_cn.txt
-rw------- 1 root root   36296 Nov 27 07:03 ReadMeFirst_Important_Notices_en.txt
-rw------- 1 root root   50695 Nov 27 07:03 ReadMeFirst_Important_Notices_ja.txt
-rw------- 1 root root   58932 Nov 27 07:03 ReadMeFirst_License.txt
-rwx------ 1 root root 4612305 Mar 16 02:00 vpncmd
-rwx------ 1 root root 4612477 Mar 16 02:00 vpnserver
vpncmd の check コマンドによる動作チェック
vpmcmdを実行して、VPN Toolsで動作チェックを行います。
$ sudo ./vpncmd
vpncmd command - SoftEther VPN Command Line Management Utility
SoftEther VPN Command Line Management Utility (vpncmd command)
Version 4.22 Build 9634   (English)
Compiled 2016/11/27 15:23:56 by yagi at pc30
Copyright (c) SoftEther VPN Project. All Rights Reserved.

By using vpncmd program, the following can be achieved.

1. Management of VPN Server or VPN Bridge
2. Management of VPN Client
3. Use of VPN Tools (certificate creation and Network Traffic Speed Test Tool)

Select 1, 2 or 3: 3

VPN Tools has been launched. By inputting HELP, you can view a list of the commands that can be used.

VPN Tools>check
Check command - Check whether SoftEther VPN Operation is Possible
---------------------------------------------------
SoftEther VPN Operation Environment Check Tool

Copyright (c) SoftEther VPN Project.
All Rights Reserved.

If this operation environment check tool is run on a system and that system passes, it is most likely that SoftEther VPN software can operate on that system. This check may take a while. Please wait...

Checking 'Kernel System'...
              Pass
Checking 'Memory Operation System'...
              Pass
Checking 'ANSI / Unicode string processing system'...
              Pass
Checking 'File system'...
              Pass
Checking 'Thread processing system'...
              Pass
Checking 'Network system'...
              Pass

All checks passed. It is most likely that SoftEther VPN Server / Bridge can operate normally on this system.

The command completed successfully.

VPN Tools>exit
スタートアップスクリプトへの登録
サービスとして起動させる為に、以下のようにスタートアップスクリプトを登録します。
$ sudo vim /etc/init.d/vpnserver
# !/bin/sh
#
# chkconfig: 2345 99 01
# description: SoftEther VPN Server

DAEMON=/usr/local/vpnserver/vpnserver
LOCK=/var/lock/subsys/vpnserver

test -x $DAEMON || exit 0

case "$1" in
  start)
    $DAEMON start
    touch $LOCK
    ;;
  stop)
    $DAEMON stop
    rm $LOCK
    ;;
  restart)
    $DAEMON stop
    sleep 3
    $DAEMON start
    ;;
  *)
    echo "Usage: $0 {start|stop|restart}"
    exit 1
esac

exit 0
権限設定をしておきます。
$ sudo chmod 755 /etc/init.d/vpnserver
自動起動設定をしておきます。
$ sudo chkconfig --add vpnserver
$ sudo chkconfig --list vpnserver
vpnserver       0:off   1:off   2:on    3:on    4:on    5:on    6:off
サービスの開始と停止
以下のコマンドでサービスを開始できます。
ただ、自動起動の確認として、サーバを再起動したほうが良いかと思います。
$ sudo /etc/init.d/vpnserver start
サーバーの設定・管理
サーバーの管理はvpncmdでも可能ですが、ここではGUIで行います。
マニュアルはこちらです。
なお、管理される側のサーバはTCPポートを解放しておく必要があります。
※ここの例では443を利用しています。
サーバーの設定としては、PC 間接続 VPNの設定を行います。
SoftEther VPN Server Managerのインストール
サーバーと同様にSoftEther ダウンロード センターからダウンロードしてインストールします。
GUIツールの動作環境はWindowsかMacのみです。
インストールについては、特筆すべき点はないと思います。
**ダウンロードするソフトウェア:**SoftEther VPN (Freeware)
**コンポーネント:**SoftEther VPN Server Manager for Windows
**プラットフォーム:**Windows
**CPU:**Intel (x86 and x64)
サーバへの接続
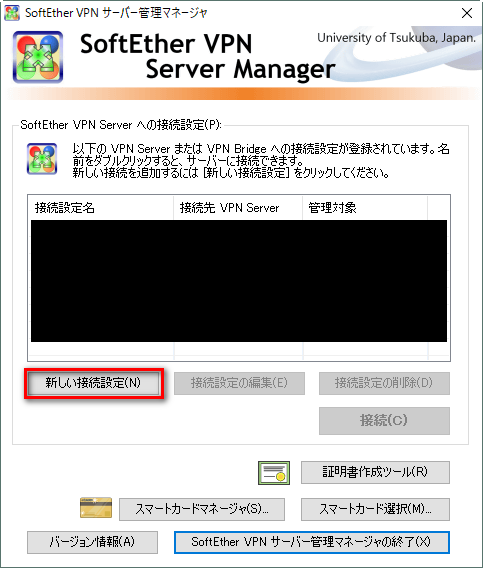
インストールしたら「SoftEther VPN サーバー管理マネージャ」を起動して、「新しい接続設定」をクリックします。
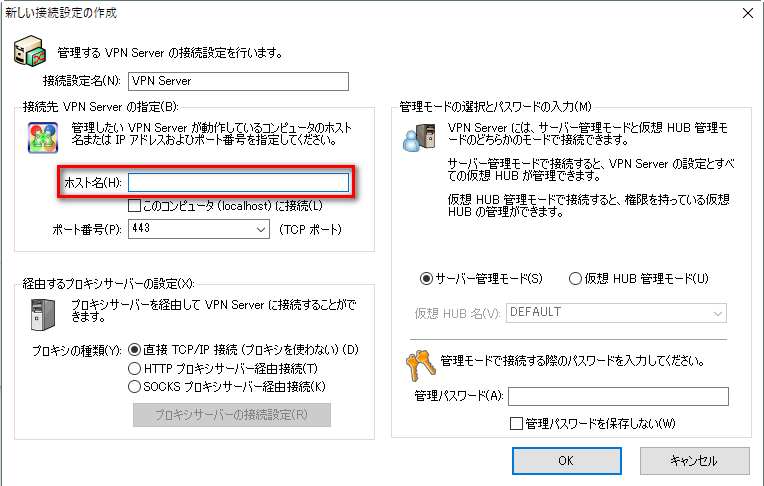
ホスト名またはIPアドレスを指定して[OK]をクリックします。
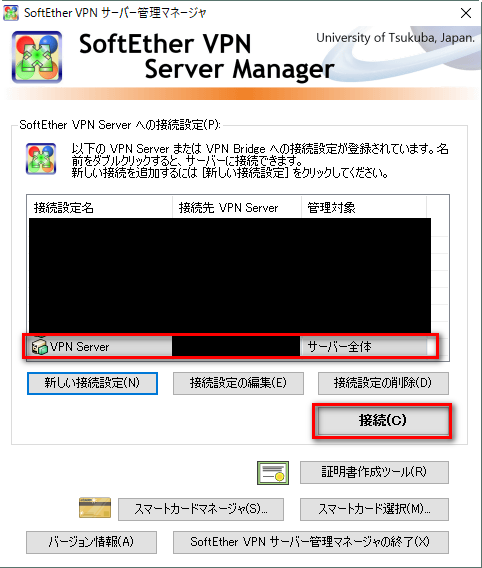
追加した接続設定を選択して[接続]をクリックします。
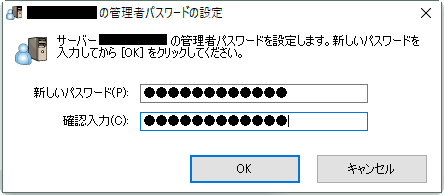
初回接続時には管理者パスワードの設定ダイアログが出てくるので設定を行います。
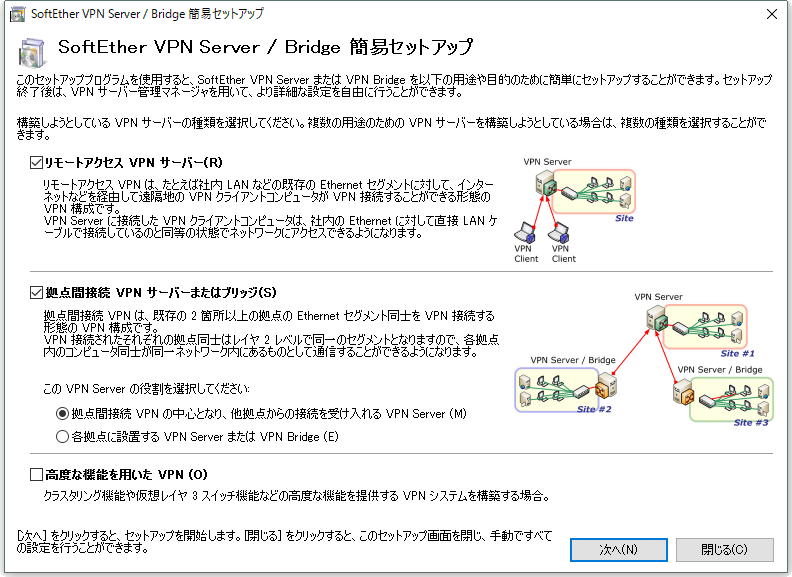
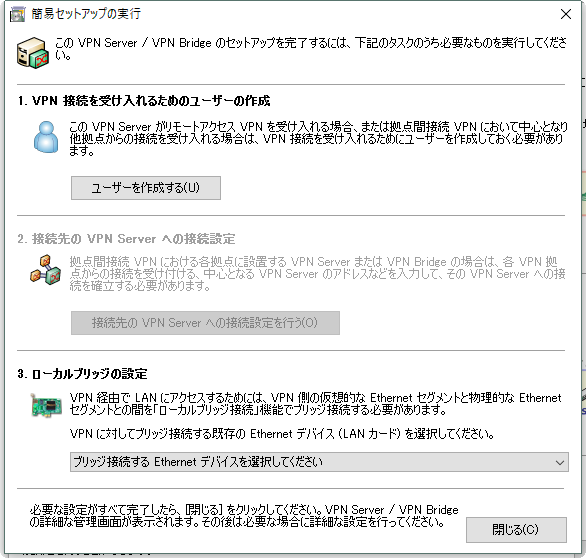
簡易セットアップ
セットアップ設定としては、以下の通り「リモートアクセスVPNサーバー」と「拠点間接続VPNサーバーまたはブリッジ」にチェックを入れ、
VPN Serverの役割としては「拠点間接続VPNの中心となり、他拠点からの接続を受け入れるVPN Server」とします。
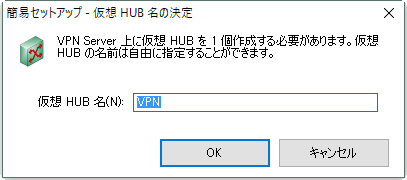
仮想HUB名を指定します。
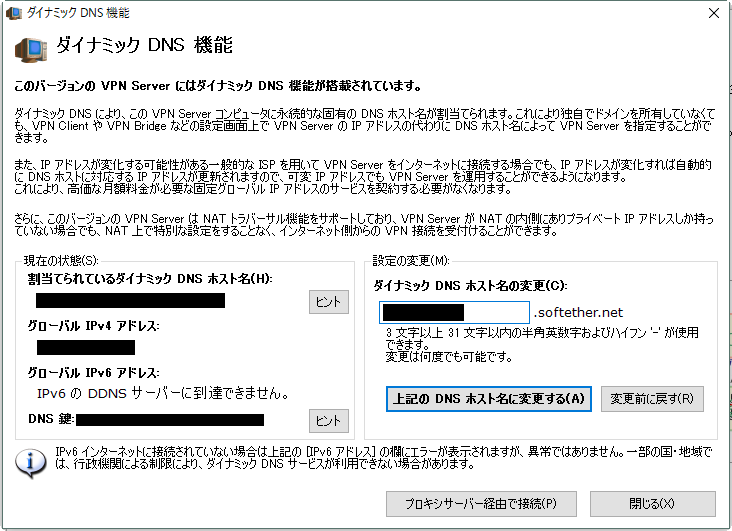
ダイナミックDNSホスト名を指定して、[上記のDNSホスト名に変更する]をクリックした後に[閉じる]をクリックします。
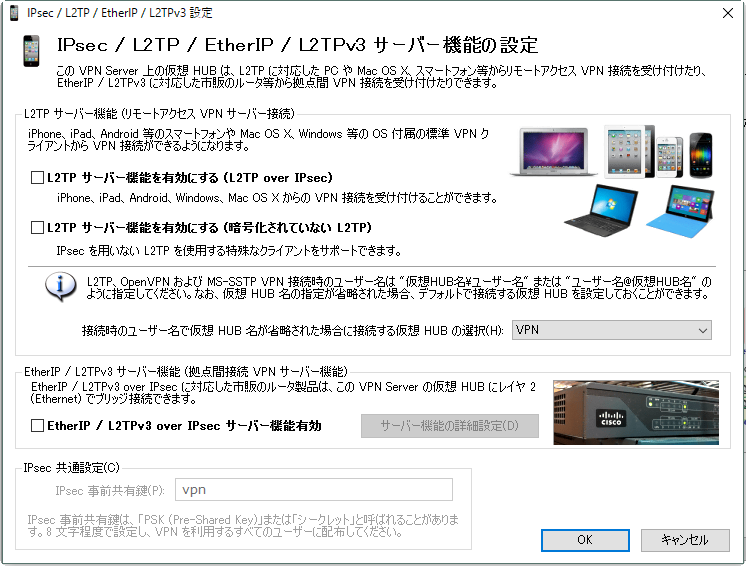
IPSec / L2TP / EtherIP / L2TPv3 サーバー機能の設定は、無効のままで[OK]をクリックします。
VPN Azureは今回は不要なので無効にします。

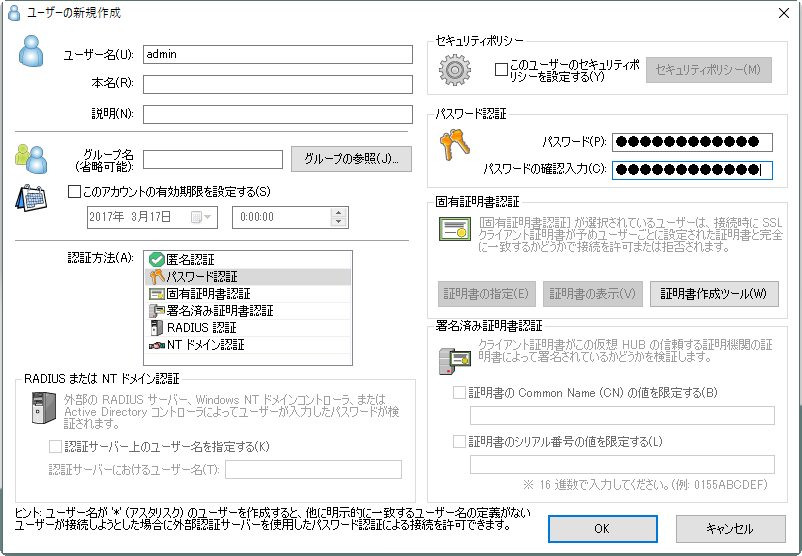
[ユーザーを作成する]をクリックしてユーザーを作成します。
ユーザー名とパスワードを設定して[OK]をクリックします。
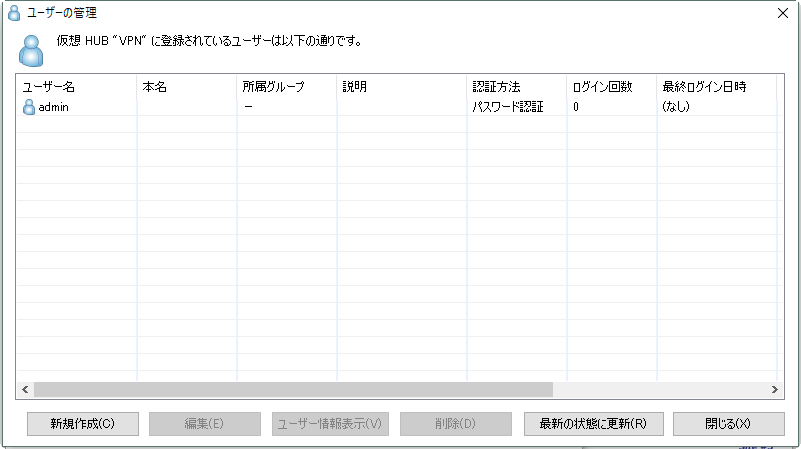
ユーザーが追加されたことを確認して[閉じる]をクリックします。
今回はローカルブリッジは行わないので、そのまま[閉じる]をクリックします。
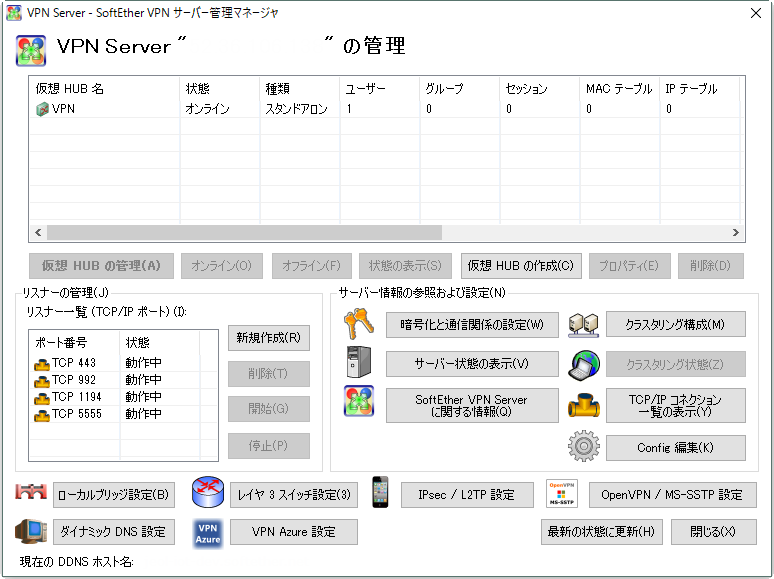
すると通常の管理画面に移ります。
必要に応じて、それぞれ設定を調整すると良いと思います。
DHCPの設定
PC間接続VPNを構成する為に、DHCPの設定を行います。
詳細については公式ドキュメント「10.3 コンピュータ間 VPN の構築」を参照してください。
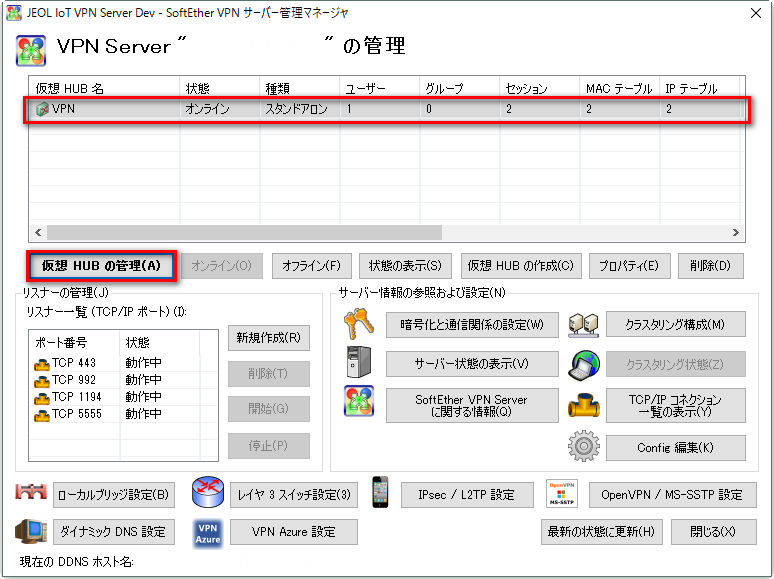
管理画面から仮想HUBを選択し、[仮想HUBの管理]をクリックして仮想HUB管理画面を開きます。
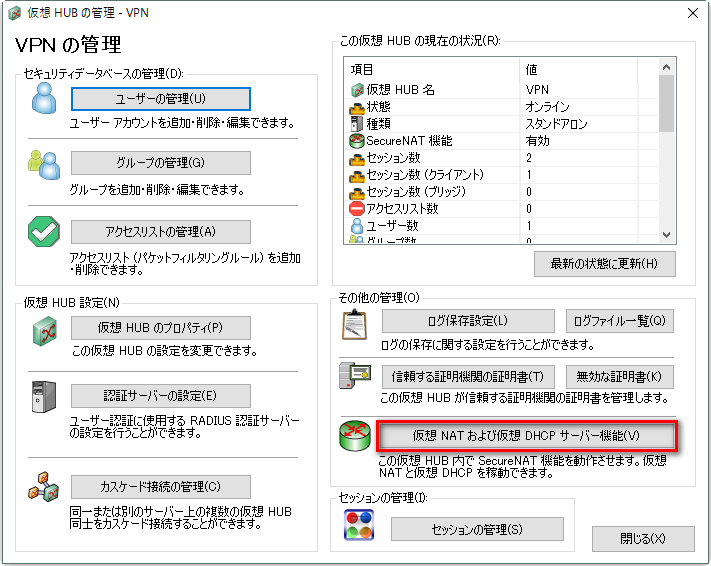
続いて[仮想NATおよび仮想DHCPサーバー機能]をクリックします。
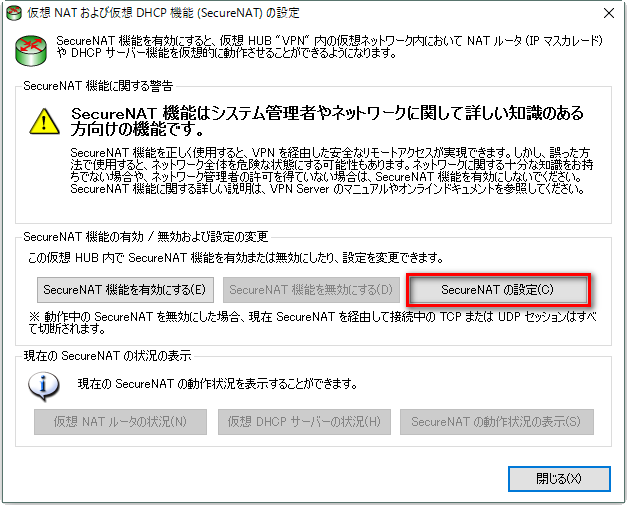
[SecureNATの設定]をクリックします。
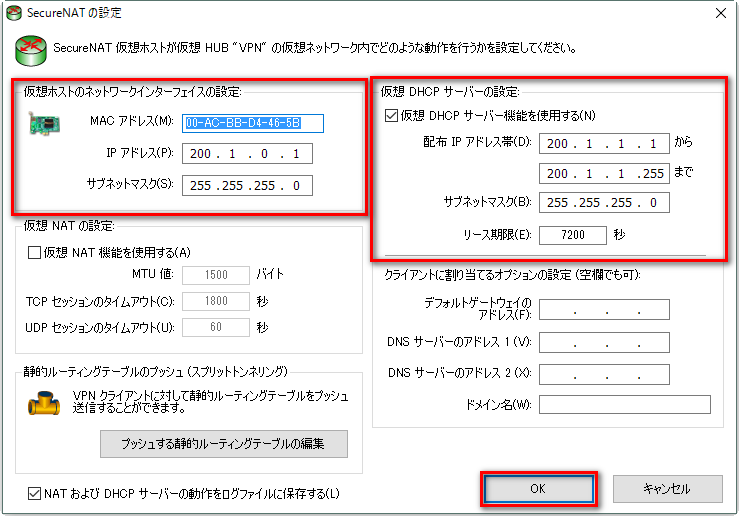
「仮想ホストのネットワークインターフェイスの設定」と「仮想DHCPサーバーの設定」を以下のように行います。
また「仮想NAT」は必要ないのでチェックボックスは外しておきます。
設定をしたら[OK]をクリックします。
最後に[SecureNAT機能を有効する]をクリックして[閉じる]をクリックします。

以上でPC間接続VPN用の設定は完了です。
続き
SoftEther VPN でPC間接続VPNをする (Client編)に続きます。
参考
SoftEther VPN 公式サイト
・PC 間接続 VPN
・7.3 Linux へのインストールと初期設定
・3.3 VPN Server 管理
・10.3 コンピュータ間 VPN の構築