この記事は
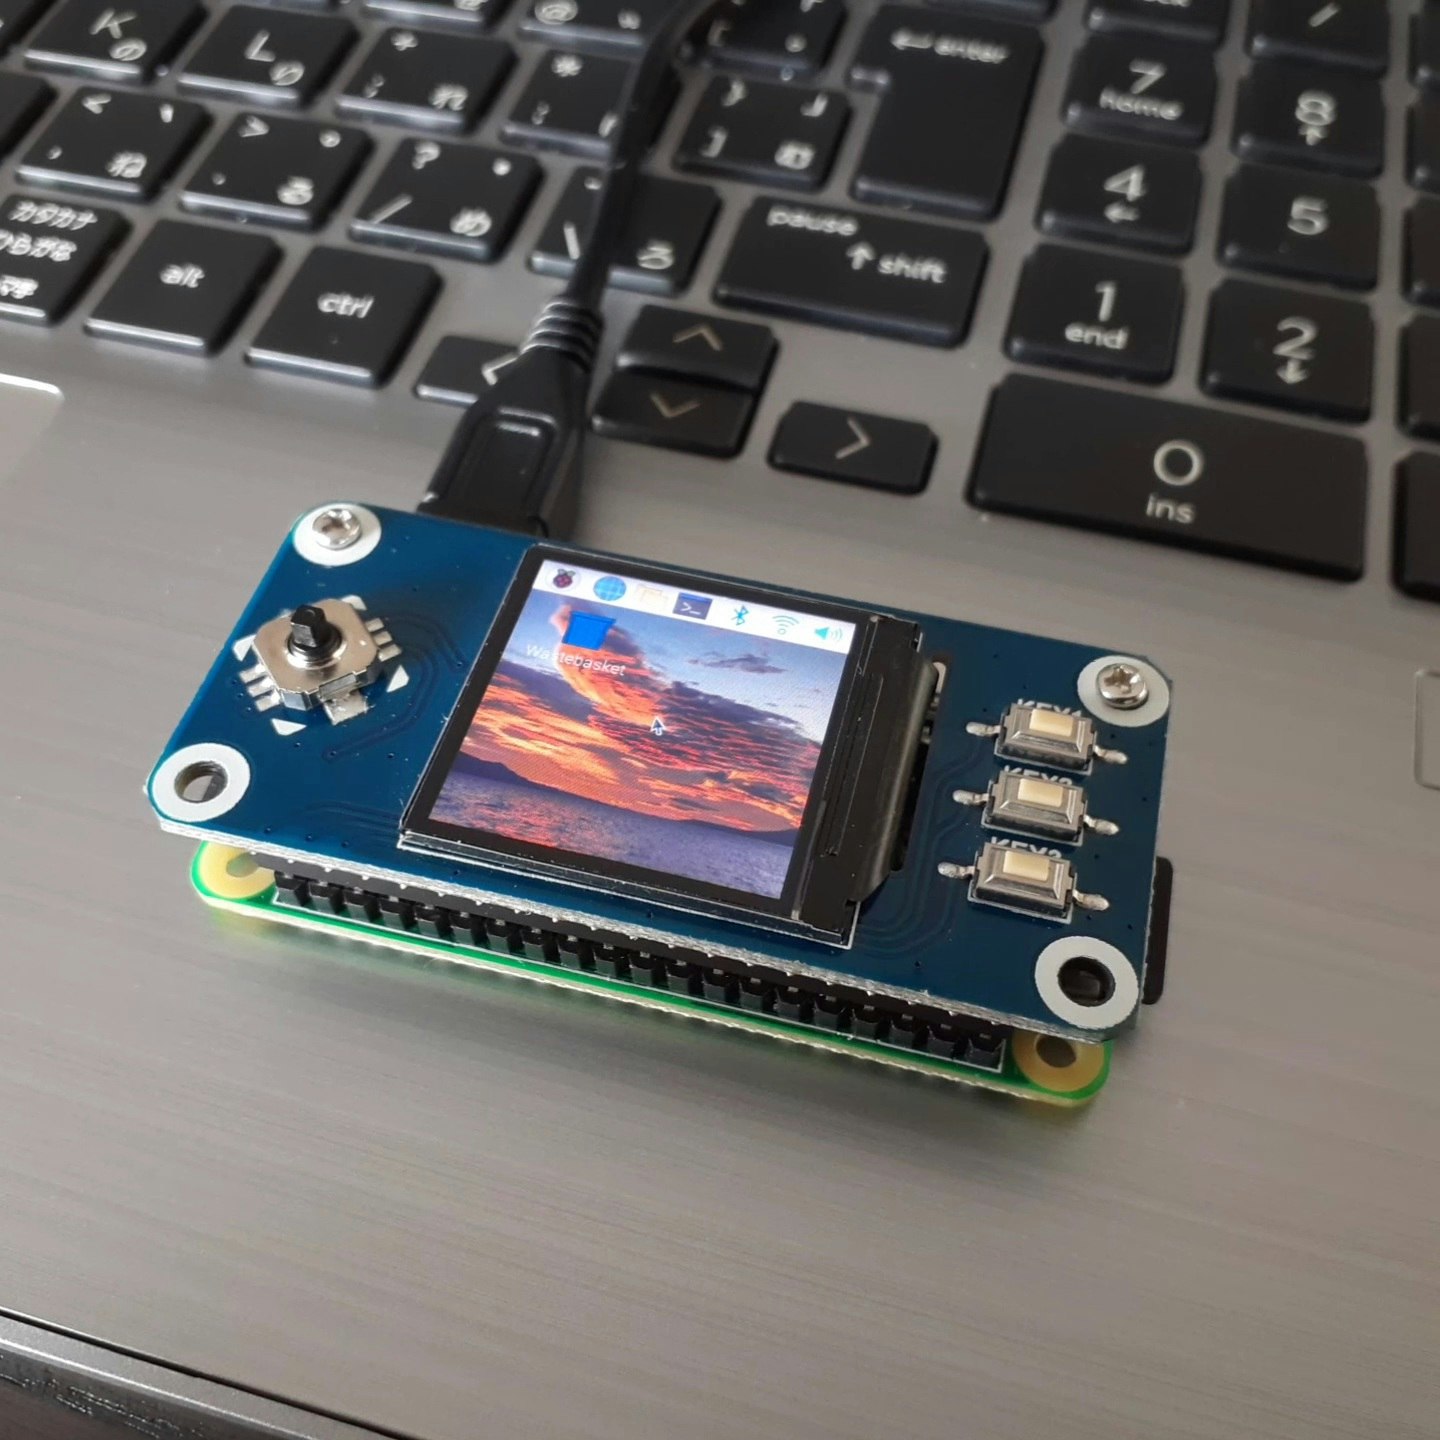
千石電商で 1,710円 で買える WaveShare社製 1.3インチ 240×240 IPS LCDディスプレイHATボタン付き液晶HAT を 2022年1月2日現在にラスパイZero W で使えるようにするメモです。
WaveShare社サイト
1.3inch IPS LCD display HAT for Raspberry Pi, 240x240 pixels, SPI interface
https://www.waveshare.com/1.3inch-lcd-hat.htm
千石電商
WaveShare 14972 1.3インチ 240×240 IPS LCDディスプレイHAT for RaspberryPi
https://www.sengoku.co.jp/mod/sgk_cart/detail.php?code=EEHD-5BKD
ポイント
- 液晶について
- この液晶を駆動できるドライバは2種類ある。どちらを使うかでセットアップ方法が全く違う。
- 開発元のWaveShare社のWikiの"Guides for Pi" はfbcp-ili9341を使う前提で書いてある
| ドライバ | プロジェクトのURL | 特徴 |
|---|---|---|
| fbcp-ili9341 | https://github.com/juj/fbcp-ili9341 | リフレッシュレートが高くゲーム向き。他のSPIデバイスが併用できない。 |
| fbtft | https://github.com/notro/fbtft/ | リフレッシュレートは低いが、他のSPIデバイスが併用できる。 |
- ボタンについて
- ボタンは押下時にlow (0V)になる負論理。ラズパイのGPIOにpull upの設定が必要
- ボタンをキーボードとして使うには Device Trees Overlays の
gpio-keyを設定 - ボタンをマウスとして使うにはWaveShare社のWikiの
mouse.pyをX上で起動すればOK。
手順
Raspberry pi のセットアップ
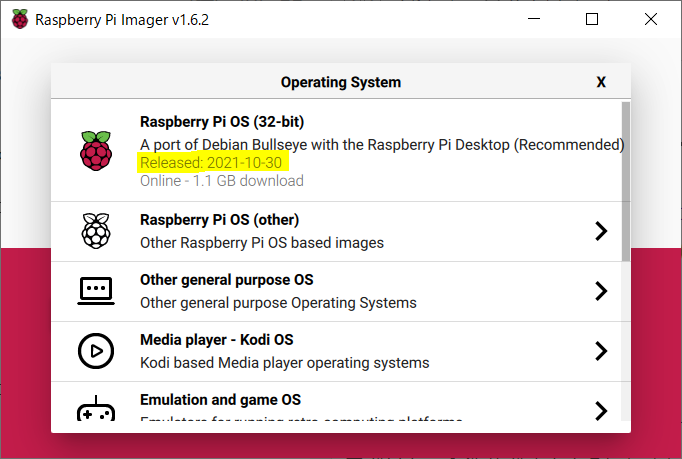
Raspberry Pi OS をSDカードに書き込む。
Raspberry Pi Imagerをつかって 最新の Raspberry Pi OS を書き込みます。
今回は 2022年1月現在最新のRaspberry Pi OS 2021-10-30 版、Debian 11 (bullseye)ベースで試します。
Headless化する
今回つなぐ240×240ディスプレイに合わせてHDMI出力も極小画面になってしまうので、ローカルでの作業が非常にやりづらくなります。SSHでリモート作業できるようにします。
Headless化を開始する方法はSetting up a Headless Raspberry Pi (公式ドキュメント)に掲載されています。
ドキュメントに従い
- wpa_supplicant.conf
- ssh (拡張子なしの0バイトファイル)
をSDカードの bootパーティションにエクスプローラを使って置けばOKです。wpa_supplicant.conf の内容は以下の例のようにします。
ctrl_interface=DIR=/var/run/wpa_supplicant GROUP=netdev
country=JP
update_config=1

network={
 ssid="<Name of your wireless LAN>"
 psk="<Password for your wireless LAN>"
}
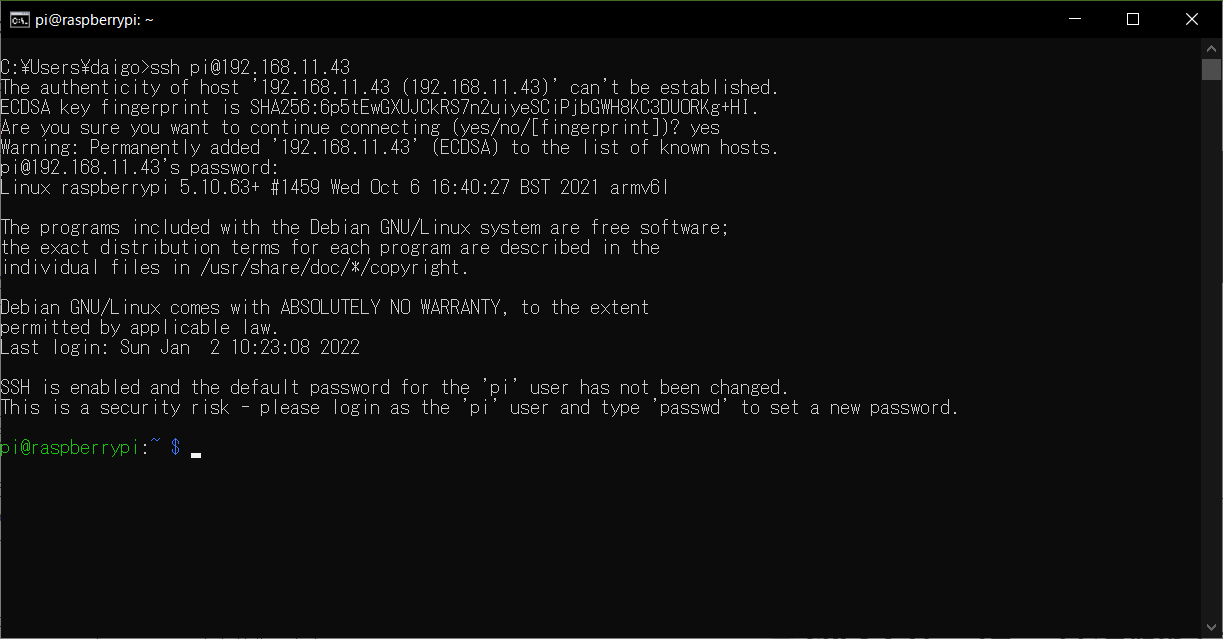
ssh でログインする
HATを接続して電源を投入、しばらくしたらsshログインします。
ログイン先のIPアドレス、つまりラズパイがDHCPサーバから獲得したIPアドレスを調べるには、スマホアプリのFingやルータの管理画面 が有用です。
デフォルトのユーザー名はpiで、パスワードはraspberryです。
液晶ドライバを導入する(fbcp-ili9341の場合)
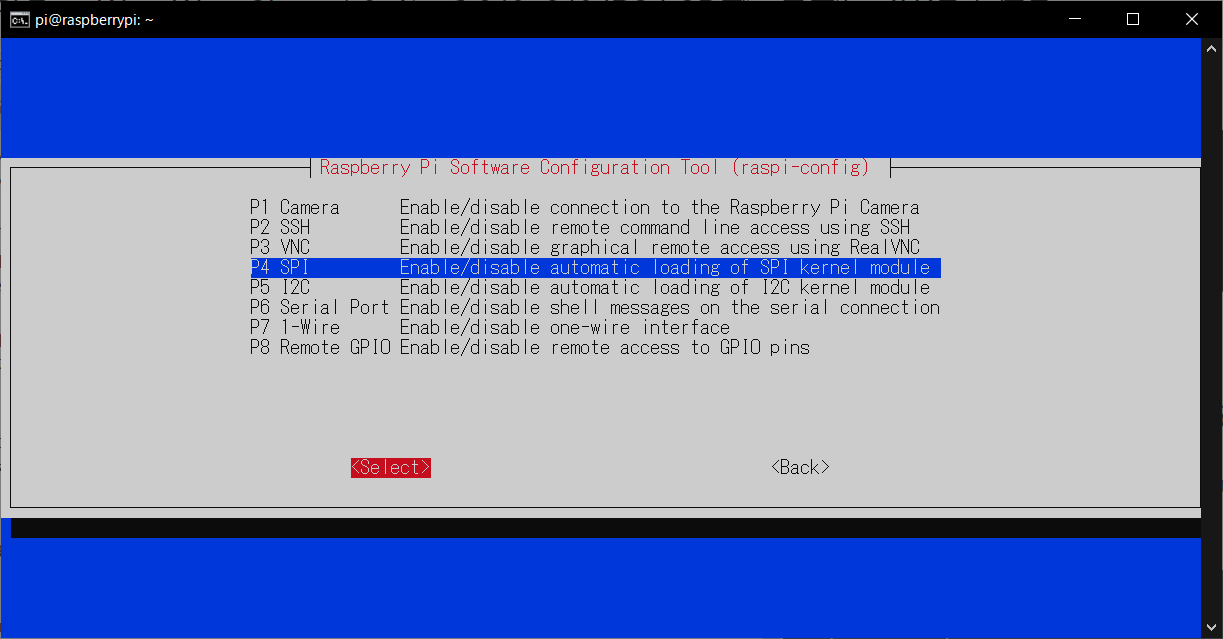
SPI を無効化する
このドライバは **SPI (シリアル ペリフェラル インターフェース)**でラズパイ本体と接続されますが、デフォルトのSPIドライバーを使用しないため、競合が発生しないように raspi-config から ラズパイ本体のSPI を無効化します。
(有効化されても動きますが、同時につかうとfbcp-ili9341が異常終了します)
sudo raspi-config
[Interface Options]-> [SPI]-> [NO]と選択して、SPIを無効にします。
FBCP Driver ; fbcp-ili9341 のビルドとインストール
プロジェクト公式の手順にしたいがいビルド。
sudo apt update
sudo apt-get install cmake git -y
cd ~
git clone https://github.com/juj/fbcp-ili9341
cd fbcp-ili9341
mkdir build
cd build
cmake -DSPI_BUS_CLOCK_DIVISOR=20 -DWAVESHARE_ST7789VW_HAT=ON -DBACKLIGHT_CONTROL=ON -DSTATISTICS=0 ..
make -j
sudo ./fbcp-ili9341
実行することで画面表示が確認できると思います。
さらにビルドしたファイルを/usr/local/bin/ 配下にコピーし
起動時に実行されるように /etc/rc.local の exit 0 の前に追記します。
sudo cp ~/waveshare_fbcp/build/fbcp-ili9341 /usr/local/bin/fbcp-ili9341
sudo vi /etc/rc.local
..(省略)..

fbcp-ili9341 &
exit 0
さらに、WaveShare社Wikiに従い、画面サイズ等を設定していきます。
具体的には /boot/config.txt に次の5行を追加します。
hdmi_force_hotplug=1
hdmi_cvt=300 300 60 1 0 0 0
hdmi_group=2
hdmi_mode=87
display_rotate=0
それぞれの設定値の意味は解説はRaspberrypi.com公式ドキュメントにあります。
Raspberrypi.com 公式ドキュメント: The config.txt file - Video Options
300x300 の画面サイズを設定していますが、自動的に240x240にスケーリング(縮小表示)されます。
(240x240だと狭すぎてXの画面が崩れるため少し大きめにしているようです)
--
さらに Open GL を無効化します。/boot/config.txt から 以下の2行をコメントアウトします。
- dtoverlay=vc4-kms-v3d
- max_framebuffers=2
# Enable DRM VC4 V3D driver
# dtoverlay=vc4-kms-v3d
# max_framebuffers=2
その後ラズパイをリブートします
sudo reboot
これで次のBootから 起動する GUIが見れます。
液晶ドライバを導入する(fbtft の場合)
SPI を有効化する
このドライバはデフォルトの **SPI (シリアル ペリフェラル インターフェース)**SPIドライバーを使用するため raspi-config から ラズパイ本体のSPI を有効化します。
sudo raspi-config
[Interface Options]-> [SPI]-> [YES]と選択して、SPIを有効にします。
デバイスオーバーレイの設定
fbtftを使うにはデバイスオーバレイを設定せよ、と公式のドキュメントに書いてあるので、デバイスオーバレイのREADMEを確認します。
Name:   fbtft
Info:   Overlay for SPI-connected displays using the fbtft drivers.

        This overlay seeks to replace the functionality provided by fbtft_device
        which is now gone from the kernel.

        Most displays from fbtft_device have been ported over.
        Example:
          dtoverlay=fbtft,spi0-0,rpi-display,reset_pin=23,dc_pin=24,led_pin=18,rotate=270

        It is also possible to specify the controller (this will use the default
        init sequence in the driver).
        Example:
          dtoverlay=fbtft,spi0-0,ili9341,bgr,reset_pin=23,dc_pin=24,led_pin=18,rotate=270

        For devices on spi1 or spi2, the interfaces should be enabled
        with one of the spi1-1/2/3cs and/or spi2-1/2/3cs overlays.

        The following features of fbtft_device have not been ported over:
        - parallel bus is not supported
        - the init property which overrides the controller initialization
          sequence is not supported as a parameter due to memory limitations in
          the bootloader responsible for applying the overlay.

        See https://github.com/notro/fbtft/wiki/FBTFT-RPI-overlays for how to
        create an overlay.

Load:   dtoverlay=fbtft,<param>=<val>
Params:
        spi<n>-<m>              Configure device at spi<n>, cs<m>
                                (boolean, required)
        speed                   SPI bus speed in Hz (default 32000000)
        cpha                    Shifted clock phase (CPHA) mode
        cpol                    Inverse clock polarity (CPOL) mode

        adafruit18              Adafruit 1.8
        adafruit22              Adafruit 2.2 (old)
        adafruit22a             Adafruit 2.2
        adafruit28              Adafruit 2.8
        adafruit13m             Adafruit 1.3 OLED
        admatec_c-berry28       C-Berry28
        dogs102                 EA DOGS102
        er_tftm050_2            ER-TFTM070-2
        er_tftm070_5            ER-TFTM070-5
        ew24ha0                 EW24HA0
        ew24ha0_9bit            EW24HA0 in 9-bit mode
        freetronicsoled128      Freetronics OLED128
        hy28a                   HY28A
        hy28b                   HY28B
        itdb28_spi              ITDB02-2.8 with SPI interface circuit
        mi0283qt-2              Watterott MI0283QT-2
        mi0283qt-9a             Watterott MI0283QT-9A
        nokia3310               Nokia 3310
        nokia3310a              Nokia 3310a
        nokia5110               Nokia 5110
        piscreen                PiScreen
        pitft                   Adafruit PiTFT 2.8
        pioled                  ILSoft OLED
        rpi-display             Watterott rpi-display
        sainsmart18             Sainsmart 1.8
        sainsmart32_spi         Sainsmart 3.2 with SPI interfce circuit
        tinylcd35               TinyLCD 3.5
        tm022hdh26              Tianma TM022HDH26
        tontec35_9481           Tontect 3.5 with ILI9481 controller
        tontec35_9486           Tontect 3.5 with ILI9486 controller
        waveshare32b            Waveshare 3.2
        waveshare22             Waveshare 2.2

        bd663474                BD663474 display controller
        hx8340bn                HX8340BN display controller
        hx8347d                 HX8347D display controller
        hx8353d                 HX8353D display controller
        hx8357d                 HX8357D display controller
        ili9163                 ILI9163 display controller
        ili9320                 ILI9320 display controller
        ili9325                 ILI9325 display controller
        ili9340                 ILI9340 display controller
        ili9341                 ILI9341 display controller
        ili9481                 ILI9481 display controller
        ili9486                 ILI9486 display controller
        pcd8544                 PCD8544 display controller
        ra8875                  RA8875 display controller
        s6d02a1                 S6D02A1 display controller
        s6d1121                 S6D1121 display controller
        seps525                 SEPS525 display controller
        sh1106                  SH1106 display controller
        ssd1289                 SSD1289 display controller
        ssd1305                 SSD1305 display controller
        ssd1306                 SSD1306 display controller
        ssd1325                 SSD1325 display controller
        ssd1331                 SSD1331 display controller
        ssd1351                 SSD1351 display controller
        st7735r                 ST7735R display controller
        st7789v                 ST7789V display controller
        tls8204                 TLS8204 display controller
        uc1611                  UC1611 display controller
        uc1701                  UC1701 display controller
        upd161704               UPD161704 display controller

        width                   Display width in pixels
        height                  Display height in pixels
        regwidth                Display controller register width (default is
                                driver specific)
        buswidth                Display bus interface width (default 8)
        debug                   Debug output level {0-7}
        rotate                  Display rotation {0, 90, 180, 270} (counter
                                clockwise). Not supported by all drivers.
        bgr                     Enable BGR mode (default off). Use if Red and
                                Blue are swapped. Not supported by all drivers.
        fps                     Frames per second (default 30). In effect this
                                states how long the driver will wait after video
                                memory has been changed until display update
                                transfer is started.
        txbuflen                Length of the FBTFT transmit buffer
                                (default 4096)
        startbyte               Sets the Start byte used by fb_ili9320,
                                fb_ili9325 and fb_hx8347d. Common value is 0x70.
        gamma                   String representation of Gamma Curve(s). Driver
                                specific. Not supported by all drivers.
        reset_pin               GPIO pin for RESET
        dc_pin                  GPIO pin for D/C
        led_pin                 GPIO pin for LED backlight
WaveShare 1.3 用のプリセットは無いようですが、コントローラチップ名やピンアサインなどはWaveShare社のWikiに記載があるのでその情報をもとに以下のような行を設定していきます。
sudo vi /boot/config.txt
dtoverlay=fbtft,spi0-0,st7789v,reset_pin=27,dc_pin=25,led_pin=24,width=240,height=240,rotate=270
さらに/boot/cmdline.txtにコンソール向け設定を追記します。
https://github.com/notro/fbtft/wiki/Boot-console を参考に末尾に fbcon=map:10 を追加します。
console=serial0,115200 console=tty1 root=PARTUUID=f637df08-02 rootfstype=ext4 fsck.repair=yes rootwait quiet splash plymouth.ignore-serial-consoles fbcon=map:10
もし文字のサイズが小さすぎて見えない場合などは sudo dpkg-reconfigure console-setup で文字フォントやサイズを変更します。
ボタンを設定する
HATのボタン入力に合わせてGPIOを設定する
まずはGPIOの状態をチェックするツール wiringpi を導入します。
wiringpi のオーナーであるGordon氏は残念ながらツールが有名になるにつれいろいろつらい目にあったようで、現在ではプロジェクトを非推奨とし、メンテの主体が非公式のフォークに移りつつある状態です。が、ツール自体は有用性に変わりはなく、また現状の最新版は依然としてGordon氏が最後に公開したVersion 2.52でありこれが利用可能です。以下のコマンドでインストールすることができます。
cd /tmp
wget https://project-downloads.drogon.net/wiringpi-latest.deb
sudo dpkg -i wiringpi-latest.deb
インストールが終わったら実行します。
watch コマンドと一緒につかって、0.1秒ごとに表示を更新してみます。
watch --interval 0.1 gpio readall
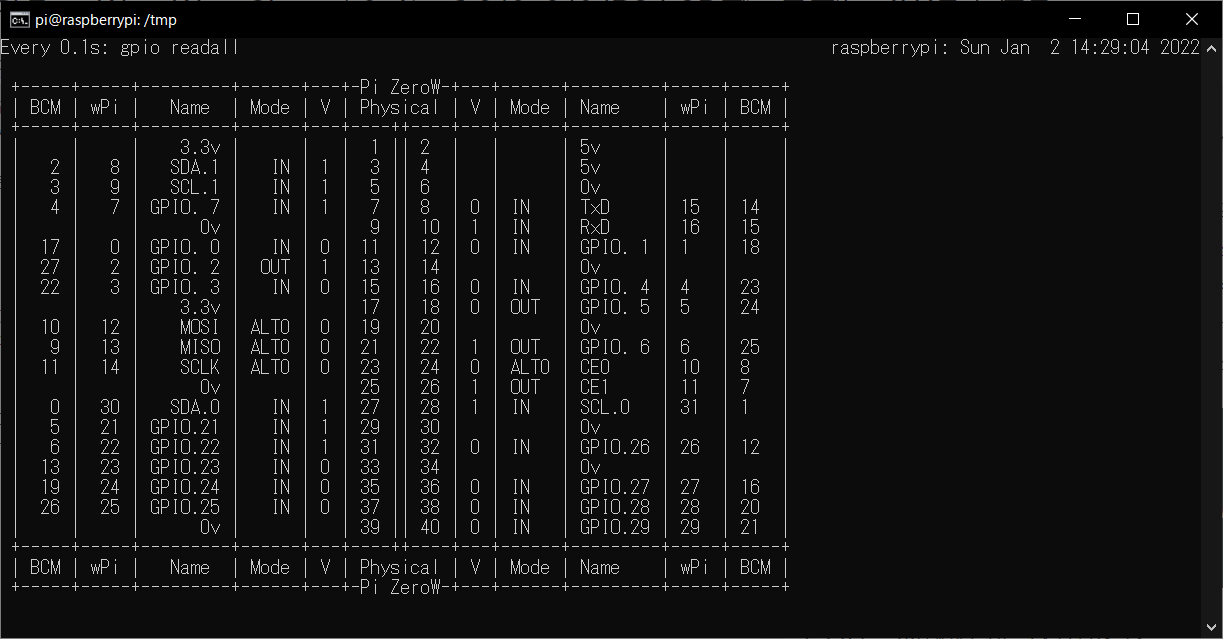
この状態でHATのボタンを押してみましょう。
BCMという列がGPIOの番号です。Joystick UP と Joystick Left ボタンに反応して BCM 5,6 の V が1 から 0 に変わったら成功しています。
ただ、現状ではこれ以外のボタンは反応しません。
なぜならば、ラズパイはデフォルトの状態では GPIO 1 - 8 が Pull-UP / GPIO 9 - 27 は Pull-Downされており、 HATのJoystick UP/Left 以外の各ボタンはデフォルトでPull-Downされている GPIO に接続されているからです。
HATのボタンは 通常時=HI(3.3V)/押下時=LO(0V) の負論理で接続されているため、GPIOが Pull-UP でないと動作しません。
ここでHATのボタンとラズパイのGPIOの対応を見てみましょう。
WaveShare社Wiki の "Introduction" -> "pin out"に書かれていますが、再掲すると以下のようになります。
| PIN | Raspberry Pi Interface (BCM) | Description |
|---|---|---|
| KEY1 | P21 | KEY1GPIO |
| KEY2 | P20 | KEY2GPIO |
| KEY3 | P16 | KEY3GPIO |
| Joystick UP | P6 | Upward direction of the Joystick |
| Joystick Down | P19 | Downward direction of the Joystick |
| Joystick Left | P5 | Left direction of the Joystick |
| Joystick Right | P26 | Right direction of the Joystick |
| Joystick Press | P13 | Press the Joystick |
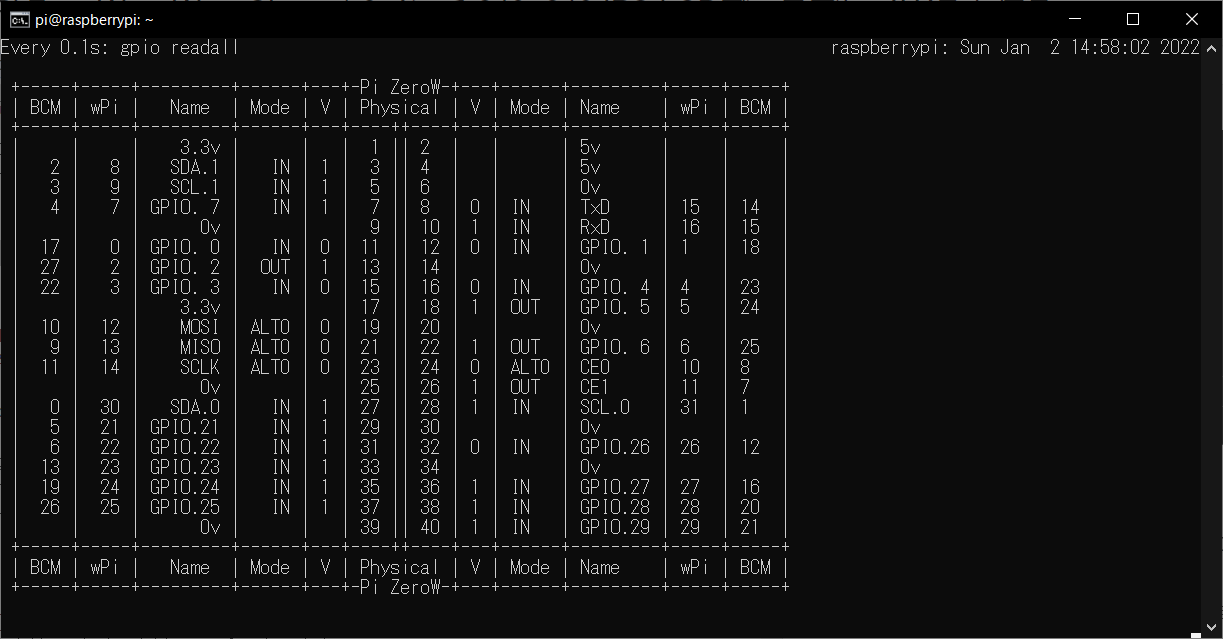
このため、デフォルトでPull-Downとなっている GPIO 13,16,19,20,21,26 を Pull-UP に変える必要があります。
変更する手順は GPIO Control ( Raspberrypi.com 公式ドキュメント)にありますが、/boot/config.txtに1行追記するだけです。
sudo vi /boot/config.txt
gpio=13,16,19,20,21,26=pu
この状態で再起動し、先ほどと同様にwatch --interval 0.1 gpio readall すれば、今度は全ボタンが反応します。
HATのジョイスティックをマウス代わりに使う
HATのジョイスティックでカーソルを動かし、KEY1で左クリック、KEY2で右クリックとするPythonのプログラムとその導入方法がWaveShare社のWikiの "Guides for Pi" - "Analog mouse" に掲載されています。
手順をほぼそのまま実施できますが、以下の2点は変更します
- python-xlibは python3-xlib に名前が変更されている
- pyMouse は PyUserInput に マージされたため、 PyUserInputを使う。
- ssh から
sudo python mouse.pyとやってもエラーになるだけなので、実際に試す場合はX上のTerminal からpython mouse.pyを実行する。
sudo apt-get install python3-xlib
sudo pip install PyUserInput
wget http://www.waveshare.net/w/upload/d/d3/Mouse.7z
7z x Mouse.7z
ls mouse.py
その後、pi user でデスクトップログインした際にmouse.pyが自動実行されるように autostartに仕掛けます。
cd .config/
mkdir autostart
cd autostart/
sudo vi local.desktop
[Desktop Entry]
Type=Application
Exec=python /home/pi/mouse.py
HATのボタン入力をキーボード代わりに使う
※前項の"HATのジョイスティックをマウス代わりに使う"のmouse.pyとは同時に利用できません。
前項を実施している場合はmv /home/pi/.config/autostart/local.desktop /home/pi/.config/autostart/local.desktop.back などとして自動起動ファイルを退避させてください。
HATのキーに Enter や Esc などのキーボードのボタンを割り当てたい場合は Device Trees Overlays :デバイスツリーオーバーレイを利用します。
Device Trees, Overlays, and Parameters (raspberrypi.com 公式ドキュメント)
公式ドキュメントにある通り、デバイスツリーは
-
.dtsファイル(デバイス ツリー ソースファイル)に記述され、、 -
.dtb.dtboファイルにコンパイルされて/boot/overlaysに置かれ、、 -
/boot/config.txtで、ユーザーがdtoverlay とdtparam で指定することで読み込まれます。
PIOをキーボードとして取り込むgpio-key.dtbo は /boot/overlays/gpio-key.dtbo に用意されていますので、ユーザーがやることは /boot/config.txtにdtoverlay とdtparamを書き込むだけです。
書き込むべき dtoverlay と dtparam については /boot/overlays/READMEに解説があります。
Name:   gpio-key
Info:   This is a generic overlay for activating GPIO keypresses using
        the gpio-keys library and this dtoverlay. Multiple keys can be
        set up using multiple calls to the overlay for configuring
        additional buttons or joysticks. You can see available keycodes
        at https://github.com/torvalds/linux/blob/v4.12/include/uapi/
        linux/input-event-codes.h#L64
Load:   dtoverlay=gpio-key,<param>=<val>
Params: gpio                    GPIO pin to trigger on (default 3)
        active_low              When this is 1 (active low), a falling
                                edge generates a key down event and a
                                rising edge generates a key up event.
                                When this is 0 (active high), this is
                                reversed. The default is 1 (active low)
        gpio_pull               Desired pull-up/down state (off, down, up)
                                Default is "up". Note that the default pin
                                (GPIO3) has an external pullup
        label                   Set a label for the key
        keycode                 Set the key code for the button
なので、、、最終的には以下のような記述を書けばよいことになります。
sudo vi /boot/config.txt
# gpio=13,16,19,20,21,26=pu
dtoverlay=gpio-key,gpio=21,active_low=1,gpio_pull=up,label=ESC,keycode=1
dtoverlay=gpio-key,gpio=20,active_low=1,gpio_pull=up,label=SUPER_L,keycode=125
dtoverlay=gpio-key,gpio=16,active_low=1,gpio_pull=up,label=ENTER,keycode=28
dtoverlay=gpio-key,gpio=6,active_low=1,gpio_pull=up,label=UP,keycode=103
dtoverlay=gpio-key,gpio=19,active_low=1,gpio_pull=up,label=DOWN,keycode=108
dtoverlay=gpio-key,gpio=5,active_low=1,gpio_pull=up,label=LEFT,keycode=105
dtoverlay=gpio-key,gpio=26,active_low=1,gpio_pull=up,label=RIGHT,keycode=106
dtoverlay=gpio-key,gpio=13,active_low=1,gpio_pull=up,label=SPACE,keycode=57
この例では
- KEY1 を ESC
- KEY2 を 左WINDOWキー
- KEY3 を ENTER
- カーソルキーは上下左右キー
- カーソル押し込みを SPACE
としています。
なお、keycode=に記載するキーコードは xev でとれるキーコードではなく、showkey --scancodes でとれるスキャンコードの10進表示ですので調査の際は注意してください。(参考記事)