Electronを使ってTo-Doアプリを作るまで
日頃はGoogle To-Doを使用しているのだが、ブラウザを開かないと操作できないのと、GMailのオマケみたいな作りが気に入らない。
スマホでは専用アプリがあるので気にならないがパソコン作業時に困るのでこの際だから作ってみようと思い立った。
ほぼやっていた作業順にメモを残した感じです。
目次
- 1. Electronプロジェクトを作る
- 2. アプリケーションをビルドする
- 3. タスクトレイを追加する
- 4. Google認証の手続き ※作成中
- 5. メインプロセスからレンダラプロセスへデータを渡す ※作成中
- 6. レンダラプロセスからメインプロセスへデータを渡す ※作成中
- 7. フロントエンドをReactで作成する ※作成中
1. Electronプロジェクトを作る
フォルダを作成して必要なモジュールをインストールする
$ mkdir my_project && cd my_project
# プロジェクトを初期化する
$ npm init
#
# 後のためにメインスクリプトだけ以下に設定
  "main": "src/main/main.js",
# それ以外の入力は好きにしよう
#
# 開発用ツールとしてelectronとelectron-builder
# electron: フレームワーク
# electron-builder: ビルドツール
$ npm i --save-dev electron
$ npm i --save-dev electron-builder
今回の開発では以下のようなフォルダ構成にする
my_project/
├── node_modules/ # インストールされたモジュール
├── package.json  # パッケージ情報
├── package-lock.json
└── src/
    ├── main/     # メインプロセスのソース
    │   ├── main.js    # メインスクリプト
    │   └── preload.js # レンダリング前に読まれるスクリプト
    └── renderer/ # レンダラプロセスのソース
        ├── css/       # スタイルシート
        ├── index.html # トップページ
        └── scripts/   # レンダラプロセスで読まれるスクリプト
基本的な情報の記述
// main.js

// モジュールの読み込み
const { app, BrowserWindow } = require('electron')
const path = require('path')

const createWindow = () => {
  const win = new BrowserWindow({
    width: 800,   // 画面サイズ幅
    height: 600,  // 画面サイズ高さ
    webPreferences: {
      // 事前読み込みのスクリプトを登録
      preload: path.join(__dirname, 'preload.js')
    }
  })

  /***************************/
  /* 開発時のデバックモードを有効 */
  win.webContents.openDevTools()
  /***************************/

  // レンダラが読み込むHTMLを登録
  win.loadFile(path.join(__dirname, '..', 'renderer', 'index.html'))
}

// 準備完了時に処理をする
app.whenReady().then(() => {

  // ウインドウを作成する
  createWindow()

  app.on('activate', () => {
    if(BrowserWindow.getAllWindows().length ===0)
      createWindow()
  })
})

// すべてのウインドウが閉じた時
app.on('window-all-closed', () => {
  if(process.platform != 'darwin')
    app.quit()
})
アプリケーションを実行する際にスクリプトを登録する
/* package.json */
{
  "name": "my_project",
  "version": "1.0.0",
  "description": "",
  "main": "src/main/main.js",
  "scripts": {
    /****** ここを追加 ******/
    "start": "electron .",
    /**********************/
    "test": "echo \"Error: no test specified\" && exit 1"
  },
  "author": "",
  "license": "ISC",
  "devDependencies": {
    "electron": "^16.0.8",
    "electron-builder": "^22.14.5"
  },
}
これで基本的な準備は終了
以下のコマンドからアプリを起動する
$ npm start
2. アプリケーションをビルドする
electron-builderを使用してアプリをビルドする
そのためにpackage.jsonにビルド設定を追加記述する
/* package.json */
{
  "scripts": {
    /****** ここを追加 ******/
    "build:linux": "electron-builder build --linux",
    /**********************/
  },

  /****** ここを追加 ******/
  "build": {
    "directories": {
      "output": "build"
    },
    "files": [
      "node_modules/**",
      "src/**"
    ],
    "linux": {
      "target": "AppImage"
    }
  }
  /**********************/
}
以下のコマンドからビルドを行う
$ npm run build:linux
3. タスクトレイを追加する
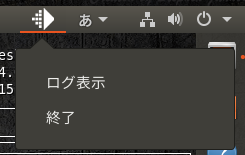
下記画像のようにタスクバー端のタスクトレイにアイコンを表示するようにする
// main.js
// const { app, BrowserWindow } = require('electron')
const { app, BrowserWindow, Menu, Tray } = require('electron')

/*** ここから追加 ***/
const createTrayIcon = () => {
  // コンテキストメニューを作る
  const contextMenu = Menu.buildFromTemplate([
    { label: 'ログ表示', click: () => { console.log("TEST") } },
    { label: '終了', role: 'quit' }
  ])

 // タスクトレイを設定する
  const tray = new Tray(path.join(__dirname, 'test.png'))
  tray.setToolTip(app.name)
  tray.setContextMenu(contextMenu)
}
/******************/

