概要
自宅のサーバーにVNCで接続する環境を構築した作業をそのままメモ書きしました。
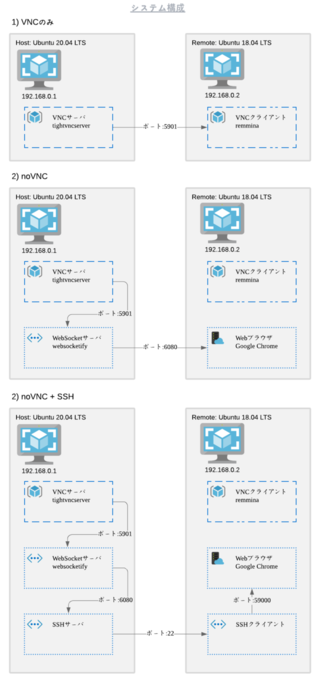
構築の方法として以下の3パターンを試しましたが、
最終的にはVNCクライアントを必要とせず、セキュリティも安心な3) noVNC + SSHにしました。
実行環境
-
ホスト
OS: Ubuntu 20.04 LTS
VNC: tightvncserver 1.3.10-0ubuntu5 -
リモート
OS: Ubuntu 18.04 LTS
WEBブラウザ: Google Chrome 87.0.4280.141-1
作業手順
VNCサーバの構築
ホストにVNCサーバをインストールします。
# [ホストPC内]
# VNCサーバのインストール
$ sudo apt install tightvncserver
リモートマシンからVNCサーバにアクセスするためのパスワードを設定します。
※このパスワードはログイン時のパスワードとは異なり、6~8文字の長さにしなければならない。
# [ホスト内PC]
# VNCパスワードの設定
$ vncpasswd
You will require a password to access your desktops.

Password:********
Verify:********
VNCで使用するデスクトップGUIの設定を行う。
今回はUbuntuデスクトップを使用します。
# [ホストPC内]
# Ubuntuデスクトップのインストール
$ sudo apt install ubuntu-desktop
VNCの設定ファイルを変更する。
# [ホストPC内]
# 古い設定ファイルをバックアップ
$ cp $HOME/.vnc/xstartup $HOME/.vnc/xstartup.bak
# 設定ファイルを変更する
$ nano $HOME/.vnc/xstartup
変更後の設定ファイルは以下になります。
# !/bin/sh
unset SESSION_MANAGER
unset DBUS_SESSION_BUS_ADDRESS

# startxfce4 &
# startlxde &
# exec /usr/bin/mate-session &
exec /usr/bin/gnome-session &

[ -x /etc/vnc/xstartup ] && exec /etc/vnc/xstartup
[ -r $HOME/.Xresources ] && xrdb $HOME/.Xresources
xsetroot -solid grey
vncconfig -iconic &
VNCサーバを起動する。
# [ホストPC内]
# VNCサーバーを起動する
$ vncserver -localhost no :1
VNCサーバーへの接続を確認する。
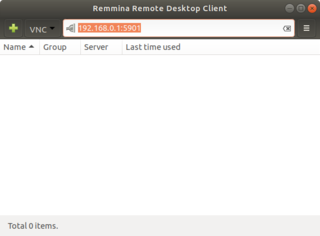
Ubuntuに予めインストールされているRemminaを使用してリモートPCからホストPCへ接続できるか確認をする。
ここまでで1) VNCのみが完了です。
WebSocketサーバの構築
※注意 先の作業でVNCサーバがすでに起動している場合は、以下の手順で停止します
# [ホストPC内]
# VNCサーバを停止させる
$ vncserver -kill :1
VNCサーバをlocalhost内からのアクセスだけを許可するように起動する
# [ホストPC内]
# VNCサーバをlocalhost内からのアクセスのみ許可で起動する
$ vncserver -localhost yes :1
WebSocketサーバをインストールする
# [ホストPC内]
# WebSocketサーバをインストールする
$ sudo apt install websockify
WebSocketサーバを起動する
# [ホストPC内]
# WebSocketサーバとVNCサーバをリンクして起動する
$ websockify --web=/usr/share/novnc 6080 localhost:5901
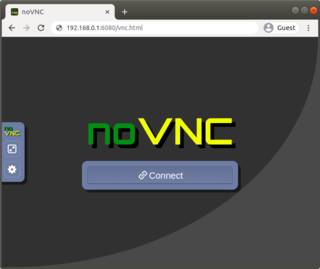
WebSocketサーバとの接続を確認する。
Webブラウザを起動して、http://192.168.0.1:6080/vnc.htmlへアクセスする。
ここまでで2) noVNCが完了です。
SSHサーバを構築
SSHサーバをインストールする。
# [ホストPC内]
sudo apt install ssh openssh-server
SSHサーバの設定を変更する。
# [ホストPC内]
$ nano /etc/ssh/sshd_config
以下の設定を変更しよう。
PubkeyAuthentication yes
RSAAuthentication yes
AuthorizedKeysFile      .ssh/authorized_keys
PasswordAuthentication no
PermitEmptyPasswords no
接続を確認するためにリモートPCからSSHで接続して、トンネルを作成する。
# [リモートPC内]
ssh -L 59000:localhost:5901 -C -N -l ${USER} 192.168.0.1
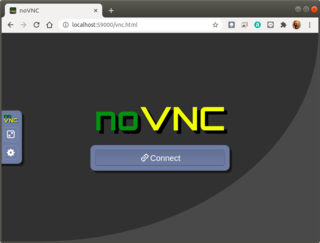
その後、リモートPCのWebブラウザからhttp://localhost:59000/vnc.htmlにアクセスできるか確認する。
ここまでで2) noVNC+SSHが完了です。


