- 製造業出身のデータサイエンティストがお送りする記事
- 今回はGoogle Colab でYOLOv5 を使ってみました。
はじめに
今回は、YOLOv5 の学習モデルをGoogle Colab で作る方法をご紹介します。
YOLO は、物体検出(object detection)手法の一つです。他の手法では、SSD とかも有名です。
物体検出とは、画像内の「どこに」「何が」写っているかを検出する技術のこと指します。
YOLOv5 を使ってみた
今回の実装は、YOLOv5 のチュートリアルを一部改変して実装したものです。
学習データの準備
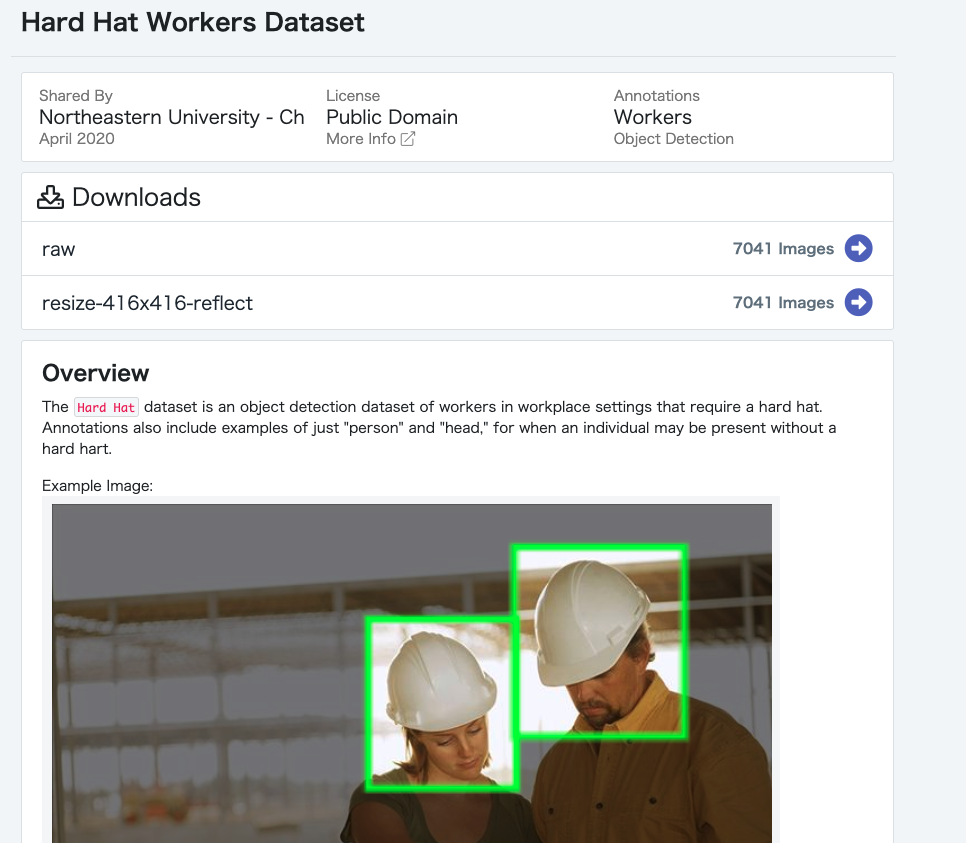
YOLOv5 に対応した画像データセットが入手できるObject Detection Datasets からデータをダウンロードします。
データをダウンロードする上で、メールアドレスの登録が必要になりますが、無料で使えます。
今回は、製造業で活用することを考慮して、ヘルメットを被っている作業者を検出するためのデータセットHard Hat Workers Dataset を使いました。
ダウンロードは、「raw」をクリックして頂き、ダウンロードできます。
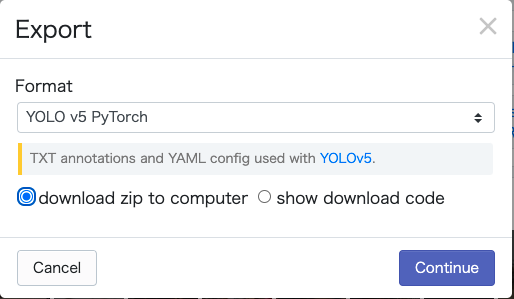
その後、下記のような画面が出ますので、以下のように選択してダウンロードしてください。
- Format:YOLO v5 PyTorchを選択
- download zip to computerを選択
今回ダウンロードしたzipファイルは以下のような名前を付け、Google ドライブのマイドライブ内に以下のようなフォルダを作成して保存しました。
- ファイル名:Workers.zip
- フォルダ構成:My Drive/YOLOv5/配下に格納
YOLOv5 環境設定
YOLOv5 をインストールし、必要なライブラリーをインストールします。
!git clone https://github.com/ultralytics/yolov5
%cd yolov5
%pip install -qr requirements.txt

import torch
from IPython.display import Image, clear_output

clear_output()
print('Setup complete. Using torch %s %s' % (torch.__version__, torch.cuda.get_device_properties(0) if torch.cuda.is_available() else 'CPU'))

# Setup complete. Using torch 1.9.0+cu102 _CudaDeviceProperties(name='Tesla T4', major=7, minor=5, total_memory=15109MB, multi_processor_count=40)
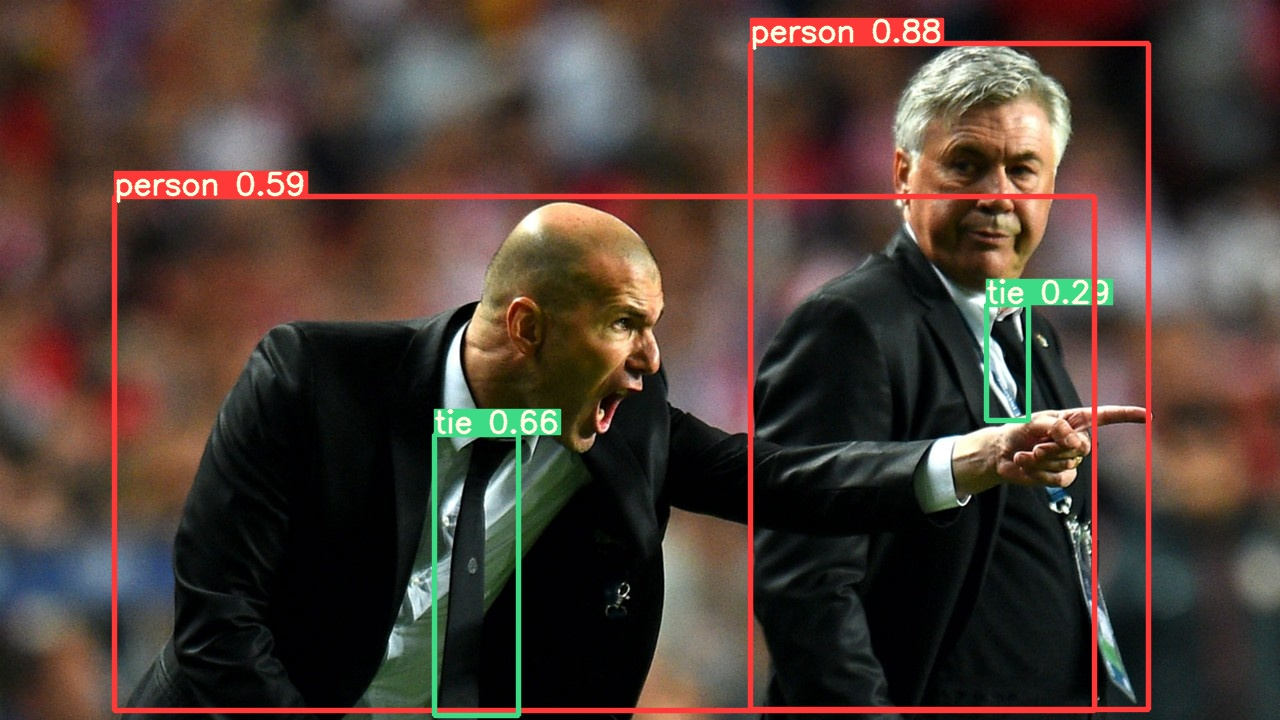
次にYOLOv5 が問題無く使えるかを確認します。
!python detect.py --weights yolov5s.pt --img 640 --conf 0.25 --source data/images/
Image(filename='runs/detect/exp/zidane.jpg', width=600)
下記のような結果が得られていれば、環境構築部分は問題ないです。
学習データのダウンロード
事前に準備していたWorkers.zip を解答し、ダウンロードします。
最初にgoogle ドライブをマウントします。
from google.colab import drive
drive.mount('/content/drive')
次にzip ファイルを解答し、ダウンロードします。
!cp /content/drive/My\ Drive/YOLOv5/Workers.zip /content/
!unzip /content/Workers.zip
!rm /content/Workers.zip

!ls /content/yolov5
学習
次にフォルダ内にあるdata.yamlを修正します。
初期状態は下記のようになっております。
%cat data.yaml

# train: ../train/images
# val: ../valid/images
#
# nc: 3
# names: ['head', 'helmet', 'person']
data.yaml はtrain とval のパスが異なっているため、修正が必要です。また、今回のデータセットWorkers.zip では、valid データがなかったため、test データを仮でvalid データとして使用しました。
修正したコードは下記です。
# define number of classes based on YAML
# data.yaml contains the information about number of classes and their labels required for this project
import yaml
with open("data.yaml", 'r') as stream:
    num_classes = str(yaml.safe_load(stream)['nc'])
# customize iPython writefile so we can write variables
from IPython.core.magic import register_line_cell_magic

@register_line_cell_magic
def writetemplate(line, cell):
    with open(line, 'w') as f:
        f.write(cell.format(**globals()))
# Below we are changing the data configuration for right path to the dataset
%%writetemplate /content/yolov5/data.yaml

train: ./train/images
val: ./test/images

nc: 3
names: ['head', 'helmet', 'person']
# Let's check the data.yaml file for confirmation
%cat data.yaml

# train: ./train/images
# val: ./test/images
#
# nc: 3
# names: ['head', 'helmet', 'person']
with open(r'data.yaml') as file:
    # The FullLoader parameter handles the conversion from YAML
    # scalar values to Python the dictionary format
    labels_list = yaml.load(file, Loader=yaml.FullLoader)

    label_names = labels_list['names']

print("Number of Classes are {}, whose labels are {} for this Object Detection project".format(num_classes,label_names))

# Number of Classes are 3, whose labels are ['head', 'helmet', 'person'] for this Object Detection project
Google Colab 上では、モデルの設定ファイル yolov5s.ymal も修正が必要です。
yolov5s.yml では、number of classes が80となっております。今回のタスクでは、nc:3 であるため、修正が必要となります。
最初に修正前の設定ファイルを確認します。
# this is the model configuration we will use for our tutorial
# yolov5s.yaml contains the configuration of neural network required for training.
%cat /content/yolov5/models/yolov5s.yaml
設定ファイルの中身は下記です。
# parameters
nc: 80  # number of classes
depth_multiple: 0.33  # model depth multiple
width_multiple: 0.50  # layer channel multiple

# anchors
anchors:
  - [10,13, 16,30, 33,23]  # P3/8
  - [30,61, 62,45, 59,119]  # P4/16
  - [116,90, 156,198, 373,326]  # P5/32

# YOLOv5 backbone
backbone:
  # [from, number, module, args]
  [[-1, 1, Focus, [64, 3]],  # 0-P1/2
   [-1, 1, Conv, [128, 3, 2]],  # 1-P2/4
   [-1, 3, C3, [128]],
   [-1, 1, Conv, [256, 3, 2]],  # 3-P3/8
   [-1, 9, C3, [256]],
   [-1, 1, Conv, [512, 3, 2]],  # 5-P4/16
   [-1, 9, C3, [512]],
   [-1, 1, Conv, [1024, 3, 2]],  # 7-P5/32
   [-1, 1, SPP, [1024, [5, 9, 13]]],
   [-1, 3, C3, [1024, False]],  # 9
  ]

# YOLOv5 head
head:
  [[-1, 1, Conv, [512, 1, 1]],
   [-1, 1, nn.Upsample, [None, 2, 'nearest']],
   [[-1, 6], 1, Concat, [1]],  # cat backbone P4
   [-1, 3, C3, [512, False]],  # 13

   [-1, 1, Conv, [256, 1, 1]],
   [-1, 1, nn.Upsample, [None, 2, 'nearest']],
   [[-1, 4], 1, Concat, [1]],  # cat backbone P3
   [-1, 3, C3, [256, False]],  # 17 (P3/8-small)

   [-1, 1, Conv, [256, 3, 2]],
   [[-1, 14], 1, Concat, [1]],  # cat head P4
   [-1, 3, C3, [512, False]],  # 20 (P4/16-medium)

   [-1, 1, Conv, [512, 3, 2]],
   [[-1, 10], 1, Concat, [1]],  # cat head P5
   [-1, 3, C3, [1024, False]],  # 23 (P5/32-large)

   [[17, 20, 23], 1, Detect, [nc, anchors]],  # Detect(P3, P4, P5)
  ]
下記で設定ファイルを修正します。
# Below we are changing the configuration so that it becomes compatible to number of classes required in this project
%%writetemplate /content/yolov5/models/custom_yolov5s.yaml

# parameters
nc: {num_classes}  # number of classes  # CHANGED HERE
depth_multiple: 0.33  # model depth multiple
width_multiple: 0.50  # layer channel multiple

# anchors
anchors:
  - [10,13, 16,30, 33,23]  # P3/8
  - [30,61, 62,45, 59,119]  # P4/16
  - [116,90, 156,198, 373,326]  # P5/32

# YOLOv5 backbone
backbone:
  # [from, number, module, args]
  [[-1, 1, Focus, [64, 3]],  # 0-P1/2
   [-1, 1, Conv, [128, 3, 2]],  # 1-P2/4
   [-1, 3, BottleneckCSP, [128]],
   [-1, 1, Conv, [256, 3, 2]],  # 3-P3/8
   [-1, 9, BottleneckCSP, [256]],
   [-1, 1, Conv, [512, 3, 2]],  # 5-P4/16
   [-1, 9, BottleneckCSP, [512]],
   [-1, 1, Conv, [1024, 3, 2]],  # 7-P5/32
   [-1, 1, SPP, [1024, [5, 9, 13]]],
   [-1, 3, BottleneckCSP, [1024, False]],  # 9
  ]

# YOLOv5 head
head:
  [[-1, 1, Conv, [512, 1, 1]],
   [-1, 1, nn.Upsample, [None, 2, 'nearest']],
   [[-1, 6], 1, Concat, [1]],  # cat backbone P4
   [-1, 3, BottleneckCSP, [512, False]],  # 13

   [-1, 1, Conv, [256, 1, 1]],
   [-1, 1, nn.Upsample, [None, 2, 'nearest']],
   [[-1, 4], 1, Concat, [1]],  # cat backbone P3
   [-1, 3, BottleneckCSP, [256, False]],  # 17 (P3/8-small)

   [-1, 1, Conv, [256, 3, 2]],
   [[-1, 14], 1, Concat, [1]],  # cat head P4
   [-1, 3, BottleneckCSP, [512, False]],  # 20 (P4/16-medium)

   [-1, 1, Conv, [512, 3, 2]],
   [[-1, 10], 1, Concat, [1]],  # cat head P5
   [-1, 3, BottleneckCSP, [1024, False]],  # 23 (P5/32-large)

   [[17, 20, 23], 1, Detect, [nc, anchors]],  # Detect(P3, P4, P5)
  ]
ここから、モデルを学習します。
import os
os.chdir('/content/yolov5')
# train yolov5s on Aquarium object detection data for 100 epochs [aroung 1000 epochs for better training and result]
# NOTE: All the images are already pre-processed to 416 x 416 size.
# We will be training for 100 epoch (increase it for better result) with batch size of 80
# data.yaml also contains the information about location of Train and Validation Data. That's how you get the train data.
# the training also requires the configuration of neural network, which is in custom_yolov5s.yaml
# weights will be by-default stored at /content/yolov5/runs/exp2/weights/best.pt
# time its performance

%%time
%cd /content/yolov5/
!python train.py --img 416 --batch 80 --epochs 100 --data './data.yaml' --cfg ./models/custom_yolov5s.yaml --weights ''
学習に3時間弱ぐらいかかりましたので、気をつけてください。
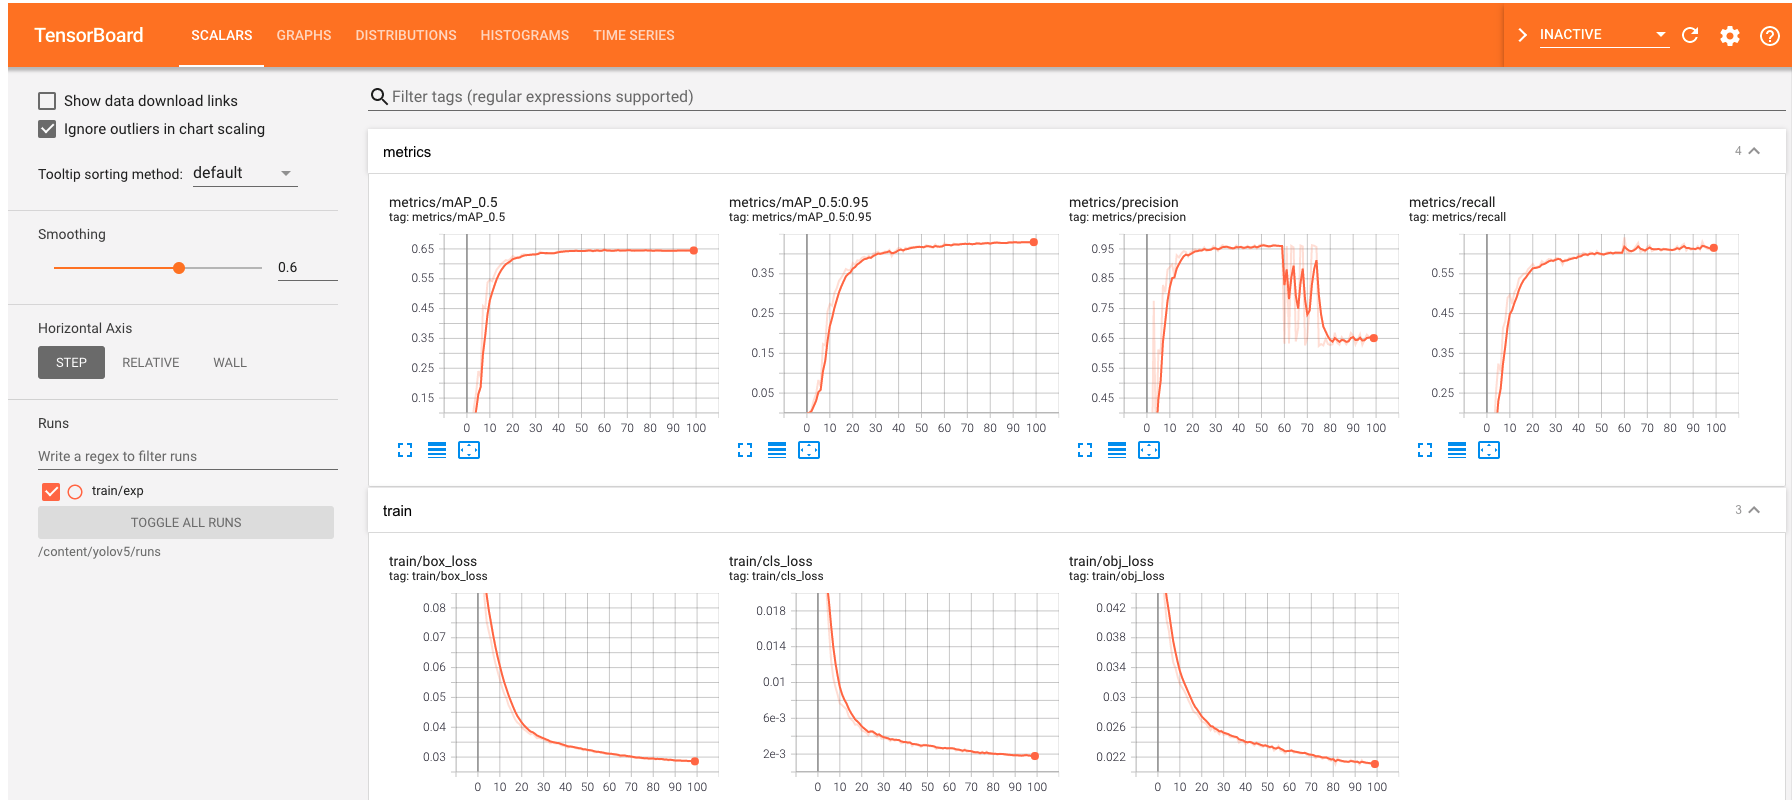
学習の結果、モデルの重みが runs/train/exp/weights/best.pt に保存されます。
次にtensorboard で学習結果を確認します。
# Start tensorboard
# Launch after you have started training to all the graphs needed for inspection
# logs save in the folder "runs"
%load_ext tensorboard
%tensorboard --logdir /content/yolov5/runs
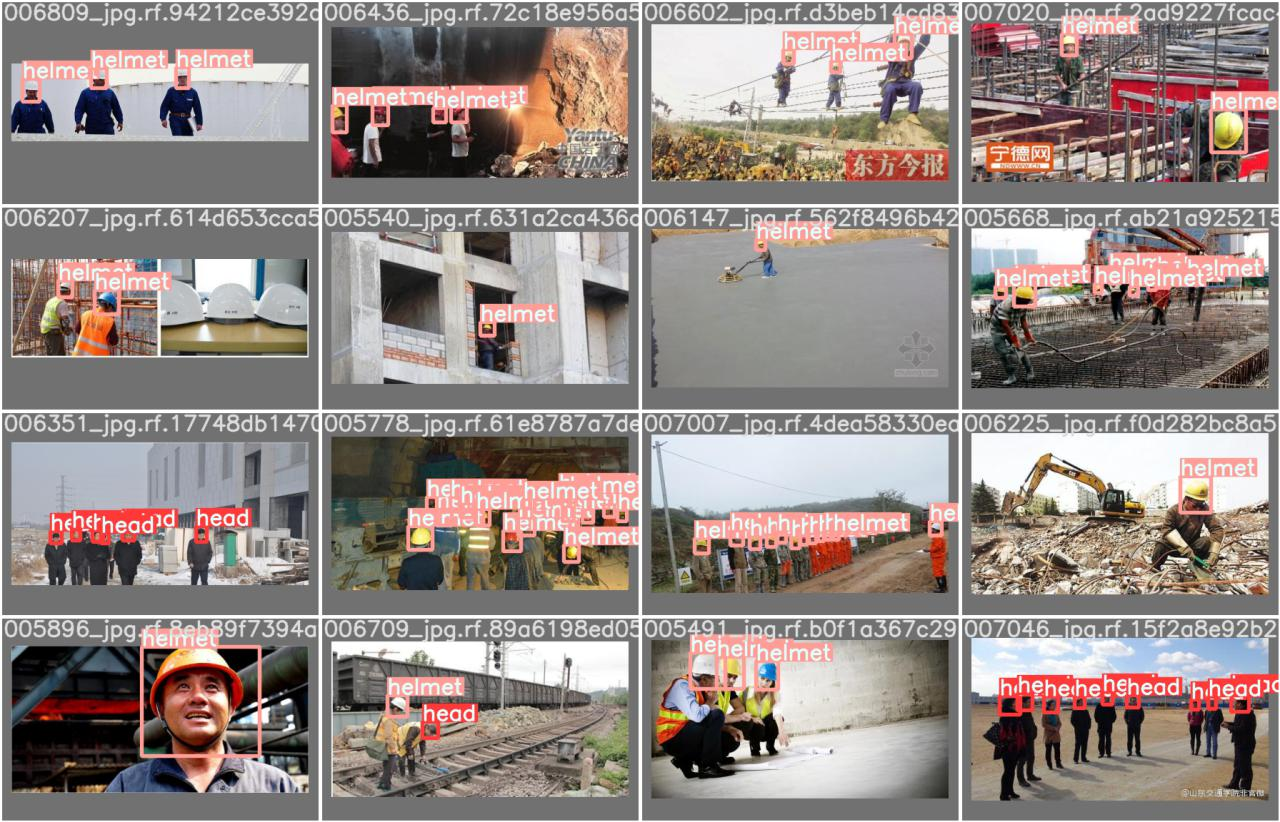
次に学習したデータはどのような画像を学習したのかを確認します。
# first, display our ground truth data
# The ground truth [Train data] is available in jpg file at location /content/yolov5/runs/train/exp2/test_batch0_labels.jpg
print("GROUND TRUTH TRAINING DATA:")
Image(filename='/content/yolov5/runs/train/exp/test_batch0_labels.jpg', width=900)
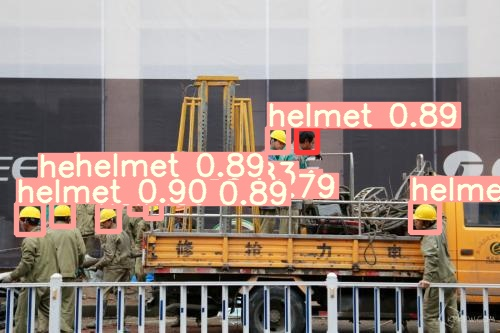
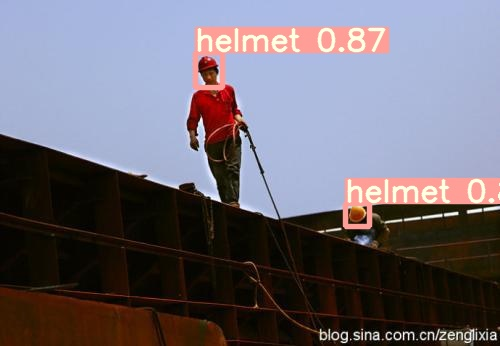
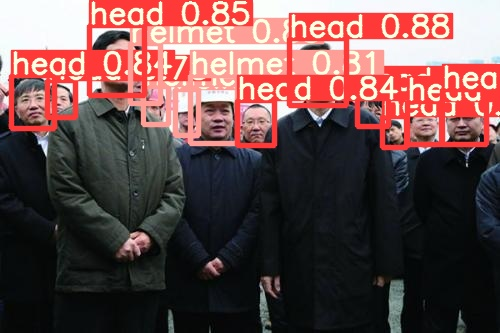
最後に実際テストデータに対してどのように予測できているのかを確認します。
# display inference on ALL test images
# this looks much better with longer training above

import glob
from IPython.display import Image, display

for imageName in glob.glob('/content/yolov5/runs/detect/exp2/*.jpg'): #assuming JPG
    display(Image(filename=imageName))
    print("\n")
結構精度良くできているのではないでしょうか?
これは実務でも活用できそうですね。
学習したモデルの重みを保存します。
%cp /content/yolov5/runs/train/exp/weights/best.pt /content/drive/My\ Drive/YOLOv5
さいごに
最後まで読んで頂き、ありがとうございました。
YOLOv5 をここまで簡単に使えるとは思いませんでした。実務で活用できそうです。
訂正要望がありましたら、ご連絡頂けますと幸いです。
