概要
MacでVSCodeを使ってPlantUMLを書けるようにする。
環境
- MacBook Pro (M1): macOS 13.3.1 Build 22E261
- Visual Studio Code 1.77.3
- openjdk 20 2023-03-21
手順
Graphvizのインストール
$ brew install graphviz
PlantUML VSCode拡張機能のインストール
VSCodeの拡張機能タブから、Rich PlantUML support for Visual Studio Codeをインストールする。
動作確認
サンプルファイル作成
VSCodeで下記内容のテキストファイルを作成する。
拡張子は.wsd、.pu、.puml、.plantuml、.iumlが使える。
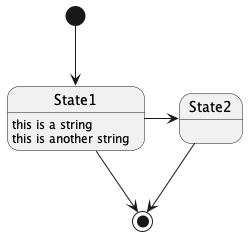
@startuml
[*] --> State1
State1 --> [*]
State1 : this is a string
State1 : this is another string
State1 -> State2
State2 --> [*]
@enduml
UML画像のプレビュー
VSCodeのコマンドパレットから、PlantUML: Preview current diagramを実行すると、UML画像が表示される。
UML画像の保存
VSCodeのコマンドパレットから、PlantUML: Export current diagramを実行すると、UML画像がファイルに保存される。
補足
VSCodeの拡張機能の設定に以下の機能がある。
- 拡張機能に組み込まれているplantuml.jarの代わりに、別のplantuml.jarを使用できる。例えば、別途入手した
plantuml-1.2023.6.jarを使う場合、当該ファイルのパスをLocal Render Settings: plantuml.jarに設定する。 -
Local Render Settings: plantuml.javaにjavaの所在を指定できる。例えば、/opt/homebrew/opt/openjdk/libexec/openjdk.jdk/Contents/Home/bin/javaのようにjdkのインストールディレクトリを設定する。
参考情報