PHP(Laravel)を使って、Wordファイルを出力する記事です。
わざわざLaravelとPHPWordを使ってはがき宛名面の作成は実用性低いですが、
この手順は報告書の自動作成などにも応用できます。
ちなみに、年賀状の宛名面がテーマなのはただの思いつきで決めました![]()
動作環境
・Windows 10
・XAMPP
・Word 2016
開発環境
・Laravel 6
1.LaravelとPHPWordのインストール
Composerを利用して、Laravelのインストールを行います。
プロジェクトのフォルダに移動して、下記コマンドを実行します。
$ composer create-project "laravel/laravel=6.0.*" project
PHPWordをインストールします。
$ composer require phpoffice/phpword
2.マイグレーションファイルを作成します。
$ php artisan make:migration create_addresses_table --create=addresses
2020_11_09_134553_create_addresses_table.php
<?php

use Illuminate\Database\Migrations\Migration;
use Illuminate\Database\Schema\Blueprint;
use Illuminate\Support\Facades\Schema;

class CreateAddressesTable extends Migration
{
    /**
     * Run the migrations.
     *
     * @return void
     */
    public function up()
    {
        Schema::create('addresses', function (Blueprint $table) {
            $table->increments('id');
            $table->timestamps();
            $table->string('zipcode', 7);
            $table->string('name', 50);
            $table->string('prefecture', 30);
            $table->string('city', 30);
            $table->string('town', 100);
        });
    }

    /**
     * Reverse the migrations.
     *
     * @return void
     */
    public function down()
    {
        Schema::dropIfExists('addresses');
    }
}
3.モデルを作成します。
$ php artisan make:model Address
4.コントローラーを作成します。
$ php artisan make:controller TestController
5.シーダーを作成します。
$ php artisan make:seeder AddressTableSeeder
AddressTableSeeder.php
<?php

use Illuminate\Database\Seeder;

class AddressTableSeeder extends Seeder
{
    /**
     * Run the database seeds.
     *
     * @return void
     */
    public function run()
    {
        DB::table('addresses')->insert([
            [
                'zipcode' => '1430002',     //郵便番号
                'prefecture' => '東京都',   //都道府県
                'city' => '大田区',         //市区町村
                'town' => '城南島六ー二ー一 カーム城南島 一〇〇六号室',      //町域
                'name' => '高野彦好',       //名前
            ],
            [
                'zipcode' => '1730003',     //郵便番号
                'prefecture' => '東京都',   //都道府県
                'city' => '板橋区',         //市区町村
                'town' => '加賀二ー二ー九',      //町域
                'name' => '米田政広',       //名前
            ],
            [
                'zipcode' => '1940204',     //郵便番号
                'prefecture' => '東京都',   //都道府県
                'city' => '町田市',         //市区町村
                'town' => '小山田桜台一ー一三ー八 アスコットヴィラ小山田桜台 二一二',    //町域
                'name' => '溝口為一郎',     //名前
            ],
            [
                'zipcode' => '1300025',     //郵便番号
                'prefecture' => '東京都',   //都道府県
                'city' => '墨田区',         //市区町村
                'town' => '千歳二ー七ー七五',       //町域
                'name' => '小倉真紀子',     //名前
            ],
            [
                'zipcode' => '2060041',     //郵便番号
                'prefecture' => '東京都',   //都道府県
                'city' => '多摩市',         //市区町村
                'town' => '愛宕五ー二ー九',      //町域
                'name' => '吉井孝市',       //名前
            ]
        ]);
    }
}
6.マイグレーションとシードを同時に実行します。
$ php artisan migrate:fresh --seed
7.Viewのレイアウトファイルを作る
base.blade.php
<!DOCTYPE html>
<html lang="ja">
<head>
  <meta charset="utf-8">
  <meta name="viewport" content="width=device-width, initial-scale=1, shrink-to-fit=no">
  <meta http-equiv="x-ua-compatible" content="ie=edge">
  <title>アプリケーション名</title>
  <link rel="stylesheet" href="https://stackpath.bootstrapcdn.com/bootstrap/4.3.1/css/bootstrap.min.css" integrity="sha384-ggOyR0iXCbMQv3Xipma34MD+dH/1fQ784/j6cY/iJTQUOhcWr7x9JvoRxT2MZw1T" crossorigin="anonymous">
</head>

<body>
  <nav class="navbar navbar-expand-lg navbar-light bg-light">
    <a class="navbar-brand" href="#">テスト</a>
  </nav>

@yield('content')

    <script src="https://code.jquery.com/jquery-3.3.1.slim.min.js" integrity="sha384-q8i/X+965DzO0rT7abK41JStQIAqVgRVzpbzo5smXKp4YfRvH+8abtTE1Pi6jizo" crossorigin="anonymous"></script>
    <script src="https://cdnjs.cloudflare.com/ajax/libs/popper.js/1.14.7/umd/popper.min.js" integrity="sha384-UO2eT0CpHqdSJQ6hJty5KVphtPhzWj9WO1clHTMGa3JDZwrnQq4sF86dIHNDz0W1" crossorigin="anonymous"></script>
    <script src="https://stackpath.bootstrapcdn.com/bootstrap/4.3.1/js/bootstrap.min.js" integrity="sha384-JjSmVgyd0p3pXB1rRibZUAYoIIy6OrQ6VrjIEaFf/nJGzIxFDsf4x0xIM+B07jRM" crossorigin="anonymous"></script>
</body>

</html>
8.ルーティングの設定をする
web.php
Route::group(['prefix' => 'test'], function() {
    Route::get('index','TestController@index');
    Route::post('word_inport','TestController@word_inport');
    Route::get('word_inport','TestController@word_inport');
});
9.コントローラーの設定をする。
今回は、phpwordのテンプレートプロセッサを利用してdocxファイル出力をする。TestController.php
<?php

namespace App\Http\Controllers;

use App\Address;

use PhpOffice\PhpWord\PhpWord;
use PhpOffice\PhpWord\IOFactory;
use PhpOffice\PhpWord\TemplateProcessor;

use Illuminate\Http\Request;

class TestController extends Controller
{
    //
    public function index(){
        $addresses = Address::all();

        return view('index',['addresses' => $addresses]);
    }

    public function word_inport(Request $request){
        $addresses = Address::find($request->id);

        $templateprocessor = new TemplateProcessor('./template/template.docx');
        $templateprocessor->setValue('zipcode',$addresses->zipcode);
        $templateprocessor->setValue('prefecture',$addresses->prefecture);
        $templateprocessor->setValue('city',$addresses->city);
        $templateprocessor->setValue('town',$addresses->town);
        $templateprocessor->setValue('name',$addresses->name);

        $templateprocessor->saveAs($addresses->name.'様宛名.docx');
        return response()->download($addresses->name.'様宛名.docx')->deleteFileAfterSend(true);
    }
}
10.一覧画面を作る
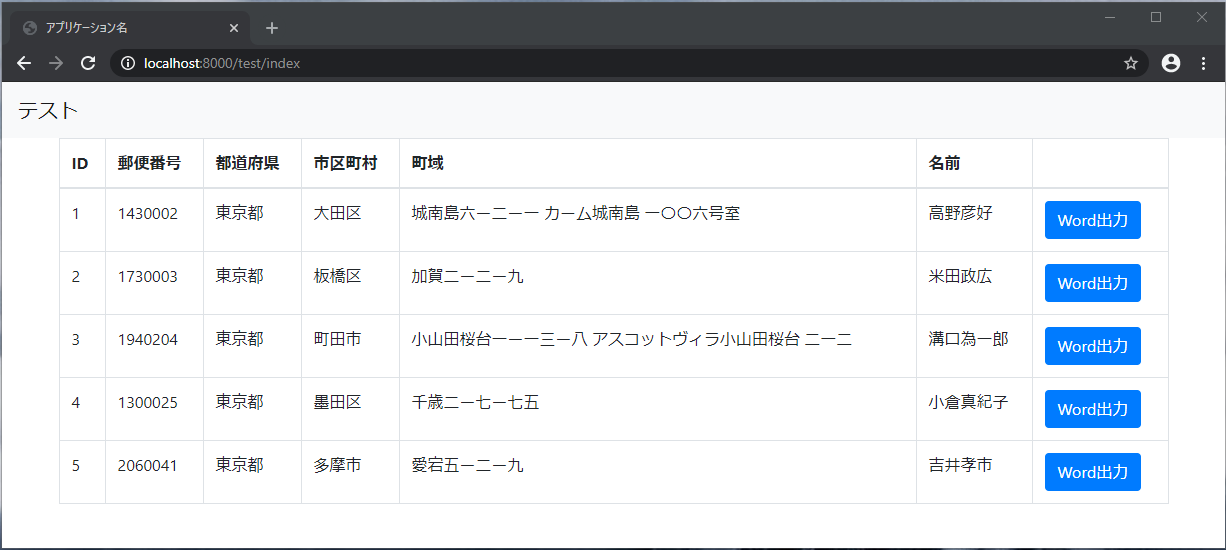
index.blade.php
@extends('base')
@section('title', 'テスト')

@section('content')
<div class="container">
    <div class="table_position">
        <table class="table table-bordered">
            <thead>
                <tr>
                    <th>ID</th>
                    <th>郵便番号</th>
                    <th>都道府県</th>
                    <th>市区町村</th>
                    <th>町域</th>
                    <th>名前</th>
                    <th></th>
                </tr>
            </thead>
            <tbody class="table">
            @foreach($addresses as $address)
                <tr>
                    <td>{{ $address->id }}</td>
                    <input type="hidden" value="{{ $address->id }}" name="id">
                    <td>{{ $address->zipcode }}</td>
                    <input type="hidden" value="{{ $address->zipcode }}" name="zipcode">
                    <td>{{ $address->prefecture }}</td>
                    <input type="hidden" value="{{ $address->prefecture }}" name="prefecture">
                    <td>{{ $address->city }}</td>
                    <input type="hidden" value="{{ $address->city }}" name="city">
                    <td>{{ $address->town }}</td>
                    <input type="hidden" value="{{ $address->town }}" name="town">
                    <td>{{ $address->name }}</td>
                    <input type="hidden" value="{{ $address->name }}" name="name">
                    <th><a href="{{ action('TestController@word_inport', ['id' => $address->id]) }}" class="btn btn-primary">Word出力</a></th>
                </tr>
            @endforeach
            </tbody>
        </table>
    </div>
</div>
@endsection
11.テンプレートファイルを置く
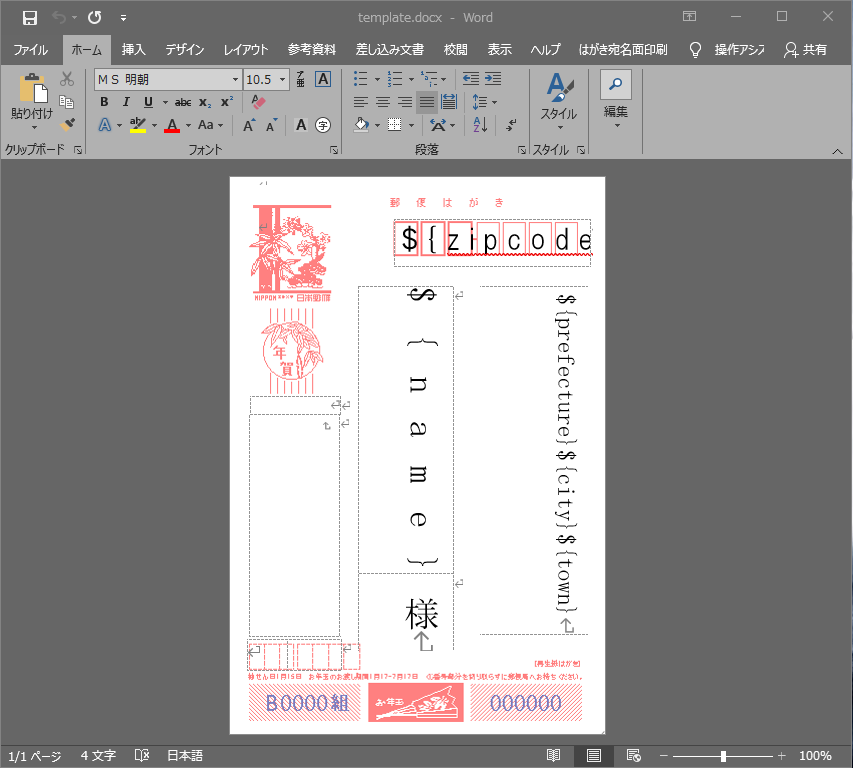
Wordで、宛名面のテンプレートファイルを使って図のように編集する。 注意:宛名印刷テンプレートが利用できるのは、Windows版のWordのみです。 Mac版の場合は、ご自身でテンプレートファイルを探してください。 編集したものは、project\public\templateに置く
(ここでは、ファイル名はtemplate.docxになっている。)
動作確認をしてみる。
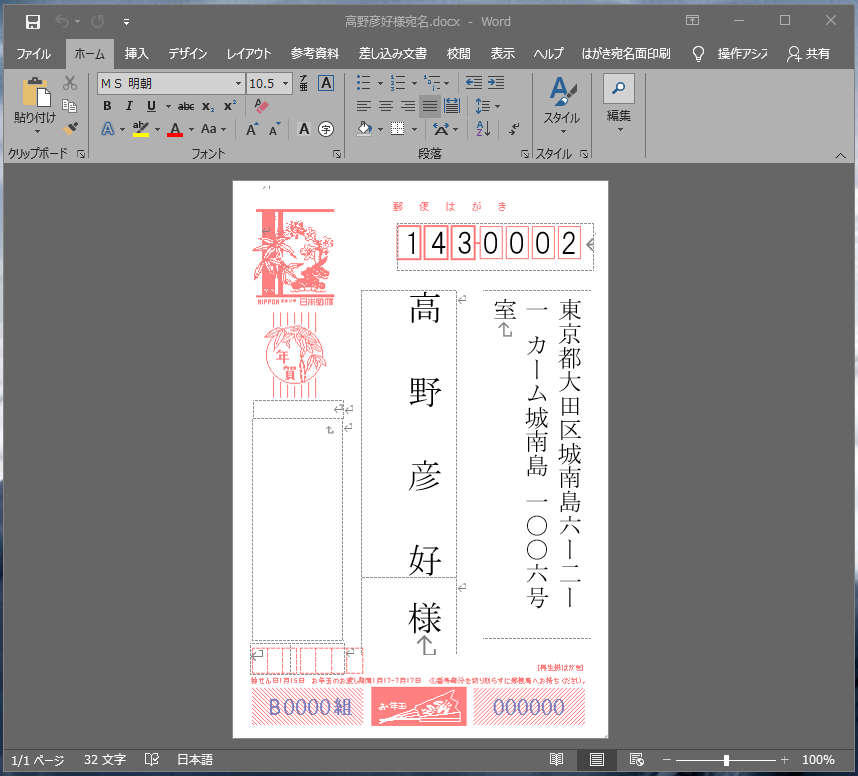
http://localhost:8000/test/indexを開き、Word出力のボタンを押す。ダウンロードされたdocxファイルを開く。
以上で、LaravelとPHPWordを用いてのテンプレート出力が完了です。

