はじめに
パブリック プレビュー段階の機能ですが、Azure AI サービスの Speech Studioにて、テキスト読み上げアバターの作成が実現できるようになりました。
この記事は2024年5月12日の内容です。
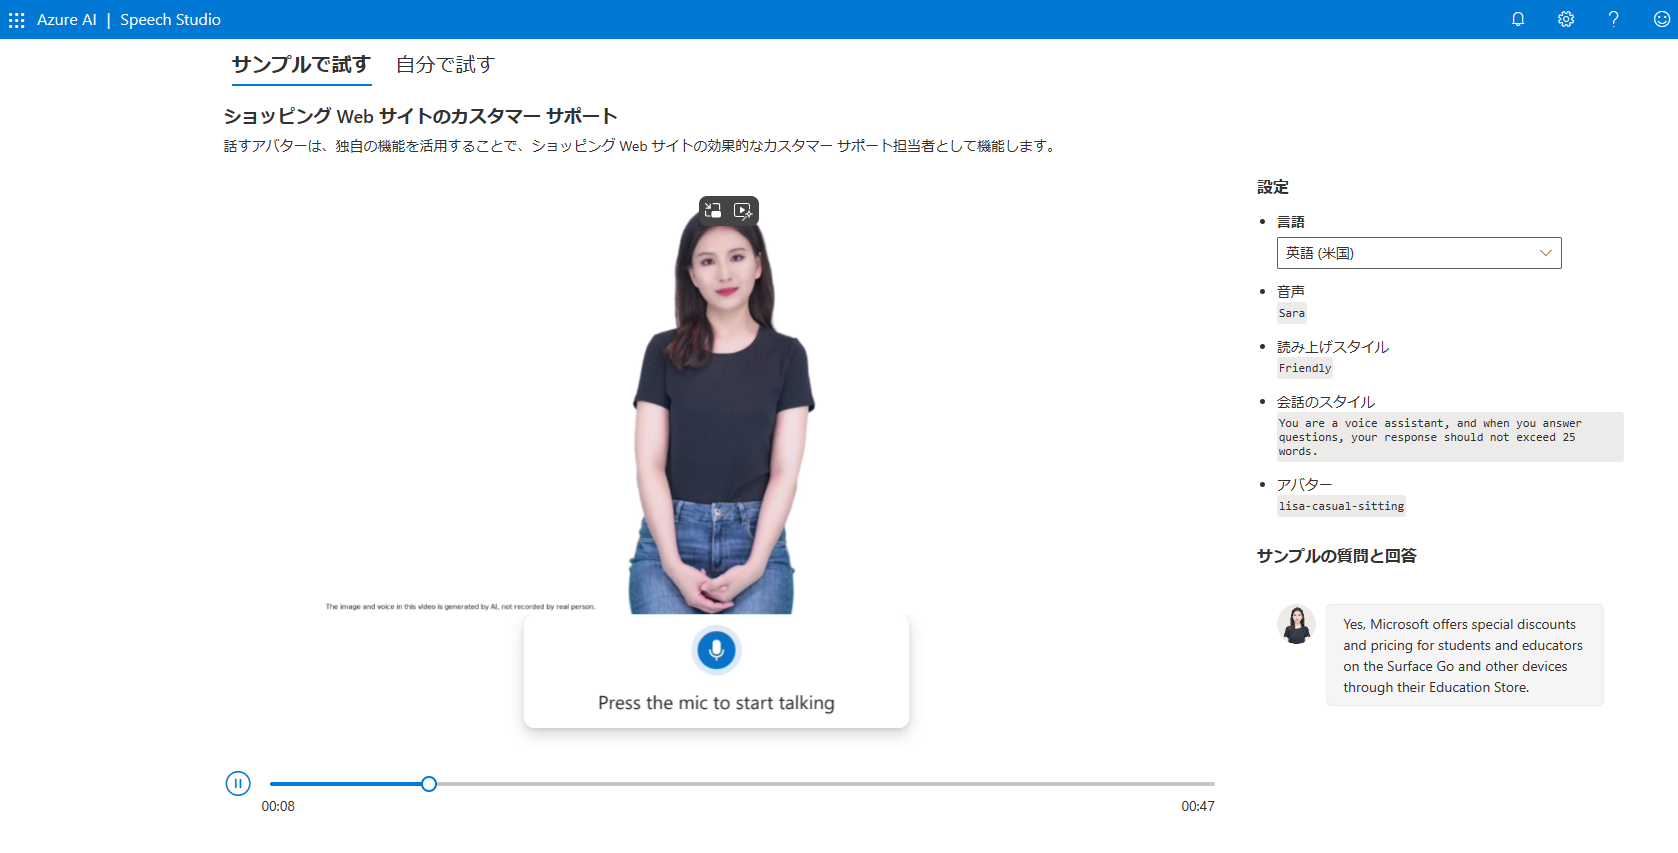
Speech Studioで早速使ってみると、本当に生きているようなアバターと会話を試すことができます!
非常に面白いサービスで心が踊ります。
テキスト読み上げアバターは、パブリック プレビュー段階です。
このプレビュー版はサービス レベル アグリーメントなしで提供されています。
あくまで趣味で使うという認識で使ってみてください。
今回はAzure AIでリソースをデプロイし、Power Appsを画面に、Power Automateから、テキスト読み上げアバター動画をバッチ合成、対話を実現するアプリを作成してみました!
作成したもの
このようなPower Appsを作成しています。

■ アプリケーションの流れ
-
Power Appsのテキスト入力からテキストを入力 - ボタンコントロールからテキストを
Power Automateに渡す - Azure OpenAIのgpt3.5に結果を渡し、アバターが読み上げるテキストを作成する
- テキスト読み上げアバターの動画をバッチ合成する
- 結果をPower Appsに返し、ビデオコントロールで投影する
1. Azureでリソースの作成
作成するリソースは下記の通りです。
-
Azure OpenAI
- リージョン:
Japan East - モデル名:
gpt-35-turbo - モデル バージョン:
0613
- リージョン:
-
音声サービス
- リージョン:
West US 2
- リージョン:
テキスト読み上げアバター機能を使用できるリージョンは限られています。
- 米国西部 2 West US 2
- 西ヨーロッパ West Europe
- 東南アジア Southeast Asia
2. Power Automate
Power AutomateはHTTP要求を、作成したリソースに渡し、結果を受け取り、Power Appsに返します。

-
PowerApps (V2) トリガーで下記の値を定義-
テキスト読み上げアバターのために、Job ID(SynthesisId) -
Open AIのために、Prompt
-
-
作成アクションで下記を設定-
Azure OpenAIの
URIとエンドポイント、システム プロンプト -
Speech Serviceの
URIとエンドポイント
-
Azure OpenAIの
-
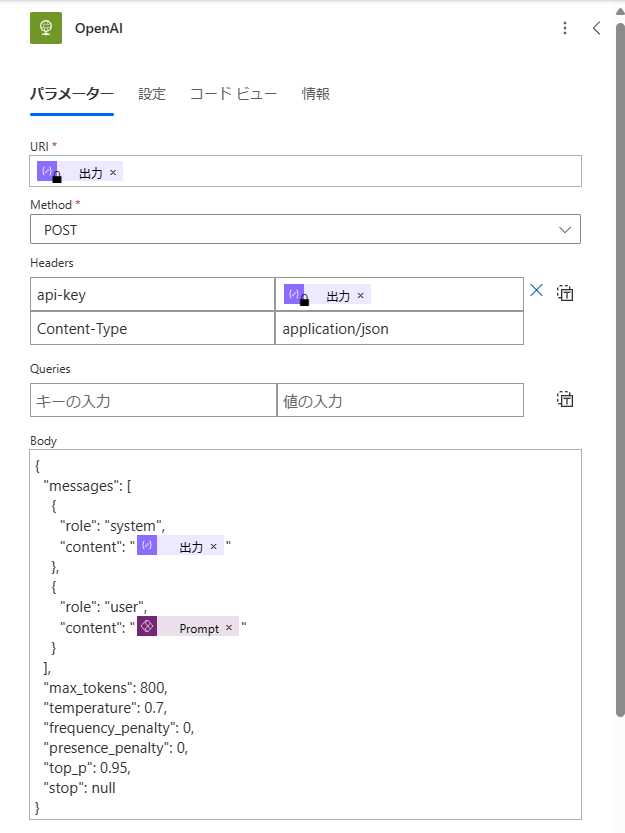
HTTPでAzure OpenAIに要求を送信し、テキストを生成 - (3)で作成したテキストを含めた音声合成マークアップ言語 (SSML)を定義
- テキスト読み上げアバターのバッチ合成要求を作成
- 変数でステータス(進捗状況 確認用)を宣言
- 繰り返し処理
Do until:statusがSucceededになるまで - (7)で取得した値から
output.resultを抽出し、HTTP要求を送信し、バッチ合成の結果ファイルを取得する -
Power Appsに、Azure OpenAIによる生成テキストと、バッチ合成の結果ファイルの
$contentを返す
3. HTTPでAzure OpenAIに要求を送信し、テキストを生成
チャットの履歴を無視した方法です。
https://{AZURE_OPENAI_ENDPOINT}/openai/deployments/{YOUR-DEPLOYMENT_NAME_HERE}/chat/completions?api-version=2024-02-15-preview
Method : POST
Header :
| キー | 値 |
|---|---|
| api-key | AZURE OPENAIのAPIキー |
| Content-Type | application/json |
{
  "api-key": "@{outputs('OpenAIAPIKey')}",
  "Content-Type": "application/json"
}
戻り値は下記のようになります。
{
  "choices": [
    {
      "content_filter_results": {
        "hate": {
          "filtered": false,
          "severity": "safe"
        },
        "self_harm": {
          "filtered": false,
          "severity": "safe"
        },
        "sexual": {
          "filtered": false,
          "severity": "safe"
        },
        "violence": {
          "filtered": false,
          "severity": "safe"
        }
      },
      "finish_reason": "stop",
      "index": 0,
      "logprobs": null,
      "message": {
        "content": "OPEN AIサービスで生成されたテキスト",
        "role": "assistant"
      }
    }
  ],
  "created": 11111111,
  "id": "chatcmpl-hogehoge",
  "model": "gpt-35-turbo",
  "object": "chat.completion",
  "prompt_filter_results": [
    {
      "prompt_index": 0,
      "content_filter_results": {
        "hate": {
          "filtered": false,
          "severity": "safe"
        },
        "self_harm": {
          "filtered": false,
          "severity": "safe"
        },
        "sexual": {
          "filtered": false,
          "severity": "safe"
        },
        "violence": {
          "filtered": false,
          "severity": "safe"
        }
      }
    }
  ],
  "system_fingerprint": null,
  "usage": {
    "completion_tokens": 49,
    "prompt_tokens": 60,
    "total_tokens": 109
  }
}
生成されたテキストを直接取得するには、下記を指定します。
body('OpenAIのアクション名')?['choices'][0]?['message']?['content']
4. (3)で作成したテキストを含めた音声合成マークアップ言語 (SSML)を定義
SSMLは、Speech serviceで使用する言語です。
読み上げる言語とモデルを選択します。
日本語で、モデルja-JP-MayuNeuralを使用する場合、下記の例になります。
<speak version='1.0' xml:lang='ja-JP'>
    <voice name='ja-JP-MayuNeural'>
        読み上げるテキスト
    </voice>
</speak>
今回は、作成アクションで、SSMLの定義を行いました。
モデルによる声質の違いは、Speech Studioで試すことをお勧めします。
5. テキスト読み上げアバターのバッチ合成要求を作成
まず新しいバッチ合成ジョブを作成します。
動画を作成するために、10秒ほど時間がかかる認識です。
https://{リージョン}.api.cognitive.microsoft.com/avatar/batchsyntheses/{Job ID(SynthesisId)}?api-version=2024-04-15-preview
Method : PUT
Header :
| キー | 値 |
|---|---|
| Ocp-Apim-Subscription-Key | 音声サービスのAPIキー |
| Content-Type | application/json |
{
  "Ocp-Apim-Subscription-Key": "@{outputs('AvatarAPIKEY')}",
  "Content-Type": "application/json"
}
{
  "inputKind": "SSML",
  "inputs": [
    {
      "content": "@{outputs('SSML')}"
    }
  ],
  "avatarConfig": {
    "talkingAvatarCharacter": "lisa",
    "talkingAvatarStyle": "graceful-sitting"
  }
}
Bodyの中でアバターのモデルや振る舞いを定義しています。
SSMLを含めて、Bodyに書くことが手間であったことから、SSMLは作成アクションで定義しています。
ジョブIDが、すでに存在する場合、このリクエストは通りません。

{
    "type": "object",
    "properties": {
        "id": {
            "type": "string"
        },
        "Status": {
            "type": "string"
        },
        "createdDateTime": {
            "type": "string"
        },
        "lastActionDateTime": {
            "type": "string"
        },
        "inputKind": {
            "type": "string"
        },
        "customVoices": {
            "type": "object",
            "properties": {}
        },
        "properties": {
            "type": "object",
            "properties": {
                "timeToLiveInHours": {
                    "type": "integer"
                }
            }
        },
        "avatarConfig": {
            "type": "object",
            "properties": {
                "talkingAvatarCharacter": {
                    "type": "string"
                },
                "talkingAvatarStyle": {
                    "type": "string"
                },
                "videoFormat": {
                    "type": "string"
                },
                "videoCodec": {
                    "type": "string"
                },
                "subtitleType": {
                    "type": "string"
                },
                "bitrateKbps": {
                    "type": "integer"
                },
                "customized": {
                    "type": "boolean"
                }
            }
        }
    }
}
7. 繰り返し処理 Do until:statusがSucceededになるまでテキスト読み上げアバターのバッチ合成を取得
バッチ合成には、時間を要するため、HTTP要求で進捗状況を確認し、完了()まで待機します。
https://{リージョン}.api.cognitive.microsoft.com/avatar/batchsyntheses/{Job ID(SynthesisId)}?api-version=2024-04-15-preview
Method : GET
Header :
| キー | 値 |
|---|---|
| Ocp-Apim-Subscription-Key | 音声サービスのAPIキー |
{
  "Ocp-Apim-Subscription-Key": "@{outputs('AvatarAPIKEY')}",
}

ステータスのチェックは、変数で行っています。
具体的には、GET要求の戻り値のstatusがSucceededか、equals関数で確認します。
equals(body('GET_Avatar')?['status'],'Succeeded')
{
    "type": "object",
    "properties": {
        "id": {
            "type": "string"
        },
        "Status": {
            "type": "string"
        },
        "createdDateTime": {
            "type": "string"
        },
        "lastActionDateTime": {
            "type": "string"
        },
        "inputKind": {
            "type": "string"
        },
        "customVoices": {
            "type": "object",
            "properties": {}
        },
        "properties": {
            "type": "object",
            "properties": {
                "timeToLiveInHours": {
                    "type": "integer"
                },
                "sizeInBytes": {
                    "type": "integer"
                },
                "durationInMilliseconds": {
                    "type": "integer"
                },
                "succeededCount": {
                    "type": "integer"
                },
                "failedCount": {
                    "type": "integer"
                },
                "billingDetails": {
                    "type": "object",
                    "properties": {
                        "neuralCharacters": {
                            "type": "integer"
                        },
                        "talkingAvatarDurationSeconds": {
                            "type": "integer"
                        }
                    }
                }
            }
        },
        "avatarConfig": {
            "type": "object",
            "properties": {
                "talkingAvatarCharacter": {
                    "type": "string"
                },
                "talkingAvatarStyle": {
                    "type": "string"
                },
                "videoFormat": {
                    "type": "string"
                },
                "videoCodec": {
                    "type": "string"
                },
                "subtitleType": {
                    "type": "string"
                },
                "bitrateKbps": {
                    "type": "integer"
                },
                "customized": {
                    "type": "boolean"
                }
            }
        },
        "outputs": {
            "type": "object",
            "properties": {
                "result": {
                    "type": "string"
                },
                "summary": {
                    "type": "string"
                }
            }
        }
    }
}
8. (7)で取得した値からoutput.resultを抽出し、HTTP要求を送信し、バッチ合成の結果ファイルを取得する
GET要求の戻り値のstatusがSucceededになった場合、outputのresult属性から、結果ファイルのURLを取得できます。
outputのresult属性の値に、GET要求を送信することで、結果ファイルのコンテンツを取得することができます。
@{body('Get_Avatar_Result')?['outputs']?['result']}
Method : GET
Header :
| キー | 値 |
|---|---|
| Ocp-Apim-Subscription-Key | 音声サービスのAPIキー |
{
  "Ocp-Apim-Subscription-Key": "@{outputs('AvatarAPIKEY')}",
}

ここまでで、Power Automateの準備は完了です!
3. Power Apps
ほとんどテンプレートです。
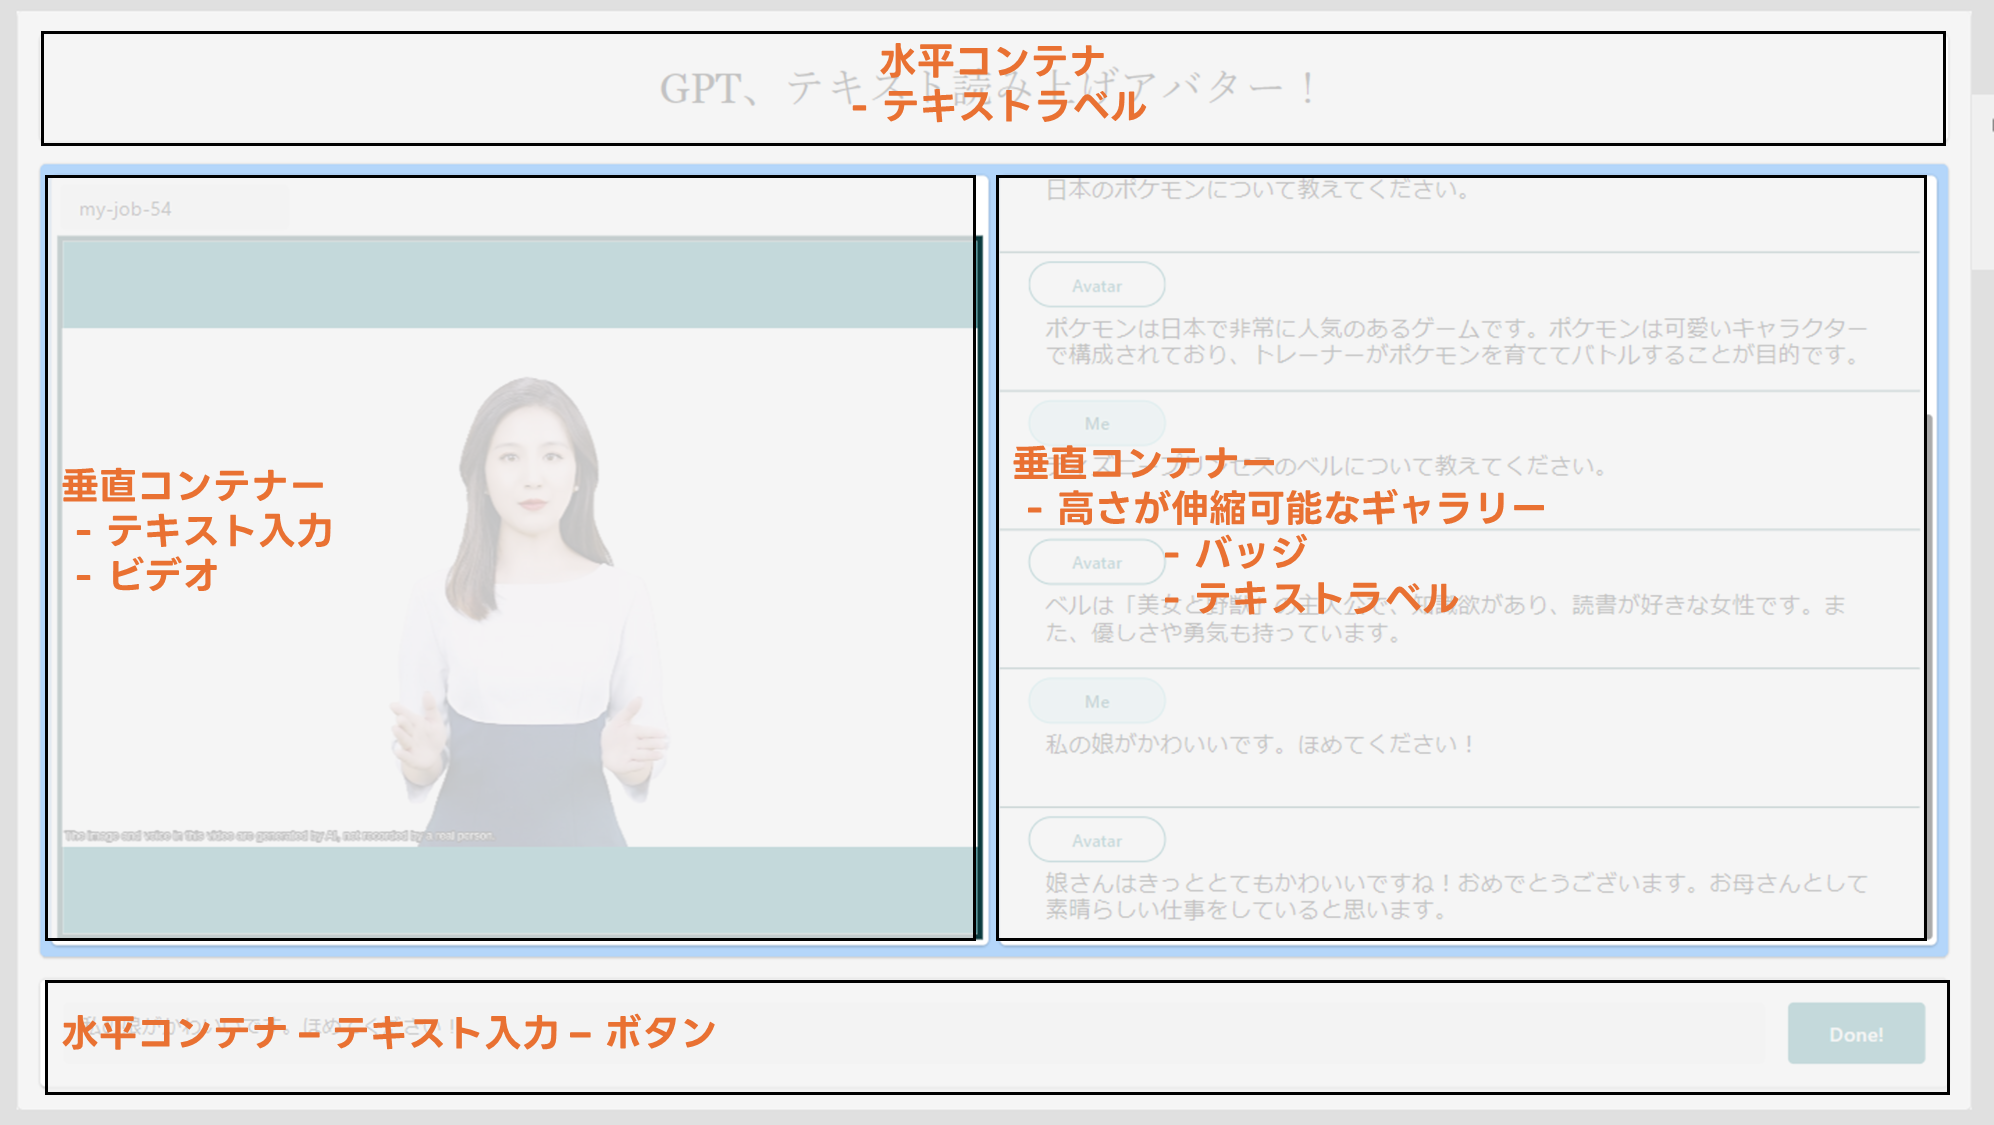
ギャラリーコントロールにチャットの履歴、ボタンコントロールで機能を集約しています。
ボタンコントロールのOnSelectに下記の式を設定します。
/*
* Power AutomateにJob IDとプロンプトを送信
*/
With(
    {
        Whisper:
            TextToSpeechAvatar.Run(
                IdInput.Value,
                PromptInput.Value
            )
    },
    UpdateContext(
        {
            Result:Whisper.result,
            Answer:Whisper.content,
            IDNumber: IDNumber + 1
        }
    )
);
/*
* colChatというコレクションに、文字列を設定
*/
Collect(colChat,Table(
    {Speaker: "Me", content: PromptInput.Value, role: "user"},
    {Speaker: "Avatar", content: Answer, role: "assistant"}
    )
);
/*
* colChatというコレクションに、文字列を設定
*/
Collect(colJob,{id: IdInput.Value});
/*
* Prompt入力用のテキスト入力コントロールをリセット
*/
Reset(PromptInput);
ビデオコントロールのMedia属性が、バッチ合成された動画を再生する部品です。
Power Automateからの戻り値はbase64で取得されるため、Media属性を下記の通り設定します。
"data:audio/wav;base64," & Result
これで機能はそろいました!
実践
実際に使ってみると、下記のように動きます!
近未来的で、超興奮しました!
Whisperを省くと、安定する!
— 出戻りガツオ🐟 Microsoft MVP (@DemodoriGatsuo) May 12, 2024
Open AI GPT 3.5で、Power Apps & Power Automate、Azure AIによる対話アプリ!テキスト読み上げアバターがしゃべる!!娘をほめてもらいました!#PowerApps #PowerAutomate #Azure #OpenAIhttps://t.co/2Nq8ibOThR pic.twitter.com/ASon06ROON
Whisperを使って、マイクを使った対話も作成中ですが・・・、課題ありです。
プレビュー機能のライブアバターチャットを使って、Power Apps & Power Automate、Azure AIによる対話アプリが、それっぽくはなった!!
— 出戻りガツオ🐟 Microsoft MVP (@DemodoriGatsuo) May 11, 2024
Whisperでコケる・・・
ノンエンジニアでもこれまで作れる時代!楽しすぎる!https://t.co/DGXeOFA4Ul#PowerApps #PowerAutomate #Azure #OpenAI pic.twitter.com/sAJyc3xjNV
非常に楽しい機能です!
是非試してみてください!!!