はじめに
このブログはSharePoint Listsとドキュメント ライブラリを組み合わせたビューをPower Appsで作るの続き。
途中で力尽きました・・・。
このテーマに伴い、
- SharePoint Listsのカスタマイズ
- Power Appsの関数による調整
上記が残っています。
これについて解説していきましょう。
SharePoint - Lists ・ ドキュメントライブラリをカスタマイズする
さて、Power Appsによるビューを作成しましたが、これどうやって起動するの?
という課題が出てきてしまいます。
ここで実行することが、SharePoint Listsの列・ビューのカスタマイズです。
参考とするリンクはこちら
Microsoft 公式 learnとMicrosoft 365 プラットフォーム コミュニティ(PnP)のGitHubです!
Microsoft 365 プラットフォーム コミュニティのSharePointカスタマイズの情報は見ているだけで、SharePointでこんなことできるの!! と衝撃を受けます。
ブックマークすることをお勧めします。
また今回のSharePointのカスタマイズも、こちらのリポジトリのコードを活用します。
リポジトリの主が、Microsoft MVP てっちゃん (Tetsuya Kawahara)です。
本当に凄い!尊敬いたします!!
SharePointのビューをカスタマイズする
本編とはずれた自己満足の領域です
不要であれば、やらなくていい内容です。
ビューをJSONで見栄えを整える、という方法になります。
Microsoft 公式learnを参考に、
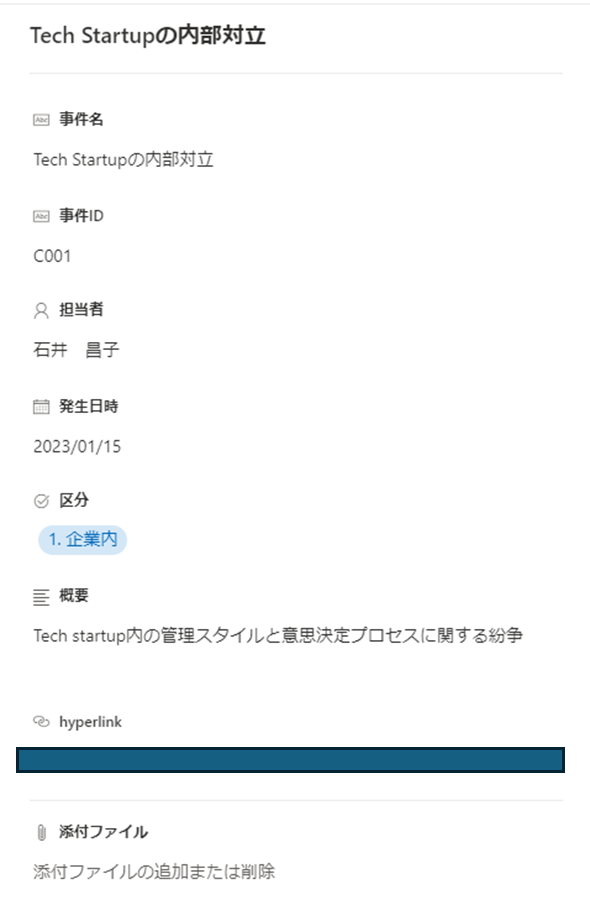
Before
After
{
    "elmType": "div",
    "attributes": {
        "class": "ms-borderColor-neutralTertiary"
    },
    "style": {
        "width": "99%",
        "border-top-width": "0px",
        "border-bottom-width": "1px",
        "border-left-width": "0px",
        "border-right-width": "0px",
        "border-style": "solid",
        "margin-bottom": "16px"
    },
    "children": [
        {
            "elmType": "div",
            "style": {
                "display": "flex",
                "box-sizing": "border-box",
                "align-items": "center"
            },
            "children": [
                {
                    "elmType": "div",
                    "attributes": {
                        "iconName": "Warning12",
                        "class": "ms-fontSize-42 ms-fontWeight-regular ms-fontColor-themePrimary",
                        "title": "Details"
                    },
                    "style": {
                        "flex": "none",
                        "padding": "0px",
                        "padding-left": "0px",
                        "height": "36px"
                    }
                }
            ]
        },
        {
            "elmType": "div",
            "attributes": {
                "class": "ms-fontColor-neutralSecondary ms-fontWeight-bold ms-fontSize-24"
            },
            "style": {
                "box-sizing": "border-box",
                "width": "100%",
                "text-align": "left",
                "padding": "21px 12px",
                "overflow": "hidden"
            },
            "children": [
                {
                    "elmType": "div",
                    "txtContent": "='Incident details of ' + [$Title]"
                }
            ]
        }
    ]
}
{
    "sections": [
        {
            "displayname": "Infomation",
            "fields": [
                "事件ID",
                "Title"
            ]
        },
        {
            "displayname": "Detail",
            "fields": [
                "担当者",
                "発生日時",
                "区分"
            ]
        },
        {
            "displayname": "",
            "fields": [
                "概要"
            ]
        },
        {
            "displayname": "",
            "fields": [
                "ハイパーリンク"
            ]
        }
    ]
}
映える!!
JSONのメリットとして、起動がメッチャ速い!
添付ファイルは「リストの設定」で非表示にしています
Fluent UI Iconのリンクは下記を参考に!
SharePointの列をカスタマイズする
1. サムネイルの作成
本編とはずれた自己満足の(以下略
列を追加 > 1行テキストでタイトルとThumbnailと入力するだけで、サムネイルがでます。
広く知られている技のようですね。
この上をいく技はコチラのリポジトリを参照!
So Cool!!
2. Power Appsの起動ボタンを作る
やっとかよ!
コチラを参考にして、列の書式をカスタマイズします。
ListsではId列の書式カスタマイズができないため、ボタン用の列を設けます。
列の書式設定にて下記の通り、カスタマイズします。
{
  "$schema": "https://developer.microsoft.com/json-schemas/sp/v2/column-formatting.schema.json",
  "elmType": "div",
  "children": [
    {
      "elmType": "a",
      "style": {
        "width": "120px",
        "height": "26px",
        "border-radius": "3px",
        "cursor": "pointer",
        "display": "flex",
        "align-items": "center",
        "justify-content": "space-evenly",
        "margin": "5px",
        "text-decoration": "none"
      },
      "attributes": {
        "class": "sp-field-quickActions",
        "iconName": "PowerAppsLogo",
        "href": "='https://apps.powerapps.com/play/e/default-hogehogehogehogeItemId='+ [$ID]"
      },
      "children": [
        {
          "elmType": "div",
          "txtContent": "Power Apps !"
        }
      ]
    }
  ]
}
ドキュメント ライブラリではcaseという参照列をボタンにしてしまいましょう。
{
  "$schema": "https://developer.microsoft.com/json-schemas/sp/v2/column-formatting.schema.json",
  "elmType": "div",
  "children": [
    {
      "elmType": "a",
      "style": {
        "width": "120px",
        "height": "26px",
        "border-radius": "3px",
        "cursor": "pointer",
        "display": "flex",
        "align-items": "center",
        "justify-content": "space-evenly",
        "margin": "5px",
        "text-decoration": "none"
      },
      "attributes": {
        "class": "sp-field-quickActions",
        "iconName": "PowerAppsLogo",
        "href": "='https://apps.powerapps.com/play/e/default-hogehogehogehogeItemId?ItemId='+ @currentField.lookupValue"
      },
      "children": [
        {
          "elmType": "div",
          "txtContent": "Power Apps !"
        }
      ]
    }
  ]
}
hrefの値は、Power AppsのWebリンクです。
こちらにパラメーターを仕込んでいます。?ItemId'=+ "[$ID]"の部分ですね。
これにより、Power Appsに値を渡すことができます。
Power AppsのParam関数です。
そちらを見ていきましょう。
その他、参考
SharePointのリストの書式設定に関する値は下記のブログが参考になります!
Power Apps
前回作成したPower AppsのビューをSharePointで選択した行に紐づく情報を集約するため、SharePointから渡されたパラメーターから、制御します。
活躍する関数はParam関数です。
Param関数
Power AppsのWebリンクの末尾にパラメーターを付与して、Power Appsの起動時に値を渡せる関数。
リンクによって、Power Appsの最初の画面、ステータスを変えたりと、便利な関数です。
関数の使い方を深堀している記事は下記が非常に参考になります。
MicrosoftのMukaiさんと公式Learnですね。
Power Apps側の設定
リンクにパラメーターが付与されているので、それをキャッチする仕様にしましょう。
AppのOnStartに下記の関数を仕込みます。
If(!IsBlank(Param("ItemId")),Set(ItemId,Value(Param("ItemId"))),Set(ItemId,1))
今回私が設定しているパラメーターの名前はItemIdです。
If文でパラメーターの有無を調べています。
elseは完全に妥協ですね。
あとは、前回作成したPower AppsのFormやギャラリーの値を変更するだけです。
First(Filter(CaseFiles,ID = ItemId))
Launch(First(Filter(CaseFilesDocs,フォルダーである=true,case.Value = Text(ItemId))).アイテムへのリンク)
Sort(Filter(CaseFilesDocs,フォルダーである=false,case.Value = Text(ItemId)),Category.Value)
データ型は、とりあえずValue()とText()を使って、無理やり整合性をとっています・・。
データ型の調査は及んでいないとこがあります・・・。
完了次第、アップデートしますので、ごめんなさい🙇
しかし、これによって準備!
SharePointからPower Appsを起動
選択したSharePoint Listsの行ID、ドキュメント ライブラリで入力されている参照しているIDからPower Appsが起動できます。
入力箇所が分散することによるやり辛さは決して否めません。
しかし、製品の機能を調べ、効率の良い運用を考えることもユーザーの腕の見せ所だと思います。
特にSharePointは、
- ファイルサーバーをそのまま置き換えて、
- ファイルサーバーと同じような運用をする
この場合、やり辛いばかりか、Power AppsやPower Automateを中心としたクラウドの恩恵を受けられません。
考え方を少し変えるだけで、とんでもなく業務が楽になるかもしれません。
そんなTipsを挙げていきたいと思います。
メリークリスマス!
よいお年とPower lifeを!
Microsoft 365活用、一緒に楽しみましょう♪


