はじめに
Azure Functions(関数アプリ)
- サーバーレスコンピューティングで
- 好きな時に
- 好きな関数を
- APIとして利用できる
とても魅力的な機能・・・。
憧れ続けてきました・・・
しかし現実は甘くなく、
PythonでAzure Functionsを実装することが思いのほか難しい!!
Linuxまったくわからない人が悪戦苦闘しながらも何とかLINE Botを作れた記録をQiitaに残します。
作品はこちら!!
概要
- LINE Messaging APIのWebhookに
- Azure Functions(関数アプリ)を設定し、下記を実現
- Azure Computer Visionで画像の文字を認識し
- Azure OpenAI(gpt 3.5 turbo)で要約してBotで返信
続きはnoteにて。
Azure Functionsの開発手順
普段使っているエディターはVisual Studio Code
今回 Azure Functionsを開発するにあたり、
Visual Studio Code 用 Azure Functions 拡張機能は欠かせない機能でした。
Azure Portalだけでは躓くばかり。
作ったプロジェクトをcmdからAzureにDeployする部分で躓きました
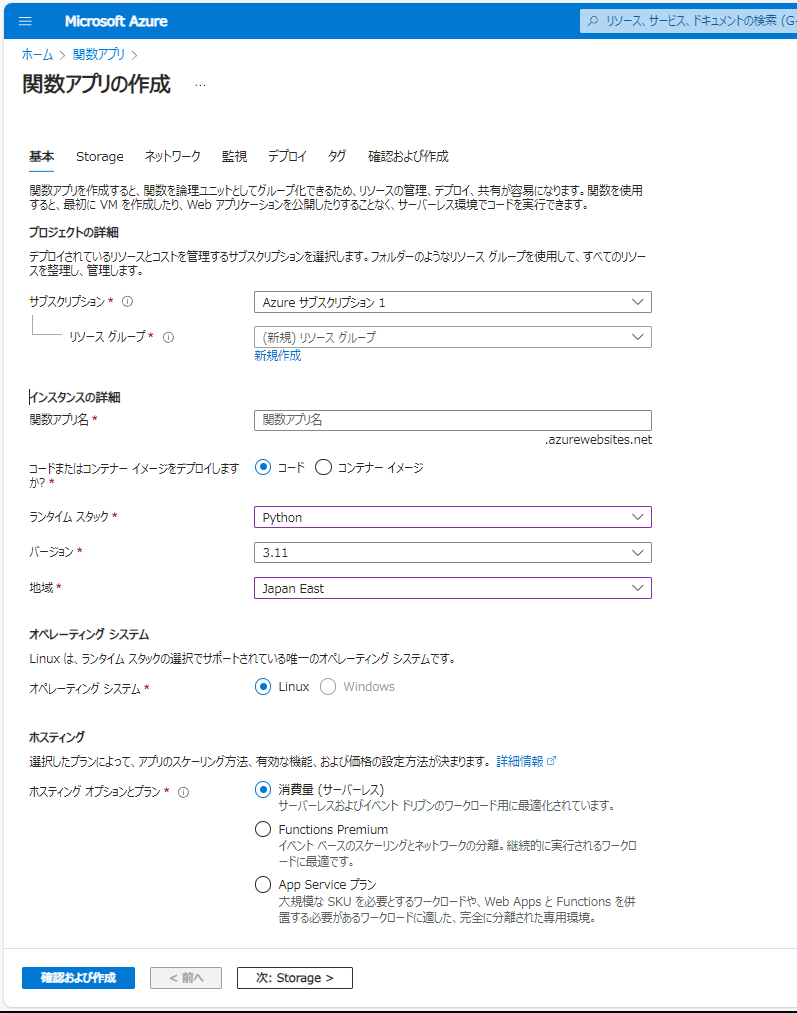
機能の詳細
| Parameter | Set |
|---|---|
| Trigger | Http trigger |
| プログラミング言語 | Python |
| ランタイム スタック | 3.11 |
| location | Japan East |
| Application Insights を有効にする | Yes |
上記に書いていない部分は伏せています。
ざっくり手順
- Azure PortalでAzure Functions(関数アプリ)のリソースを作成する
- Visual Studio Codeにて Azure Functions 拡張機能から
Http triggerを選択して
プロジェクトに必要なファイルを配置する -
開発
- 必要なライブラリの追加 & requirements.txtの追記
- コードの記入
- 環境変数の定義
- [1]で作成したリソースに、[3]で作成したファイルをデプロイ
- Azure Functionsの画面で環境変数の構成
- テスト
詳細
まずは下記のLearnをしっかりと読み込みましょう。
そのうえで内容を省略している部分もありますが、開発工程を書いていきます。
1. Azure PortalでAzure Functions(関数アプリ)のリソースを作成する
Azure Portalで関数アプリを作成しました。
VS Codeの拡張機能でも可能ですが、一旦こちらにて、リソースを用意します。
-
リソースの作成についてはこれ以上は一旦割愛 - 参考になるlearnはこちら
2. Visual Studio Codeにて Azure Functions 拡張機能からHttp triggerを選択してプロジェクトに必要なファイルを配置する

Visual Studio Code上で、拡張機能を「Azure Functions」で検索します。
ダウンロードして有効化しましょう。
3. 開発
ローカルで開発を進めます。
- まずは
拡張機能⚡をクリックしてCreate Functionを選択してみましょう。

- フォルダの選択
- プログラミング言語の選択
- (Pythonの場合)バージョンの選択
- triggerの選択
- Functionの名前の設定
- 認証の設定
と進んでいきます。

この機能の嬉しいところは、選択したフォルダに必要なファイルが揃うことです。

またコードのテンプレートも作られます。
import azure.functions as func
import logging

app = func.FunctionApp(http_auth_level=func.AuthLevel.FUNCTION)

@app.route(route="http_trigger")
def http_trigger(req: func.HttpRequest) -> func.HttpResponse:
    logging.info('Python HTTP trigger function processed a request.')

    name = req.params.get('name')
    if not name:
        try:
            req_body = req.get_json()
        except ValueError:
            pass
        else:
            name = req_body.get('name')

    if name:
        return func.HttpResponse(f"Hello, {name}. This HTTP triggered function executed successfully.")
    else:
        return func.HttpResponse(
             "This HTTP triggered function executed successfully. Pass a name in the query string or in the request body for a personalized response.",
             status_code=200
        )
自動で出力されたコードです。
上記のコードをデプロイすると、関数アプリのURLのAPIが利用可能になります。
FlaskでAPIを作ってみるケースに似ているように感じます。
パラメーターにname属性が入っていれば
Hello, {name}. This HTTP triggered function executed successfully.
入っていなければ
This HTTP triggered function executed successfully. Pass a name in the query string or in the request body for a personalized response.
上記が出力されるといったイメージです。
loggingは、関数アプリのモニターでデバッグするときにとても役に立ちます。
requirements.txt
標準ライブラリではないものは、requirements.txtに記入する必要があります。
既定で
# DO NOT include azure-functions-worker in this file
# The Python Worker is managed by Azure Functions platform
# Manually managing azure-functions-worker may cause unexpected issues

azure-functions
と記入されていますので、azure-functions以下に必要なサードパーティーライブラリを書いていきましょう。
今回はrequestsを追加します。
# DO NOT include azure-functions-worker in this file
# The Python Worker is managed by Azure Functions platform
# Manually managing azure-functions-worker may cause unexpected issues

azure-functions
requests
これによって関数アプリでもサードパーティーライブラリが使用できます。
LLMを使用するような大規模なライブラリのインストールは私の場合、成功しませんでした。
コードの記入
# Essential libraries
import azure.functions as func
import os
import requests
import json
import logging

# Constants
LINE_REPLY_API = 'https://api.line.me/v2/bot/message/reply'
LINE_ACCESS_TOKEN = os.environ['LINE_ACCESS_TOKEN']
COMPUTER_VISION_URL = os.environ['COMPUTER_VISION_URL']
COMPUTER_VISION_KEY = os.environ['COMPUTER_VISION_KEY']
OPENAI_API_URL = os.environ['OPENAI_API_URL']
OPENAI_API_KEY = os.environ['OPENAI_API_KEY']

app = func.FunctionApp(http_auth_level=func.AuthLevel.ANONYMOUS)

@app.route(route="azure_line_image_interpreter", methods=['POST'])
def azure_line_image_interpreter(req: func.HttpRequest) -> func.HttpResponse:
    """
    Main function that handles POST requests.
    Processes the images received from LINE bot, extracts the text,
    and sends a summarized reply.
    """
    logging.info('Python HTTP trigger function processed a request.')

    body = req.get_json()

    logging.info(body)
    events = body['events']

    for event in events:
        if event['type'] == 'message':
            image_id = event['message']['id']
            image_content = get_image_content_from_line(image_id)
            extracted_text = extract_text_from_image(image_content)
            summarize_text = summarize_text_ocr_result(extracted_text)
            reply_to_line(event['replyToken'], summarize_text)

    return func.HttpResponse(
            "This HTTP triggered function executed successfully. Pass a name in the query string or in the request body for a personalized response.",
            status_code=200
    )

def get_image_content_from_line(image_id):
    """
    Fetches the image content from LINE messenger using the message ID.
    """
    headers = {
        'Authorization': f'Bearer {LINE_ACCESS_TOKEN}'
    }
    response = requests.get(f'https://api-data.line.me/v2/bot/message/{image_id}/content', headers=headers)
    return response.content

def extract_text_from_image(image_data):
    """
    Uses the Azure Computer Vision service to extract text from the given image data.
    """
    headers = {
        'Content-Type': 'application/octet-stream',
        'Ocp-Apim-Subscription-Key': COMPUTER_VISION_KEY
    }
    response = requests.post(COMPUTER_VISION_URL, headers=headers, data=image_data)
    data = response.json()
    return data['readResult']['content']

def summarize_text_ocr_result(extracted_text):
    """
    Uses the OpenAI API to summarize the extracted text and translates it to Japanese.
    """
    headers = {
        'Content-Type': 'application/json',
        'api-key': OPENAI_API_KEY
    }
    payload = {
                "messages": [
                    {
                        "role": "system",
                        "content": "#Instructions\nYou are a professional editor. Please summarize the text you are entering according to the following constraints.\n\n#Constraints\n・Provide machine-translated transcriptions of the text. Please infer the content of the document from the text and state what kind of document it is at the beginning.\n・Don't leave out important keywords.\n・Don't change the meaning of the text.\n・Summarize the content in a concise manner.\n・Summarize the input text within 300 characters, including punctuation, and output it in Japanese.\n・Don't change the numerical values in the sentences."
                    },
                    {
                        "role": "user",
                        "content": extracted_text
                    }
                ],
                "max_tokens": 500,
                "temperature": 0.7,
                "frequency_penalty": 0,
                "presence_penalty": 0,
                "top_p": 0.95,
            }
    response = requests.post(OPENAI_API_URL, headers=headers, data=json.dumps(payload))
    data = response.json()
    print(data)
    return data['choices'][0]['message']['content']

def reply_to_line(reply_token, message):
    """
    Sends the summarized text back to the LINE bot.
    """
    headers = {
        'Authorization': f'Bearer {LINE_ACCESS_TOKEN}',
        'Content-Type': 'application/json'
    }
    data = {
        'replyToken': reply_token,
        'messages': [{'type': 'text', 'text': message}]
    }
    requests.post(LINE_REPLY_API, headers=headers, data=json.dumps(data))
先にお断りを入れておくと、ChatGPTの力をひたすら借りて作成できたものです。
例外処理も未実装です。
APIを多用する仕組みになります。
エンドポイントやアクセストークンは環境変数に設定しています。
4. デプロイ
VS Codeの拡張機能からDeploy to Function App...を選択します。
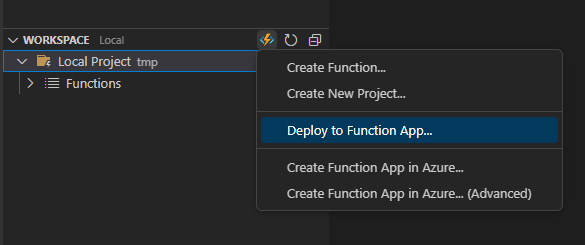
コマンドパレットで作成したコードをアップロードするリソースを選択します。
この操作によってAzureにコードがアップロードされます。

OpenAIとComputer Visionのデプロイ関係については割愛
参考になるMicrosoftのLearnを書いておきます
- Azure OpenAI
- Computer Vision (OCR)
5. Azure Functionsの画面で環境変数の構成
LINE_ACCESS_TOKEN = os.environ['LINE_ACCESS_TOKEN']
COMPUTER_VISION_URL = os.environ['COMPUTER_VISION_URL']
COMPUTER_VISION_KEY = os.environ['COMPUTER_VISION_KEY']
OPENAI_API_URL = os.environ['OPENAI_API_URL']
OPENAI_API_KEY = os.environ['OPENAI_API_KEY']
上記のような環境変数は、Azure Portalで設定します。
具体的にはコードをアップロードした関数アプリのリソースで、
[設定] > [構成] を選択します。

- [アプリケーション設定]の[+ アプリケーション設定]
- [アプリケーション設定]の追加/編集
- 名前にkey、値にvalueを設定します。
上記がAzure Functionsの中の環境変数に該当します。
この画面で、Pythonのコードで呼び出す環境変数を追加していきます。

6. テスト

VS Codeにて実施したデプロイ[4. デプロイを参照]が成功している場合、
上記の画面の赤丸内にコード名が表示されます。
クリックをすると [コードとテスト] の画面に移ります。
1. 関数の URL の取得
まずは[関数の URL の取得]をクリックして、APIとして利用するためのURLを取得します。

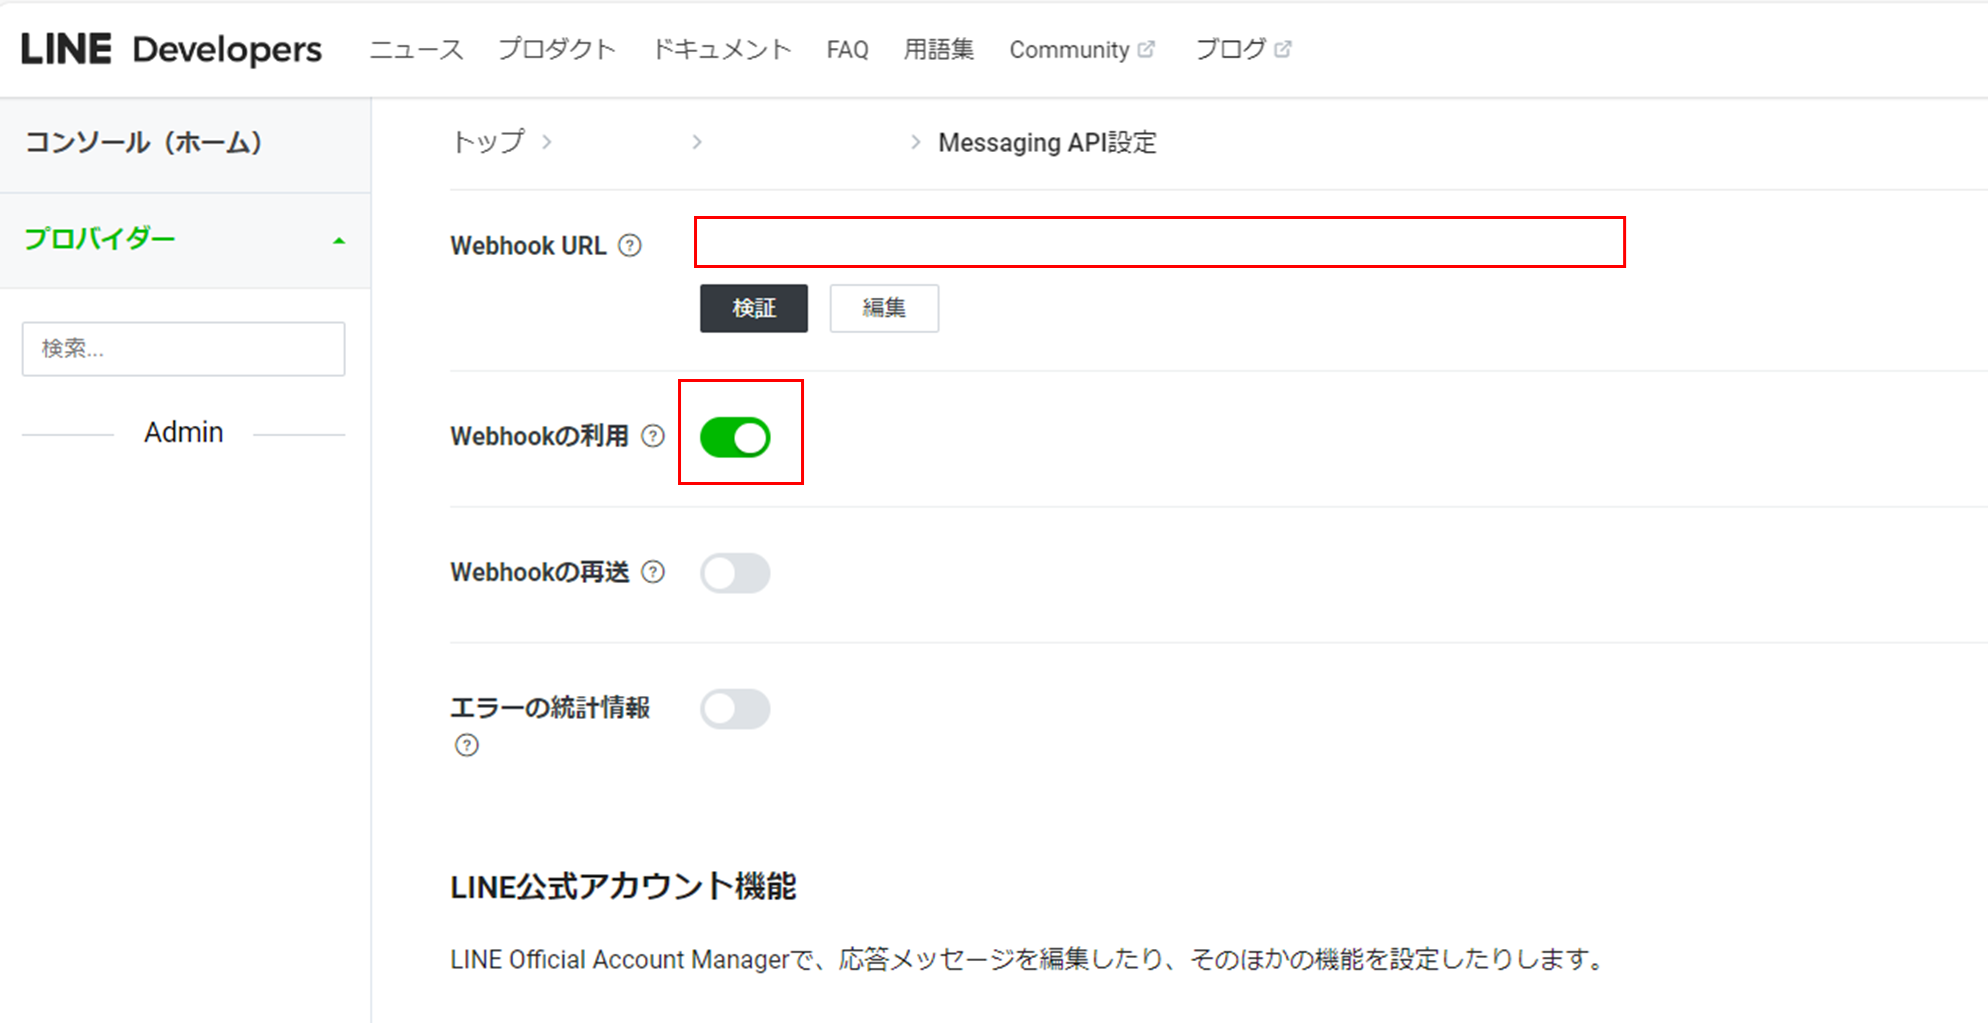
2. LINE Developers Messaging APIの設定
LINE Developersにアクセスして、Messaging APIの設定をします。
-
Webhook URL この画面に[1. 関数の URL の取得]で取得したURLを入力します。
- [検証]を実施して確認をしてみましょう。
- Webhookの利用 こちらをONにします。
LINE Messaging APIの記事は沢山あるため、本記事では割愛します。
公式のURLはこちら
3. モニター > ログ
Azure Portalに戻り、[モニター]をクリックします。

Application Insightsで関数の成功/失敗が確認できます。

こちらで[ログ]をクリックしてみましょう。
接続されました。が画面に表示するまで待ちます。(数秒です)
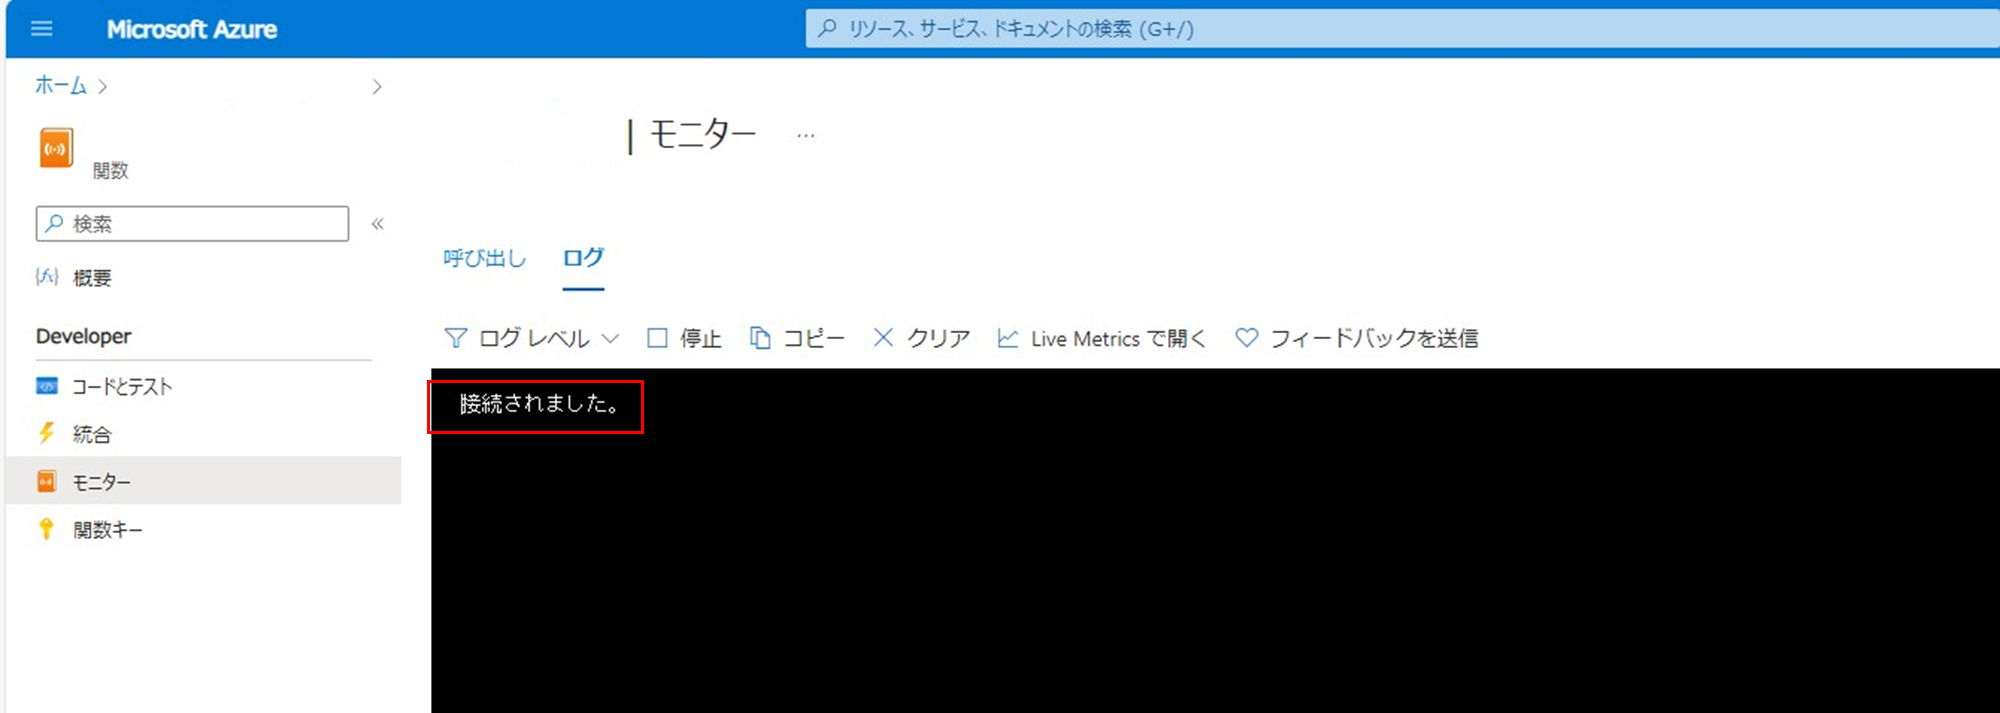
接続が完了され次第、Azure Functionsの動きを確認できます。
試しにLINE Botを実施してみると、下記の様に表示されます。

loggingの機能を使った、ログを監視することができるので挙動を確認するには、とても良い機能です。
このテストが終了次第、完成ですね!

LINEの挙動も上手く行きました🎉
最後に
何度も挑戦して上手くいかなかったことが実現出来て何よりも嬉しい!
今回の挙動は全てPower Automateで再現できます。
どちらを採用するかは、チームや組織の考え方にもよりますが、ケースバイケースで何が最適か考えられると良いですね!