GraffityでUnityエンジニアをしているcovaです。
今回はUnityでAppleVisionPro 向けコンテンツを開発するにあたり 両手を使った動作 を作りたいものです。
しかしながら、公式のSampleには 片手 のサンプルのみで両手についてのサンプルがありません。
今回は両手の動作を作る上での注意点などについて紹介します
TL;DR
-
EnhancedSpatialPointerSupport.GetPointerState(Touch.activeTouches[0]),EnhancedSpatialPointerSupport.GetPointerState(Touch.activeTouches[1])でそれぞれの手の情報を取得可能 - SpatialPointerState に割とほとんどの必要な情報が格納されているので、変にパラメータクラスを自作する必要はない
- Position系は
interactionPosition/deltaInteractionPosition/startInteractionPosition/inputDevicePositionと4種あるので使い所に気を付ける
実際どうなん?
Apple のハンドジェスチャーとUnity開発時に利用できるジェスチャーについて
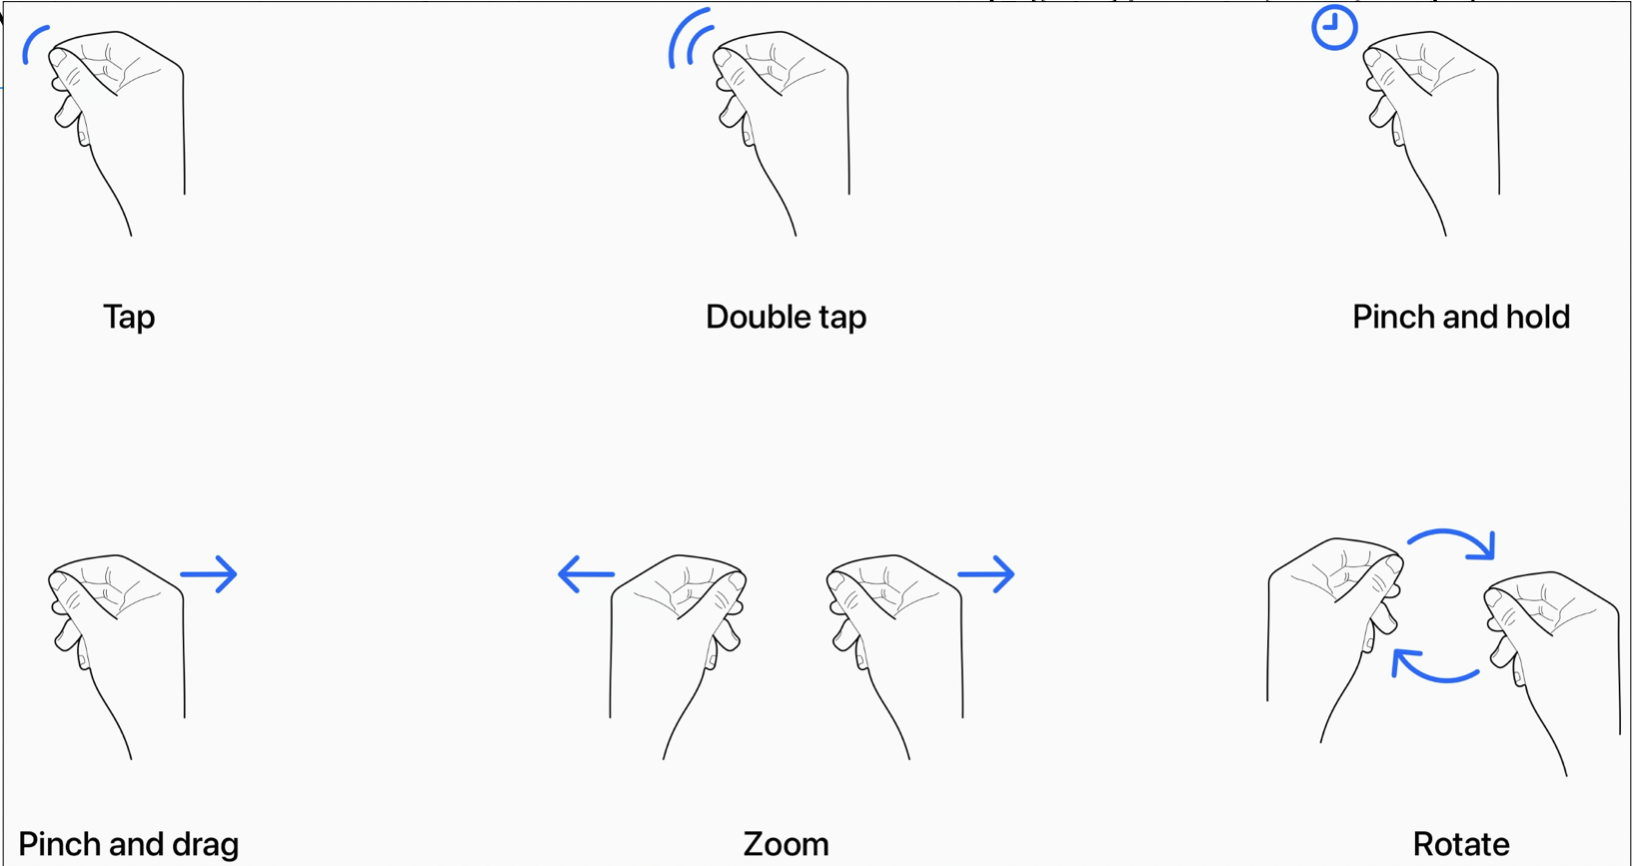
公式では6種ほどジェスチャー(VisionOS1.x系, VisionOS2.x系ではホーム画面のショートカットメニューが追加された)あります。
しかしこれらのうち、Unityでとれるのは Tap のみです。
Tap動作の状態としては SpatialPointerPhase で定義されています。
namespace UnityEngine.InputSystem.LowLevel
{
  public enum SpatialPointerPhase : byte
  {
    None,        // 未選択
    Began,       // 選択開始
    Moved,       // 選択中
    Ended,       // 選択終了
    Cancelled,   // 選択キャンセル
  }
}
ここからわかる通り、開始〜途中〜終了 を取得可能なため、これらの状態を組み合わせてTap以外の動作を実装します。
実装されてないジェスチャーについて(片手)
DoubleTap
DoubleTap はUnity側でDoubletap猶予時間を定義して、その時間内に2回Tap動作を検知したらDoubleTap とする実装を行うことで実現します。
そのため以下のような入力管理クラスとイベント監視クラスに分けて実装してみました.
using R3;
using Unity.PolySpatial.InputDevices;
using UnityEngine;
using UnityEngine.InputSystem.EnhancedTouch;
using UnityEngine.InputSystem.LowLevel;
using Touch = UnityEngine.InputSystem.EnhancedTouch.Touch;

public class ManipulationManager : MonoBehaviour
{
        private Subject<SpatialPointerState> m_singleHandManipulate = new();
        public Observable<SpatialPointerState> OnSingleHandManipulate => m_singleHandManipulate;


        void OnEnable()
        {
            EnhancedTouchSupport.Enable();
        }

        void Update()
        {
            if (Touch.activeTouches.Count < 1) return;
            if (Touch.activeTouches.Count == 1) SingleHandUpdate();
            else if(Touch.activeTouches.Count == 2 )DualHandUpdate();
            else Debug.LogAssertion("More than two touches are not supported");
        }

        void SingleHandUpdate()
        {
            var touch = Touch.activeTouches[0];
            var spatialPointerState = EnhancedSpatialPointerSupport.GetPointerState(touch);

            m_singleHandManipulate.OnNext(spatialPointerState);
        }

    (略)
}
using System;
using System.Collections.Generic;
using R3;
using UnityEngine;
using UnityEngine.InputSystem.LowLevel;

    public class DoubleTapEventObserver : IDisposable
    {
        private readonly CompositeDisposable _disposable = new();

        public DoubleTapEventObserver(ManipulationManager manager)
        {

            const float DOUBLE_TAP_TIME_THRESHOLD = 0.1f;
            float prevTouchTime = Time.unscaledTime;
            manager.OnSingleHandManipulate
                .Pairwise()
                .Where(pair => )
                .Subscribe(pair =>
                {
                    if (pair.Previous.targetObject == pair.Current.targetObject
                        && Time.unscaledTime - prevTouchTime < DOUBLE_TAP_TIME_THRESHOLD)
                    {
                        // DoubleTap
                    }

                    prevTouchTime = Time.unscaledTime;
                });
        }

        public void Dispose()
        {
            if (_disposable.IsDisposed) return;
            _disposable.Dispose();
        }
}
こんな感じでTapイベントを監視してあげることでdouble tap は実現できます。
(今回はロジックの分離とイベントドリブンなコードにするためR3(UniRxでも可) を使用しました)
Pinch and hold
いわゆる 長押し。
よって長押しの時間を設定して、一定時間以上Moved なら長押し判定とすれば良いです
using System;
using System.Collections.Generic;
using R3;
using UnityEngine;
using UnityEngine.InputSystem.LowLevel;

    public class LongTapEventObserver : IDisposable
    {
        private readonly CompositeDisposable _disposable = new();
        private Subject<Unit> m_onHoldEnough = new();
        public Observable<Unit> OnLongTap => m_onHoldEnough;

        public LongTapEventObserver(ManipulationManager manager)
        {

            const float LONG_TAP_HOLD_TIME_THRESHOLD = 0.1f;
            IDisposable holdDiposable = null;
            // Tap開始監視
            manager.OnSingleHandManipulate
                .Where(s => s.phase == SpatialPointerPhase.Began)
                .Subscribe(pair =>
                {
                    holdDiposable?.Dispose();
                    holdDiposable = Observable.Timer(TimeSpan.FromSeconds(LONG_TAP_HOLD_TIME_THRESHOLD))
                        .Subscribe(_ => { m_onHoldEnough.OnNext(Unit.Default); });
                })
                .AddTo(_disposable);


            // Tap終了監視
            manager.OnSingleHandManipulate
                .Where(s => s.phase == SpatialPointerPhase.Ended
                            || s.phase == SpatialPointerPhase.Cancelled)
                .Subscribe(pair =>
                {
                    holdDiposable?.Dispose();
                })
                .AddTo(_disposable);

        }

        public void Dispose()
        {
            if (_disposable.IsDisposed) return;
            _disposable.Dispose();
        }
}
このような形でTap開始から一定時間経過したらイベントを発火することで
[SerializeField] private ManipulationManager _manager = null;

void Initialize()
{
    var observer = new LongTapEventObserver(_manager)
    observer.OnLongTap
            .Subscribe(_ =>{} )
            .AddTo(this);
}
みたいな形で長押しイベントをとれます。
Pinch and Drag
ここについてはUnityの ManipulationInputManager.cs のサンプルが、選択Objectに対して
手の相対的な動きを適応するようになっているので ManipulationInputManager.cs を参考にしてください
実装されてないジェスチャーについて(両手)
両手のジェスチャーについては Touch.activeTouches.Count が 2 の時のみの入力をとることで可能です。
using R3;
using Unity.PolySpatial.InputDevices;
using UnityEngine;
using UnityEngine.InputSystem.EnhancedTouch;
using UnityEngine.InputSystem.LowLevel;
using Touch = UnityEngine.InputSystem.EnhancedTouch.Touch;

public class ManipulationManager : MonoBehaviour
{
        private Subject<(SpatialPointerState,SpatialPointerState)> m_dualHandManipulate = new();
        public Observable<(SpatialPointerState,SpatialPointerState)> OnDualHandManipulate => m_dualHandManipulate;


        void OnEnable()
        {
            EnhancedTouchSupport.Enable();
        }

        void Update()
        {
            if (Touch.activeTouches.Count < 1) return;
            if (Touch.activeTouches.Count == 1) SingleHandUpdate();
            else if(Touch.activeTouches.Count == 2 )DualHandUpdate();
            else Debug.LogAssertion("More than two touches are not supported");
        }

    (略)

        void DualHandUpdate()
        {
            var firstTouch = Touch.activeTouches[0];
            var secondTouch = Touch.activeTouches[1];
            var firstSpatialPointerState = EnhancedSpatialPointerSupport.GetPointerState(firstTouch);
            var secondSpatialPointerState = EnhancedSpatialPointerSupport.GetPointerState(secondTouch);

            m_dualHandManipulate.OnNext( (firstSpatialPointerState, secondSpatialPointerState) );
        }
}
上記のような感じでまずは入力をまとめてとれるようにします。
このとき、Touch.activeTouches[0] / Touch.activeTouches[1] でそれぞれの手の入力情報をとれます。
ただし、以下の注意点があるのでお気をつけください
- 必ずしも
0==左手, 1==右手ではありません - 最初に選択操作した手が0, 2番目に選択操作した手が1です
Zoom
Zoomは両手の距離関係に応じてScaleすれば良いです。
また、もちろん両手で選択しているObjectは同一Objectであることが必須条件です。
using System;
using System.Collections.Generic;
using R3;
using UnityEngine;
using UnityEngine.InputSystem.LowLevel;

    public class ZoomEventObserver : IDisposable
    {
        private readonly CompositeDisposable _disposable = new();
        private Subject<float> m_onZoomScaleChanged = new();
        public Observable<Unit> OnZoomScaleChanged => m_onZoomScaleChanged;

        public ZoomEventObserver(ManipulationManager manager)
        {
            float startDistance = 0f;
            // 両手操作
            manager.OnDualHandManipulate
                // 同一Object選択が条件
                .Where(hands => hands.Item1.targetObject == hands.Item2.targetObject)
                .Where(hands => hands.Item1.phase == SpatialPointerPhase.Began
                ||  hands.Item2.phase == SpatialPointerPhase.Began)
                .Subscribe(hands =>
                {
                    // inputDevicePosition はUnityのWorld座標系での手の位置を取得可能
                    startDistance = Vector3.Distance(hands.Item1.inputDevicePosition,
                    hands.Item2.inputDevicePosition);
                })
                .AddTo(_disposable);

            // 操作中のイベント監視
            manager.OnDualHandManipulate
                // 同一Object選択が条件
                .Where(hands => hands.Item1.targetObject == hands.Item2.targetObject)
                .Where(hands => hands.Item1.phase == SpatialPointerPhase.Moved
                &&  hands.Item2.phase == SpatialPointerPhase.Moved)
                .Subscribe(hands =>
                {
                    try
                    {
                        float currentDistance = Vector3.Distance(hands.Item1.inputDevicePosition, hands.Item2.inputDevicePosition);
                        float scale = currentDistance / startDistance;
                        m_onZoomScaleChanged.OnNext(scale);
                    }
                    catch( Exception e)
                    {
                        Debug.LogError(e);
                    }
                })
                .AddTo(_disposable);

        }

        public void Dispose()
        {
            if (_disposable.IsDisposed) return;
            _disposable.Dispose();
        }
}
Rotate
Rotateはかなりトリッキーです。
実装ロジックとしては
-
同一Objectを選択している
-
選択開始時点の両手間ベクトルと現在の両手間ベクトルを求める
-
2.のベクトルから回転軸である外積を求める- Unity の外積は左手の法則に従うので注意
- 大抵学校の物理で習うのは右手の法則
- https://docs.unity3d.com/jp/current/ScriptReference/Vector3.Cross.html
- Unity の外積は左手の法則に従うので注意
-
2のベクトルと3.の回転軸から両手で動かした時の回転角を求める -
求めた回転角を選択対象に適応する
using System;
using System.Collections.Generic;
using R3;
using UnityEngine;
using UnityEngine.InputSystem.LowLevel;

    public class RotateInputObserver : IDisposable
    {
        private readonly CompositeDisposable _disposable = new();
        private Subject<(Vector3, float)> m_onRotate = new();
        public Observable<(Vector3, float)> m_onRotate => m_onRotate;

        public RotateInputObserver(ManipulationManager manager)
        {
            Vector3 startVector = Vector3.zero;
            // 両手操作
            manager.OnDualHandManipulate
                // 同一Object選択が条件
                .Where(hands => hands.Item1.targetObject == hands.Item2.targetObject)
                // 開始タイミングのみとりたいので
                .Where(hands => hands.Item1.phase == SpatialPointerPhase.Began || hands.Item2.phase == SpatialPointerPhase.Began)
                .Subscribe(hands =>
                {
                    // inputDevicePosition はUnityのWorld座標系での手の位置を取得可能
                    // inputDevicePosition の差分で手2→手1 ベクトルを計算
                    startVector = hands.Item1.inputDevicePosition - hands.Item2.inputDevicePosition;
                })
                .AddTo(_disposable);

            // 操作中のイベント監視
            manager.OnDualHandManipulate
                // 同一Object選択が条件
                .Where(hands => hands.Item1.targetObject == hands.Item2.targetObject)
                .Where(hands => hands.Item1.phase == SpatialPointerPhase.Moved
                &&  hands.Item2.phase == SpatialPointerPhase.Moved)
                .Subscribe(hands =>
                {
                    try
                    {
                        var currentVector = hands.Item1.inputDevicePosition - hands.Item2.inputDevicePosition;
                        var rotateAxis = Vector3.Cross(startVector, currentVector).normalized;
                        var angle = Vector3.SignedAngle(currentVector, startVector, rotationAxis);
                        m_onRotate.OnNext( (rotateAxis, angle);
                    }
                    catch( Exception e)
                    {
                        Debug.LogError(e);
                    }
                })
                .AddTo(_disposable);

        }

        public void Dispose()
        {
            if (_disposable.IsDisposed) return;
            _disposable.Dispose();
        }
}
ざっくりこんな形で行えば手を円周に沿うようなRotateのジェスチャーから現在の回転角を求めることもできます。
ただ、上記を実装してた時にUnity の外積の影響なのか、回転角の符号がSignAngle にもかかわらず正しくとれないケースもあったため try-catch の部分を、以下のように目的に応じて補正してあげないといけない場合もありました。
                    try
                    {
                        var currentVector = hands.Item1.inputDevicePosition - hands.Item2.inputDevicePosition;
                        var rotateAxis = Vector3.Cross(startVector, currentVector).normalized;
                        var angle = Vector3.SignedAngle(currentVector, startVector, rotationAxis);
                        // Unityの外積は左手の法則なので、Y軸回転するときは補正をする
                        if (rotationAxis.y > 0)
                        {
                            angle = Mathf.Abs(angle);  // 時計回り
                        }
                        else
                        {
                            angle = -Mathf.Abs(angle);   // 反時計回り
                        }
                        m_onRotate.OnNext( (rotateAxis, angle);
                    }
                    catch( Exception e)
                    {
                        Debug.LogError(e);
                    }
本来は不要なのですが、何回試してもなかなかうまくいかなかったため、仕方なく上記のような実装をしました。
ここの動作については要追加検証だと思っています。
struct SpatialPointerState について
手の操作情報についてまとめて返してくれます。
パラメータの説明は以下のとおりです。
| 変数名 | 説明 |
|---|---|
| Kind | 入力の種別です. SpatialPointerKind のenumで DirectPinch, IndirectPinch, Touch はよく使います。前から 直接Objectに触れた状態でのPinch, 直接Objectに触れない状態でのPinch, Objectに触れているだけ です。 |
| phase | 手の動きの状態です。 Began, Moved, Ended をよく使います |
| interactionId | 操作識別用のIDです。どの手の入力か?を判定するとき等に利用します |
| interactionPosition | 現在のInteractionのWorldPosition.あくまでもコライダーと干渉したところから基準の位置なので、手の位置そのものではない です。 |
| deltaInteractionPosition | Interactionの位置の差分。大抵0.01とかそれ以下の値になることが多いです(人間、1Fで数十cmとかなかなか動かせません。) |
| startInteractionPosition | コライダーとのインタラクション開始位置。コライダーベースなので両手でそれぞれ選択開始した時は大抵ほぼ同じ座標になります |
| startInteractionRayOrigin | Rayの位置らしいですが、AR/MR, Window/ Volume アプリでは動きませんでした |
| inputDevicePosition | 現在の手(厳密にはピンチしている親指と人差し指の間)の位置. World座標系。 |
| inputDeviceRotation | 現在の手(厳密にはピンチしている親指と人差し指の間)の回転. World座標系。 |
| targetId | 選択しているObjectのInstanceIDっぽい。あんまり使わない |
| modifierKeys | 公式Doc見ても実際の値みてもよくわからなかったです... |
Positionが4種あるので使い分けに注意です。
直感的に手の位置を知りたい場合は inputDevicePosition 利用を推奨です
また、これらは Kind にもあるとおり
-
DirectPinch,IndirectPinch,Touchなど何かのObjectを選択しないと取得できません - Update()で常に値を返すものではありません
あと、これらの値はBounded でもUnbounded でも取得可能な値がほとんどなため、 ハンドトラッキング はUnbounded でしか出来ませんが、ジェスチャー認識は Bounded でも可能です
まとめ
Apple公式で提供されているジェスチャーは、かなり頑張ればUnityでも実装できます。
せっかく両手をコントローラーとして使えるデバイスなので、Unityのサンプルを例に両手操作ができるように拡張してあげましょう。
