TL;DR
現在の端末の向いている方向を取得して、それに応じて適切に画像データを回転させましょう
経緯
スマホの縦持ち画面でARアプリを作っていて、ARカメラ画像を加工して遊ぼうととしていたところ、Unity公式のサンプルを利用して取得したカメラ画像(Texture)が90度回転していました。
公式のドキュメントを探してもそのような挙動は記載されていなかったため、仕様なのかバグなのかわからず、色々調査した結果を本記事でまとめておきます。
ARカメラ画像の取得方法
公式のドキュメントにある通りにやるとカメラ画像を取得することができます。
注意点その1
サンプルコードをそのままコピペすると定義漏れでコンパイルエラーになります。
以下の環境下では二点ほど修正する必要があります
| 項目 | バージョン |
|---|---|
| Unity | 2021LTS |
| ARFoundation | 4.2.8 |
修正点1
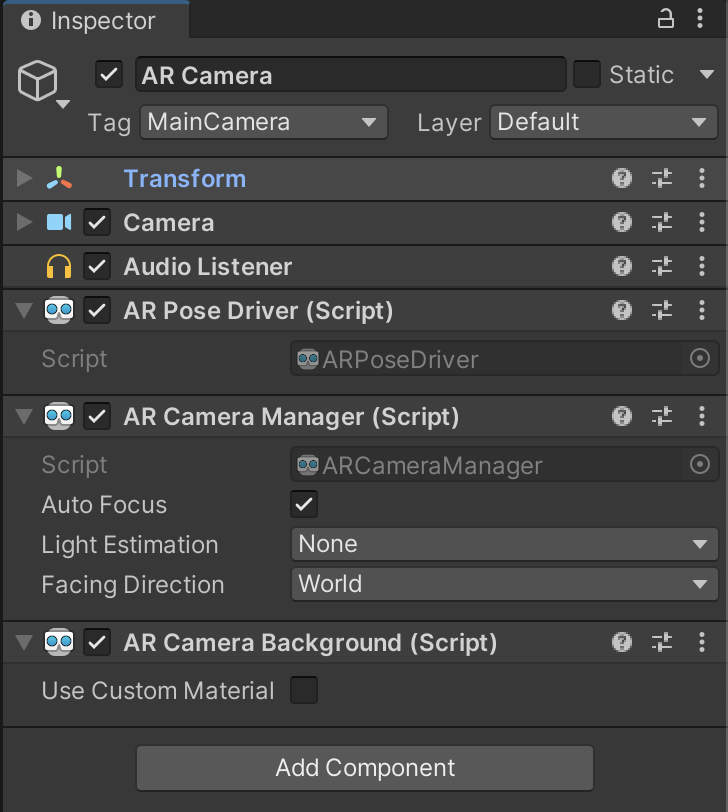
[SerializeField]ARCameraManager cameraManager = null; を追加する。
そもそも定義が無いのでエラーになります。
よって定義を追加すればコンパイルエラーは回避できます。
ただ、これではどこの要素からARCameraManager をとってくればいいのか?という話になります。
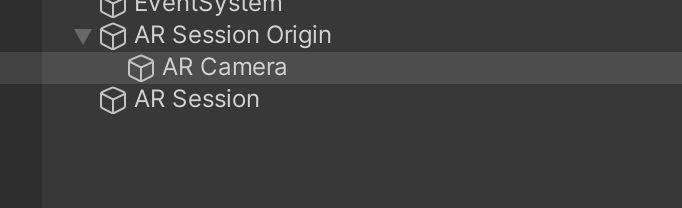
結論としては、ARの必須要素であるARSessionOrigin 以下にあるARCameraに付随するコンポーネントを設定してあげれば大丈夫です。(Inspector にComponentのアタッチする方法は割愛します)
修正点2
ARFoundation v4.2.8では、公式のサンプルの時に比べ、いくつかのAPIのリネームが行われています。
cameraFrameReceived は frameReceived に変更されているため、OnEnable()/OnDisable()双方のコードをリネームしてあげる必要があります。
注意点その2
画像の回転ですが、公式のIssue を見ると以下のような投稿があります。
どうやらこれを見る限り現在は 仕様 なのか バグ なのか不明で、一旦は取得する画像データをバイナリレベルかUI上で回転させて対応すれば利用可能なので放置という状態です。
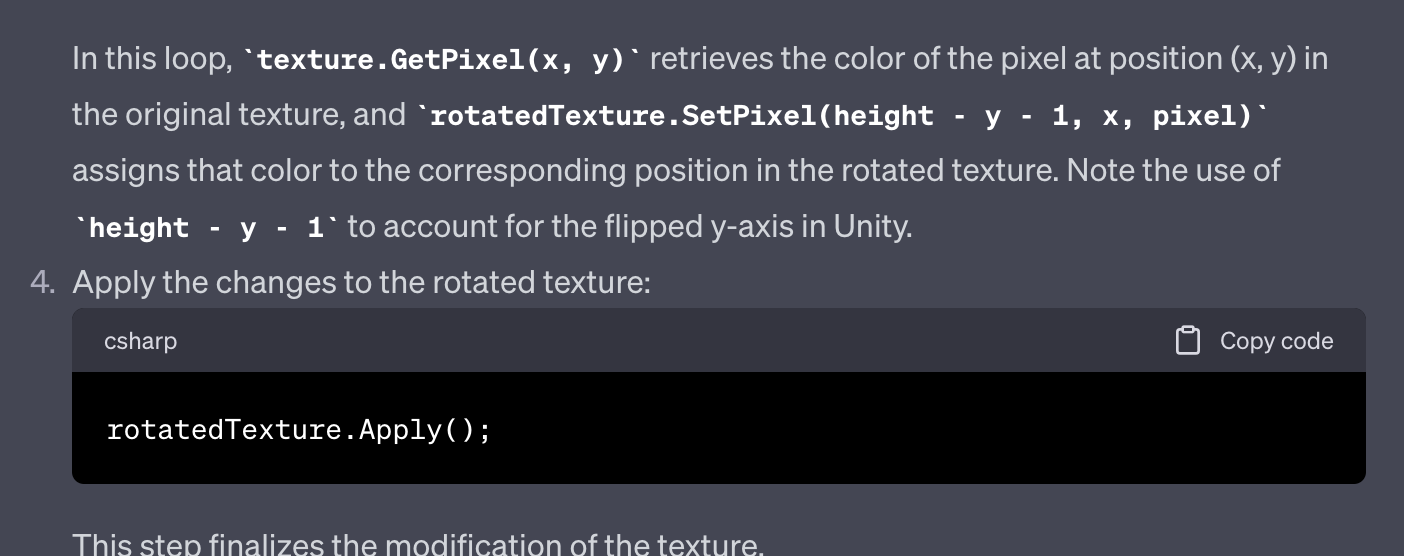
さて、Texture画像の回転ですが、手っ取り早くコードを書くため ChatGPT さんに聞いてみました。

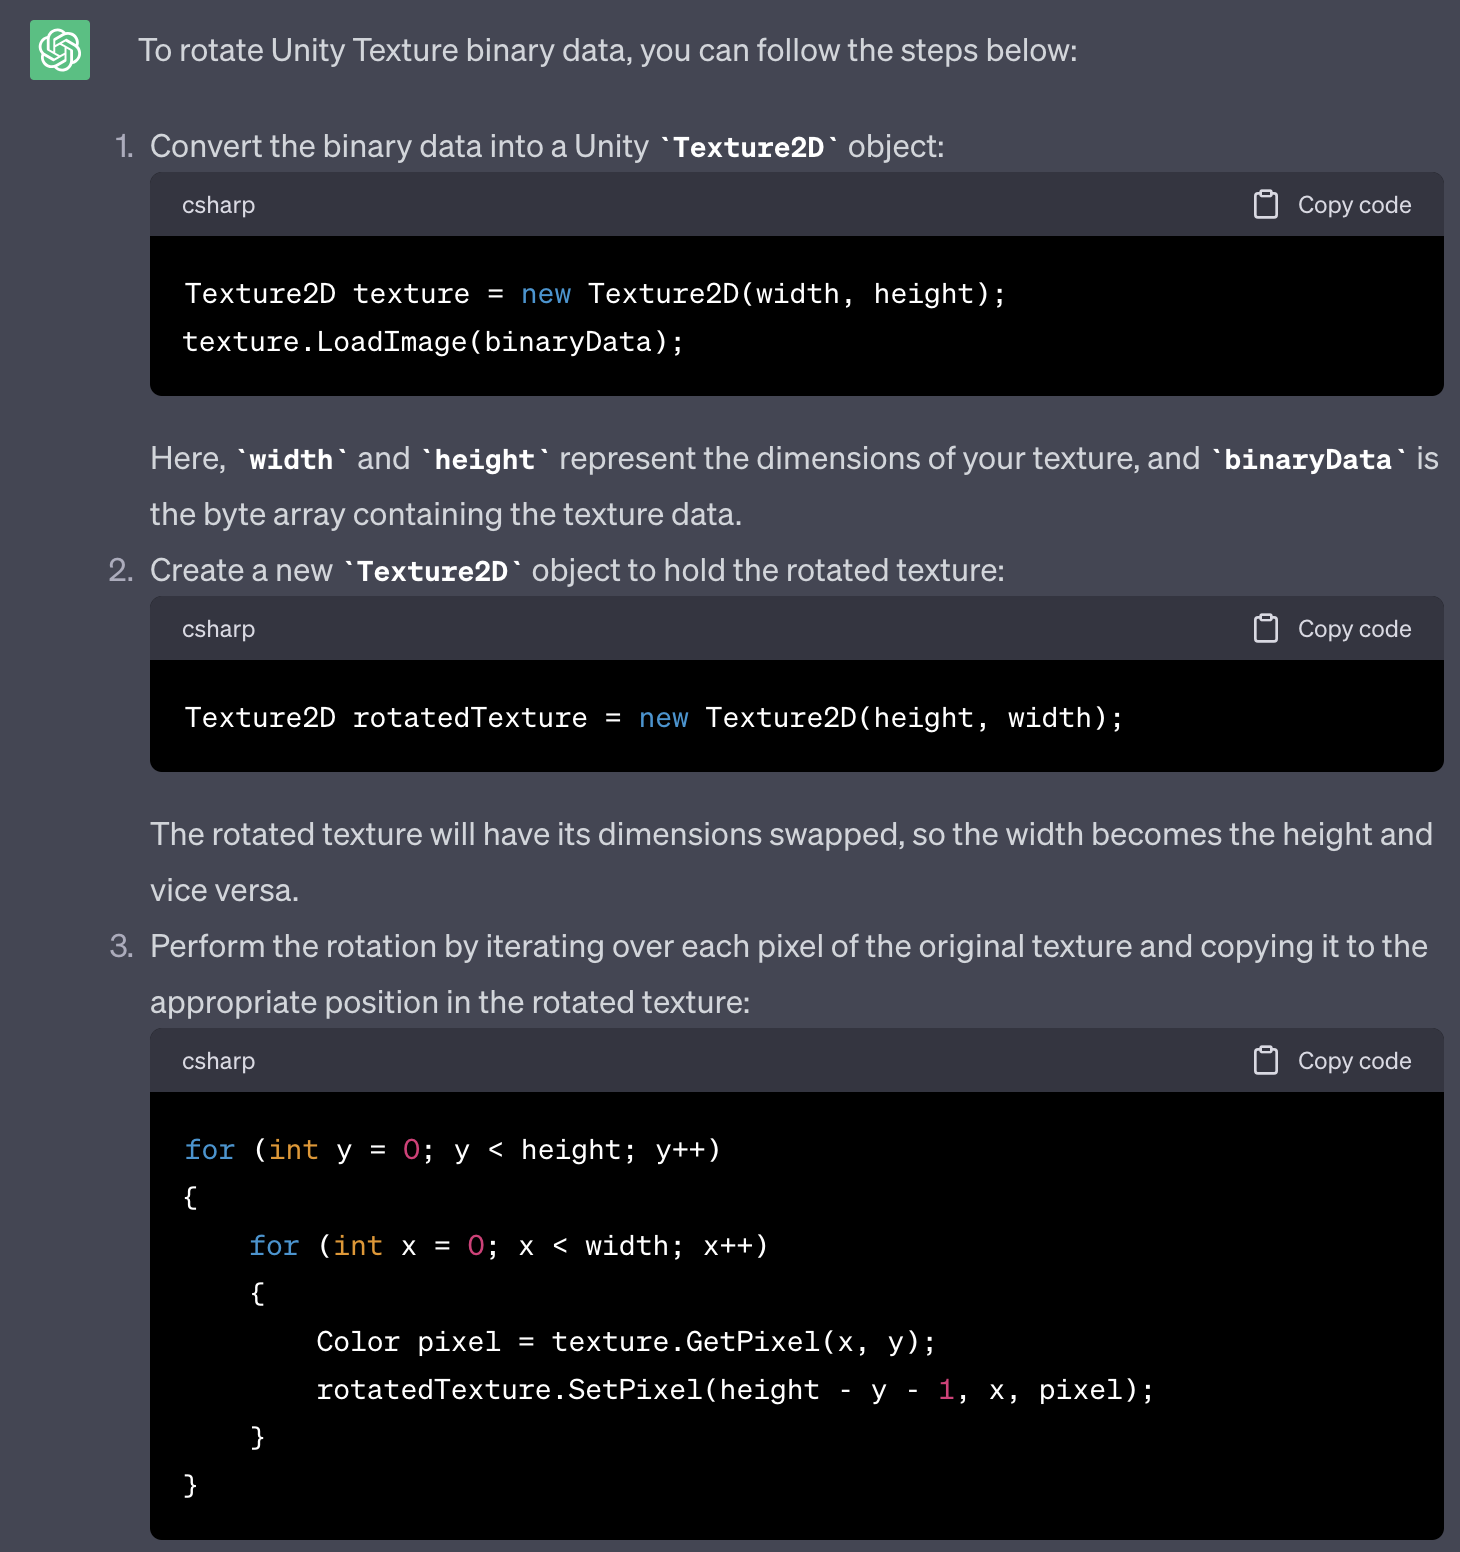
う〜ん優秀!
ということで、これを元に180度、270度回転のバージョンを聞いて、最終的に端末の回転情報を合わせ込むと以下のようになります。
public class ARCameraDetector : MonoBehaviour
{
    private Texture2D tempBuffer = null;
    private Texture2D m_Texture = null;

    unsafe void OnCameraFrameReceived(ARCameraFrameEventArgs eventArgs)
    {
        if (!cameraManager.TryAcquireLatestCpuImage(out XRCpuImage image))
            return;

        currentConversionParam.inputRect = new RectInt(0, 0, image.width, image.height);
        currentConversionParam.outputDimensions = new Vector2Int(image.width, image.height);
        currentConversionParam.outputFormat = TextureFormat.RGBA32;
        currentConversionParam.transformation = XRCpuImage.Transformation.MirrorY;


        // See how many bytes you need to store the final image.
        int size = image.GetConvertedDataSize(currentConversionParam);

        // Allocate a buffer to store the image.
        var buffer = new NativeArray<byte>(size, Allocator.Temp);

        // Extract the image data
        image.Convert(currentConversionParam, new IntPtr(buffer.GetUnsafePtr()), buffer.Length);

        // The image was converted to RGBA32 format and written into the provided buffer
        // so you can dispose of the XRCpuImage. You must do this or it will leak resources.
        image.Dispose();

        // At this point, you can process the image, pass it to a computer vision algorithm, etc.
        // In this example, you apply it to a texture to visualize it.

        // You've got the data; let's put it into a texture so you can visualize it.
        ReCreateTexture(ref tempBuffer, currentConversionParam.outputDimensions, currentConversionParam.outputFormat);


        tempBuffer.LoadRawTextureData(buffer);
        tempBuffer.Apply();


        if (UnityEngine.Input.deviceOrientation == DeviceOrientation.Portrait)
        {
            Vector2Int dimension = Vector2Int.zero;
            dimension.x = currentConversionParam.outputDimensions.y;
            dimension.y = currentConversionParam.outputDimensions.x;
            ReCreateTexture(ref m_Texture, dimension, currentConversionParam.outputFormat);

            // 90° rotate
            for (int y = 0; y < image.height; y++)
            {
                for (int x = 0; x < image.width; x++)
                {
                    m_Texture.SetPixel(image.height - y - 1, x,  tempBuffer.GetPixel(x, y));
                }
            }
            m_Texture.Apply();
        }
        else if (UnityEngine.Input.deviceOrientation == DeviceOrientation.LandscapeLeft)
        {
            ReCreateTexture(ref m_Texture, currentConversionParam.outputDimensions, currentConversionParam.outputFormat);
            // 180° rotate
            for (int y = 0; y < image.height; y++)
            {
                for (int x = 0; x < image.width; x++)
                {
                    m_Texture.SetPixel(image.width - x - 1, image.height - y - 1, tempBuffer.GetPixel(x, y));
                }
            }
            m_Texture.Apply();
        }
        else if (UnityEngine.Input.deviceOrientation == DeviceOrientation.PortraitUpsideDown)
        {
            Vector2Int dimension = Vector2Int.zero;
            dimension.x = currentConversionParam.outputDimensions.y;
            dimension.y = currentConversionParam.outputDimensions.x;
            ReCreateTexture(ref m_Texture, dimension, currentConversionParam.outputFormat);

            // 270° rotate
            for (int y = 0; y < image.height; y++)
            {
                for (int x = 0; x < image.width; x++)
                {
                    m_Texture.SetPixel(y, image.width - x - 1, tempBuffer.GetPixel(x, y));
                }
            }
            m_Texture.Apply();
        }
        else
        {
            m_Texture = tempBuffer;
        }


        // Done with your temporary data, so you can dispose it.
        buffer.Dispose();
    }

    protected void ReCreateTexture(ref Texture2D tex, in Vector2Int size, TextureFormat foramt)
    {
        // Check necessity
        if (tex != null
            && Mathf.RoundToInt(tex.texelSize.x) == size.x
            && Mathf.RoundToInt(tex.texelSize.y) == size.y)
        {
            return;
        }

        if (tex != null )
        {
            var prev = tex;
            tex = null;
            Destroy(prev);
        }
        tex = new Texture2D(
            size.x,
            size.y,
            foramt,
            false);
    }
}
m_Texture.Apply(); 以降に画面の回転に応じてTextureを回転させて上書きしています。
また、Textureですが、サンプルのままだと毎回Texture2Dを生成していて、過去のテクスチャは放置されているのでこのまま実行するとメモリリークを引き起こします。
そのためReCreateTexture 関数を用意して内部で必要に応じて生成するかどうかの判断と、不要なテクスチャはDestroyしてメモリリークを防ぐ対策を入れています。
注意点その3
公式サンプルはポインタを扱う特性上 unsafe です。
そのためProjectSettingsからunsafeを許可するようにしないとエラーになります。
Player→OtherSettings 下部にある Allow unsafe code のチェックを入れてください。

修正版コード
最終的には以下のようになります。
public class CameraImageExample : MonoBehaviour
{
    private Texture2D tempBuffer = null;
    private Texture2D m_Texture = null;
    public Texture2D CurrentArImage => m_Texture;
    [SerializeField]ARCameraManager cameraManager = null;
    private XRCpuImage.ConversionParams currentConversionParam;
    void OnEnable()
    {
        cameraManager.frameReceived += OnCameraFrameReceived;
    }

    void OnDisable()
    {
        cameraManager.frameReceived -= OnCameraFrameReceived;
    }

    unsafe void OnCameraFrameReceived(ARCameraFrameEventArgs eventArgs)
    {
        if (!cameraManager.TryAcquireLatestCpuImage(out XRCpuImage image))
            return;


        currentConversionParam.inputRect = new RectInt(0, 0, image.width, image.height);
        currentConversionParam.outputDimensions = new Vector2Int(image.width, image.height);
        currentConversionParam.outputFormat = TextureFormat.RGBA32;
        currentConversionParam.transformation = XRCpuImage.Transformation.MirrorY;


        // See how many bytes you need to store the final image.
        int size = image.GetConvertedDataSize(currentConversionParam);

        // Allocate a buffer to store the image.
        var buffer = new NativeArray<byte>(size, Allocator.Temp);

        // Extract the image data
        image.Convert(currentConversionParam, new IntPtr(buffer.GetUnsafePtr()), buffer.Length);

        // The image was converted to RGBA32 format and written into the provided buffer
        // so you can dispose of the XRCpuImage. You must do this or it will leak resources.
        image.Dispose();


        // At this point, you can process the image, pass it to a computer vision algorithm, etc.
        // In this example, you apply it to a texture to visualize it.

        // You've got the data; let's put it into a texture so you can visualize it.
        ReCreateTexture(ref tempBuffer, currentConversionParam.outputDimensions, currentConversionParam.outputFormat);

        tempBuffer.LoadRawTextureData(buffer);
        tempBuffer.Apply();

        if (UnityEngine.Input.deviceOrientation == DeviceOrientation.Portrait)
        {
            Vector2Int dimension = Vector2Int.zero;
            dimension.x = currentConversionParam.outputDimensions.y;
            dimension.y = currentConversionParam.outputDimensions.x;
            ReCreateTexture(ref m_Texture, dimension, currentConversionParam.outputFormat);

            // 90° rotate
            for (int y = 0; y < image.height; y++)
            {
                for (int x = 0; x < image.width; x++)
                {
                    m_Texture.SetPixel(image.height - y - 1, x,  tempBuffer.GetPixel(x, y));
                }
            }
            m_Texture.Apply();
        }
        else if (UnityEngine.Input.deviceOrientation == DeviceOrientation.LandscapeLeft)
        {
            ReCreateTexture(ref m_Texture, currentConversionParam.outputDimensions, currentConversionParam.outputFormat);

            // 180° rotate
            for (int y = 0; y < image.height; y++)
            {
                for (int x = 0; x < image.width; x++)
                {
                    m_Texture.SetPixel(image.width - x - 1, image.height - y - 1, tempBuffer.GetPixel(x, y));
                }
            }
            m_Texture.Apply();
        }
        else if (UnityEngine.Input.deviceOrientation == DeviceOrientation.PortraitUpsideDown)
        {
            Vector2Int dimension = Vector2Int.zero;
            dimension.x = currentConversionParam.outputDimensions.y;
            dimension.y = currentConversionParam.outputDimensions.x;
            ReCreateTexture(ref m_Texture, dimension, currentConversionParam.outputFormat);

            // 270° rotate
            for (int y = 0; y < image.height; y++)
            {
                for (int x = 0; x < image.width; x++)
                {
                    m_Texture.SetPixel(y, image.width - x - 1, tempBuffer.GetPixel(x, y));
                }
            }
            m_Texture.Apply();
        }
        else
        {
            m_Texture = tempBuffer;
        }
        // Done with your temporary data, so you can dispose it.
        buffer.Dispose();
    }

    protected void ReCreateTexture(ref Texture2D tex, in Vector2Int size, TextureFormat foramt)
    {
        // Check necessity
        if (tex != null
            && Mathf.RoundToInt(tex.texelSize.x) == size.x
            && Mathf.RoundToInt(tex.texelSize.y) == size.y)
        {
            return;
        }

        if (tex != null )
        {
            var prev = tex;
            tex = null;
            Destroy(prev);
        }
        tex = new Texture2D(
            size.x,
            size.y,
            foramt,
            false);
    }
}
まとめ
ARCamera画像取得APIは癖があるため、そのまま使える場合と使えない場合があります。
必要に応じて回転処理を加えてあげることで普通に利用できるようになるため、使う時は注意しましょう。