1. はじめに
この記事は、2025年2月14日にリポジトリが公開された int-ball2_simulator の環境構築を行った際のメモとして残しています。
実際の起動画面はこちら

なお、手順書は INSTALL.md や docs/manual/*.pdf に記載があります。
本記事では2025年4月1日時点で動作確認が取れた手順を示しており、参考として現時点でのハッシュを以下に示しておきます。
git log --oneline -1
2ab1c78 (HEAD -> main, tag: v0.1.0, origin/main, origin/HEAD) Update READMEs
なるべく脳死コピペで構築できるようにしているつもりですが、途中のヒントや注意点なども読んでいただけると応用が利くかもしれません。
なお、ROS melodic を動かすためには、Ubuntu 18.04 環境が必要です。
Windows であれば WSL2 で、Ubuntu 22.04 以降であれば以下の記事で Ubuntu 18.04 を構築することができます。
2. JAXA の必要なリポジトリを取得
JAXA のリポジトリを${HOME}直下に配置しておきます
以降、pdf を閲覧したい場合は ${HOME}/IB2/docs/manual/ からアクセスできます
cd
git clone https://github.com/jaxa/int-ball2_simulator.git IB2
git clone https://github.com/jaxa/int-ball2_platform_works.git platform_works
3. Ubuntu18.04 の基本機能のインストール
おまじない的にすべて最新に更新
sudo apt update && sudo apt full-upgrade -y
GUIに必要な基本機能を入れておく
sudo apt install -y ubuntu-gnome-desktop fonts-roboto
4. Gazebo のインストール準備(インストールしない)
Gazebo は最新にしたいため、以下のコマンドで apt 用のリポジトリを取り込む
curl -sSL http://get.gazebosim.org | sh によるインストールでは動かなかったので注意。
sudo apt remove --purge gazebo* ros-melodic-gazebo* で削除して以下をやり直すと解消するはず。
sudo sh -c 'echo "deb http://packages.osrfoundation.org/gazebo/ubuntu-stable `lsb_release -cs` main" > /etc/apt/sources.list.d/gazebo-stable.list'
wget https://packages.osrfoundation.org/gazebo.key -O - | sudo apt-key add -
5. ROS melodic をインストール
ROS melodic のリポジトリを取り込む
sudo sh -c 'echo "deb http://packages.ros.org/ros/ubuntu $(lsb_release -sc) main" > /etc/apt/sources.list.d/ros-latest.list'
sudo apt install curl # if you haven't already installed curl
curl -s https://raw.githubusercontent.com/ros/rosdistro/master/ros.asc | sudo apt-key add -
sudo apt update
必要なパッケージをインストール
sudo apt install -y ros-melodic-desktop python-rosdep python-rosinstall python-rosinstall-generator python-wstool build-essential
Gazebo 連携のためのパッケージをインストール
sudo apt install -y ros-melodic-gazebo-*
次回ログイン時にROSの設定を有効化するために ~/.bashrc に追加
echo "source /opt/ros/melodic/setup.bash" >> ~/.bashrc
source ~/.bashrc
6. Python3 のインストール
python3 と pip3 をインストール
sudo apt install -y python3 python3-pip
pip3 で ROS 関連のパッケージをインストール
(ubuntu18.04時代なので venv とか不要)
pip3 install --user rospkg empy==3.3.4
catkin で利用する python のバージョンを、以下のファイルを変更して 3 にする
sudo nano /opt/ros/melodic/etc/catkin/profile.d/1.ros_python_version.sh
ubuntu@ros1-melodic:~$ cat /opt/ros/melodic/etc/catkin/profile.d/1.ros_python_version.sh
# generated from ros_environment/env-hooks/1.ros_python_version.sh.in

export ROS_PYTHON_VERSION=3
7. 地上運用支援ツールの環境構築
地上運用支援ツールが利用するバイナリやライブラリを、インストーラーやソースからビルドしてインストールする。
あまり行儀の良い行為ではないですが、/usr/local/src ディレクトリをユーザー権限で書き換え可能にしておく。
sudo chmod 777 /usr/local/src
7.1. Nasm のインストール
mkdir -p ~/tools && cd ~/tools
wget https://www.nasm.us/pub/nasm/releasebuilds/2.15.05/nasm-2.15.05.tar.gz
tar xf nasm-2.15.05.tar.gz -C /usr/local/src
cd /usr/local/src/nasm-2.15.05
./configure
make -j 8
sudo make install
7.2. x264 のインストール
最新のソースコードを git で取得
cd /usr/local/src
git clone https://code.videolan.org/videolan/x264.git
cd x264
念の為、動作を確認したときのハッシュ
ubuntu@ros1-melodic:/usr/local/src/x264$ git log --oneline -1
fe9e4a7f (HEAD -> master, origin/master, origin/HEAD) Provide implementations for functions using the instructions SDOT/UDOT in the DotProd Armv8 extension.
./configure --disable-asm --enable-shared --enable-static --enable-pic
make -j 8
sudo make install
7.3. ffmpeg のインストール
ffmpeg のバージョンをタグで指定して取得
cd /usr/local/src
git clone https://github.com/FFmpeg/FFmpeg.git -b n4.1.3
cd FFmpeg
./configure --extra-cflags="-I/usr/local/include" --extra-ldflags="-L/usr/local/lib" --extra-libs="-lpthread -lm -ldl -lpng" --enable-pic --disable-programs --enable-shared --enable-gpl --enable-libx264 --enable-encoder=png --enable-version3
make -j 8
sudo make install
7.4. VLC media player のインストール
まずはビルドに必要なツール・ライブラリのインストール
sudo apt install -y libasound2-dev libxcb-shm0-dev libxcb-xv0-dev libxcb-keysyms1-dev libxcb-randr0-dev libxcb-composite0-dev lua5.2 lua5.2-dev protobuf-compiler bison libdvbpsi-dev libpulse-dev
cd ~/tools
wget https://repo.jing.rocks/videolan/vlc/3.0.7.1/vlc-3.0.7.1.tar.xz
tar xf vlc-3.0.7.1.tar.xz -C /usr/local/src
vlc のソースコードを git で取得した場合 autoreconf -i で configure を生成してもうまくビルドが通りませんでした。
wget の方だとすんなり通るのでこちらを使いましょう。
cd /usr/local/src/vlc-3.0.7.1
CFLAGS="-I/usr/local/include" \
LDFLAGS="-L/usr/local/lib" \
X264_CFLAGS="-L/usr/local/lib -I/usr/local/include" \
X264_LIBS="-lx264" \
X26410b_CFLAGS="-L/usr/local/lib -I/usr/local/include" \
X26410b_LIBS="-lx264" \
AVCODEC_CFLAGS="-L/usr/local/lib -I/usr/local/include" \
AVCODEC_LIBS="-lavformat -lavcodec -lavutil" \
AVFORMAT_CFLAGS="-L/usr/local/lib -I/usr/local/include" \
AVFORMAT_LIBS="-lavformat -lavcodec -lavutil" \
./configure \
--disable-a52 \
--enable-merge-ffmpeg \
--enable-x264 \
--enable-x26410b \
--enable-dvbpsi

make -j 8
インストールと、以降でソースコードを参照するためにリンクを張っておく
sudo make install
ln -sf /usr/local/src/vlc-3.0.7.1 /usr/local/src/vlc
7.5. Qt のインストール
インストーラーを使ってインストール
※ Qtへアカウント登録が必要です
(Ubuntu18.04 の System 側の Qt は 5.9.5 なので CMakeLists.txt の修正で簡略化できるかも?)
cd ~/tools
wget https://download.qt.io/archive/qt/5.12/5.12.3/qt-opensource-linux-x64-5.12.3.run
chmod +x qt-opensource-linux-x64-5.12.3.run
sudo ./qt-opensource-linux-x64-5.12.3.run
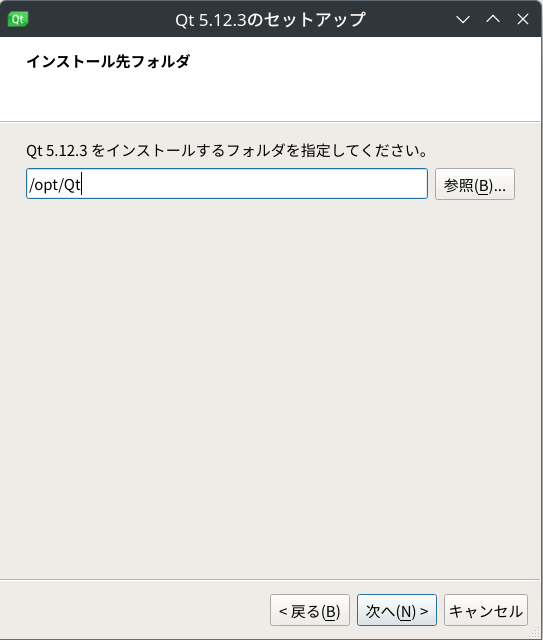
インストール先は /opt/Qt に変更し、コンポーネントは Desktop gcc 64-bit のみでOK
最後、シンボリックリンクでバージョン濁し
sudo ln -sf /opt/Qt/5.12.3 /opt/Qt/5
8. Int-Ball2 技術実証プラットフォームシミュレータの環境構築
8.1. docker の準備
docker リポジトリを取り込む
sudo install -m 0755 -d /etc/apt/keyrings
sudo curl -fsSL https://download.docker.com/linux/ubuntu/gpg -o /etc/apt/keyrings/docker.asc
sudo chmod a+r /etc/apt/keyrings/docker.asc

echo \
  "deb [arch=$(dpkg --print-architecture) signed-by=/etc/apt/keyrings/docker.asc] https://download.docker.com/linux/ubuntu \
  $(. /etc/os-release && echo "${UBUNTU_CODENAME:-$VERSION_CODENAME}") stable" | \
  sudo tee /etc/apt/sources.list.d/docker.list > /dev/null
sudo apt-get update
docker のインストール
sudo apt-get install -y docker-ce docker-ce-cli containerd.io docker-buildx-plugin docker-compose-plugin
docker 関連パッケージをインストール
pip3 install --user docker defusedxml netifaces
コンテナ用サービスを常時起動の設定
sudo systemctl enable docker docker.socket
sudo systemctl start docker.socket
自身を docker のグループに追加してサービス再起動
sudo gpasswd -a $USER docker
sudo chgrp docker /var/run/docker.sock
sudo service docker restart
ログインし直す
脳死コピペでは進めないので適宜お願いします
以下のように permission denied がでなければOK
ubuntu@ros1-melodic:~$ docker ps
CONTAINER ID   IMAGE     COMMAND   CREATED   STATUS    PORTS     NAMES
8.2. コンテナのセットアップ
cd ~/platform_works/platform_docker/template
docker build . -t ib2_user:0.1
9. Int-Ball2 GSE のビルド
cd ~/IB2/Int-Ball2_platform_gse/
source /opt/ros/melodic/setup.bash
catkin_make
sudo mkdir -p /var/log/ground_system && sudo chown $USER:$USER /var/log/ground_system
10. Int-Ball2 Simulator のビルド
必要なパッケージをインストール
sudo apt install -y libpcl-dev ros-melodic-pcl-ros
cd ~/IB2/Int-Ball2_platform_simulator/
catkin_make –DWITH_PCA9685=OFF
11. 起動
2つ起動する必要があるため、2つのコンソールを用意
11.1 Int-Ball2 GSE 起動
1つ目のコンソールで実行
cd ~/IB2/Int-Ball2_platform_gse/
source devel/setup.bash
roslaunch platform_gui bringup.launch
11.2 Int-Ball2 技術実証プラットフォームシミュレータ 起動
2つ目のコンソールで実行
cd ~/IB2/Int-Ball2_platform_simulator/
source devel/setup.bash
rosrun platform_sim_tools simulator_bringup.sh
これで起動するはず!


