概要
GaussView は Gaussian 社の提供する分子可視化ソフトである。主に Gaussian の計算結果を見るのに使われる。デフォルトのままでも十分に使いやすいが、カスタマイズすると作業効率が上がる。
gv > data 内のファイルを編集することで、GaussView の分子パレットを拡張することが可能である。 本記事では、拡張方法について解説する。
分子パレットの拡張
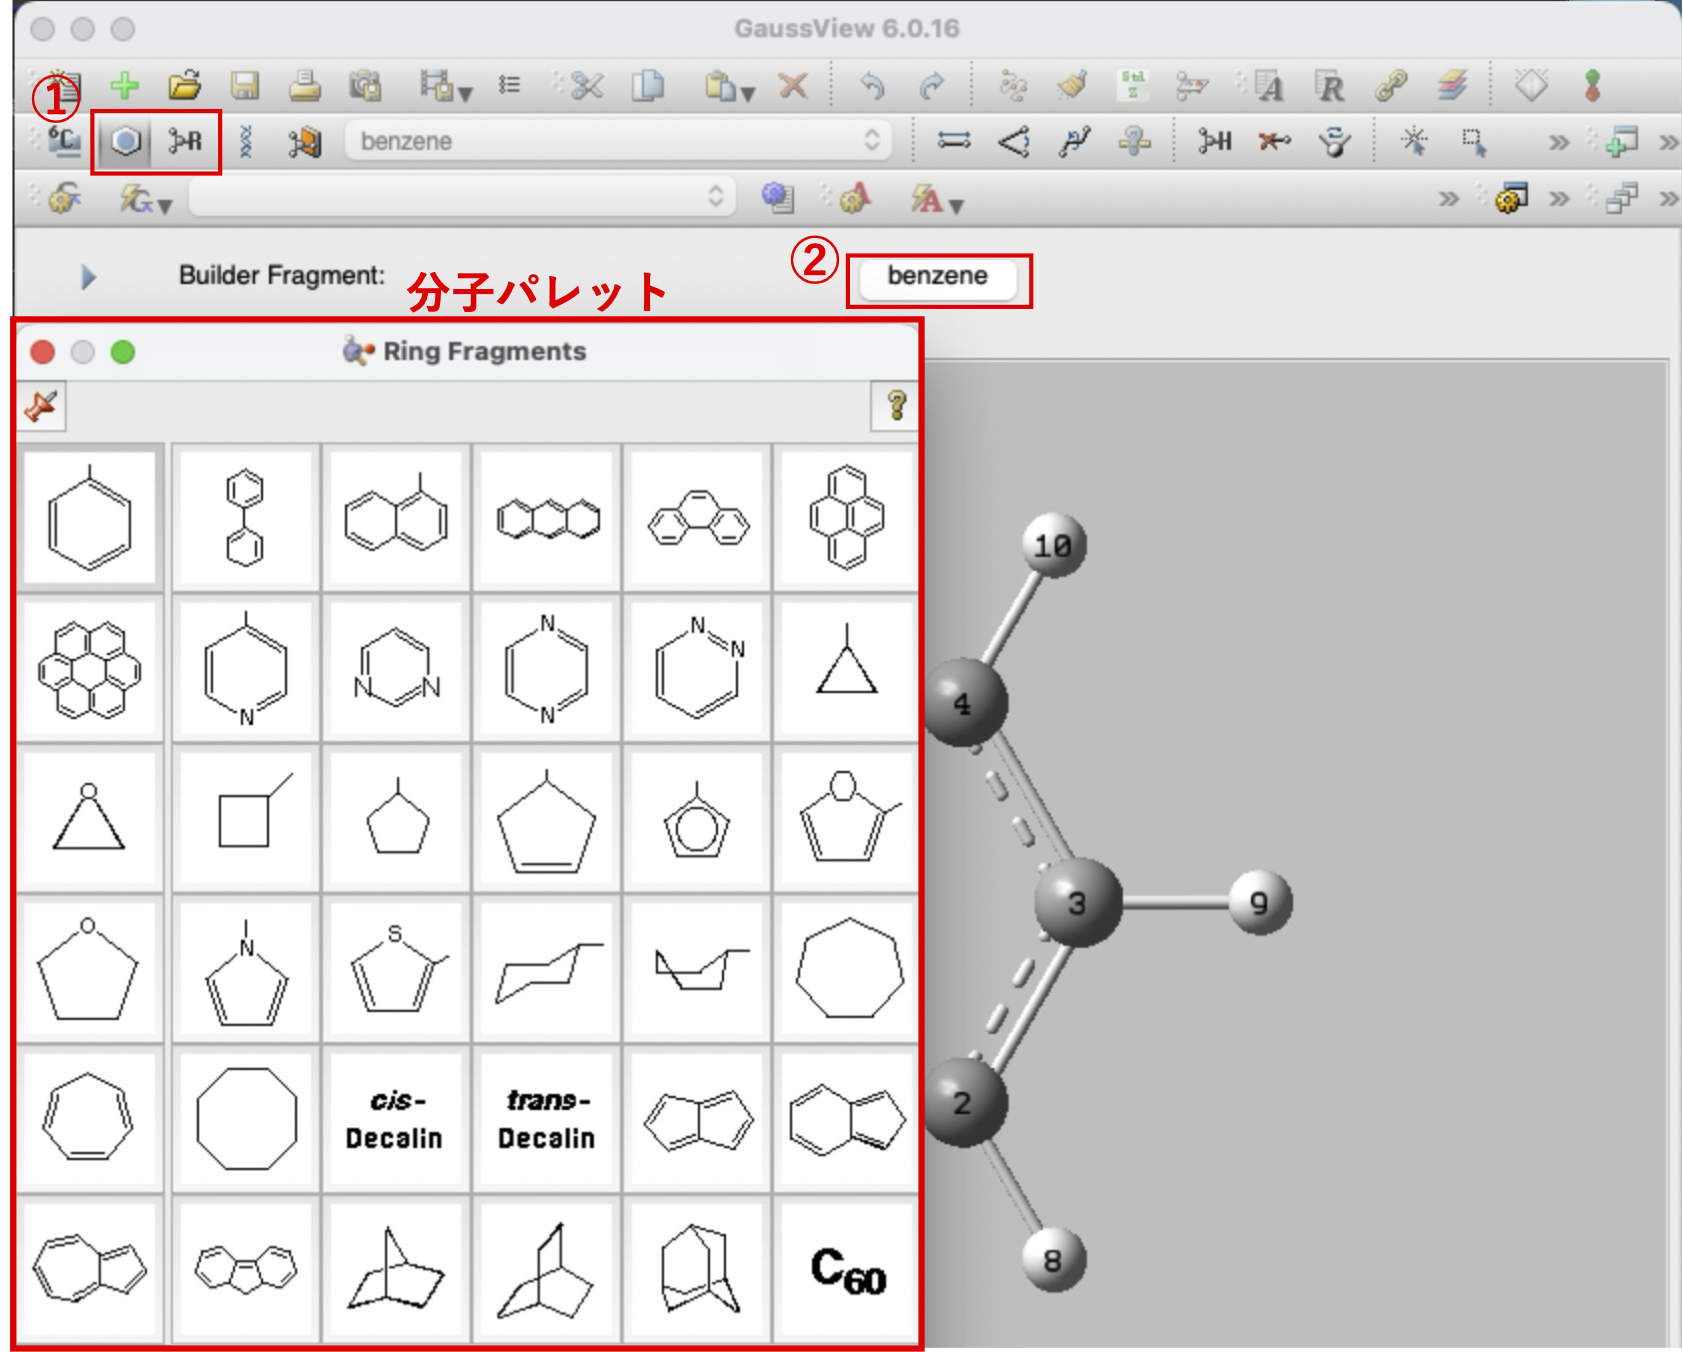
構造式を効率的に描くために、分子パレットを使います。GaussView のメニューの左上のベンゼン環のボタン(①)、または その隣の R ボタン(①)を押し、続いて中央のボタン(②)を押すと分子パレットが表示される。
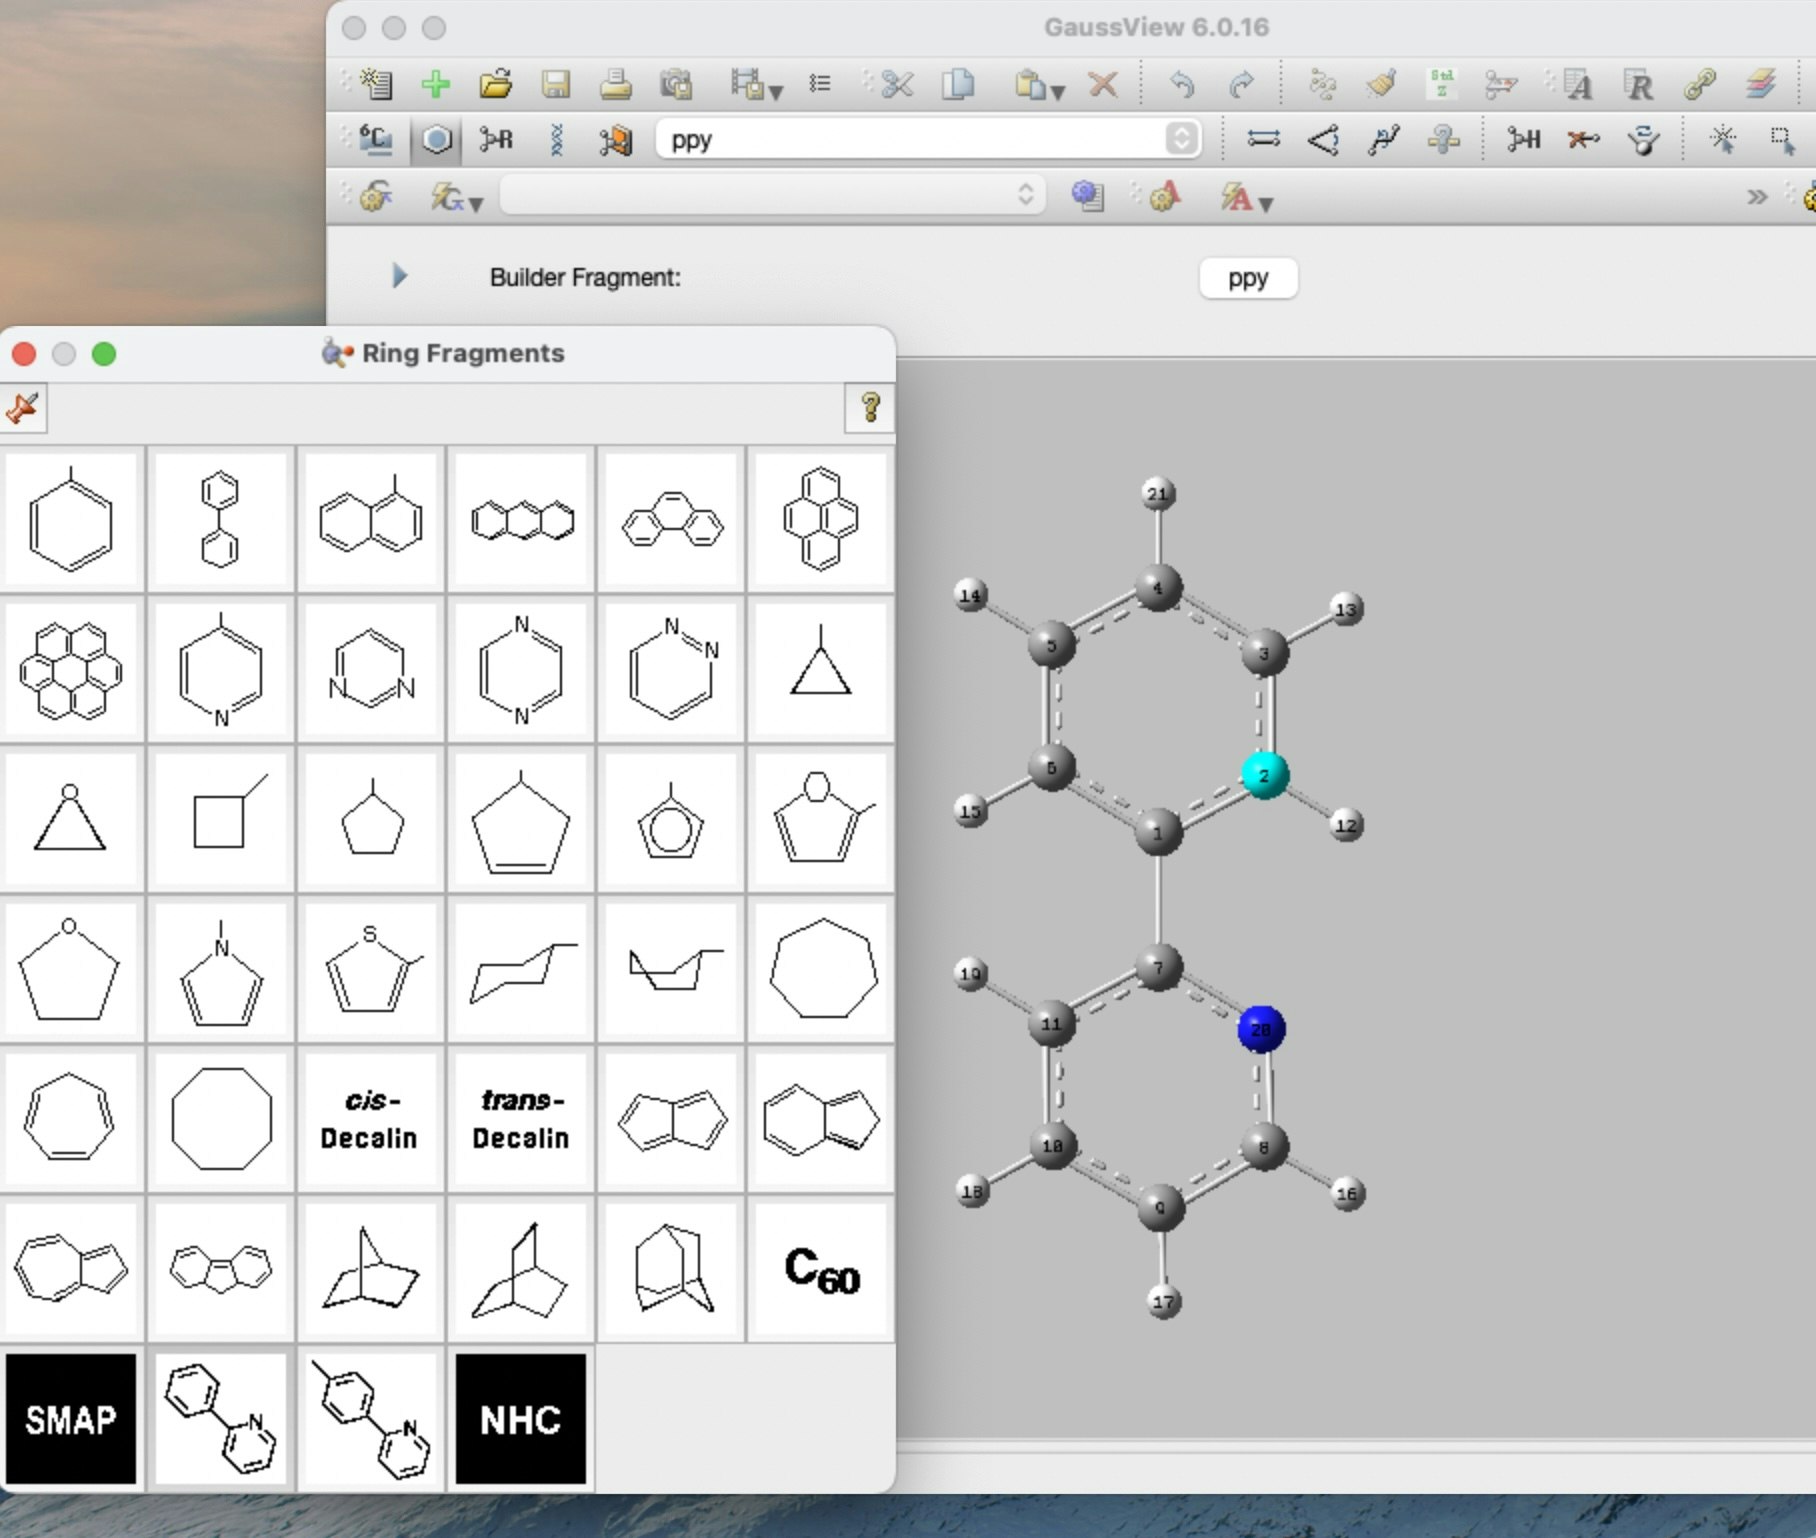
しかし、この分子パレットには使わないものも多く含まれている。例えば、C60 フラーレンは分野によっては使うことは一度もない。反応開発分野の研究者は、配位子などを分子パレットに入れた方が効率的に仕事を進めることができる。以下には、配位子を追加した分子パレットを表示している。
分子パレット関連ファイルの格納場所
GaussView の分子パレットは、環状分子(rings)とその他の分子(rgroups)の2グループに分けられている。これらの分子構造は、gv > data > rings または gv > data > rgroups 内のファイルに記述されている。bitmaps と fragments という2つのディレクトリと rings.ftb というファイルが存在する。
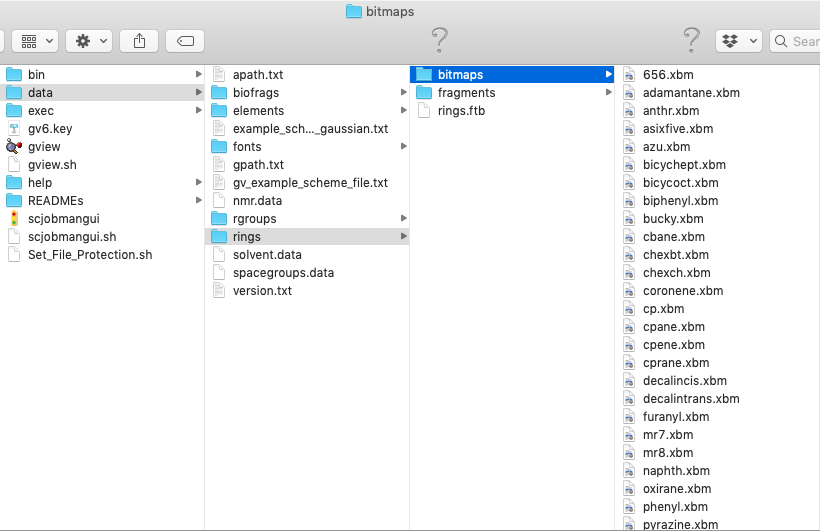
- bitmaps 内の hoge.xbm はアイコン画像のファイル
- fragments 内の hoge.frg は分子構造のファイル
- rings.ftb というファイルは、分子パレットの表示内容を指定する
上記のファイル等を作成・編集することで分子パレットを拡張することが可能である。
アイコン.xbm の作成
実際の分子パレットを見ると、構造式がアイコンのものと分子名がアイコンのものが存在している(Decalin や C60 など)。これらは、xbm で指定することができる。以下に xbm ファイルの作り方を示す。
- 分子構造のアイコンを作る際は、ChemDraw で構造を書き png 形式で保存する。
- 以下のスクリプトで png を xbm 形式に変換し、65 x 65 のサイズで保存する。
以下のスクリプトを png2xbm.py という名前で保存する。
from PIL import Image
import sys

def convert_to_xbm(input_file, output_file, size=(65, 65)):
    img = Image.open(input_file)
    img = img.resize(size)
    img = img.convert('L')
    img = img.point(lambda x: 0 if x < 128 else 1, '1')
    img.save(output_file)

    print(f"{input_file} を {output_file} に変換しました(サイズ: {size[0]}x{size[1]})")

if __name__ == "__main__":
    if len(sys.argv) < 3:
        print("使用方法: python png2xbm.py input.png output.xbm")
        sys.exit(1)

    input_file = sys.argv[1]   # 入力ファイル(PNG, JPG など)
    output_file = sys.argv[2]  # 出力ファイル(.xbm)

    # デフォルトサイズは65x65
    convert_to_xbm(input_file, output_file)
以下のように実行する
python png2xbm.py input.png output.xbm
xbm ファイルを構造式にする場合は、ChemDraw の Bond width を太め(0.081 cm 以上)にし、元素記号を大きめ(18 pt 以上)にする必要がある。二重結合の線幅が気になる場合は、Fixed Length を 0.8 以上にすると解消される。
ChemDraw の構造を直接 png にすると背景が黒色になってしまうので、構造式の後ろに白色の四角形の図形を配置すると良い。
分子構造.frg の作成
Gauss View で構造を作成し、.com 形式で保存する。
その後、以下のスクリプトを用いて frg 形式に変換する。
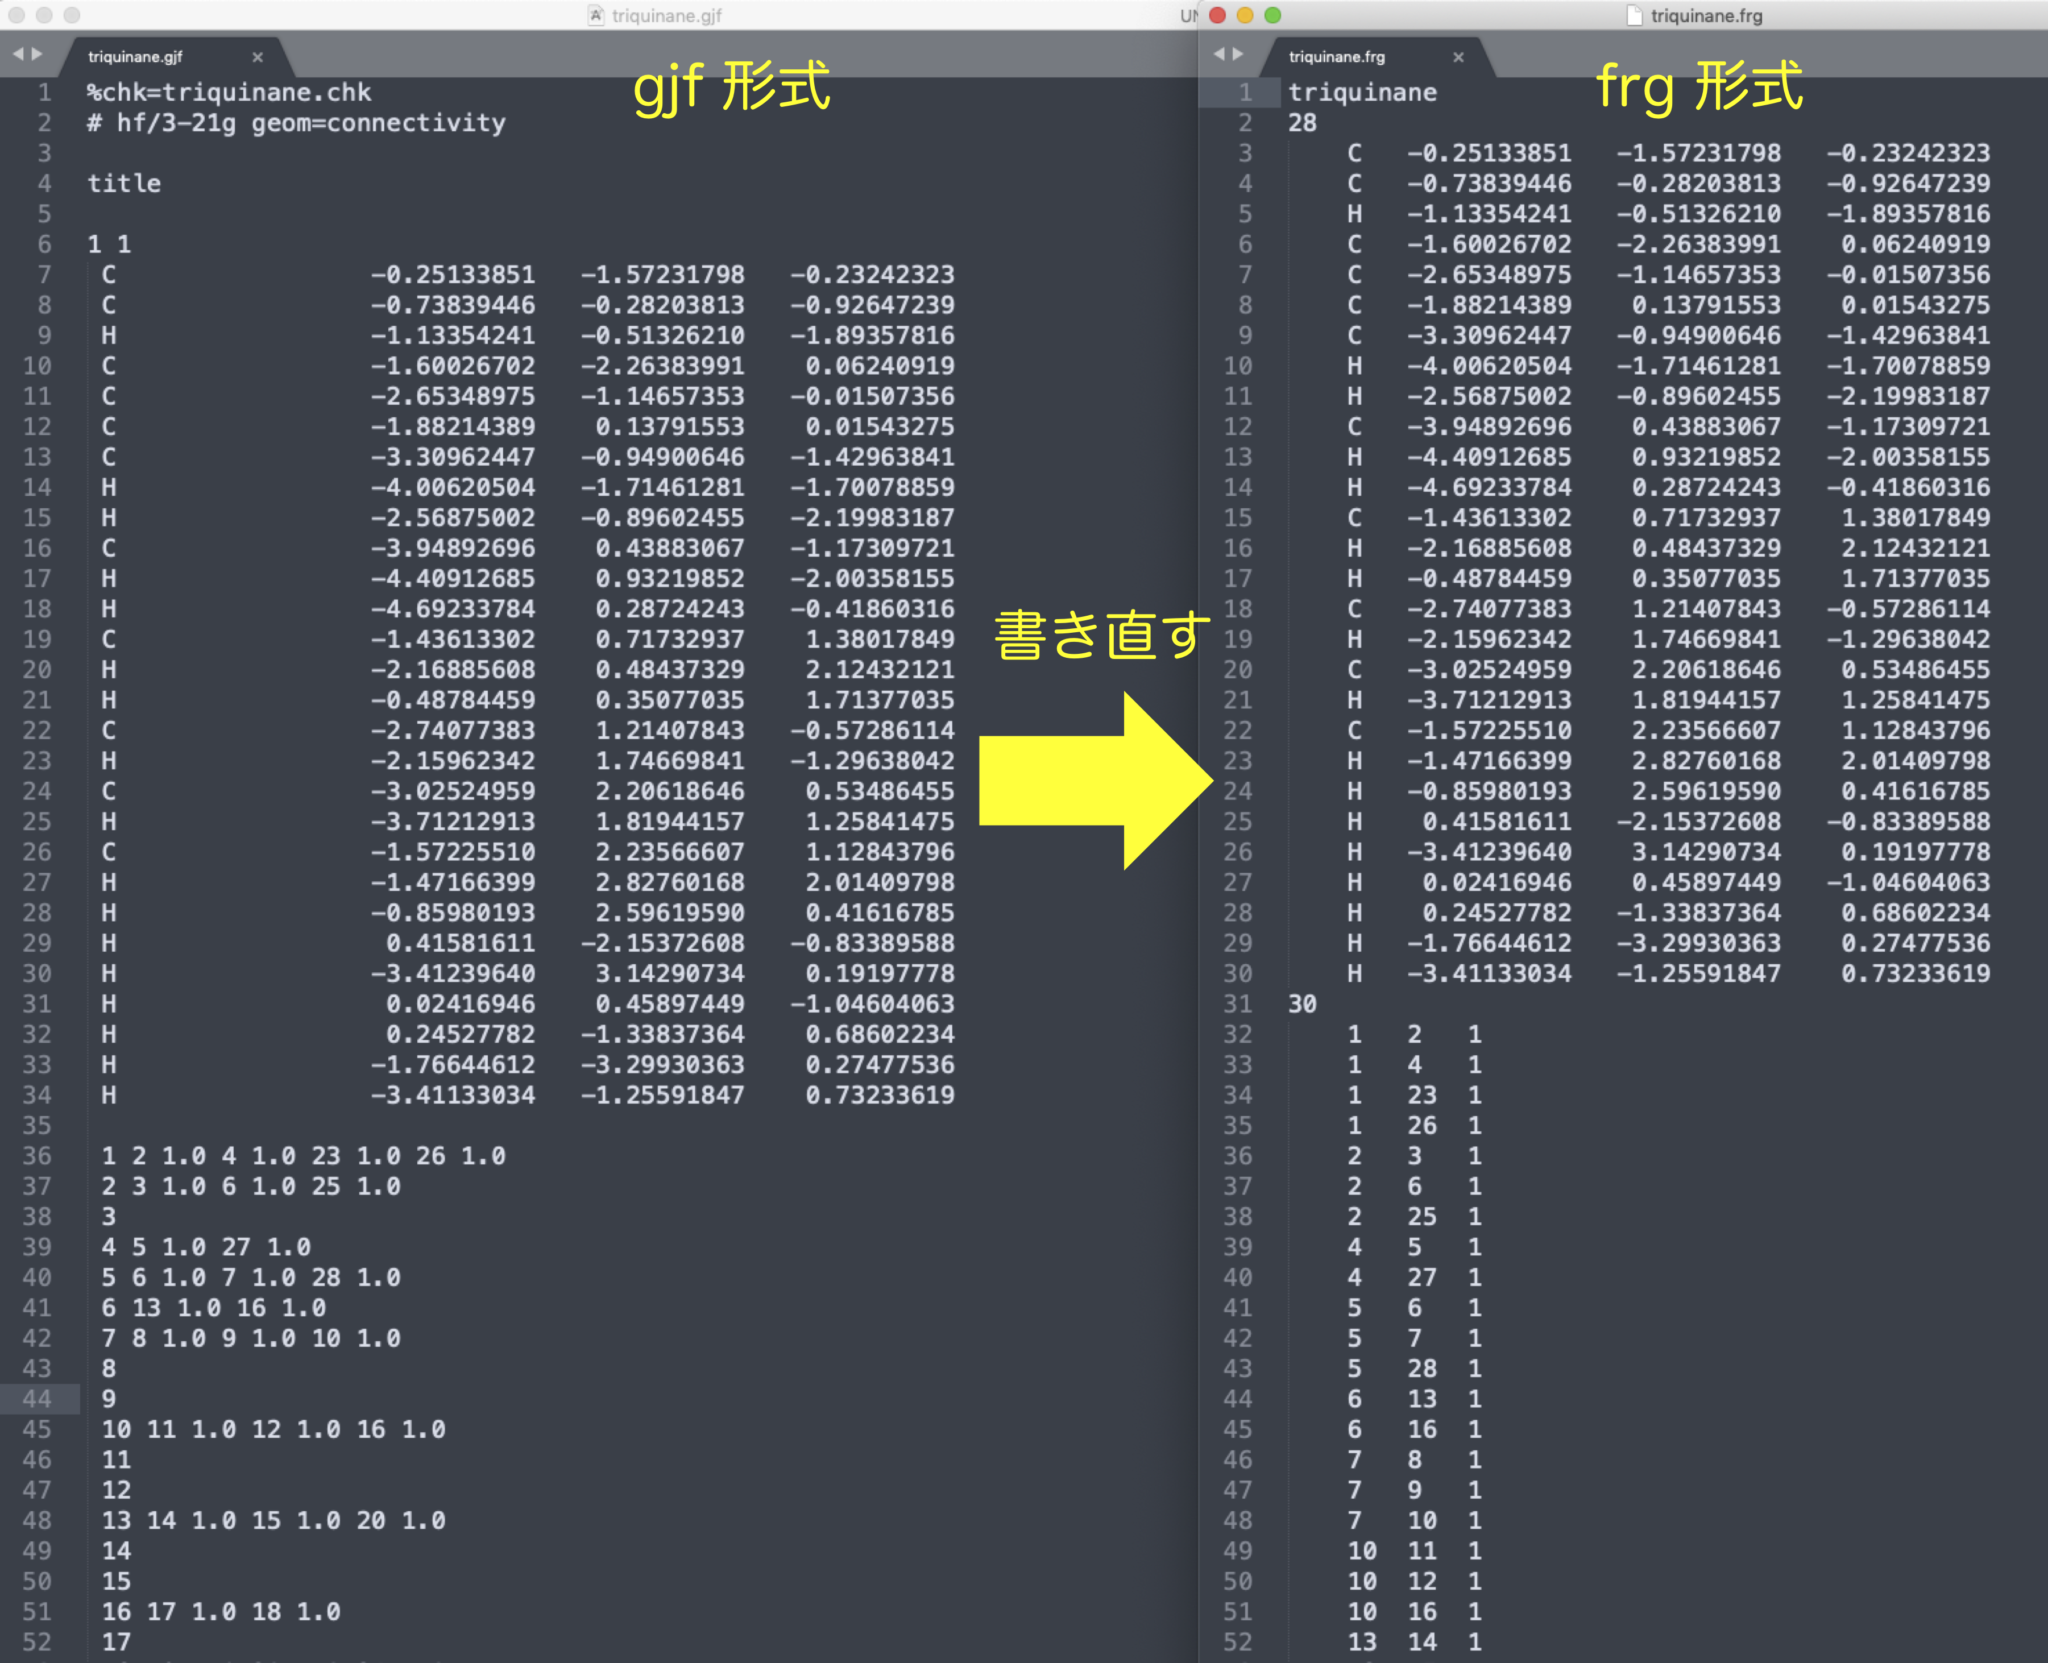
frg 形式の注意点は以下の通り。
- 1行目に分子名を書く
- 2行目に原子数を書く
- 座標は左寄せにせず、tab 1 個分のスペースを開ける。
- 元素名と x 座標の間も tab 1 個分です。
- その次に結合情報の行数を書く
以下のスクリプトを com2frg.py として保存する。
#!/usr/bin/env python3
#This script converts Gaussian .com input files to .frg fragment files.

import os
import re
import sys

def parse_gjf_file(gjf_path):
    """Parse a Gaussian .gjf file and extract coordinates and connectivity."""
    with open(gjf_path, 'r') as f:
        lines = f.readlines()

    # Extract molecule name from file name without numbers or special characters
    base_name = os.path.splitext(os.path.basename(gjf_path))[0]
    molecule_name = ''.join(c for c in base_name if c.isalpha())

    # Skip header lines to find coordinates section
    i = 0
    while i < len(lines) and not re.match(r'^\s*\d+\s+\d+\s*$', lines[i].strip()):
        i += 1

    if i >= len(lines):
        raise ValueError("Could not find charge and multiplicity line in .gjf file")

    i += 1  # Skip charge and multiplicity line

    # Parse coordinates
    atoms = []
    atom_coords = []
    j = i
    while j < len(lines) and lines[j].strip():
        parts = lines[j].strip().split()
        if len(parts) >= 4:
            atom_symbol = parts[0]
            x, y, z = float(parts[1]), float(parts[2]), float(parts[3])
            atoms.append(atom_symbol)
            atom_coords.append((x, y, z))
        j += 1

    num_atoms = len(atoms)

    # Parse connectivity section
    connectivity = []
    j += 1  # Skip empty line after coordinates

    while j < len(lines) and lines[j].strip():
        parts = lines[j].strip().split()
        if len(parts) >= 2:
            atom_idx = int(parts[0])
            for k in range(1, len(parts), 2):
                if k+1 < len(parts):
                    connected_atom = int(parts[k])
                    bond_type = parts[k+1].rstrip('.')
                    # In .frg files, bond types are represented differently:
                    # 1.0 -> 1, 1.5 -> 4, 2.0 -> 2, 3.0 -> 3
                    if bond_type == '1.0':
                        bond_type = '1'
                    elif bond_type == '1.5':
                        bond_type = '4'
                    elif bond_type == '2.0':
                        bond_type = '2'
                    elif bond_type == '3.0':
                        bond_type = '3'
                    connectivity.append((atom_idx, connected_atom, bond_type))
        j += 1

    return {
        'molecule_name': molecule_name,
        'num_atoms': num_atoms,
        'atoms': atoms,
        'coordinates': atom_coords,
        'connectivity': connectivity
    }


def normalize_coordinates(coords):
    """Normalize coordinates to set the first atom at (0,0,0)."""
    if not coords:
        return []

    # Get the coordinates of the first atom
    first_x, first_y, first_z = coords[0]

    # Translate all coordinates so the first atom is at origin
    normalized = []
    for x, y, z in coords:
        normalized.append((round(x - first_x, 8), round(y - first_y, 8), round(z - first_z, 8)))

    return normalized


def write_frg_file(output_path, mol_data):
    """Write the parsed molecular data to a .frg file."""
    with open(output_path, 'w') as f:
        # Write molecule name
        f.write(f"{mol_data['molecule_name']}\n")

        # Write number of atoms
        f.write(f"{mol_data['num_atoms']}\n")

        # Normalize coordinates to set first atom at origin
        normalized_coords = normalize_coordinates(mol_data['coordinates'])

        # Write atom coordinates section
        for i, ((x, y, z), atom) in enumerate(zip(normalized_coords, mol_data['atoms']), 1):
            f.write(f"    {atom:<2}   {x:11.8f}   {y:11.8f}   {z:11.8f}\n")

        # Create a list of all bond pairs
        bonds = []
        for atom1, atom2, bond_type in mol_data['connectivity']:
            bonds.append((atom1, atom2, bond_type))

        # Write number of bonds
        f.write(f"{len(bonds)}\n")

        # Write connectivity section
        for atom1, atom2, bond_type in sorted(bonds):
            f.write(f"    {atom1:<4} {atom2:<4} {bond_type}\n")


def convert_gjf_to_frg(gjf_path, output_dir=None):
    """Convert a .gjf file to .frg format."""
    if output_dir is None:
        output_dir = os.path.dirname(gjf_path)

    # Parse the .gjf file
    mol_data = parse_gjf_file(gjf_path)

    # Create output file path
    output_filename = f"{mol_data['molecule_name']}.frg"
    output_path = os.path.join(output_dir, output_filename)

    # Write the .frg file
    write_frg_file(output_path, mol_data)

    return output_path


def main():
    if len(sys.argv) < 2:
        print("Usage: python com2frg.py <input.gjf> [output_directory]")
        sys.exit(1)

    input_path = sys.argv[1]
    output_dir = sys.argv[2] if len(sys.argv) > 2 else None

    try:
        output_path = convert_gjf_to_frg(input_path, output_dir)
        print(f"Successfully converted to {output_path}")
    except Exception as e:
        print(f"Error: {str(e)}")
        sys.exit(1)


if __name__ == "__main__":
    main()
以下のコマンドで実行する。
python com2frg.py input.com
ftb ファイルの編集
.ftb ファイルの形式を以下に示す。
“分子名” アイコンファイル名.xbm 分子構造ファイル名.frg パレットの列番号 パレットの行番号
# Rings Fragment Table
#   Format: name pixmap fragment row col [atnum hotx hoty]
#   Tabstops = 20, Indexes = 0 ... n-1
nItems = 37         defaultItem = 0
"benzene"					phenyl.xbm			phenyl.frg			0	0
"biphenyl"					biphenyl.xbm		biphen.frg			0	1
"naphthalene"				naphth.xbm			naphth.frg			0	2
"anthracene"				anthr.xbm			anthr.frg			0	3
"phenanthrene"				rings3.xbm			rings3.frg			0	4
"pyrene"					rings4.xbm			rings4.frg			0	5
"coronene"					coronene.xbm		coronene.frg		1	0
"pyridine"					pyridinyl.xbm		pyridinyl.frg		1	1
"pyrimidine"				pyrimidine.xbm		pyrimidine.frg		1	2
"pyrazine"					pyrazine.xbm		pyrazine.frg		1   3
"pyridazine"				pyridazine.xbm		pyridazine.frg		1   4
"cyclopropane"				cprane.xbm			cprane.frg			1   5
"oxirane"					oxirane.xbm			oxirane.frg			2   0
"cyclobutane"				cbane.xbm			cbane.frg			2   1
"cyclopentane"				cpane.xbm			cpane.frg			2   2
"cyclopentene"				cpene.xbm			cpene.frg			2   3
"cyclopentadiene"			cp.xbm				cp.frg				2   4
"furan"						furanyl.xbm			furanyl.frg			2   5
"tetrahydrofuran"			thf.xbm				thf.frg				3   0
"pyrrole"					pyrryl.xbm			pyrryl.frg			3   1
"thiophene"					thiophenyl.xbm		thiophenyl.frg		3   2
以下省略
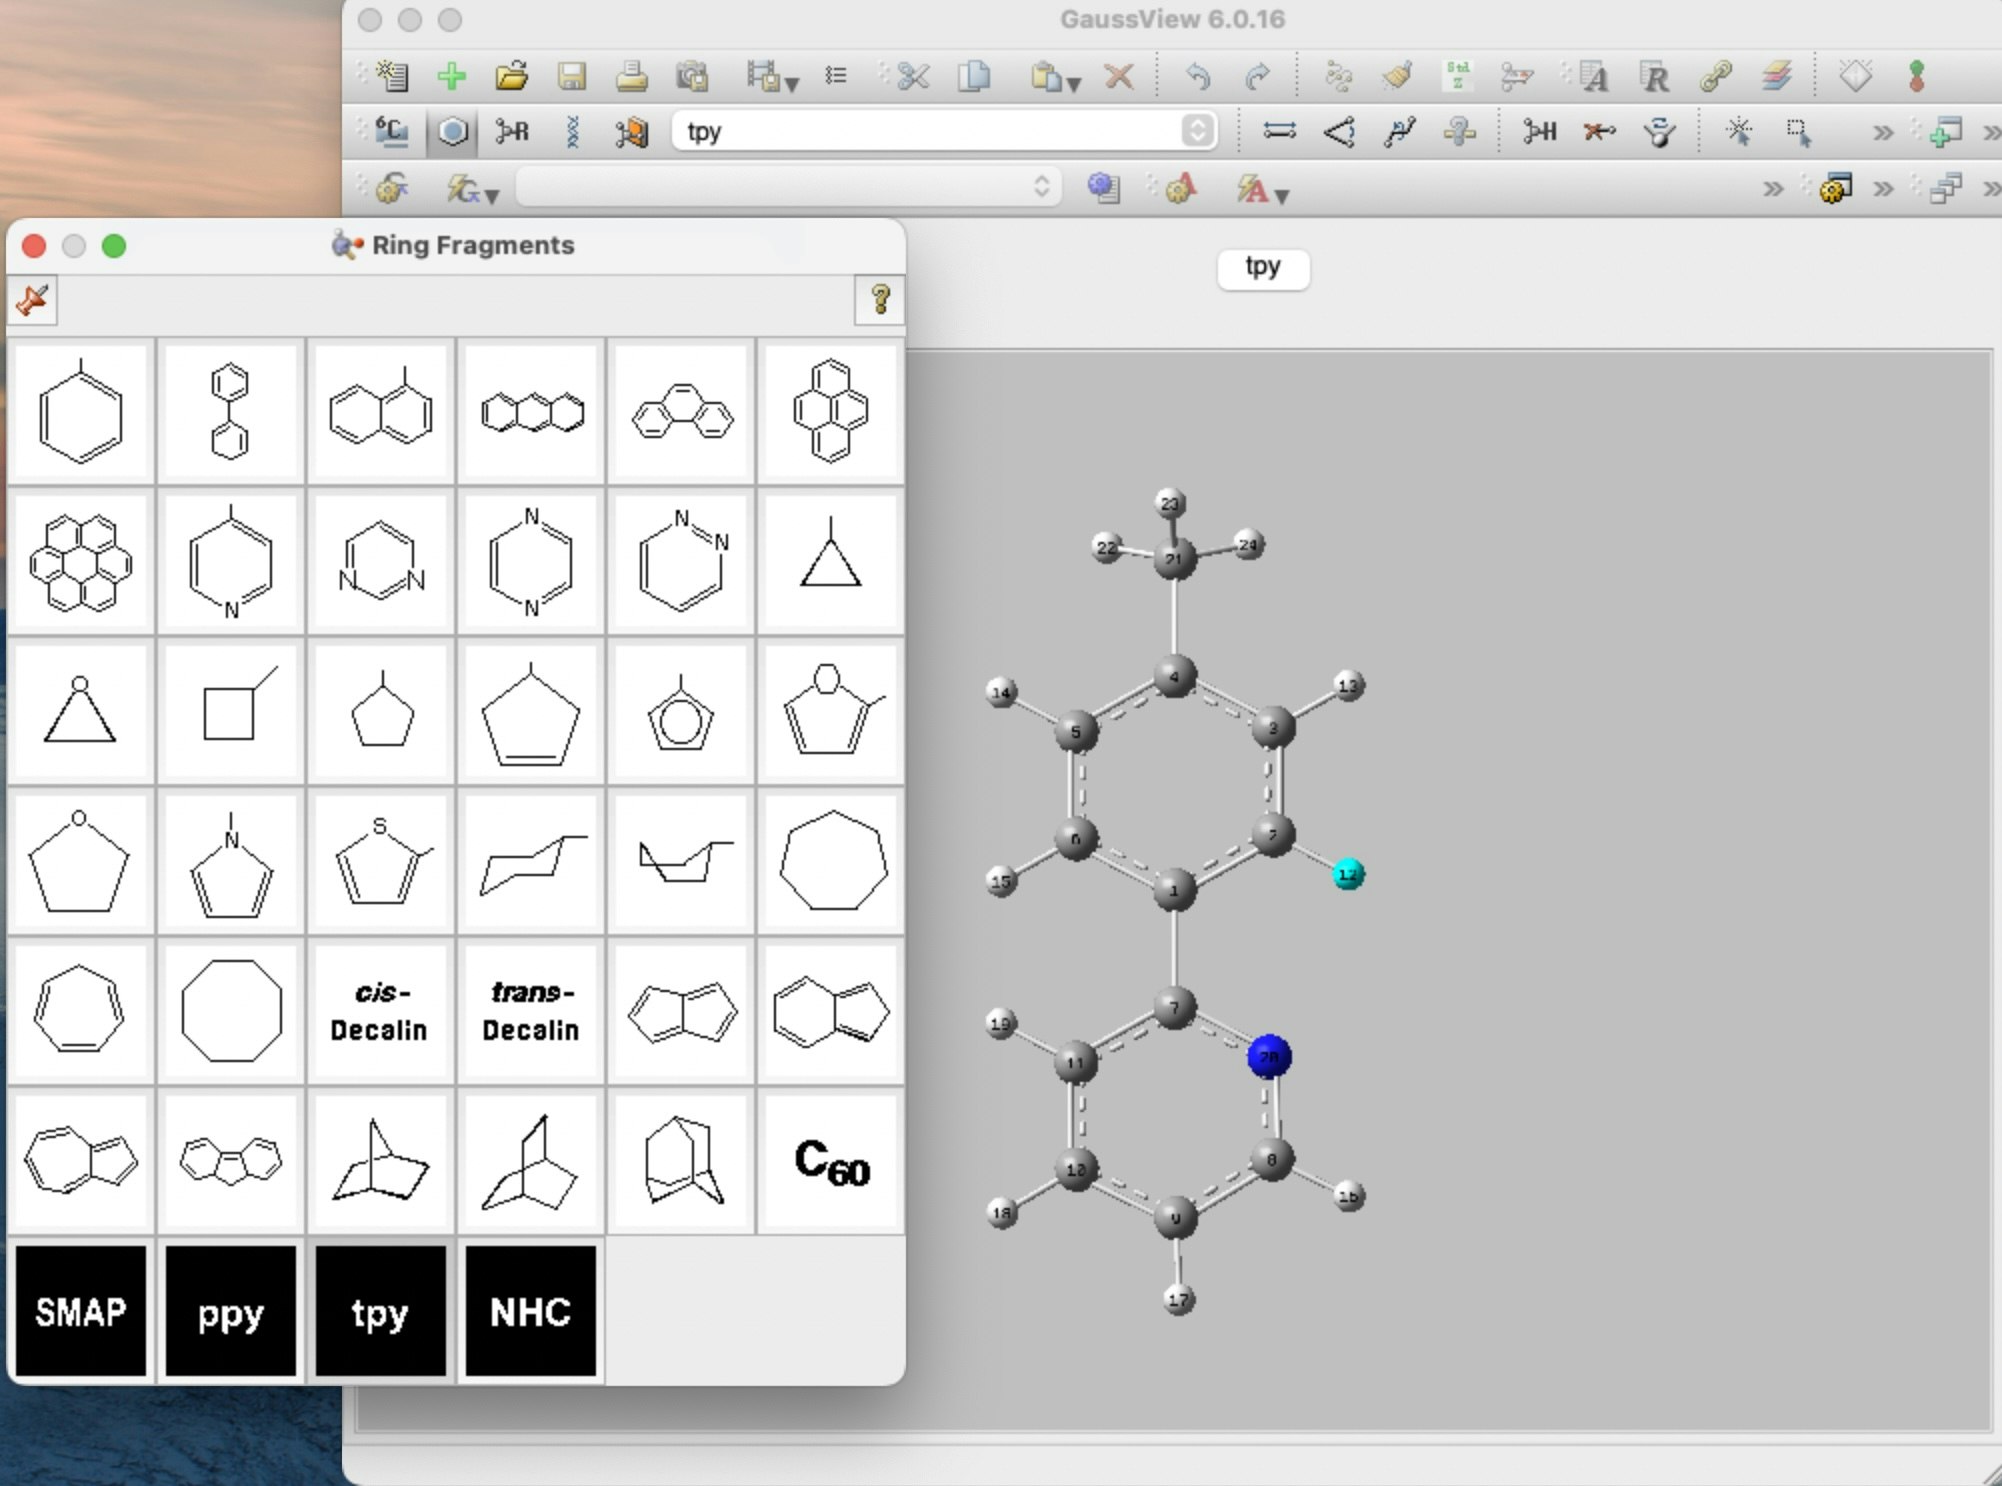
例えば、BINAP、SMAP、tpy を作成し、.ftb ファイルの末尾に以下のように追記すると、分子パレット上で7列目の1〜3行目に表示される。
"bicyclo[2.2.1]heptane"		bicychept.xbm		bicychept.frg		5   2
"bicyclo[2.2.2]octane"		bicycoct.xbm		bicycoct.frg		5   3
"adamantane"				adamantane.xbm		adamantane.frg		5   4
"fullerene"					bucky.xbm			bucky.frg		    5   5
"SMAP"                      SMAP.xbm            SMAP.frg            6   0 #追記
"ppy"                       ppy.xbm             ppy.frg             6   1 #追記
"tpy"                       tpy.xbm             tpy.frg             6   2 #追記
"NHC"                       NHC.xbm             NHC.frg             6   3 #追記
以下に実際の分子パレットの様子を示す。
新しく分子を追加した場合は、ファイル中4行目の nItems の番号を増やす必要がある。
今回は、配位子名をアルファベットで表す xbm ファイルを作成したが、ChemDraw の構造式を png ファイルで保存して png2xbm.py で変換すれば、構造式を分子パレット上に表示することも可能である。
本記事の前半の画像では ppy、tpy を構造式で追加したが、下図のようにアルファベット表記で追記した方が分かりやすい。