はじめに
今日は、エンジニア初級者による初級者のための投稿です。
iOSエンジニアにおなじみのNSAttributedStringを、少し深掘りしてみた話を書いてみたいと思います。
同じようにSwift勉強中の方に少しでもお役に立てれば幸いです!
NSAttributedStringとは
NSAttributedStringは、 テキスト(文字列)を装飾するためのクラスです。
UILabelやUITextFieldをオシャレに装飾するために皆さまよく利用されていると思います。
もちろんUILabelのtextColorプロパティなどを利用して、簡易的な装飾を行うことはできますが、
フォントの種類やサイズ、行間や縁取りなど、複雑な装飾を行うためには、NSAttributedStringを利用する必要があります。
使い方はカンタンで、
テキスト(string) + 装飾内容(attributes) -> NSAttributedString
と組み合わせるだけで生成できます。具体的にはNSAttributedStringのinit処理 init(string:attributes:) を利用します。
        // テキスト
        let text = "NSAttributedStringを試してみる"

        // 行間の設定
        let lineSpaceStyle = NSMutableParagraphStyle()
        lineSpaceStyle.lineSpacing = 20

        // 装飾する内容
        let attributes: [NSAttributedString.Key : Any] = [
            .font : UIFont.systemFont(ofSize: 24.0), // 文字色
            .foregroundColor : UIColor.orange, // カラー
            .strokeColor : UIColor.red, // 縁取りの色
            .paragraphStyle: lineSpaceStyle // 行間
        ]

        // UILabelを装飾
        let testLabel = UILabel()
        testLabel.attributedText = NSAttributedString(string: text, attributes: attributes)
attributesは[NSAttributedString.Key : Any]の辞書ですので、
複数の要素を一度に指定することができます。装飾できる種類(NSAttributedString.Key)は他にも多くありますので、ぜひ色々とお試しいただければと思います。
(参考)
NSAttributedString.Keyの一覧(apple公式ドキュメント)
テキストを装飾する/NSAttributedStringの属性一覧
NSMutableAttributedString
より自由に文字装飾を利用するためには、NSAttributedStringクラスを継承しているNSMutableAttributedStringが便利です。
Mutableの意味は「可変」ですので、
その名の通り、文字列を変更したり、装飾内容を変更したり、装飾された文字列を結合したり、とより柔軟に利用できるようになります。
こちらも使い方は難しくなく、以下のように生成することできます。
テキスト(string) + 装飾内容(attributes) -> NSMutableAttributedString
NSAttributedString -> NSMutableAttributedString
一つの例として、装飾された文字列を結合するサンプルです。
        // テキスト
        let text1 = "text1"

        // 装飾する内容
        let attributes1: [NSAttributedString.Key : Any] = [
            .font : UIFont.systemFont(ofSize: 100.0), // 文字色
            .foregroundColor : UIColor.orange // カラー
        ]

        // NSAttributedString
        let attributedText1 =  NSAttributedString(string: text1, attributes: attributes1)

        // NSAttributedString -> NSMutableAttributedString
        let mutableAttributedText1 = NSMutableAttributedString(attributedString: attributedText1)


        // テキスト
        let text2 = "text2"

        // 装飾する内容
        let attributes2: [NSAttributedString.Key : Any] = [
            .font : UIFont.systemFont(ofSize: 50.0), // 文字色
            .foregroundColor : UIColor.purple, // カラー
            .strokeColor : UIColor.blue, // 縁取り色
            .strokeWidth : -2 // 縁取りの太さ
        ]

        // string + attirbutes -> NSMutableAttributedString
        let mutableAttributedText2 = NSMutableAttributedString(string: text2, attributes: attributes2)

        // 結合
        mutableAttributedText1.append(mutableAttributedText2)

        // UILabelへ表示
        label.attributedText = mutableAttributedText1
結果はこのように装飾されます。
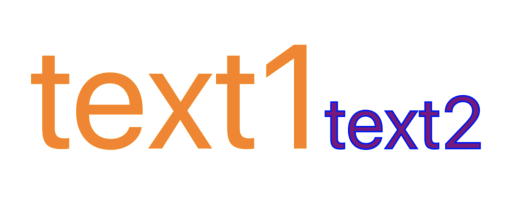
結合は配列にように.appendで対応できるのがわかりやすいですよね。
Custom Keyに値を埋め込む
前置きが長くなってしまいました。ここからが本論です。
装飾内容の種類を示すNSAttributedString.Keyですが、実はCustomで独自のKeyを設定することができます。
表示される文字列の裏に、何らかの値を保持しておきたい場合、非常に便利に利用することができます。
例えばユーザー名の裏にidを保持したり、<a>タグのようにリンク先URLを保持することも可能かと思います。
Keyの作成方法もシンプルです。
let testIDKey = NSAttributedString.Key(rawValue: "testID")
先ほどのサンプルの続きでtestIDKeyが埋め込まれた文字列(NSMutableAttributedString)を作成してみましょう。
        let testIDKey = NSAttributedString.Key(rawValue: "testID")

        // テキスト
        let text3 = "ここにKeyがあるよー"

        // 装飾する内容
        let attributes3: [NSAttributedString.Key : Any] = [
            .font : UIFont.systemFont(ofSize: 33.0), // 文字色
            .foregroundColor : UIColor.green, // カラー
            testIDKey: "id123456" // custom Key
        ]

        // string + attirbutes -> NSMutableAttributedString
        let mutableAttributedText3 = NSMutableAttributedString(string: text3, attributes: attributes3)

        // 結合
        mutableAttributedText1.append(mutableAttributedText3)

        // UILabelへ表示
        label.attributedText = mutableAttributedText1
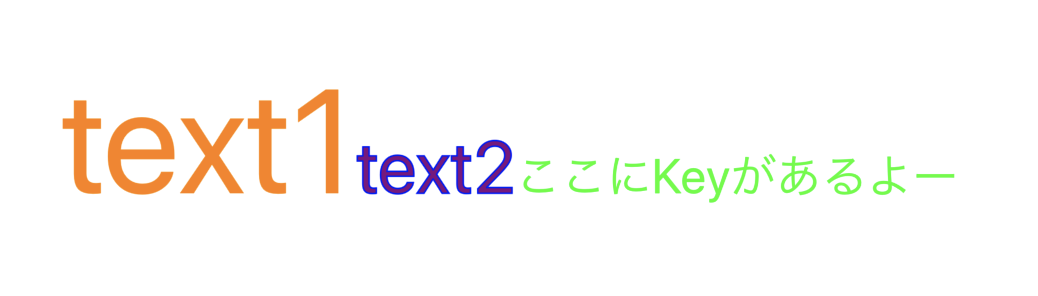
結果はこのように装飾されます。
他にも、rangeを指定してattributesを追加するメソッド、
addAttribute(_ name: NSAttributedString.Key, value: Any, range: NSRange)もありますので、それぞれの実装に合ったものを利用するとよいと思います。
Custom Keyから値を取り出す
埋め込んだCustom Keyを埋め込んだ後は、抽出が必要かと思います。
Custom Keyから値を取り出すためには、NSAttributedStringクラスのenumerateAttribute(_:in:options:using:)メソッドが便利です。
抽出したいNSAttributedString.Keyと検索をかける範囲NSRangeを引数に持たせ、
usingのクロージャ内で抽出した値と該当するRangeを取得することができます。
先ほどのサンプルの続きでやってみましょう。
        // 検索する文字列範囲を指定(ここでは文字列全体)
        let range = NSRange(location: 0, length: mutableAttributedText1.string.count)

        // Custom Keyから値を取り出す
        mutableAttributedText1.enumerateAttribute(testIDKey, in: range) { result, resultRange, _ in
            guard let result = result as? String else { return }
            print("result:", result)
            print("resultRange:", resultRange)
        }
printで以下の通り、掃き出されています。
result: id123456
resultRange: {10, 11}
(0番目から始まるため)11文字目から11文字分の範囲に、
id123456が埋めこまれていることが分かりました。
このようにしてCustom Keyの値を抽出することができます。
さいごに
はじめは、 NSAttributedStringやNSMutableAttributedStringやら違いがよくわからず、かつ、NSMutableAttributedStringについてはQiita記事も少なく、理解するのに苦労しましたが、自分でサンプルを作成しながら、多くのメソッドを試すことで理解が深まっていきました。
文字列にアタマを悩ませている方がいらっしゃったら、少しでもお役に立てれば幸いです。
以上です!
まだまだValuのAdvent Calendarは続きます!!お楽しみに!!