Expoアプリの作成/トークンの取得
このチュートリアルの沿っていくには、プッシュ通知が届けるアプリが必要です。この記事の指示に従って、アプリを作成してください。作って終わってから、コンソールで表示されるプッシュトークンをコピーして下さい。
Firebaseプロジェクトの設定
Firebase Consoleで、新しいプロジェクトを作りましょう。 前のステップで、Expoアプリを作った時に、Firebaseプロジェクトを作成した場合は、同じプロジェクトを使ってもいいです。
次、ウエブアプリをプロジェクトに追加します。

ウエブアプリの名前を選びます。(Firebase Hostingは要りません)
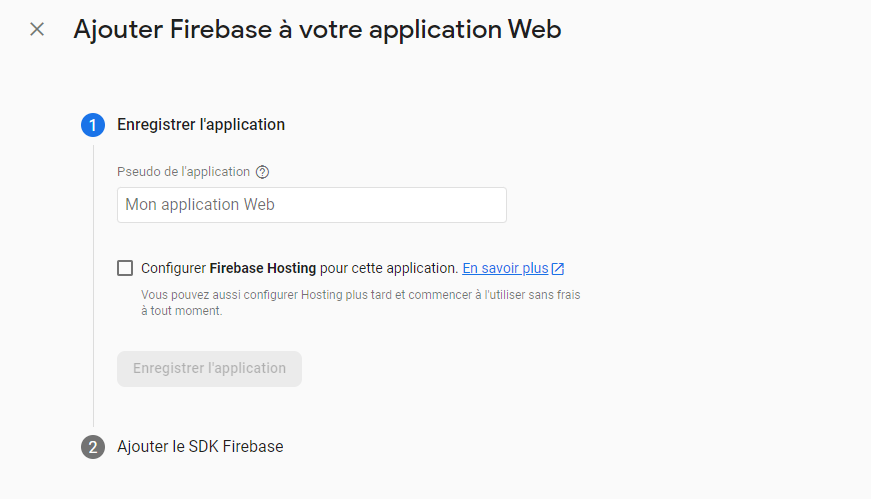
後でNextアプリでFirebase設定はしますので、ステップ2で、何もせずに、下の青いボタンをクリックします。
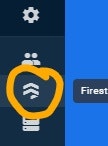
次、Firestoreデータベースを作成していきます。ホーム画面の左側のサイドバーで、Firestoreアイコンをクリックします。
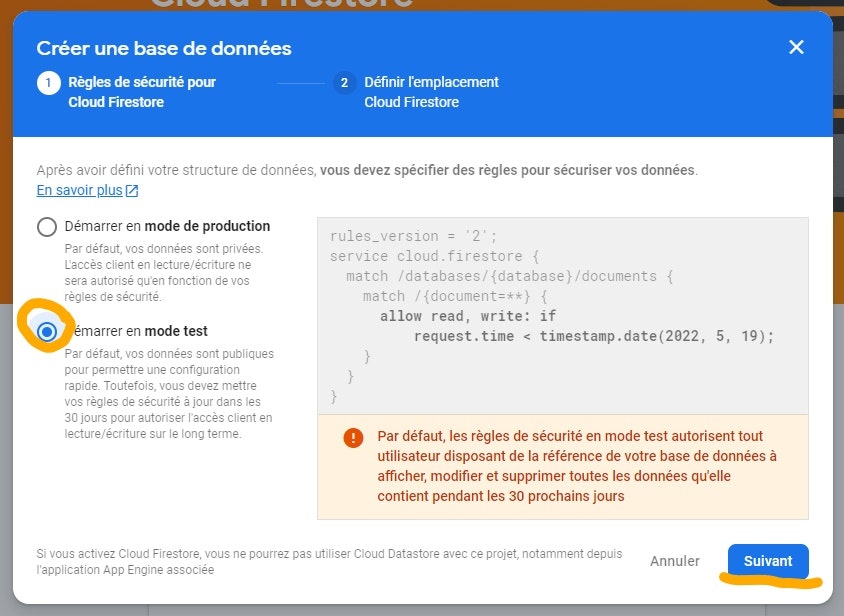
テストモードを選択します (30日以上アプリを使いたいなら、後でルールを編集する必要があります)。下の青いボタンをクリックします。
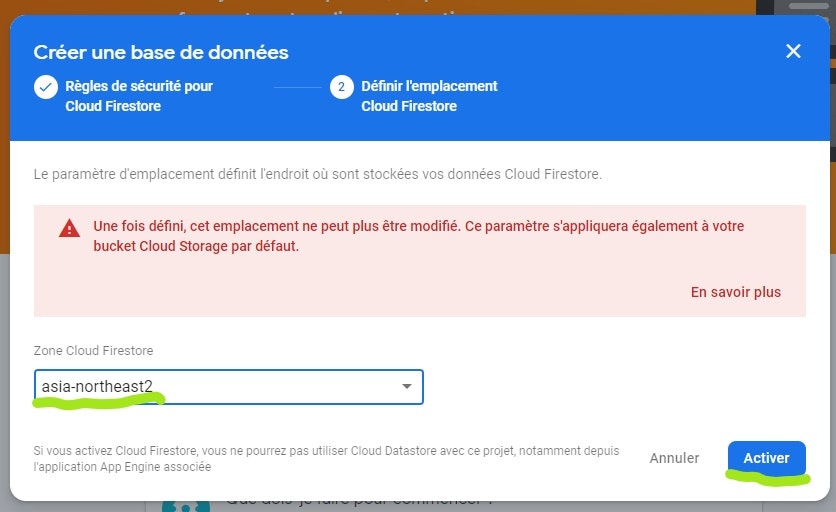
Firestore Cloud ゾーンで、「asia-northeast1」(東京)か「asia-northeast2」(大阪)を選択し、青いボタンをクリックします。
新しいコレクションを作成します。
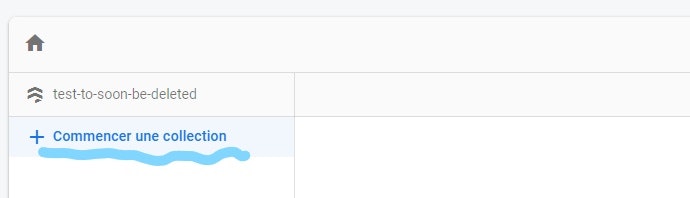
コレクションIDを「tokens」」にします。
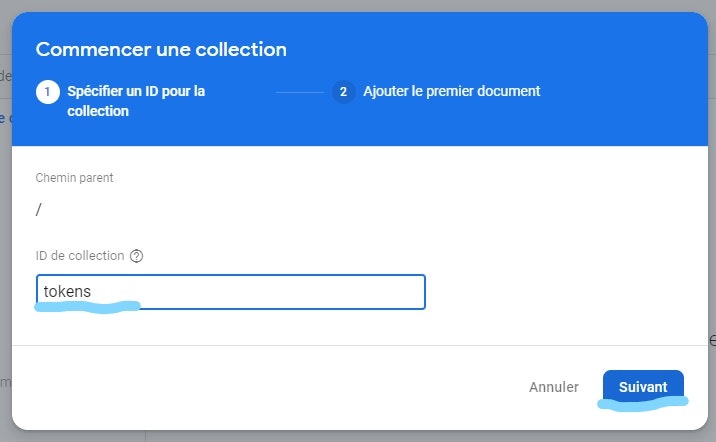
自動的にドキュメントIDを生成します。

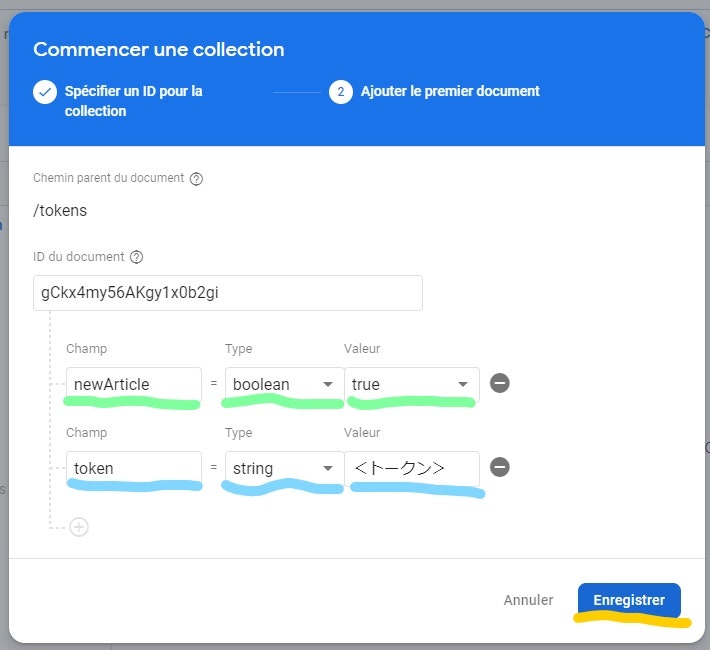
私たちが今作っている通知サービスはオンラインブログで使用されていると想像してみてましょう。 newArticleフィールドは、新しい記事が公開されたときに、ユーザーに通知を送るかどうかを示します。tokenフィールドは、ユーザーのプッシュトークンを示します(<トーケン>を前にコピーしたトークンに置き換えて下さい)。最後に、変更を保存します。
Nextアプリの作成
Next Typescriptアプリを作っていきましょう:npx create-next-app@latest --ts。
フロントエンド
import type { NextPage } from "next";
import { useState } from "react";
import styles from "../styles/Home.module.css";

const Home: NextPage = () => {
  const [title, setTitle] = useState("");
  const [content, setContent] = useState("");
  const [data, setData] = useState("");

  const sendNotification = async () => {
    //ユーザー、コンテンツ、またはデータが空白かどうかを確認する
    //いずれかが空白であれば、ユーザに知らせる
    if (title === "" || content === "" || data === "") {
      alert("タイトル、内容、データを入力してください。");
      return;
    }
    //dataはオブジェクトかどうかを確かめる
    try {
      JSON.parse(data);
    } catch {
      alert("データはJSONフォーマットで入力して下さい。");
      return;
    }

    //ユーザが入力した情報をバックエンドに送る
    try {
      const res = await fetch("/api/notification", {
        method: "POST",
        body: JSON.stringify({
          title,
          content,
          data,
        }),
        headers: {
          "Content-Type": "application/json",
        },
      });
      console.log("res", res);
    } catch (err) {
      console.log("error", err);
    }
  };

  return (
    <div className={styles.container}>
      <main className={styles.main}>
        <input
          className={styles.input}
          type="text"
          value={title}
          placeholder="通知タイトル"
          onChange={(e) => setTitle(e.target.value)}
        />
        <input
          className={styles.input}
          type="text"
          value={content}
          placeholder="通知内容"
          onChange={(e) => setContent(e.target.value)}
        />
        <input
          className={styles.input}
          type="text"
          value={data}
          placeholder='{"data": "データ"}'
          onChange={(e) => setData(e.target.value)}
        />
        <button className={styles.button} onClick={sendNotification}>
          通知を送信する
        </button>
      </main>
    </div>
  );
};

export default Home;
.container {
  padding: 0 2rem;
}

.main {
  min-height: 100vh;
  padding: 4rem 0;
  flex: 1;
  display: flex;
  flex-direction: column;
  justify-content: center;
  align-items: center;
}

.title a {
  color: #0070f3;
  text-decoration: none;
}

.description {
  text-align: center;
}

.description {
  margin: 4rem 0;
  line-height: 1.5;
  font-size: 1.5rem;
}

.button {
  border: none;
  background-color: #0070f3;
  color: white;
  font-weight: 600;
  font-size: 16px;
  padding: 10px 20px;
  border-radius: 5px;
  cursor: pointer;
  margin-top: 20px;
}

.button:hover {
  opacity: 0.8;
}

.input {
  border: 1px solid rgb(63, 62, 62);
  color: rgb(63, 62, 62);
  height: 50px;
  width: 350px;
  max-width: 95%;
  margin: 0 0 20px 0;
  padding: 0 20px;
  border-radius: 5px;
}
バックエンド
pages/api/notification.tsを作りましょう。
Firebaseからトークンの取得
notification.tsで、Firebaseを設定します。Firebaseコンソールのプロジェクト設定で、ウェブアプリの設定にあるfirebaseConfigをコピーして、notification.tsにペストします。
import { initializeApp } from "firebase/app";
import {
  getFirestore,
  collection,
  getDocs,
  Firestore,
  where,
  query,
} from "firebase/firestore";

//FirebaseコンソールにあるfirebaseConfigをコピーして、ここにペストする
const firebaseConfig = {
  apiKey: "----",
  authDomain: "----",
  projectId: "----",
  storageBucket: "----",
  messagingSenderId: "----",
  appId: "-----",
};

//Firebaseウエブアプリを初期化する
const app = initializeApp(firebaseConfig);
const db: Firestore = getFirestore(app);

//Firestoreで保存してるトークンを取得する
const getTokens = async () => {
  //newArticleフィールドがtrueに設定されているトークンを取得する
  const q = query(collection(db, "tokens"), where("newArticle", "==", true));
  const querySnapshot = await getDocs(q);
  let tokensArray: string[] = [];
  querySnapshot.forEach((doc) => {
    tokensArray.push(doc.data().tokenValue);
  });
  return tokensArray;
};

export default async function handler(req: any, res: any) {
  const { method, body } = req;
  const { title, content, data } = body;

  if (method === "POST") {
    try {
      //トークンを取得する
      const tokensFromFirebase = await getTokens();
      }
  catch (err) {
      console.log(err);
      return res.status(422).send("何かがうまくいかなかったです。");
    }
  } else {
    return res.status(404).send("not found エラー");
  }
}
通知の送信
Expoに通知情報とプシュットーケンを送信します。トークンを一度に1つずつを送信するより、チャンクを送信することが良いです。大量のトークンを送信する場合、チャンクで送るのは効率的です。
Expoは通知を送信したら、レシートを作成し、私たちが届く返事にレシートIDを含めます。チャンクでレシートIDを送信すると、レシートが届けます。エラーが発生した場合には、エラー情報がレシートに含めます。
import { Expo, ExpoPushReceipt } from "expo-server-sdk";
...

//FirebaseConfig, Firebaseアプリの初期化
const getTokens = async()=>{...}
....

export default async function handler(req: any, res: any) {
  const { method, body } = req;
  const { title, content, data } = body;

  if (method === "POST") {
    try {
      //トークンを取得する
      const tokensFromFirebase = await getTokens();

      //Expoクラスのインスタンスを初期化します
      let expo = new Expo();

      let messages = [];

      //Firebaseから取得したトーケンは有効なExpoトークンかどうかを確認する
      for (let pushToken of tokensFromFirebase) {
        if (!Expo.isExpoPushToken(pushToken)) {
          console.error(
            `プッシュトークン ${pushToken} は有効なExpoプッシュトークンではありません`
          );
          continue;
        }

        //メッセージを作る
        // メッセージの作り方: https://docs.expo.io/push-notifications/sending-notifications/
        messages.push({
          to: pushToken,
          title: title,
          body: content,
          data: data,
        });
      }

      //トークンを一度に1つずつを送信するより、チャンクを送信することをお勧めしま。
      //大量のトークンを送信する場合、チャンクで送るのは効率的です。
      let chunks = expo.chunkPushNotifications(messages);
      let tickets: any = [];
      (async () => {
        for (let chunk of chunks) {
          try {
            let ticketChunk = await expo.sendPushNotificationsAsync(chunk);
            console.log(ticketChunk);
            tickets.push(...ticketChunk);
          } catch (error) {
            console.error(error);
          }
        }
      })();
      //通知がExpoから送信されたら、レシートがExpoに作られます。
      //そのレシートのIDはExpoからの返事チケットに含めています。
      //IDで、レシートをリクエストすることが出来ます。

      //通知を送信する時に、ExpoはGoogle(アンドロイド)やApple(iOS)に通知情報を送ります。
      //時々、GoogleやApple側のエラーが発生します。その時に、
      //ExpoはGoogleやAppleから届いたエラー情報をレシートに含めます。

      let receiptIds = [];
      for (let ticket of tickets) {
        //Expo側、エラーが発生すれば、届けるチケットにIDがない場合もあります。
        //代わり、エラー情報がチケットに含めます。
        if (ticket.id) {
          receiptIds.push(ticket.id);
        }
      }

      let receiptIdChunks = expo.chunkPushNotificationReceiptIds(receiptIds);
      (async () => {
        //チャンクでレシートIDを送信します。
        for (let chunk of receiptIdChunks) {
          try {
            let receipts: { [id: string]: UpdatedExpoPushReceipt } =
              await expo.getPushNotificationReceiptsAsync(chunk);
            console.log(receipts);

            for (let receiptId in receipts) {
              let { status, message, details } = receipts[receiptId];
              if (status === "ok") {
                continue;
              } else if (status === "error") {
                console.error(`通知の送信中にエラーが発生しました: ${message}`);

                //@ts-ignore
                if (details && details.error) {
                  //エラーコードはExpoのドキュメンテーションで確認出来ます:
                  // https://docs.expo.io/push-notifications/sending-notifications/#individual-errors

                  //@ts-ignore
                  console.error(`エラーコードは ${details.error}。`);
                }
              }
            }
          } catch (error) {
            console.error(error);
          }
        }
      })();
      res.send();

      }
  catch (err) {
      console.log(err);
      return res.status(422).send("何かがうまくいかなかったです。");
    }
  } else {
    return res.status(404).send("not found エラー");
  }
}
テスト通知の送信
これで、テスト通知を送る事が出来ます!Expoアプリのサーバーを起動し、Nextアプリのターミナルでnpm run devを実行し、localhost:3000を開きます。localhostで通知のタイトル、内容とデータを入力したら、送信ボタンをクリックします。モバイルデバイスで通知を受け取ります!