はじめに
「Hello World」をDataBindingで作ったのでメモ。
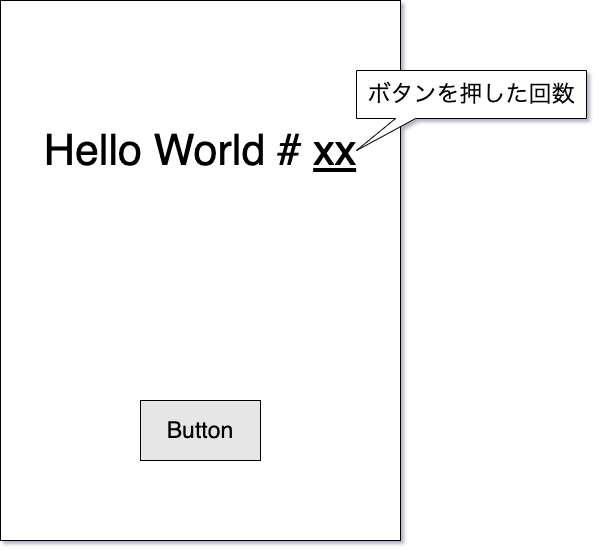
目標物
構成
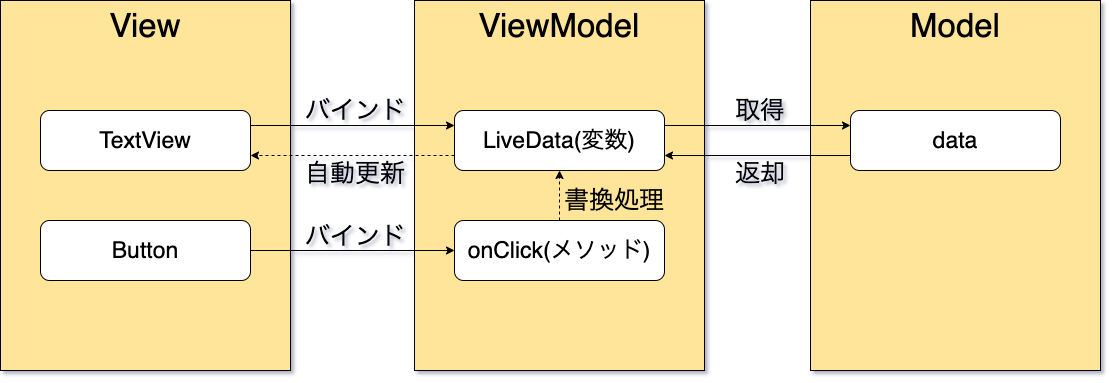
Viewには、値を表示するTextViewとイベント発生用のButtonのみ配置。
それぞれをViewModelの変数やメソッドとバインドさせる。
画面に表示するデータの保持、整形はModelが担う。
やったこと
1. Gradle Scriptに追記
DataBindingを有効にするために、以下のように追記する。
android {
...
    dataBinding {
        enabled true
    }
...
}
2. レイアウトファイルを修正
既存のレイアウトファイルをデータバインディングレイアウトに変更する。
デフォルトだとこんな感じ。
<?xml version="1.0" encoding="utf-8"?>
<androidx.constraintlayout.widget.ConstraintLayout xmlns:android="http://schemas.android.com/apk/res/android"
    xmlns:app="http://schemas.android.com/apk/res-auto"
    xmlns:tools="http://schemas.android.com/tools"
    android:layout_width="match_parent"
    android:layout_height="match_parent"
    tools:context=".MainActivity">

</androidx.constraintlayout.widget.ConstraintLayout>
2.1. レイアウトを<layout>タグで囲む
データバインディングレイアウトはルートが<layout>でその子要素として
<ConstraintLayout>や<LinearLayout>を定義する。
手動でも変更できるが、Android Studioは自動で修正する機能を提供している。
現在のルート要素(レイアウト)にカーソルを置き、表示される電球マークから
「Convert to data binding layout」を選択
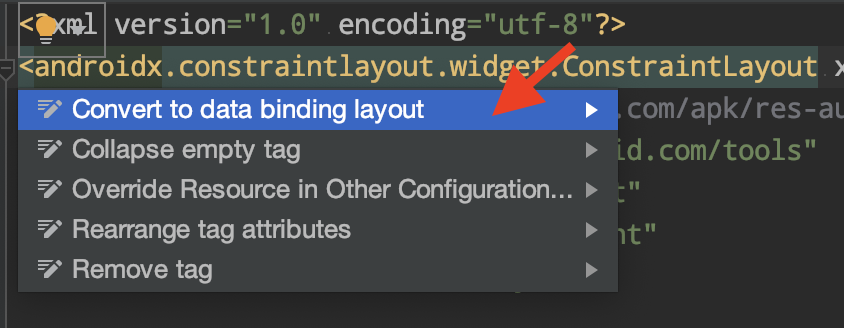
データバインディングレイアウトに変更される。
<?xml version="1.0" encoding="utf-8"?>
<layout xmlns:android="http://schemas.android.com/apk/res/android"
    xmlns:app="http://schemas.android.com/apk/res-auto"
    xmlns:tools="http://schemas.android.com/tools">

    <data>

    </data>

    <androidx.constraintlayout.widget.ConstraintLayout
        android:layout_width="match_parent"
        android:layout_height="match_parent"
        tools:context=".MainActivity">

    </androidx.constraintlayout.widget.ConstraintLayout>
</layout>
2.2 レイアウトファイルに部品などを置いていく
レイアウトファイルに部品(TextViewとか)を置いていく。
今回は、TextViewとButtonのみのシンプルな構成とする。
<?xml version="1.0" encoding="utf-8"?>
<layout xmlns:android="http://schemas.android.com/apk/res/android"
    xmlns:app="http://schemas.android.com/apk/res-auto"
    xmlns:tools="http://schemas.android.com/tools">

    <data>

    </data>

    <androidx.constraintlayout.widget.ConstraintLayout
        android:layout_width="match_parent"
        android:layout_height="match_parent"
        tools:context=".MainActivity">

        <TextView
            android:id="@+id/tvHello"
            android:layout_width="wrap_content"
            android:layout_height="wrap_content"
            android:textSize="32sp"
            app:layout_constraintBottom_toTopOf="@+id/btHello"
            app:layout_constraintEnd_toEndOf="parent"
            app:layout_constraintHorizontal_bias="0.5"
            app:layout_constraintStart_toStartOf="parent"
            app:layout_constraintTop_toTopOf="parent"
            tools:text="HELLO" />

        <Button
            android:id="@+id/btHello"
            android:layout_width="wrap_content"
            android:layout_height="wrap_content"
            android:text="Say Hello"
            app:layout_constraintBottom_toBottomOf="parent"
            app:layout_constraintEnd_toEndOf="parent"
            app:layout_constraintHorizontal_bias="0.5"
            app:layout_constraintStart_toStartOf="parent"
            app:layout_constraintTop_toBottomOf="@+id/tvHello" />
    </androidx.constraintlayout.widget.ConstraintLayout>
</layout>
3. Modelを作成する
画面に表示するmessage、呼び出された回数を保持するcount
それぞれを連結して返却するgetHelloMessageWithCountメソッドを持つ単純なModel。
data class Hello(
    var message: String,
    private var count: Int
) {
    fun getHelloMessageWithCount(): String {
        return "$message # ${++count}"
    }
}
4. ViewModelを作成する
MVVMアーキテクチャでは重要な役割を担うViewModelを作成する。
class MainViewModel: ViewModel() {
    private var mHello: Hello = Hello("Hello World", 0)
    private val _hello = MutableLiveData<String>()
    val hello: LiveData<String> = _hello

    init {
        _hello.value = mHello.message
    }

    fun onSayHelloClick() {
        _hello.value = mHello.getHelloMessageWithCount()
    }
}
MutableLiveData<String>()はAndroid アーキテクチャ コンポーネント(AAC)におけるところのLiveDataのインスタンス。
TextViewに表示する文字列(android:text)にバインドさせたいため、型引数Stringとして定義した。
onSayHelloClickはButtonからのonClickで発火するメソッド。ViewのButtonに対してバインドする。
5. レイアウトファイルの<data>を設定する
レイアウトファイルの<data>タグの中には、<variable>を用いて
バインドさせたい要素の情報を定義する。
<data>
    <variable
        name="viewmodel"
        type="com.example.mymvvm.viewmodel.MainViewModel" />
</data>
name属性にはtypeで使用するViewModelのレイアウトファイル内での
名前を記載する。
type属性には、バインドさせるViewModelを指定する。
6. ViewとViewModelをバインドさせる
View(Activity)とViewModelをバインドさせるため、Activityを修正。
class MainActivity : AppCompatActivity() {

    private val mViewModel by lazy {
        ViewModelProvider(this).get(MainViewModel::class.java)
    }

    override fun onCreate(savedInstanceState: Bundle?) {
        super.onCreate(savedInstanceState)

        val binding = DataBindingUtil.setContentView<ActivityMainBinding>(
            this, R.layout.activity_main
        )
        binding.viewmodel = mViewModel
        binding.lifecycleOwner = this
    }
}
private val mViewModel by lazy {
        ViewModelProvider(this).get(MainViewModel::class.java)
    }
ViewModelを保持するためのメンバ変数。
lazyを使って、実際に使われるタイミングで初期化されるようにする(遅延評価)。
その処理をbyで移譲する。
val binding = DataBindingUtil.setContentView<ActivityMainBinding>(
            this, R.layout.activity_main
        )
既存のsetContentViewメソッドを削除し、データバインディングをするために
DataBindingUtil.setContentViewメソッドに変更する。
なお、ActivityMainBindingは自動的に作成されるクラス。
binding.viewmodel = mViewModel
binding.lifecycleOwner = this
DataBindingUtil.setContentViewの返却値であるインスタンスを使って
作成したViewModelとのバインドを行う。
ここで、binding.viewmodelのviewmodelは2.5で設定した
name=xxxxと一致させる。
併せて、lifecycleOwnerをthis(MainActivity)として設定する。
これは、LiveDataがライフサイクルを認識できる監視対象であり、使用するライフサイクルの所有者を指定する必要があるため。
7. レイアウトの属性値とViewModelを紐づける
レイアウトの属性値とViewModelの変数を紐づけることにより、紐づけたデータが
画面に反映される。
android:text="@{viewmodel.hello}"

android:onClick="@{() -> viewmodel.onSayHelloClick()}"
レイアウトファイルのTextViewのtext属性を
ViewModelのhelloと紐づける。
こうすることで、ViewModel側でhelloが更新されたときに、
その変更を検知し、View側に自動的に反映される。
また、ButtonのonClick属性の値として、
ラムダ式を用いてViewModelのonSayHelloClickメソッドと紐づける。
クリック時に、onSayHelloClickが呼ばれて、中の処理が実行される。
8. 動作確認
こんな感じに動作する。

おわりに
指摘事項お待ちしております。
参考
Android Data Binding ⬅︎ わかりやすいので是非。