はじめに
この記事では、MAMPなどのローカル環境で開発したLaravelのアプリケーションをVPSにデプロイするまでの過程を記しています。
ほとんど自分向けです。。
この記事の対象者
- 初心者の方
- Laravelを使用
- MAMP等のローカル環境で開発
- VPSにデプロイしたい
使用環境
- ローカル
- MacBook Air (M1, 2020) macOS Big Sur
- MAMP Version 6.4
- PHP 7.4.16
- Laravel 8.64.0
- VPS
- ConoHa VPS
- メモリ 512MB/CPU 1Core
- OS centOS8
- PHP 7.3.31
- Laravel 8.64.0
ConoHa VPSでのcentOS8のVPSを開く方法
とても簡単です。
VPSはすでに開いているよという方はスキップしてください。
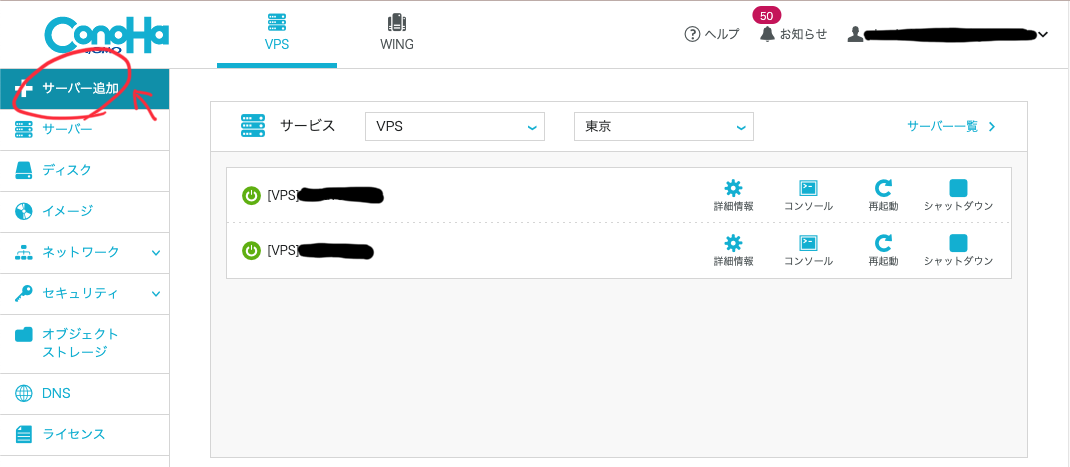
まずはConoHaのページにログインします。
サーバーの追加
サーバーを追加をクリック
サーバーのプランを選択
私は1ヶ月単位で管理したかったのでVPS割引きっぷは利用しないようにしました。
ここはお好みでご選択ください。
OSはCentOS8にしました。(CentOS7の方が情報は多そうではありますが、最新のがいいかなと言う思いで。)
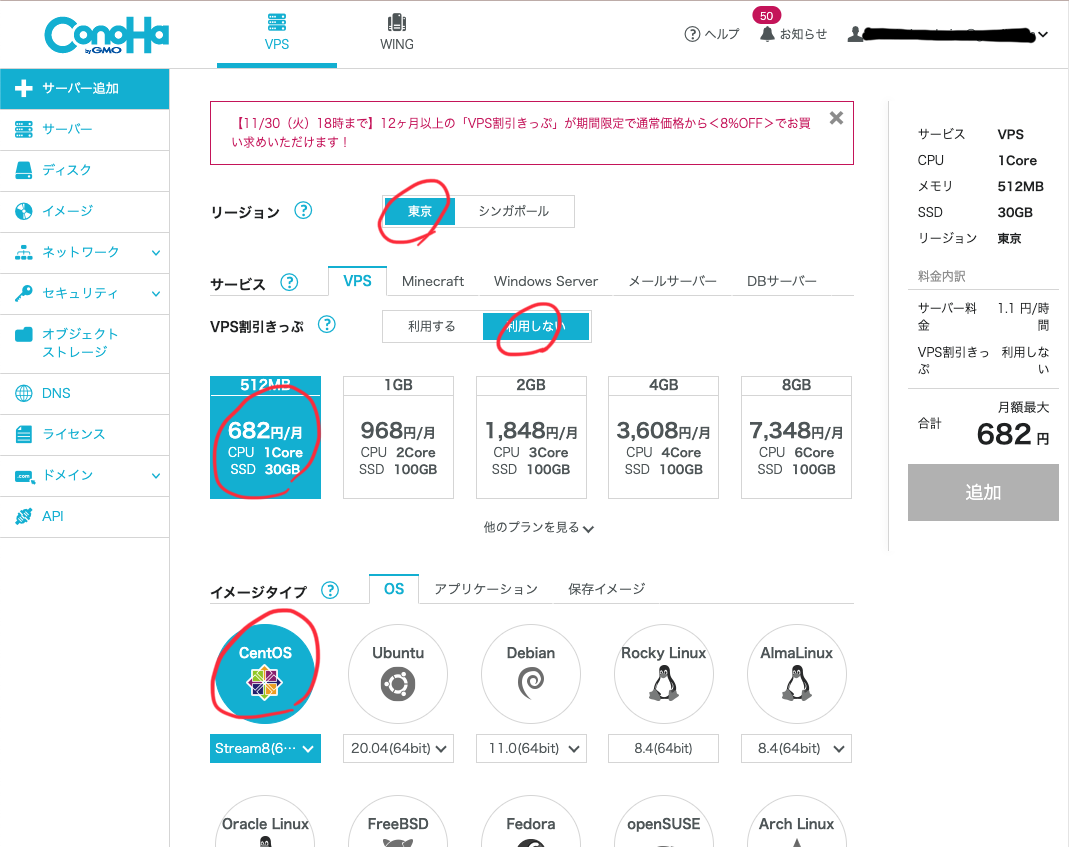
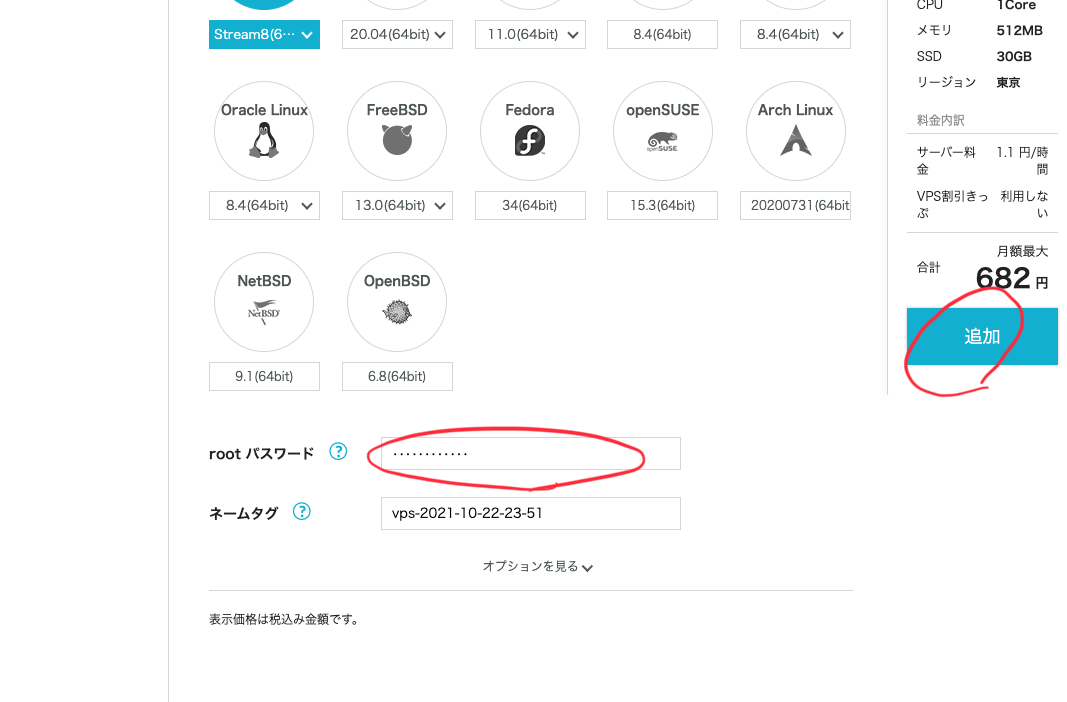
少し下にいくとサーバーにrootユーザーでアクセスするときのパスワードを設定するところがあります。
※アルファベット大文字小文字と数字に加えて記号も含める必要があります。
入力したら追加をクリック
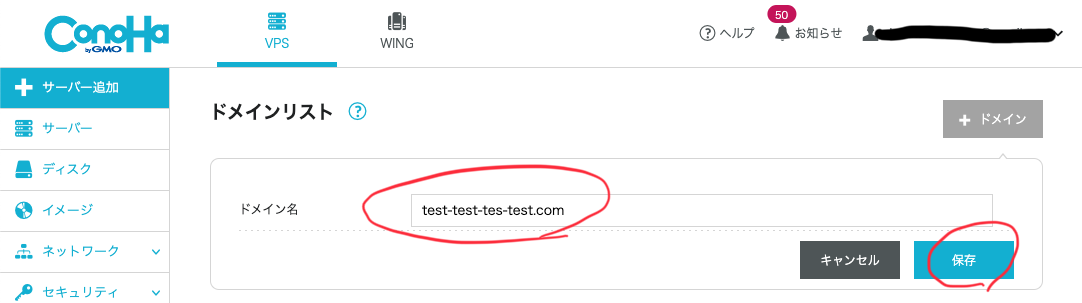
ドメインの取得
ドメインを取得済みの方はスキップしてください。
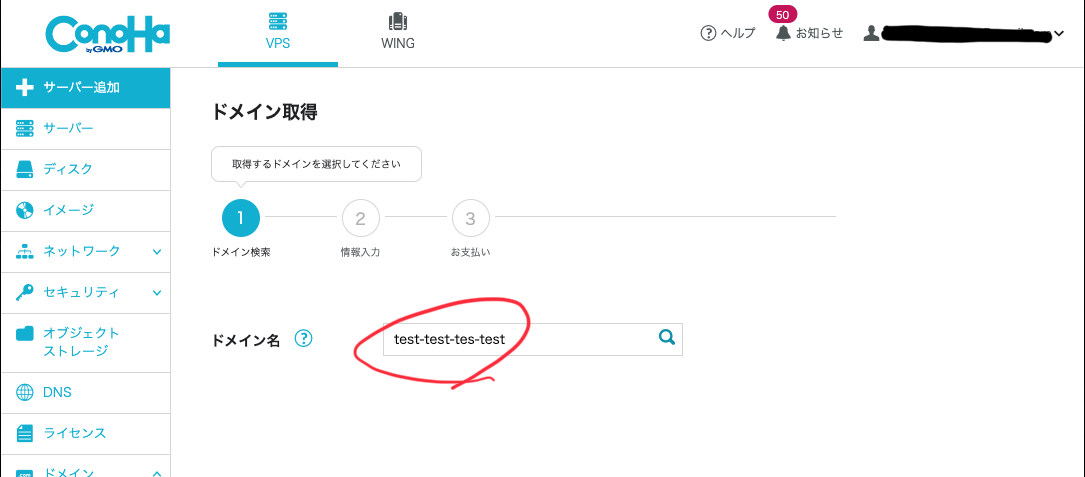
左のタブからドメインを選択して、ドメイン取得をクリック。
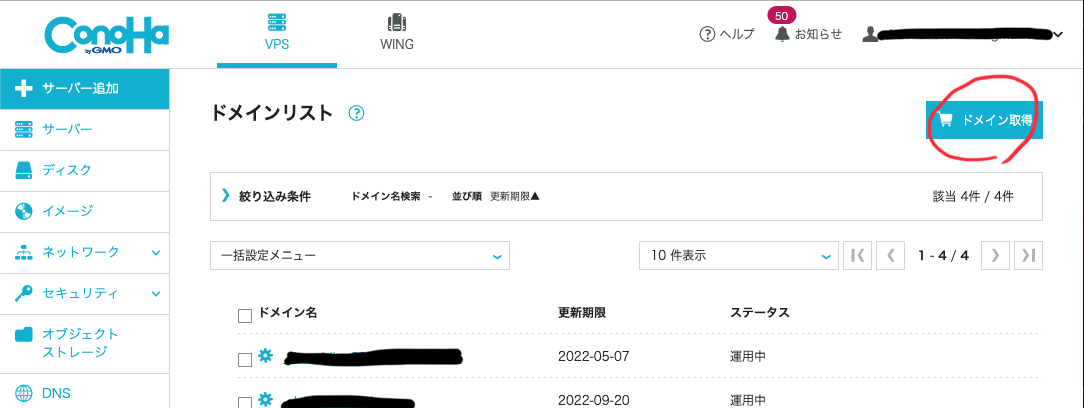
取得したいドメイン名を入力
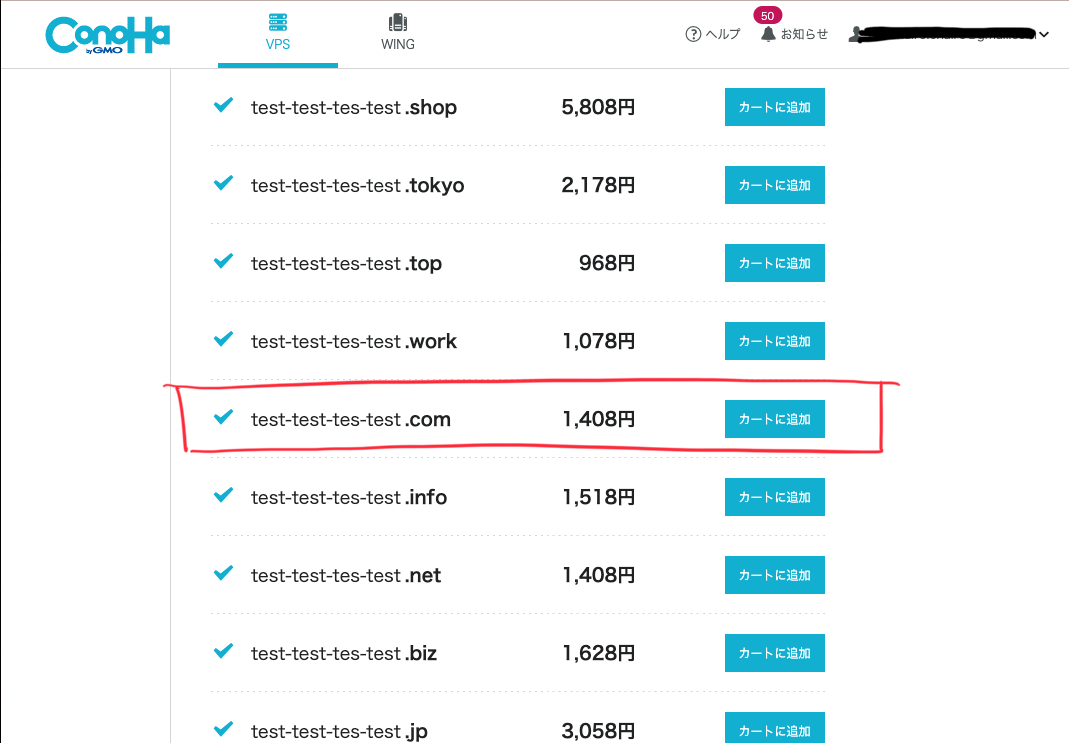
検索虫眼鏡をクリックすると下にズラッと取得可能なドメインが並ぶのでお好みに合わせて選択。(.comが無難だと思います)
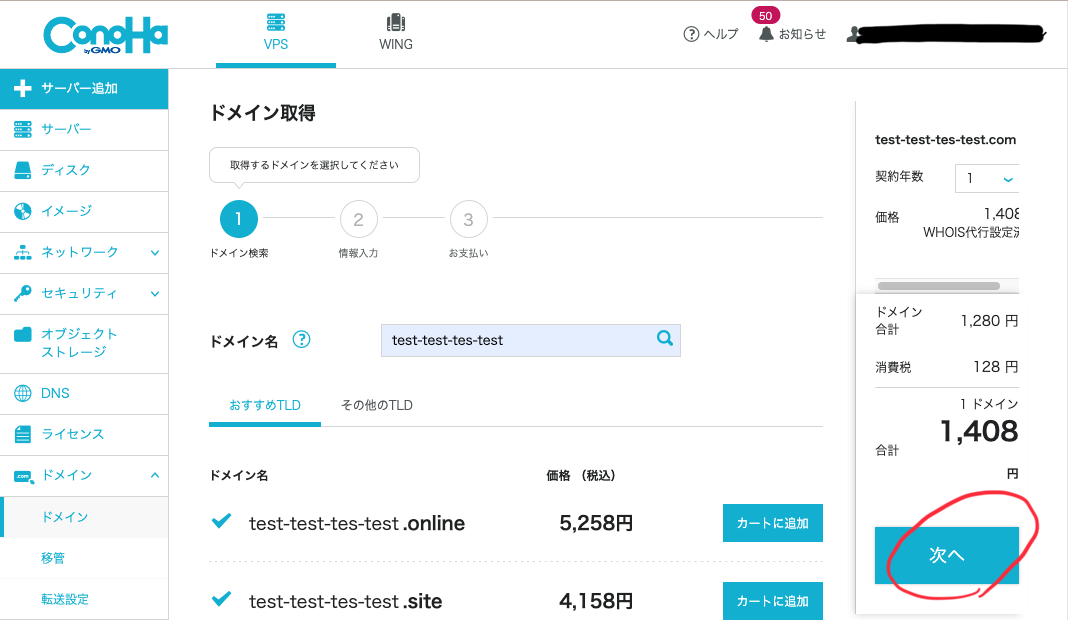
あとはお支払い情報を入れて決済するとドメインの取得は完了です。
ドメインの紐付け
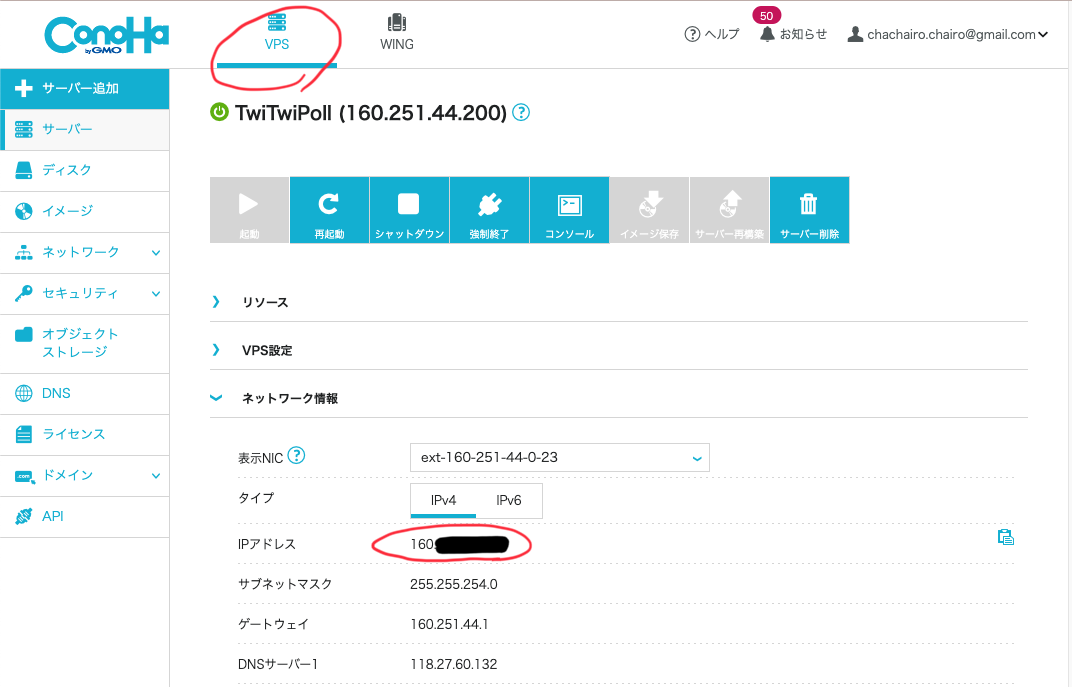
まずは紐付けたい先程追加したサーバーのIPアドレスを調べます。
左のタブから一番上のVPSタブを選択して、開いたサーバー名の横の詳細情報をクリック。
するとIPアドレスの欄に載っているのがこのサーバーのIPアドレスです。
次は左のDNSタブを選択して右上の+ドメインをクリックして、先程取得したドメインを入力します。
追加したドメインの編集ボタンを押して、先程調べたIPアドレスや設定を入力します。
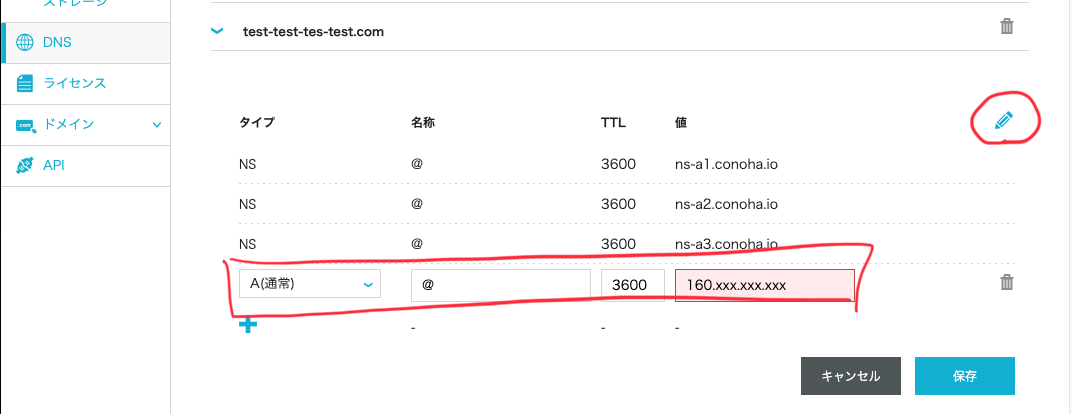
これでドメインの設定まで完了です。
SSH接続のための公開鍵・秘密鍵の設定
鍵の設定が不要な方やすでにサーバーに新たにユーザーを追加してssh接続できる方はスキップしてください。
ここでは公開鍵・秘密鍵を用いたSSH接続をするための設定を行います。
セキュリティのためにrootユーザーでの接続を禁止し、新規ユーザーを使った接続を行うようにします。
鍵の生成
ローカル環境で鍵を生成します。
ターミナル上で以下を実施。
# ホームディレクトリ下に.sshディレクトリを作成し、移動
$ mkdir ~/.ssh
$ chmod 700 ~/.ssh
$ cd ~/.ssh

# 鍵の生成
$ ssh-keygen -t rsa -b 2048
ssh-keygenを実施すると鍵の名前を聞かれるので任意の名前をつけてください。
ここでは仮にssh-keyとしておきます。
その次にパスワードも聞かれるので、秘密鍵を使用する際のパスワードを設定してください。
すると、.sshに秘密鍵ssh-keyと公開鍵ssh-key.pubが生成されています。
$ ls ~/.ssh
ssh-key   ssh-key.pub
鍵のアップロード
まずはrootユーザーでssh接続します。
# ssh ユーザー名@設定したドメイン名またはIPアドレスでログイン(ここでは仮にtest.com)
$ ssh root@test.com
# パスワードを求められるのでConoHaVPSを開いたときに設定したパスワードを入力
するとサーバーにsshでログインできるので、VPS側にも.sshディレクトリを作成します。
[root@test.com ~]# mkdir ~/.ssh
[root@test.com ~]# chmod 700 ~/.ssh
# 作成後はexitでVPSを抜けます。
[root@test.com ~]# exit
そしてローカルから公開鍵をVPS上にauthorized_keysという名前でアップロードします。
$ scp ~/.ssh/ssh-key.pub root@test.com:~/.ssh/authorized_keys
新規ユーザーでSVNにアクセスするように変更
rootユーザーでアクセスするのはセキュリティ上よろしくないので、新規にユーザーを作成します。
まずはrootユーザーでVPSにログインします。
$ ssh root@test.com
新規ユーザーを作成
# adduser ユーザー名でユーザーを作成
[root@test.com ~]# adduser test-user
# passwd ユーザー名でユーザー名のパスワードを変更
[root@test.com ~]# passwd test-user
# gpasswd -a ユーザー名 wheelでrootと同じレベルの権限を持つグループに所属させます。
[root@test.com ~]# gpasswd -a test-user wheel
作成したユーザーでログインできるか試してみる。
$ ssh test-user@test.com
# パスワードを成功して以下のようになれば成功です
[test-user@test.com ~]$
rootユーザーでの接続を禁止する
続いてセキュリティを高めるためにrootにてsshでアクセスできないようにします。
/etc/ssh下のsshd_configのPermitRootLoginを編集します。
[test-user@test.com ~]$ sudo vim /etc/ssh/sshd_config
/PermitRootLoginと入力して検索し、PermitRootLogin yesと書かれている箇所が見つかったらEnterを押して、iを入力して挿入モードに切り替えてyesをnoに変更します。
# PermitRootLogin yes → no
PermitRootLogin no
変更できたらescキーで通常モードに戻り、:wqで保存して終了します。
公開鍵認証方式でのSSH接続とその簡略化
ローカルに戻り公開鍵認証でSSH接続をしてみましょう。
# ssh -i ~/.ssh/秘密鍵 ユーザー名@ドメイン名orIPアドレス
$ ssh -i ~/.ssh/test-key test-user@test.com

# 鍵生成時に設定したパスワードを入力することでSSH接続できます。
[test-user@test.com ~]$
公開鍵認証のコマンドを簡略化するには~/.ssh下にconfigを作成し以下のように編集します。
Host  test
  HostName 160.xxx.xxx.xxx     # VPSのIPアドレス
  User test-user               # 新規作成したユーザー名
  Port 22
  IdentityFile ~/.ssh/test-key # 秘密鍵のパス
以下でSSH接続ができたら成功です。
# ssh configで設定したHost名
$ ssh test

# 鍵のパスワードを入力して接続
[test-user@test.com ~]$
これでSSH接続の設定は完了です。
LAMP環境の構築
いよいよLAMP環境を整えていきます。
ここからはVPS上での操作なのでSSH接続した上で行ってください。
Apacheのインストール
# rootユーザーに変更
[test-user@test.com ~]$ su

# Apacheのインストール
[root@test.com ~]# dnf -y install httpd

# Apacheの起動
[root@test.com ~]# systemctl start httpd

# Apacheの確認
[root@test.com ~]# systemctl status httpd
● httpd.service - The Apache HTTP Server
   Loaded: loaded (/usr/lib/systemd/system/httpd.service; disabled; vendor preset: disabled)
  Drop-In: /usr/lib/systemd/system/httpd.service.d
           └─php-fpm.conf
   Active: active (running) since Thu 2021-10-21 23:09:05 JST; 2 days ago
     Docs: man:httpd.service(8)
  Process: 148519 ExecReload=/usr/sbin/httpd $OPTIONS -k graceful (code=exited, status=0/SUCCESS)
 Main PID: 114715 (httpd)
 ......
# 上記のように表示されたら成功

# サーバー起動時に自動的にApacheを起動するように設定
[root@test.com ~]# systemctl enable httpd
ファイアーウォールの設定
http://, https://どちらでもアクセスできるようにファイアーウォールの設定を行います。
# http, httpsのアクセスを開放
[root@test.com ~]# sudo firewall-cmd --permanent -add-service=http
[root@test.com ~]# sudo firewall-cmd --permanent -add-service=https

# ファイアーウォールの設定の再読み込み
[root@test.com ~]# sudo firewall-cmd --reload
MySQLの設定(MariaDB)
# mariadb(mysql)のインストール
[root@test.com ~]# dnf -y install mariadb-server

# mariadbの起動
[root@test.com ~]# systemctl start mariadb

# mariadbの起動確認
[root@test.com ~]# systemctl status mariadb
● mariadb.service - MariaDB 10.3 database server
   Loaded: loaded (/usr/lib/systemd/system/mariadb.service; enabled; vendor preset: disabled)
   Active: active (running) since Thu 2021-10-21 23:31:57 JST; 2 days ago
     Docs: man:mysqld(8)
 .......
# 上記のように表示されたら成功

# サーバー起動時に自動的にApacheを起動するように設定
[root@test.com ~]# systemctl enable mariadb

# mariadbの初期設定 質問について答えていく(基本Yes)
[root@test.com ~]# mysql_secure_installation
PHPのインストール
Laravel8を使用したいので、PHP7.3以上をインストールする。
# インストールできるPHPのバージョンを確認
[root@test.com ~]# dnf module list php

Failed to set locale, defaulting to C.UTF-8
Last metadata expiration check: 0:38:32 ago on Fri Oct  8 00:30:15 2021.
CentOS Stream 8 - AppStream
Name      Stream       Profiles                       Summary
php       7.2 [d]      common [d], devel, minimal     PHP scripting language
php       7.3          common [d], devel, minimal     PHP scripting language
php       7.4          common [d], devel, minimal     PHP scripting language

# PHP 7.4をインストール
[root@test.com ~]# dnf -y module install php:7.4

# PHP反映
[root@test.com ~]# systemctl restart httpd

# PHP動作確認
[root@test.com ~]# php -v
PHP 7.4.19 (cli) (built: May  4 2021 11:06:37) ( NTS )
Copyright (c) The PHP Group
Zend Engine v3.4.0, Copyright (c) Zend Technologies
ここまででLAMP環境は構築完了です。
SSLの設定(https://での通信)
https://でサイトにアクセスできるように設定します。
Apacheにmod_sslをインストールします。
# Apacheにmod_sslをインストール
[root@test.com ~]# dnf install -y mod_ssl

# Apacheを再起動して反映
[root@test.com ~]# systemctl restart httpd
/etc/httpd/conf/にApacheの設定ファイルであるhttpd.confがあるのでこれを以下のように編集します。
# その後は再起動
[root@test.com ~]# vi /var/httpd/conf/httpd.conf

# Listen 80のあとに追記
Listen 80
ServerAdmin root@twi-twi-poll.com
DocumentRoot /var/www/html
ServerName twi-twi-poll.com

# その後は再起動
[root@test.com ~]# systemctl restart httpd
証明書のインストールを以下の手順で実施
# Apacheにmod_sslをインストール
[root@test.com ~]# dnf install -y mod_ssl

# Apacheを再起動して反映
[root@test.com ~]# systemctl restart httpd

# certbotをインストール
[root@test.com ~]# dnf install certbot python3-certbot-apache

# sslの反映
[root@test.com ~]# certbot --apache -d twi-twi-poll.com

# Apacheを再起動して反映
[root@test.com ~]# systemctl restart httpd
この証明書は3ヶ月で有効期限が切れてしまうため自動更新の設定を行う。
# 通常の更新 (有効期限が1ヶ月以内出ないの使えない)
[root@test.com ~]# certbot renew

# 強制的に更新
[root@test.com ~]# certbot --force-renew

# cronで自動更新
[root@test.com ~]# vi /etc/crontab

# 末行に以下を追記
0 0 * * * root /usr/bin/cerbot renew
これでSSLの設定は完了です。
これまでで一旦VPSの基本的なLAMP環境構築構築は完了で次はいよいよLaravelのアプリケーションのデプロイ作業です。
ローカルのLaravelアプリケーションをGitHubへ登録
説明ではローカルの~/laravel-appというディレクトリでLaravelアプリケーションを開発を行っていることにします。
今回はGitHub経由でデプロイするのでまずはGitHubにpushします。
# Laravelの開発環境へのパスへ移動します。(自分の環境に合わせて変えてください)
$ cd ~/laravel-app

# gitの設定
$ git init

# ステージングエリアにadd
$ git add .

# ローカルリポジトリにcommit
$ git commit -m "「gitへ登録」などのメッセージ"
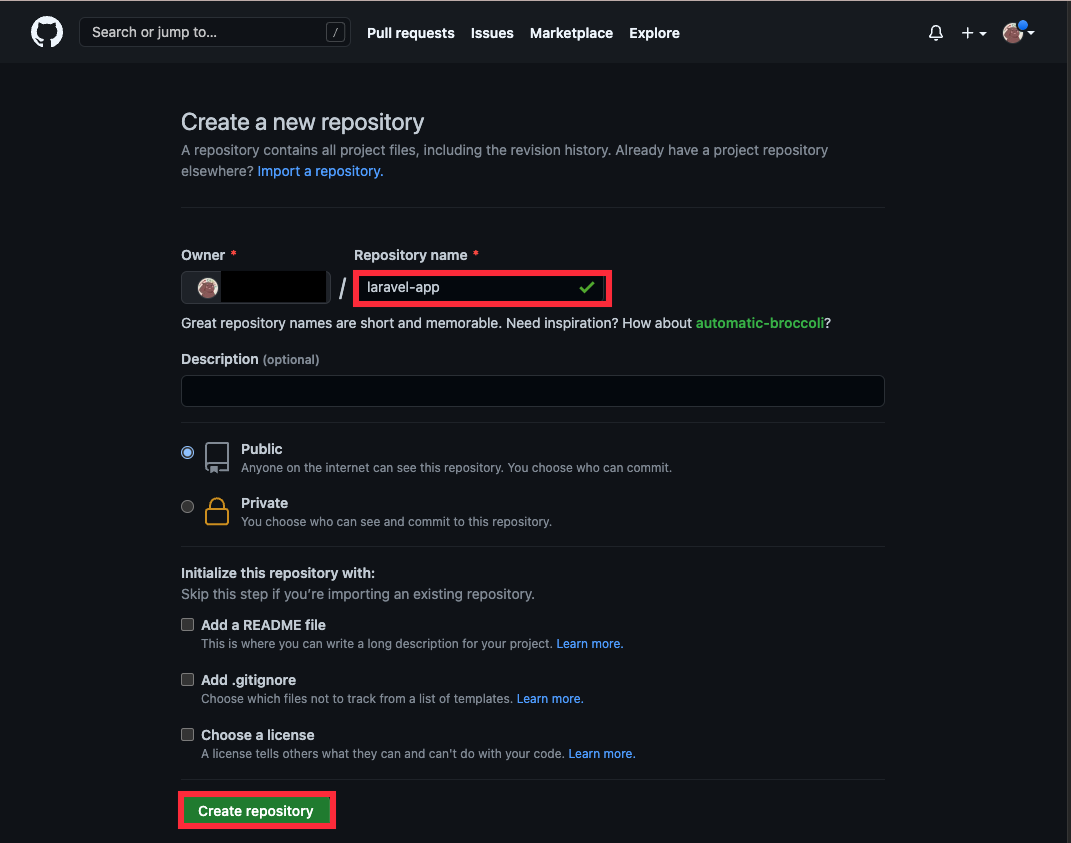
GitHubで新たにリポジトリを作成
GitHubにログインしてNewをクリックして新しいリポジトリを作成

リポジトリ名を入力してCreate repositoryで作成
作成したリポジトリにpushする。
GitHubのページにもやり方が載っていますが、そのとおりに実行します。
$ git branch -M main
$ git remote add origin https://github.com/GitHubユーザー名/laravel-app.git
$ git push -u origin main
Composerのインストール
LaravelをインストールするためにもComposerをインストールします。
# Composerのインストーラーをダウンロード
[root@test.com ~]# sudo wget https://getcomposer.org/installer -O composer-installer.php

# Composerのインストール
[root@test.com ~]# php composer-installer.php --filename=composer --install-dir=/usr/local/bin

# Composerのアップデート
[root@test.com ~]# composer self-update

# Composerのバージョンの確認
[root@test.com ~]# composer --version
Composer version 2.1.9 2021-10-05 09:47:38
ドキュメントルートの設定
まずは今回デプロイするアプリケーションをGitHubからcloneしましょう。
# GitHubからclone
[root@test.com ~]# cd /var
[root@test.com ~]# git clone https://github.com/GitHubユーザー名/laravel-app.git
SSLを設定する過程で、/etc/httpd/confにhttp-le-ssl.confという名前のファイルができているはずです。
コチラを編集してドキュメントルートを/var/laravel-app/publicに設定しましょう。
# GitHubからclone
[root@test.com ~]# vi /etc/httpd/conf/http-le-ssl.conf

# 以下のようにドメインに合わせて設定
ServerAdmin root@test.com
DocumentRoot /var/laravel-app/public
ServerName test.com
Laravelの設定
Laravelのデータベース等の設定を.envにて行います。
# .envファイルを編集
[root@test.com ~]# vi /var/laravel-app/.env

APP_NAME=SimpleMemo # アプリの名称
APP_ENV=production  # 本番環境の場合productionを設定
APP_KEY=            # 後ほどphp artisan key:generateで設定(ここでは空白)
APP_DEBUG=false     # 本番環境ではDebugは実施しない
APP_URL=https://test.com # ドメインを設定

LOG_CHANNEL=stack
LOG_LEVEL=debug

DB_CONNECTION=mysql
DB_HOST=localhost       # 今回はアプリサーバとDBサーバが同じなのでlocalhost
DB_PORT=3306
DB_DATABASE=test-db     # データベース名
DB_USERNAME=laravel     # MySQLのユーザー名
DB_PASSWORD=password    # 上記ユーザー名でのパスワード
GitHubからcloneしたのでほとんど必要なファイルは用意されましたが、その他Composerで用意されいたものを別途composer installでインストールする必要があります。
[root@test.com ~]# cd /var/laravel-app
[root@test.com laravel-app]# composer install
MySQLデータベースの設定
ローカルでアプリケーションを開発していたときのデータベースをSVN上に移します。
# データベースをファイルに出力
# mysqldump --single-transaction -u ユーザー名 -p データベース名 > 出力先のファイル
$ cd ~/laravel-app
$ mysqldump --single-transaction -u local-db-user -p local-db > local-db.sql
VPSに事前にファイル共有ディレクトリを作っておく
[root@test.com ~]# mkdir /usr/local/src
[root@test.com ~]# chmod 777 -R /usr/local/src
DBファイルをVPSに移動
# 出力したDBファイルをVPSにコピー
# scp コピーするローカルのファイル SSH接続設定Host名:VPSのコピー先パス
$ scp ~/laravel-app/local-db.sql test:/usr/local/src
DBファイルでデータベースをリストア
[root@test.com ~]# cd /var/laravel-app
[root@test.com laravel-app]# mysql -u root -p test-db < /usr/local/src/local-db.sql
LaravelからDBにアクセスするroot以外のユーザーlaravelを作成します。
# mysqlに接続
[root@test.com ~]# mysql -u root -p

# パスワードを入力すると以下のようにDBに接続できる
Welcome to the MariaDB monitor.  Commands end with ; or \g.
Your MariaDB connection id is 1054
Server version: 10.3.28-MariaDB MariaDB Server

Copyright (c) 2000, 2018, Oracle, MariaDB Corporation Ab and others.

Type 'help;' or '\h' for help. Type '\c' to clear the current input statement.
MariaDB [(none)]>
以下mysqlでの実施コマンド
# create user 作成するユーザー名@ホストのドメイン identified by 'パスワード'
MariaDB [(none)]> create user laravel@localhost identified by 'password';

# 成功すると以下のように表示される
Query OK, 0 rows affected (0.023 sec)

# 使用するDBの指定
MariaDB [(none)]> use test-db;

# ユーザーに権限の付与
MariaDB [(none)]> grant all on * to laravel@localhost;
デプロイ完了!
長かったですがこれにてデプロイは完了しているはずです。
https://test.comなど自分のドメインにアクセスしてみてください。
きっとうまくいっているはずです。。
お疲れさまでした。
さいごに
これは自分の備忘録として書きました。
なのであまり役立つものではない可能性もありますが、少しでも誰かのお役に立てればと思います。
間違っていることがあったりうまく行かないよということがあればコメントください。
謝辞と参考ページ
メンターさんにアドバイスをたくさんいただきました。
本当にありがとうございます。一人だとたぶん5年かかってました。
たくさんのサイトを参考にさせていただきました。
大変勉強になりました。ありがとうございます。