はじめに
前回記事、[個人開発]Ruby on Railsで阪神ファンのためのアプリを開発しましたでのメイン機能 第2弾のアイコンの作成方法から表示方法についてまとめていきたいと思います。第1弾の[個人開発] Geolocation APIを使って位置情報取得&比較するこれを実装済みという前提で進めていきます。
開発環境
・ canva・ remove.bg
・ Ruby on Rails 7.1.3.4
・ bootstrap 5.3.3
完成物

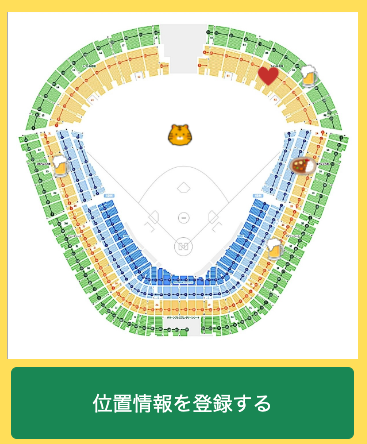
今回は甲子園球場の画像の上に、ユーザーが任意で登録したアイコンを該当の位置に表示させる機能を実装します。
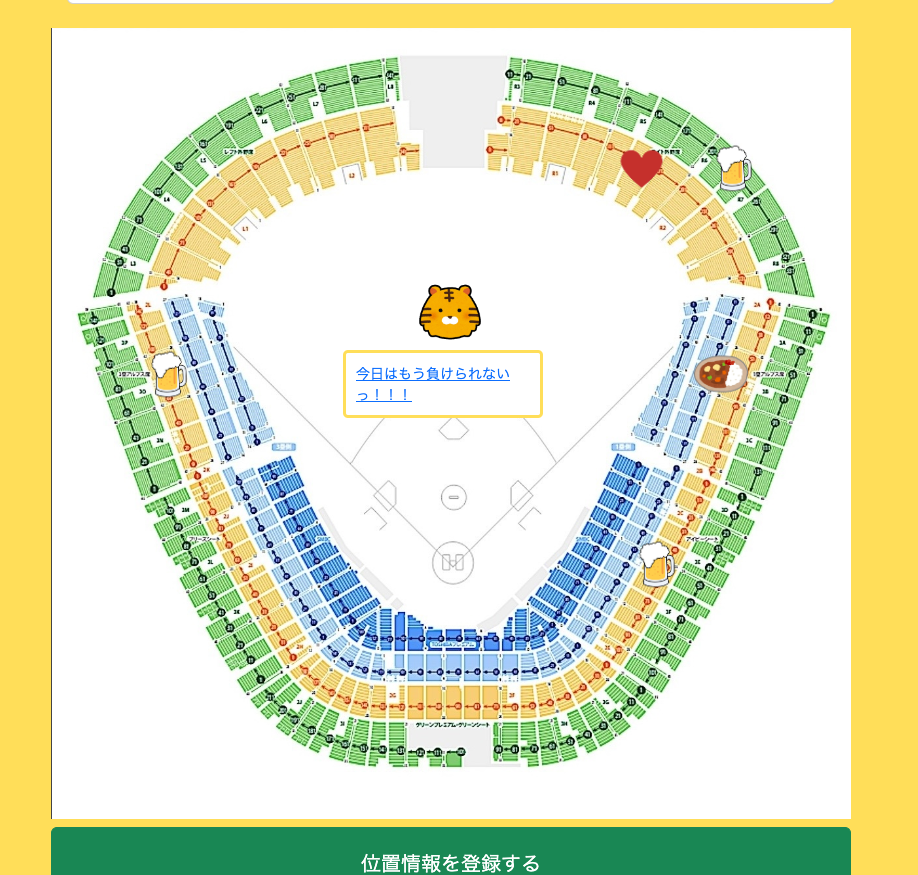
アイコンをクリックしたらそのユーザーの投稿が見られるところまでまとめていきたいと思います!
手順
1. canva でアイコンを作成する2. remove.bg で背景を消す
3. seeds.rb に画像上のシート範囲を登録する
4. MVCの作成
5. Javascript ファイルの作成
1. canva でアイコンを作成する
まずはアプリの雰囲気に合うアイコンを作成していきます。私は無課金なので、無料で使用できるアイコンのみを使用しています^^;
canvaサイトURL: https://www.canva.com/
公式サイトにアクセスしたら、ロゴを作成から、好きな素材を選択して保存します。

左側の素材から好きな素座を探します。
検索バーに記入したら関連するたくさんの素材が出てきます。
王冠マークは有料なので、ついてないものから選択していきます。
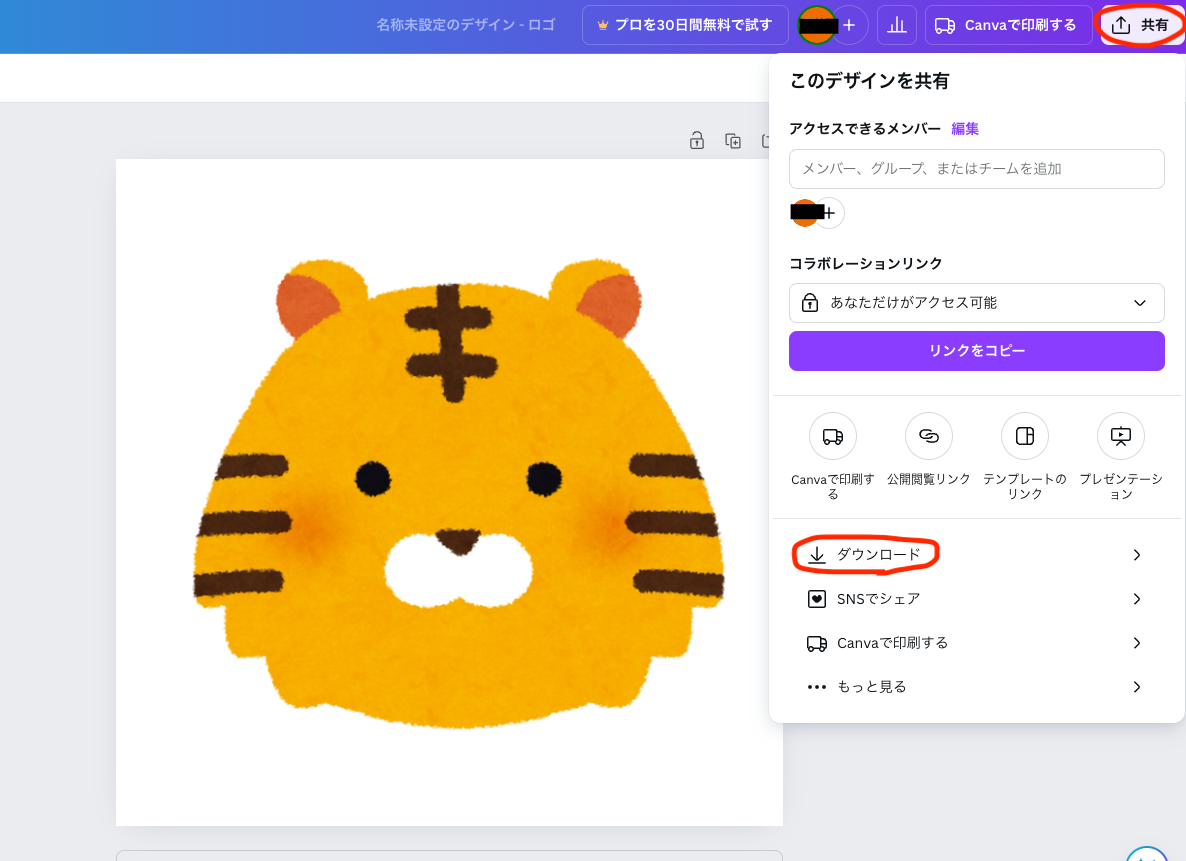
画像を選んで、右上の共有からダウンロードして保存します。
ダウンロードボタンを押すと、ファイルの種類やサイズを選択できますが、推奨の PNG と 500×500 でいいと思います!
有料だったらダウンロードの時点で背景の透過ができるのですが、この後の作業で無料で背景を消せるのであまり使わない方はそっちがいいかなと思います。
ダウンロードが完了したら次に進みます。
2. remove.bg で背景を消す
サイトURL:remove.bgこのサイトで背景の透過が簡単に行えます。
画像をドラッグ&ドロップかファイルを選択します。
 そうすると背景を自動で透過させてくれます。
そしてこの画像のように画像上の必要な白い部分も透過されたりするので、その場合は「Erase/Restore」を選択して手動で簡単に修正が可能です。
背景を消す範囲を広げたい場合は Erase を選択してブラシでその範囲を書けば消してくれて、このトラの口の部分を透過させたくない場合は Restore を選択してブラシでその部分を書けば白に戻ります。
そして Effects で輪郭をばかしたり、影をつけたりも無料でできます。
無料でここまでできたら最高です!
そしてアイコン作成が完了したら任意の名前を設定して app/assets/images フォルダに icon フォルダを作成してその中に入れていきます。
3. seeds.rb に画像上のシート範囲を登録する
アイコンを表示させたい画像をlocalhostに貼り付けて、その画像の縦横比率を100%として、left(x),top(y)の配列で何%の位置かを取得していきます。まずアイコンを一つ表示させて、開発者ツールの検証を使用して、left と top の位置を微調整しながら取得していきます。
今回はわかりやすいようにアイコンを各頂点に配置していますが、この配置したアイコンの left と top の値を seeds.rb に記述していきます。
locations = [
    { id: 1, location_type: :backnet, seat_name: "backnet", points: [{ x: 36, y: 72 }, { x: 25, y: 81 }, { x: 32, y: 86 }, { x: 58, y: 86 }, { x: 67, y: 81 }, { x: 55, y: 72 }] },
    { id: 2, location_type: :smbc_seat, seat_name: "smbc_seat", points: [{ x: 59, y: 68 }, { x: 67, y: 53 }, { x: 64, y: 61 }] },
    { id: 3,  ...
    .
    .
    .
  ]

  locations.each do |location|
    Location.find_or_create_by!(location_type: location[:location_type], seat_name: location[:seat_name]) do |loc|
      loc.points = location[:points].to_json
    end
  end
すごく地道ですが、一旦取得すると変更することはないので、一回きりと思って頑張りました!
そしてこれも多角形なのでJSON形式の配列で保存できるようにカラムのデータ型をjsonbにしています。
4. MVCの作成
前回で位置情報を取得して返す部分まで実装できているので、今回はそれにアイコンを紐づけてデータベースに保存して、甲子園球場の画像の上に表示させるところまでしていきたいと思います。ルーティングは追加がないのでそのままです!
まずはモデルから追記していきます。
・モデルの作成
class UserLocation < ApplicationRecord
  before_create :set_index
  after_create :set_date, :set_location_type
  after_create :calculate_offset

  belongs_to :user
  belongs_to :location
  enum icon: { heart: 0, tiger: 1, beer: 2, chu_hi: 3, curry: 4 }
  enum location_type: Location.location_types

  validates :icon, presence: true
  validates :location_id, presence: true

  def self.create_with_seat(location_params, user)
    user_location = new(location_params.merge(user_id: user.id))

    user_location.save

    user_location
  end

  def calculate_offset
  # pointsに定義してあるJSONデータをRubyの配列に変換
    points = JSON.parse(location.points)
  #pointsが空出ないことを確認、空の場合[0,0]を返す
    return [0, 0] unless points.present?

  # points配列のすべての点のy値とx値の平均を計算
    top = points.sum { |point| point["y"].to_i } / points.size
    left = points.sum { |point| point["x"].to_i } / points.size

  # points配列のすべての点のx値とy値の範囲(すなわち、最大値と最小値の差)を計算(点の集合の幅と高さ)
    width = points.max_by { |point| point["x"].to_i }["x"].to_i - points.min_by { |point| point["x"].to_i }["x"].to_i
    height = points.max_by { |point| point["y"].to_i }["y"].to_i - points.min_by { |point| point["y"].to_i }["y"].to_i

  # アイコンのx座標とy座標のオフセットを計算、アイコンの位置を調整
    offset_x = (index % 3) * (width / 3.0)
    offset_y = (index / 3) * (height / 3.0)

  # アイコンが画像の外に出ないように、幅または高さを超えないようにオフセットを調整
    offset_x = [offset_x, width].min
    offset_y = [offset_y, height].min

  # アイコンの最終的なx座標とy座標を計算
    [left + offset_x, top + offset_y]
  end

  private

    def set_index
    last_index = UserLocation.order(index: :desc).first&.index || -1
    self.index = last_index + 1
  end

  def set_date
    self.update(date: self.created_at.to_date)
  end

  def set_location_type
    location = Location.find(self.location_id)
    self.update(location_type: location.location_type)
  end
end
前回の記述も省略せずに記述しています。
・ set_index
同じ座席範囲に複数のアイコンが登録されてもアイコン同士の表示が被らないように、indexの値を自動的に更新するメソッドです。
・ set_date
dateフィールドに作成日を設定するメソッドです。
・ set_location_type
UserLocationオブジェクトのlocation_typeフィールドを設定するメソッドです。
関連づいている Location オブジェクトをデータベースから取得しています。
これにより、UserLocationオブジェクトから直接その場所のタイプを取得することができます。
・ enum 、validates
enumでアイコンに整数値と名前を設定し、アイコンの登録がない場合にバリデーションエラーを発生させるようにします。
・ calculate_offset
アイコンの表示位置を計算するメソッドです。
locationオブジェクトのpointsフィールドを解析し、その中心点を計算します。また、アイコンが画像の外に出ないように、オフセットを計算します。
コントローラの作成
コントローラは前回にアイコンのストロングパラメータをつけるだけです。class UserLocationsController < ApplicationController
# 省略
private
def user_location_params
params.require(:user_location).permit(:location_id, :icon) #:iconを追記
end
end
前回のコードにあった以下の記述がアイコンの登録になります。
@user_location = UserLocation.create_with_seat(user_location_params.merge(icon: user_location_params[:icon].to_i), current_user)
新しいUserLocationオブジェクトを作成するときに、そのicon属性を設定しています。
ビューの作成
まずアイコン登録のフォームの作成をします。・フォームの作成(new.html.erb)
 <%# --- 省略 --- %>

<%= form.label :icon, I18n.t('user_location.seat.icon'), class: 'form-label' %>
<div class="row icon-row icon-selection">
  <% UserLocation.icons.keys.each do |icon| %>
    <div class="col icon-option mb-3">
      <%= form.radio_button :icon, UserLocation.icons[icon], id: "icon_#{icon}" %>
      <%= label_tag "icon_#{icon}" do %>
        <div>
          <img src="<%= image_path("icons/#{icon}.png") %>" alt="<%= icon %>">
        </div>
        <div>
          <%= I18n.t("user_location.icon.#{icon}") %>
        </div>
      <% end %>
    </div>
  <% end %>
</div>

<%# --- 省略 --- %>
以下scssで見た目を整えていきます。
// user_location icon
.icon-selection {
  display: flex;
  justify-content: space-between;
  flex-wrap: wrap;
  width: auto;
}

.icon-option {
  flex-grow: 1;
  display: flex;
  flex-direction: column;
  align-items: center;
  justify-content: space-between;
  cursor: pointer;
  font-size: 0.8em;
}

.icon-option input {
  display: none;
}

.icon-option img {
  width: 60px;
  height: 60px;
  border: 2px solid transparent;
  transition: border-color 0.3s;
}

.icon-option input:checked + label img {
  border-color: #007bff;
}
完成ページ

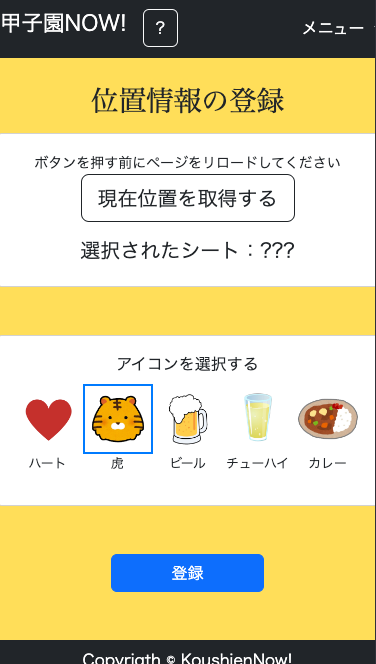
アイコンにラジオボタンを設定して、ラジオボタンに対応するラベルをそれぞれのアイコンに設定しています。
選択したらアイコンの周りに囲いが出るようにしています。
・表示ページの作成(_location.html.erb)
甲子園球場の画像にアイコンを一覧で表示させるページはトップページでレンダリングするので、パーシャルで作成します。
<div class="container d-flex justify-content-center align-items-center">
  <div class="relative text-center">

  # 画像の特定の部分にハイパーリンクを設定
    <map name="image-map">
      <% UserLocation.where(location_id: @location_id).each do |user_location| %>

      # 各UserLocationの座標を取得し、それをカンマ区切りの文字列に変換
        <% coords = location.points.map { |point| "#{point['x']},#{point['y']}" }.join(',') %>

        # 域の形状は多角形(poly)で、座標はlocation.pointsで取得
        <area shape="poly" coords="<%= location.points %>">
      <% end %>
    </map>

    # 画像マップに使用する画像を表示、#image-mapを使用
    <%= image_tag 'koushien.jpg', id: 'stadium-image', class: 'img-fluid mx-auto d-block', usemap: '#image-map', style: 'width: 800px' %>

    # @usersが空でない場合にのみ、以下のコードを実行
    <% if @users.any? %>

    # @usersを、今日のuser_locationsのlocation_idでグループ化
      <% @users.group_by { |user| user.user_locations.find_by(created_at: Date.today.all_day)&.location_id }.each do |location_id, users| %>
        <% users.each_with_index do |user, index| %>

        # 今日のuser_locationを取得
          <% user_location = user.user_locations.find_by(created_at: Date.today.all_day) %>

        # user_locationが存在する場合にのみ、以下のコードを実行
          <% if user_location.present? %>
          <% user_location.index = index %>

          # user_locationのオフセットを計算
            <% left, top = user_location.calculate_offset %>

          # 各user_locationのアイコンを表示
            <%= image_tag "icons/#{user_location.icon}", class: "seat-icon", style: "left: #{left}%; top: #{top}%;" %>

          # ユーザーの最新の投稿が存在する場合にのみ、以下のコードを実行
            <% if user.latest_post %>
              <div class="tooltip">

            # ユーザーの最新の投稿へのリンクを作成
                <%= link_to user.latest_post.body, post_path(user.latest_post) %>
              </div>
            <% end %>
          <% end %>
        <% end %>
      <% end %>
    <% end %>
  </div>
</div>
以下はscssで見た目を整えていきます。
.stadium-link {
  position: absolute;
}

.img-fluid {
  max-width: 100%;
  height: auto;
}
.relative {
  position: relative;
}
.seat-icon {
  position: absolute;
  width: 60px;
  height: 60px;
}

.tooltip {
  position: absolute;
  display: none;
  background-color: white;
  border: 3px solid #FFDE59;
  max-width: 200px;
  max-height: 100px;
  padding: 10px;
  border-radius: 5px;
  opacity: 1;
  overflow: hidden;
  transform: translate(-50%, -50%);
}
.btn-block {
  font-size: 1.25rem;
  padding: 1.25rem;
  width: 100%;
}
#stadium-image {
  pointer-events: none;
}

@media (min-width: 768px) and (max-width: 1024px) {
  #stadium-image {
    width: 100%;
  }
  .seat-icon {
    width: 45px;
    height: 45px;
  }
}
@media (max-width: 480px) and (max-width: 767px) {
  .icon-option img {
    width: 30px;
    height: 30px;
  }

  #stadium-image {
    width: 100%;
  }
  .seat-icon {
    width: 30px;
    height: 30px;
  }
  .icon-option img {
    width: 70px;
    height: 70px;
  }
  .icon-row {
    --bs-gutter-x: 0rem; // 列間のスペースをなくす
  }
  .icon-selection {
    width: 100%; // 幅を最大に設定
    flex-wrap: nowrap;
    justify-content: space-between;
  }
  .icon-option {
    width: 20%;
    display: flex;
    flex-direction: column;
    align-items: center;
    justify-content: space-between;
    cursor: pointer;
    font-size: 0.8em;
    margin: 0;
  }
}
ここでアイコンに紐づいた投稿を表示させる tooltip も記述しているのですが、基本的に非表示なのでクリックしたら表示にする動きをJavascriptでつけていきます。
そしてトップページに以下を記述してレンダリングします。
<%= render 'user_locations/location' %>
そしてユーザー情報と投稿をトップページでも使えるように、コントローラに@usersを設定します。
class StaticPagesController < ApplicationController
 def top
  @users = User.all
  @post = current_user.posts.last if user_signed_in? #最新の投稿のみを取得
 end
end
これでトップページに甲子園球場の画像の上にアイコンが選択した位置に表示されるようになりました。
次にユーザーに紐づいた投稿を表示させるJavascriptファイルを作成します。
5. Javascript ファイルの作成
document.addEventListener('turbo:load', function() {
  const icons = document.querySelectorAll('.seat-icon');
  icons.forEach(icon => {
    icon.addEventListener('click', function(event) {
      const tooltip = this.nextElementSibling;

      if (tooltip) {
      // すべてのツールチップを非表示にする
        const allTooltips = document.querySelectorAll('.tooltip');
        allTooltips.forEach(tooltip => {
          tooltip.style.display = 'none';
        });
        const allIcons = document.querySelectorAll('.seat-icon');
        allIcons.forEach(icon => {
          icon.style.width = '';
          icon.style.height = '';
          icon.dataset.enlarged = 'false'; // アイコンが拡大されていないことを示す
        });
      }

      // アイコンの位置を取得
      const iconTop = parseFloat(icon.style.top);
      const iconLeft = parseFloat(icon.style.left);

      // ツールチップの位置を設定
      let topValue;
      if (iconTop > 70) { // アイコンの位置が70%を超えた場合
        topValue = iconTop - 8; // ツールチップをアイコンの上に表示
      } else {
        topValue = iconTop + 14; // ツールチップをアイコンの下に表示
      }
      if (topValue > 100) {
        tooltip.style.top = (100 - (topValue - 100)) + '%'; // topValueが100を超える場合、100から超過分を引く
      } else {
        tooltip.style.top = topValue + '%';
      }
      tooltip.style.left = (iconLeft + 4) + '%';
      tooltip.style.display = 'block';

      // アイコンがすでに拡大されていない場合のみ、アイコンのサイズを変更
      if (icon.dataset.enlarged === 'false') {
        let style = window.getComputedStyle(icon);
        let originalWidth = parseFloat(style.width);
        let originalHeight = parseFloat(style.height);

        icon.style.width = (originalWidth * 1.3) + 'px';
        icon.style.height = (originalHeight * 1.3) + 'px';
        icon.dataset.enlarged = 'true'; // アイコンが拡大されたことを示す
      }

      event.stopPropagation();
    });
  });

  document.addEventListener('click', function(event) {
    const tooltips = document.querySelectorAll('.tooltip');
    tooltips.forEach(tooltip => {
      if (!tooltip.contains(event.target)) {
        tooltip.style.display = 'none';
      }
    });

    // クリックされた場所がアイコン以外の場合、全てのアイコンのサイズを元に戻す
    icons.forEach(icon => {
      icon.style.width = '';
      icon.style.height = '';
      icon.dataset.enlarged = 'false'; // アイコンが拡大されていないことを示す
    });
  });
});
これでアイコンをクリックしたときにアイコンが少し大きく表示され、そのユーザーの投稿が表示されます。
tooltipの表示位置も甲子園球場の画像の外に出ないように、アイコンの表示位置に合わせて上か下かに配置されるように記述しています。
これで画像上にアイコンを表示させる機能と、そのアイコンから投稿に紐付けが完了しました!
表示されるtooltipも投稿自体がリンクになっているので、投稿をクリックしたら投稿詳細画面に飛ぶことができます。
最後に
今回も長かったですが、最後までお読みいただきありがとうございます!備忘録ですが、画像の上に画像を表示させる記事があまりなかったので、参考になれば幸いです。
初学者のため、間違った見解や解説もあると思いますが、もしよければ優しくご教示いただけるととても喜びます。


