本記事は JUCE Advent Calendar 2017 の12月15日向けに投稿した記事です。
JUCEは、C++言語によるマルチメディア系アプリケーションの開発を支援するフレームワークです。JUCEはオーディオやMIDIを扱うアプリケーションに特化したAPI群が整備されているため、簡単に楽器アプリケーションを実装することができます。
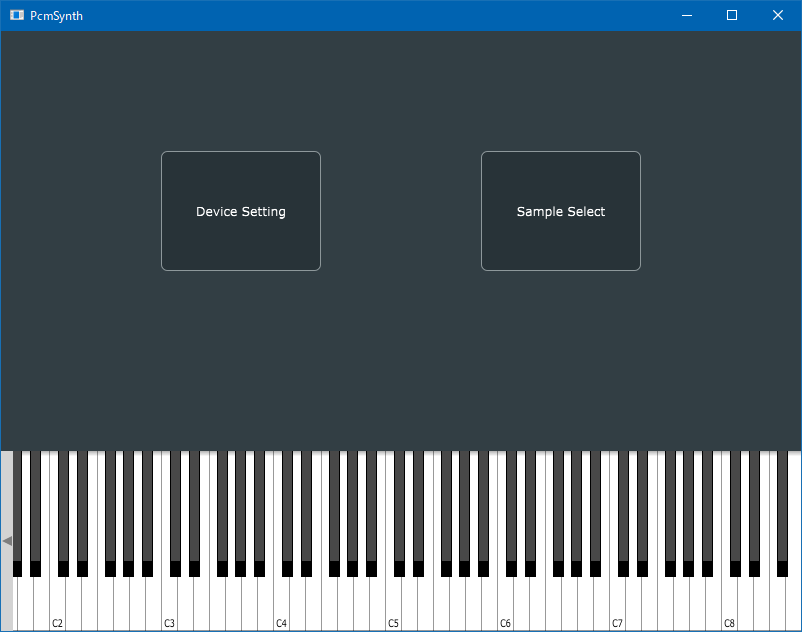
本記事では、JUCEのAPIを利用してPCMシンセサイザー(サンプラー)を作成する方法を紹介します。実装作業(コーディング)は大きく分けて3つの項目がありますが、他の記事と被る部分があるかと思いますので、読み飛ばしていただいても大丈夫です。
- A. オーディオ・MIDIデバイス設定の実装
- B. MIDI入力データ処理の実装
- C. シンセイサイザーの実装
本記事で作成するアプリケーション
ソースコード
1. 新規プロジェクトを作成
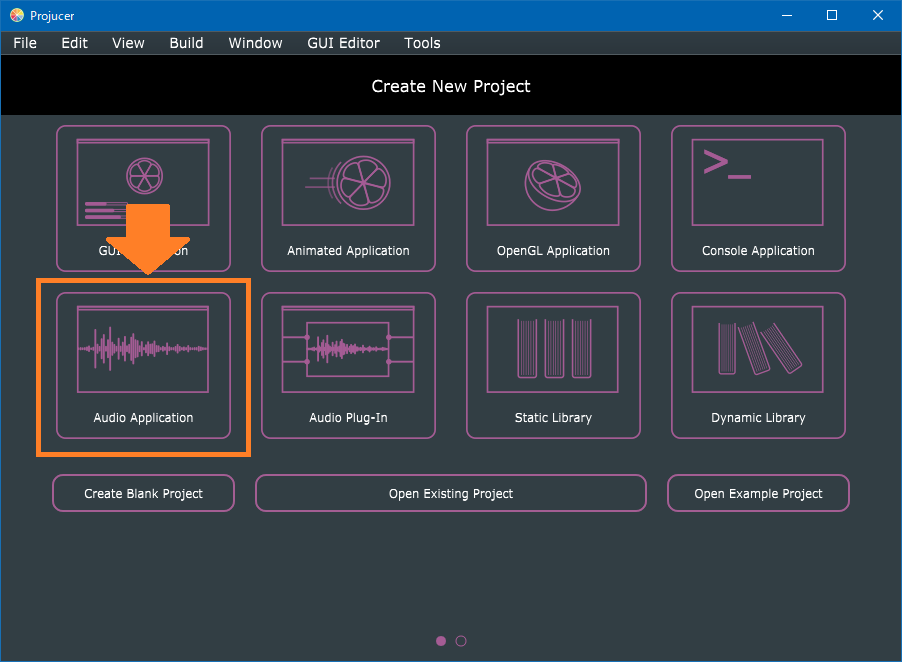
本記事では、Projucerの"Audio Application"テンプレートから新規プロジェクトを作成します。
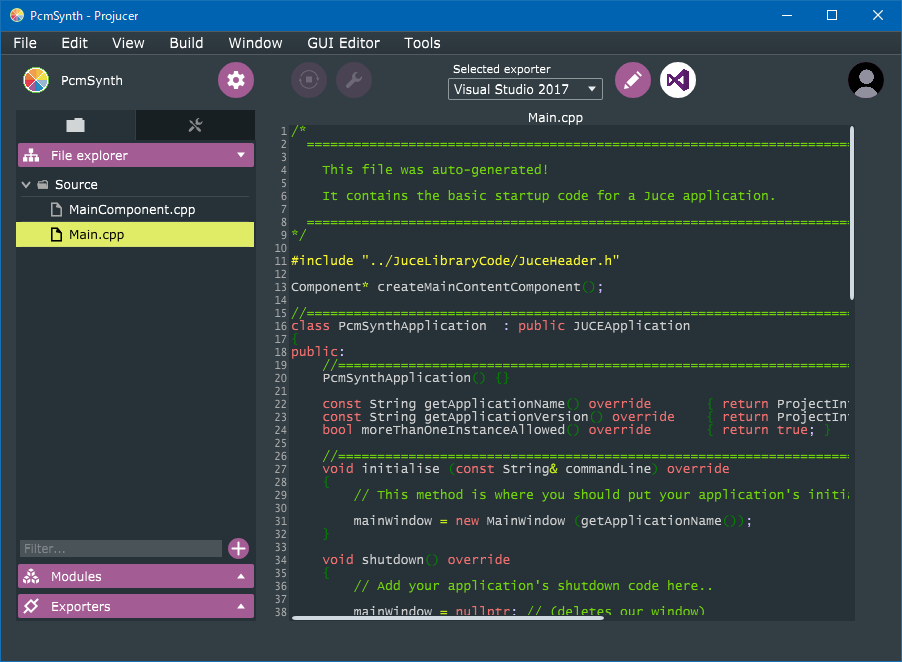
新規プロジェクトを作成すると、"Main.cpp"と"MainComponent.cpp"の2つのソースファイルが作成されます。
A. オーディオ・MIDIデバイス設定の実装
A-1. "AudioDeviceSelectorComponent"を表示する処理を実装
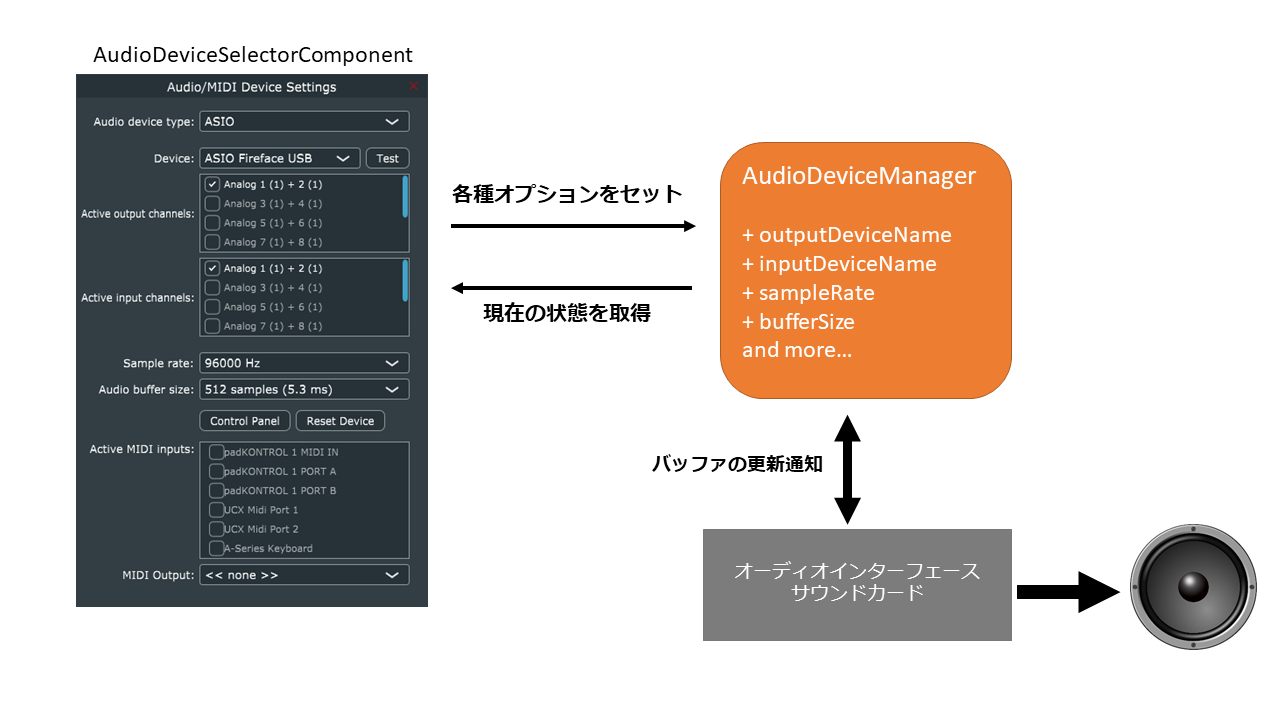
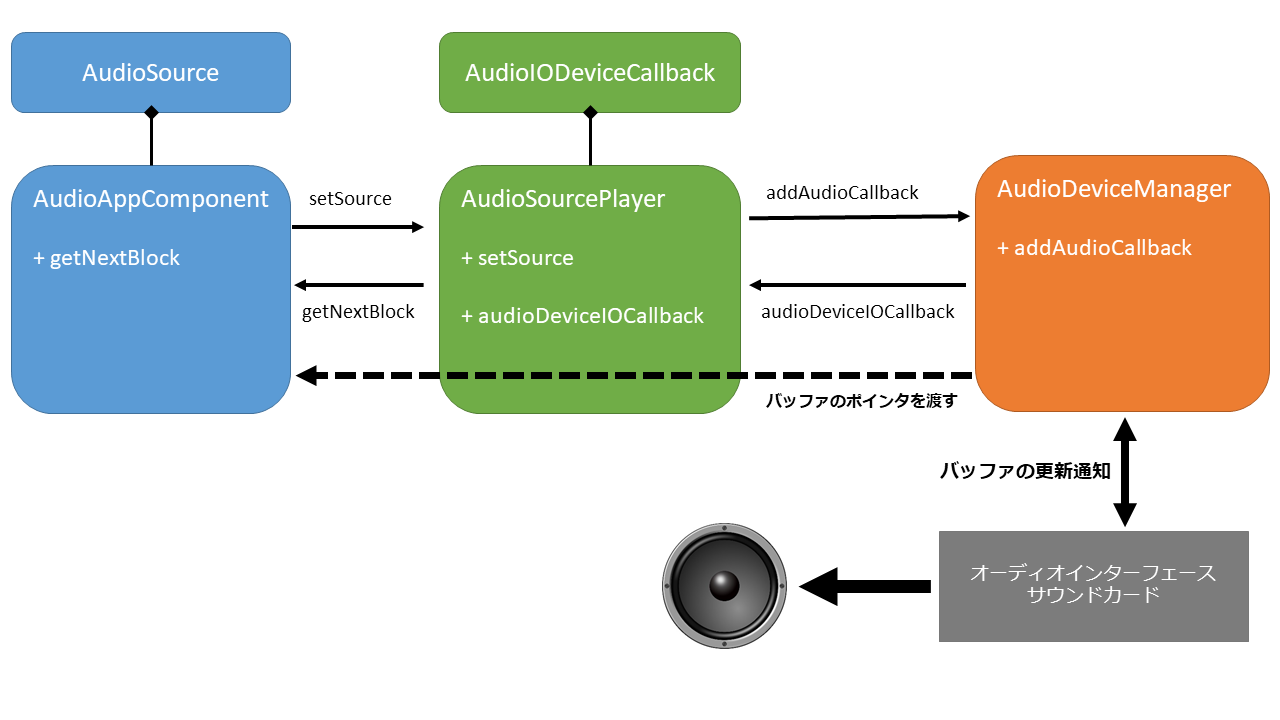
JUCEライブラリは、"AudioDeviceManager"オブジェクトがオーディオデータ・MIDIデータ各デバイスドライバに対してを送受信する仕組みとなっています。AudioDeviceManager自身も様々な設定項目を持っており、使用可能なオーディオドライバの一覧や、送受信可能なMIDIデバイスの一覧など様々な情報を扱います。
”AudioDeviceSelectorComponent”クラスはその設定項目の管理を便利にするクラスで、各種設定を編集するのに特化したGUIコンポーネントです。
"MainComponent.cpp"を次のように編集します。
"MainComponent.cpp"

class MainContentComponent   : public AudioAppComponent
{
public:

    ~~~中略~~~

private:
    void showDeviceSetting() {
        AudioDeviceSelectorComponent selector(deviceManager,
                                              0, 256,
                                              0, 256,
                                              true, true,
                                              true, false);
        selector.setSize(400, 600);

        DialogWindow::LaunchOptions dialog;
        dialog.content.setNonOwned(&selector);
        dialog.dialogTitle = "Audio/MIDI Device Settings";
        dialog.componentToCentreAround = this;
        dialog.dialogBackgroundColour = getLookAndFeel().findColour(ResizableWindow::backgroundColourId);
        dialog.escapeKeyTriggersCloseButton = true;
        dialog.useNativeTitleBar = false;
        dialog.resizable = false;
        dialog.useBottomRightCornerResizer = false;
        dialog.runModal();
    }

~~~中略~~~

    JUCE_DECLARE_NON_COPYABLE_WITH_LEAK_DETECTOR (MainContentComponent)
};
A-2. GUI:TextButtonコンポーネントとコールバックの登録
showDeviceSetting()関数を実行するトリガーとして、GUIに配置するボタンのクリック動作を紐づけたいと思います。
先ず、"MainContentComponent"クラスがボタンコンポーネントからのコールバックを受け取れるように、リスナークラスを継承させます。
続いて、TextButtonコンポーネントのインスタンス生成と、TextButtonコンポーネントへのコールバックを登録します。
最後に、ボタンがクリックされたときのイベントハンドラ(コールバック関数)内でshowDeviceSetting()関数を実行させます。
"MainComponent.cpp"

class MainContentComponent   : public AudioAppComponent,
                                private Button::Listener  // Buttonコンポーネントのリスナークラス
{
public:
    //==============================================================================
    MainContentComponent()
    {
        // ボタンコンポーネントを子オブジェクトとして配置・表示する
        addAndMakeVisible(deviceSettingButton);
        deviceSettingButton.setButtonText("Device Setting");
        deviceSettingButton.addListener(this);            //TextButtonコンポーネントへのコールバックを登録

        setSize (800, 600);

        setAudioChannels (2, 2);
    }
    ~~~中略~~~

    // ボタンコンポーネントがクリックされたときのイベントハンドラ(コールバック関数)
    void buttonClicked (Button* button) override
    {
        if(button == &deviceSettingButton)
            showDeviceSetting();
    }

private:

    ~~~中略~~~

    TextButton deviceSettingButton;

    JUCE_DECLARE_NON_COPYABLE_WITH_LEAK_DETECTOR (MainContentComponent)
};
B. MIDI入力データ処理の実装
B-1. "MidiMessageCollector"でMIDI入出力データを管理する
JUCEライブラリにはMIDI入出力を扱うのに便利なクラスとして"MidiMessageCollector"が用意されています。
"MidiMessageCollector"クラスは、MIDI入出力のデータを一定時間貯めておく機能(キュー)と、貯めておいたMIDIデータを取り出す機能を持っています。
JUCEでは、オーディオデバイスからのコールバックをトリガーとしてオーディオ・MIDI処理を行う、イベントドリブンな仕組みを採用しているため、MidiMessageCollectorはイベントドリブンな仕組みと相性が良くなるよう設計されています。
また、MidiMessageCollectorは、オーディオ・MIDIデバイス(ハード機材)とのやり取りを統括する"AudioDeviceManager"クラスにその参照を登録することで、MIDI入出力イベントが発生した際にMIDIデータを受け取ることが出来ます。
"MainComponent.cpp"を次のように編集します。
"MainComponent.cpp"

class MainContentComponent   : public AudioAppComponent,
                                private Button::Listener
{
public:
    //==============================================================================
    MainContentComponent()
    {
    ~~~中略~~~

        // AudioDeviceManagerクラスのインスタンス"deviceManager"に midiCollectorの参照を登録する
        // deviceManagerは、基底クラス"AudioAppComponent"で定義されている
        deviceManager.addMidiInputCallback(String(), &midiCollector);

        setSize (800, 600);

        setAudioChannels (2, 2);
     }

    ~~~中略~~~

private:

    ~~~中略~~~

    MidiMessageCollector midiCollector;           // MidiMessageCollectorクラスのインスタンス

    JUCE_DECLARE_NON_COPYABLE_WITH_LEAK_DETECTOR (MainContentComponent)
};
B-2. GUI:MIDIKeyboardコンポーネントを配置する
MIDI入力の状態をモニタリングするために、GUIにMIDIKeyboadコンポーネントを配置します。
"MidiKeyboardComponent"オブジェクトは、"MidiKeyboardState"オブジェクトが保持するMIDIデータに合わせて、鍵盤の色を変更する機能が予め実装されています。"MidiKeyboardComponent"のnew時に引数として、MIDI入力デバイスから取得したMIDIデータを保持する"MidiKeyboardState"オブジェクトの参照を渡します。
"MainComponent.cpp"を次のように編集します。
"MainComponent.cpp"

class MainContentComponent   : public AudioAppComponent,
                                private Button::Listener
{
public:
    //==============================================================================
    MainContentComponent()
    {
        // MIDIKeyboadComponentクラスのインスタンスを作成. 引数には入力するMIDIデータを保持するオブジェクトを与える
        keyboardComponent = new MidiKeyboardComponent(keyboardState, MidiKeyboardComponent::horizontalKeyboard);

        // MIDIKeyboadComponentを子オブジェクトとして配置・表示する
        addAndMakeVisible(keyboardComponent);

        addAndMakeVisible(deviceSettingButton);
        deviceSettingButton.setButtonText("Device Setting");
        deviceSettingButton.addListener(this);

        deviceManager.addMidiInputCallback(String(), &midiCollector);

        setSize (800, 600);

        setAudioChannels (2, 2);
    }

private:

    ~~~中略~~~

    MidiKeyboardState keyboardState;              // MIDIデータをMIDIキーボードに最適なデータに変換して保持するクラス
    MidiKeyboardComponent* keyboardComponent;     // MIDIKeyboadComponentクラスのポインタ

    JUCE_DECLARE_NON_COPYABLE_WITH_LEAK_DETECTOR (MainContentComponent)
};
B-3. MIDI入力のモニタリング処理を実装する
正しくMIDI入力が受信できていることをモニタリングするために、以下の処理を実装します。
- "MidiMessageCollector"オブジェクトがMIDI入力をキューに貯めておく
- "MidiMessageCollector"オブジェクトから取り出したMIDIメッセージを"MidiKeyboardState"オブジェクトに渡す
- "MidiKeyboardState"が保持したMIDIデータから"MidiKeyboardComponent"の表示を更新する(鍵盤の色を変更する)
"MainComponent.cpp"を次のように編集します。
"MainComponent.cpp"

class MainContentComponent   : public AudioAppComponent,
                                private Button::Listener
{
public:

~~~中略~~~
    void getNextAudioBlock (const AudioSourceChannelInfo& bufferToFill) override
    {
        bufferToFill.clearActiveBufferRegion();

        // 入力されたMIDIデータをMIDIバッファ型に変換するためのオブジェクト
        MidiBuffer incomingMidi;

        // "MidiMessageCollector"のキューに貯まったMIDIデータを回収する(MIDIバッファオブジェクトに変換する)
        midiCollector.removeNextBlockOfMessages(incomingMidi, bufferToFill.numSamples);

        // "MidiKeyboardState"に回収したMIDIデータを渡す(MIDIバッファを渡す)
        keyboardState.processNextMidiBuffer(incomingMidi, 0, bufferToFill.numSamples, true);

    }
~~~中略~~~
C. サウンドエンジン(音源部)の実装
C-1. 解説:juce::Synthesiserクラスについて
JUCEライブラリには、シンセサイザーの実装に特化したクラス"juce::Synthesiser"があります。
本記事では、この"juce::Synthesiser"クラスを利用して音源部を実装していきます。
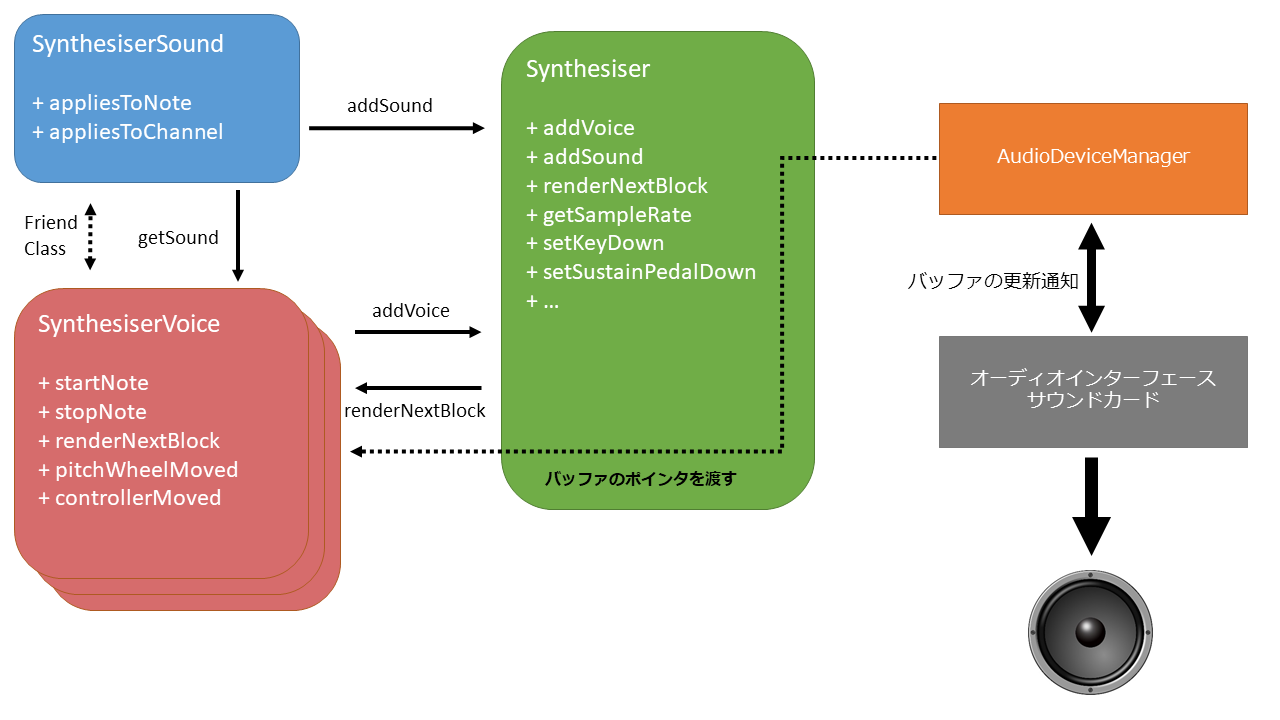
Synthesiserクラスは、シンセサイザーのコントロールモジュールとしての機能を有するものであり、それ単体では音源としての機能を持ちません。Synthesiserクラスは、"SynthesiserSound"クラスと"SynthesiserVoice"クラスと組み合わせることで、サウンドエンジン(音源部)としての機能を構築することができます。
- Synthesiserクラス... シンセサイザーのコントローラ(再生・停止、MIDI入出力、同時発音数の調整)
- SynthesiserSoundクラス... 波形が"定義"されている(数式による波形の定義、サウンドファイルからの波形データ生成)
- SynthesiserVoiceクラス... 波形を"再生"する(オーディオバッファへの書き込み、ピッチベンド・モジュレーション付加)
C-2. 解説:SamplerSoundクラスとSmaplerVoiceクラス
SynthesiserSoundクラスとSynthesiserVoiceクラスは、それぞれ純粋仮想関数(purre virtual)を持つ抽象クラスであるため、実際にそれらのインターフェースを使用するために、継承して実装コードを記述する必要があります。開発者が独自に実装することも出来ますが、JUCEライブラリでは、PCMシンセイサイザーの用途に特化した"SamplerSound"クラスと"SmaplerVoice"クラスが予め用意されています。
本記事では、これらを利用してPCMシンセイサイザーを実装します。
特に、"SamplerSound"クラスには、キーマッピング設定、アタックタイム・リリースタイムの設定、最長再生時間など、PCM音源に必要な機能が備わっています。特にキーマッピング設定では、ルートとなるキー(ピッチ)を基準として各鍵盤にそれぞれ対応したピッチとなるように異なる速度で波形の再生が行われます。また、内部では線形補完処理が行われているので、著しく音質を損なうことも無いようです。
※ "SmaplerVoice"クラスモジュレーションホイールの挙動については未実装のため、モジュレーション処理については"SynthesiserSound"クラスを継承して独自のSamplerSoundクラスを実装する必要があります。
C-3. 解説:モノフォニックとポリフォニック
SynthesiserVoiceクラスは、原則、1つのインスタンスで1ボイス分の仕事をします。よって、『Synthesiserクラスに登録した数=同時発音数』という関係となります。(子クラスの"SmaplerVoice"クラスも同様)
例えば、モノフォニックなシンセイサイザーを作りたい場合は、SynthesiserVoiceのインスタンスを、Synthesiserクラスのインスタンスに1つだけ登録します。
⇒"addVoice"関数を1回だけ実行する
また、ポリフォニックなシンセイサイザーを作りたい場合は、SynthesiserVoiceのインスタンスを、Synthesiserクラスのインスタンスに複数回(同時発音数の数)登録します。
⇒"addVoice"関数を複数回実行する
モノフォニックの場合
    // モノフォニック
    synth.addVoice(new SamplerVoice());
ポリフォニックの場合
    // 4音ポリフォニック
    for (int i = 0; i < 4; i++) {
        synth.addVoice(new SamplerVoice());
    }
    // 128音ポリフォニック
    for (int i = 0; i < 128; i++) {
        synth.addVoice(new SamplerVoice());
    }
C-4. 実装コード:PCM音源をセットアップする処理
関数"setupPcmSynth()"を定義します。この関数内で、Synthesiserクラスに対して、SamplerSoundクラスとSmaplerVoiceクラスを対応付ける処理を行います。また、HDD内のサウンドファイルを選択 → 読み込み → SamplerSoundクラスとの対応付けとキーマッピング設定も行います。
なお、"new SamplerSound()"の4番目の引数に与えている"60"は、MIDIノート番号"C3"(真ん中のド)に該当します。
参考資料:MIDIノートと周波数の関係
"MainComponent.cpp"

class MainContentComponent : public AudioAppComponent, private Button::Listener
{
public:

~~~中略~~~~

private:

~~~中略~~~~

    void setupPcmSynth()
    {
        AudioFormatManager formatManager;         // オーディオフォーマットを取り扱うクラス

        formatManager.registerBasicFormats();     // サポートするファイルフォーマットを登録(JUCE標準対応)

        // ファイル選択用のダイアログウインドウの設定
        FileChooser chooser("Select a audio file to play...",
	                      File::nonexistent, formatManager.getWildcardForAllFormats());

        // ファイル選択ダイアログウインドウが開く
        // ファイルを開くのが成功したらif文内の処理が実行される
        if (chooser.browseForFileToOpen())
        {
                File file(chooser.getResult());

                // ファイルストリームを生成する(ポインタを取得)
                AudioFormatReader* reader = formatManager.createReaderFor(file);

                // シンセイサイザーが持つ鍵盤の範囲を決める(BigInteger型で定義する 00011100011...)
                BigInteger allNotes;
                allNotes.setRange(0, 128, true);  // MIDIノートNo.0~127が有効範囲として解釈される

                // 以前のSamplerVoiceインスタンスとSamplerSoundインスタンスを消去する
                synth.clearVoices();
                synth.clearSounds();


                // SamplerVoiceインスタンスを生成、Synthesiserに登録する

                //synth.addVoice(new SamplerVoice());       // Monophonic

                for (int i = 0; i < 128; i++) {             // Polyphonic
                     synth.addVoice(new SamplerVoice());
                }

                // SamplerSoundインスタンスを生成、Synthesiserに対応付ける
                // 引数 = 1:パッチ名, 2:ファイルストリーム, 3:鍵盤の有効範囲, 4:ルートキーのノートナンバー(基準となるピッチ),
                //        5:アタックタイム(秒単位), 6:リリースタイム(秒単位), 7:オーディオソースから読み取る最大長(秒単位)
                synth.addSound(new SamplerSound("default", *reader, allNotes, 60, 0, 0.1, 10.0));
       }
    }

    Synthesiser synth;               // juce::Synthesiserクラスのインスタンス

~~~中略~~~~

    JUCE_DECLARE_NON_COPYABLE_WITH_LEAK_DETECTOR (MainContentComponent)
};
C-7. 実装コード:オーディオバッファに波形を書き込む処理
JUCEでは、"AudioDeviceManager"オブジェクトからのコールバックを受けることをトリガーとして、オーディオバッファ・MIDIバッファの処理を実行するという仕組みとなっています。本記事の場合、"MainComponent.cpp"に予め定義されている関数"prepareToPlay "と"getNextAudioBlock"に実装コードを記述することで、オーディオデバイスにシンセイサイザーの出力を渡すことが出来ます。
- "prepareToPlay"関数... オーディオデバイスの初期化・設定変更時に実行される。デバイス側のサンプリングレートを受け取り、その値をシンセイサイザーに渡すことで、バッファ処理の不整合やピッチの不整合を解消する
- "getNextAudioBlock"関数... オーディオバッファのアドレスを受け取る。オーディオバッファを読み込めばオーディオ入力の処理となり、オーディオバッファに書き込めばオーディオ出力の処理となる
なお、"Synthesiser"クラスの更新処理を実行する関数"renderNextBlock"の内部では、"SamplerVoice"クラスの波形書き込み処理が実行されますが、その波形書き込み処理自体は予め"SamplerVoice"クラスに実装されているため、改めて実装する必要はありません。
ただし、開発者が独自のボイスクラスを定義する場合は、その波形書き込み処理を新たに実装する必要があります。
"MainComponent.cpp"

class MainContentComponent : public AudioAppComponent, private Button::Listener
{
public:

~~~中略~~~~

    void prepareToPlay (int samplesPerBlockExpected, double sampleRate) override
    {
        midiCollector.reset(sampleRate);    // MidiMessageCollectorに貯まったデータをリセット

        synth.setCurrentPlaybackSampleRate(sampleRate); // シンセサイザー(音源部)のサンプリングレートを設定
    }


    void getNextAudioBlock (const AudioSourceChannelInfo& bufferToFill) override
    {
        bufferToFill.clearActiveBufferRegion();

	// 入力されたMIDIデータをMIDIバッファ型に変換するためのオブジェクト
        MidiBuffer incomingMidi;

        // "MidiMessageCollector"のキューに貯まったMIDIデータを回収する(MIDIバッファオブジェクトに変換する)
        midiCollector.removeNextBlockOfMessages(incomingMidi, bufferToFill.numSamples);

        // "MidiKeyboardState"に回収したMIDIデータを渡す(MIDIバッファを渡す)
	keyboardState.processNextMidiBuffer(incomingMidi, 0, bufferToFill.numSamples, true);

        // "Synthesiser"クラスの更新処理を実行する関数"renderNextBlock"を実行
        // 引数 = 1:書き込み先のバッファ, 2:受信MIDIデータ, 3:開始サンプル番号, 4:バッファが持つサンプル数
        synth.renderNextBlock(*bufferToFill.buffer, incomingMidi, 0,  bufferToFill.numSamples);
    }

~~~中略~~~~

    JUCE_DECLARE_NON_COPYABLE_WITH_LEAK_DETECTOR (MainContentComponent)
};
C-8. GUI:TextButtonコンポーネントとコールバックの登録
setupPcmSynth()関数を実行するトリガーとして、GUIに配置するボタンのクリック動作を紐づけます。
実装方法は、A-2.と同様です。
"MainComponent.cpp"

class MainContentComponent   : public AudioAppComponent,
                                private Button::Listener  // Buttonコンポーネントのリスナークラス
{
public:
    MainContentComponent()
    {

    ~~~中略~~~

        addAndMakeVisible(sampleSelectButton);
        sampleSelectButton.setButtonText("Sample Select");
        sampleSelectButton.addListener(this);

        setSize (800, 600);

        setAudioChannels (2, 2);
    }
    ~~~中略~~~

    // ボタンコンポーネントがクリックされたときのイベントハンドラ(コールバック関数)
    void buttonClicked (Button* button) override
    {
        if (button == &deviceSettingButton)
	        showDeviceSetting();
        else if (button == &sampleSelectButton)
	        setupPcmSynth();
    }

private:

    ~~~中略~~~

    TextButton sampleSelectButton;

    ~~~中略~~~

    JUCE_DECLARE_NON_COPYABLE_WITH_LEAK_DETECTOR (MainContentComponent)
};
D. 仕上げ
D-1. GUI:コンポーネントの配置を調整する
"MainComponent.cpp"

class MainContentComponent   : public AudioAppComponent,
                                private Button::Listener
{
public:

    ~~~中略~~~

    void resized() override
    {
         deviceSettingButton.setBoundsRelative(0.2, 0.2, 0.2, 0.2);

         sampleSelectButton.setBoundsRelative(0.6, 0.2, 0.2, 0.2);

         keyboardComponent->setBoundsRelative(0.0, 0.7, 1.0, 0.3);
    }

    ~~~中略~~~

};
参考情報
juce::Synthesiserクラス 公式ドキュメント
juce::SynthesiserSoundクラス 公式ドキュメント
juce::SynthesiserVoiceクラス 公式ドキュメント
juce::SamplerSoundクラス 公式ドキュメント
juce::SamplerVoiceクラス 公式ドキュメント
MIDIノートと周波数の関係
