本記事は JUCE Advent Calendar 2017 の12月13日向けに投稿した記事です。
JUCEは、C++言語によるマルチメディア系アプリケーションの開発を支援するフレームワークです。JUCE 5 からMIDI over Bluetooth LE(以下、MIDI over BLE)のモジュールが提供されるようになりました。執筆時点では、iOS/Androidに限定してそのモジュールを使用することが出来ます。
本記事ではiOSを事例として、MIDI over BLEを簡単に実装できるJUCEライブラリのポテンシャルについてお伝えできればと思います。
※macOSの場合は『Audio MIDI設定』ツールなど、OSレベルにてMIDI over BLEを接続することが出来ます。
本記事で作成するアプリケーション
こちらのサンプルプロジェクトは、実機テストでこんな風に動きます。
— COx2 ))))@ (@CO_CO_) 2017年11月23日
https://t.co/3Gm3wWahSB pic.twitter.com/WgBnzuQQ35
ソースコード
開発環境
- macOS 10.12.6 (Sierra)
- JUCE 5.2.0
- Xcode 9.1
動作確認環境
- iPhone 8 (iOS 11)
1. 新規プロジェクトを作成
本記事では、Projucerの"Audio Application"テンプレートから新規プロジェクトを作成します。
新規プロジェクトを作成すると、"Main.cpp"と"MainComponent.cpp"の2つのソースファイルが作成されます。

2. Projucer:プロジェクト設定(アクセス権限の設定)
iOSの場合、アプリケーションが特定の動作をする場合にアクセス権限についてユーザーから許可を受ける必要があります。参考記事
本アプリケーションの場合、以下のアクセス権限が必要になります。
- マイクへのアクセス
- Bluetoothインターフェースへのアクセス
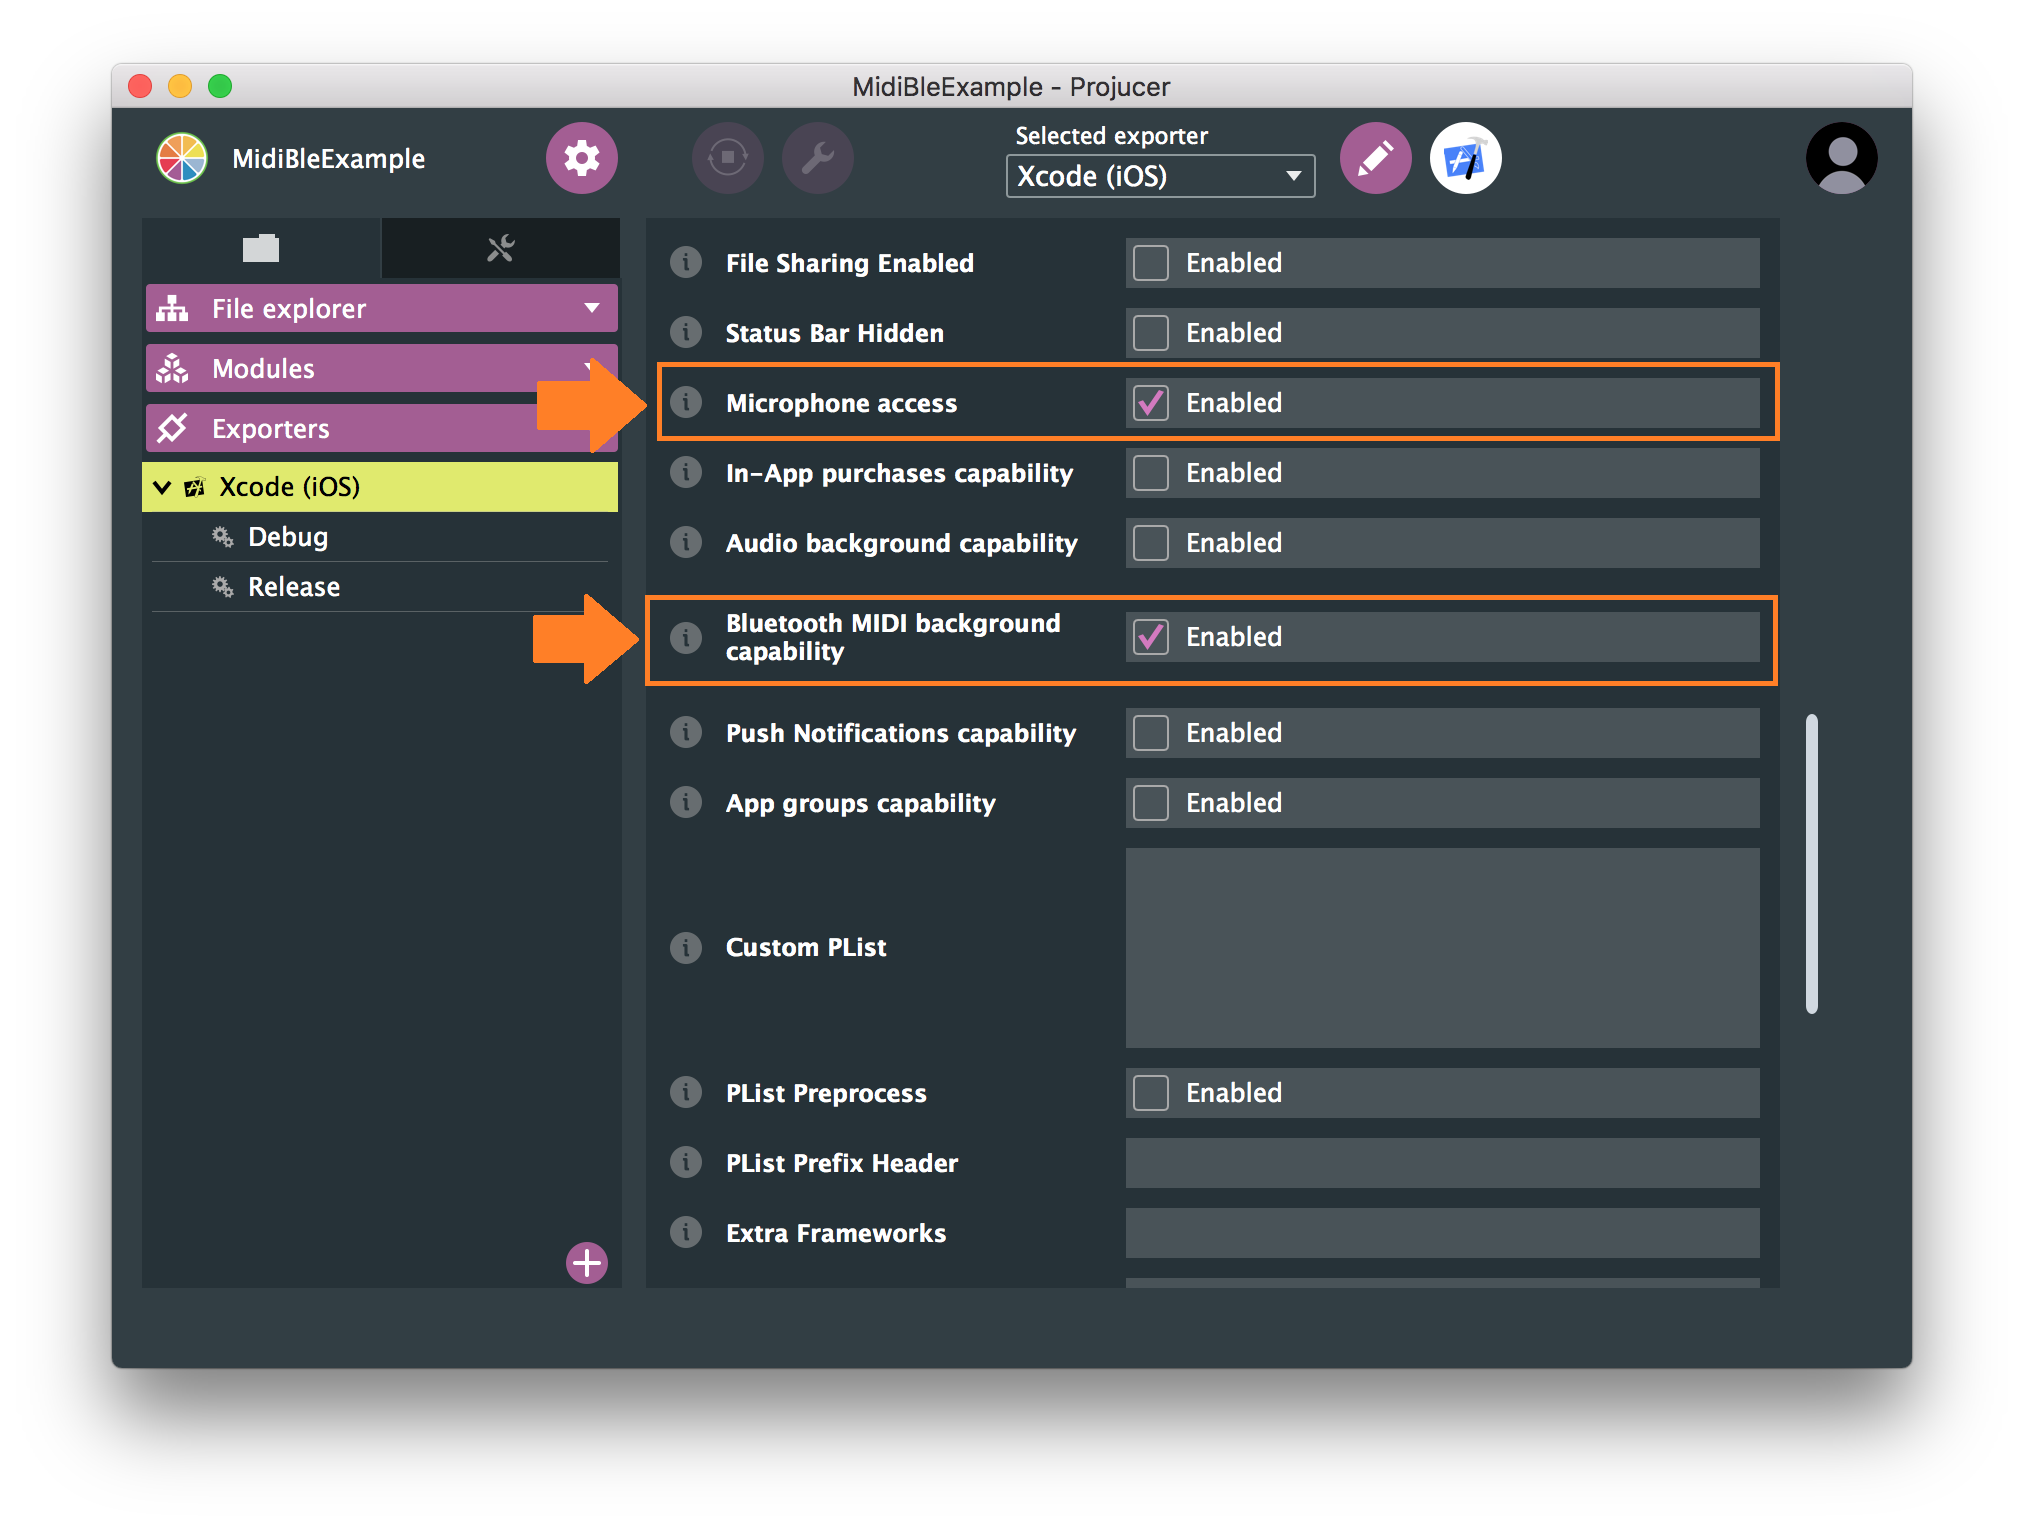
これらの設定はXcode上や外部のエディタを用いることが通例ですが、Projucerでこれらの設定を編集することが出来ます。
Projucerの[Exporters]から、Xcode(iOS)を選択し、"Microphone access"と"Bluetooth MIDI background capability"にチェックを入れてから、プロジェクトを保存します。
Xcodeにアクセス権限の設定が反映されます
3. プロジェクトを保存して、IDE(Xcode)で開く
必要な設定項目を編集したのち、プロジェクトを保存したら、(プロジェクト名).xcodeprojをXcodeで開きましょう。

4. "AudioDeviceSelectorComponent"を表示する処理を実装
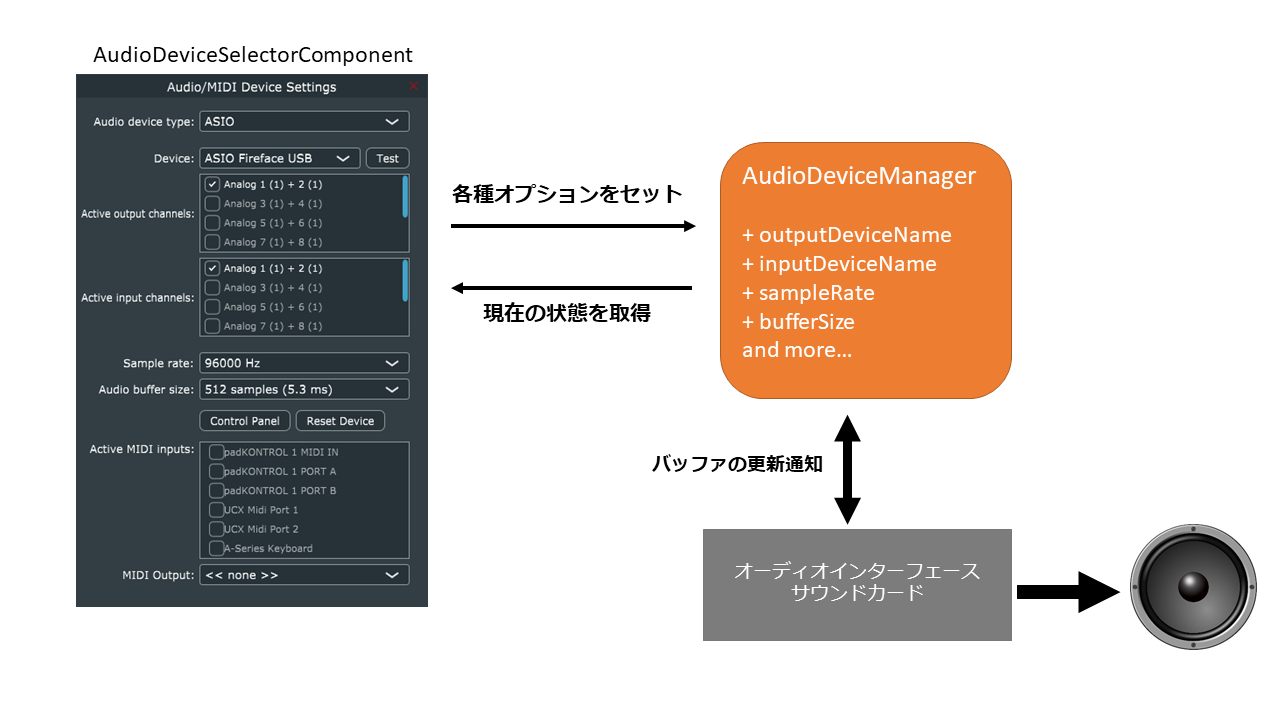
JUCEライブラリは、"AudioDeviceManager"オブジェクトがオーディオデータ・MIDIデータ各デバイスドライバに対してを送受信する仕組みとなっています。AudioDeviceManager自身も様々な設定項目を持っており、使用可能なオーディオドライバの一覧や、送受信可能なMIDIデバイスの一覧など様々な情報を扱います。
”AudioDeviceSelectorComponent”クラスはその設定項目の管理を便利にするクラスで、各種設定を編集するのに特化したGUIコンポーネントです。
"MainComponent.cpp"を次のように編集します。
"MainComponent.cpp"

class MainContentComponent   : public AudioAppComponent
{
public:

    ~~~中略~~~

private:
    void showDeviceSetting() {
        AudioDeviceSelectorComponent selector(deviceManager,
                                              0, 256,
                                              0, 256,
                                              true, true,
                                              true, false);
        selector.setSize(400, 600);

        DialogWindow::LaunchOptions dialog;
        dialog.content.setNonOwned(&selector);
        dialog.dialogTitle = "Audio/MIDI Device Settings";
        dialog.componentToCentreAround = this;
        dialog.dialogBackgroundColour = getLookAndFeel().findColour(ResizableWindow::backgroundColourId);
        dialog.escapeKeyTriggersCloseButton = true;
        dialog.useNativeTitleBar = false;
        dialog.resizable = false;
        dialog.useBottomRightCornerResizer = false;
        dialog.runModal();
    }

~~~中略~~~

    JUCE_DECLARE_NON_COPYABLE_WITH_LEAK_DETECTOR (MainContentComponent)
};
5. GUI:TextButtonコンポーネントとコールバックの登録
showDeviceSetting()関数を実行するトリガーとして、GUIに配置するボタンのクリック動作を紐づけたいと思います。
先ず、"MainContentComponent"クラスがボタンコンポーネントからのコールバックを受け取れるように、リスナークラスを継承させます。
続いて、TextButtonコンポーネントのインスタンス生成と、TextButtonコンポーネントへのコールバックを登録します。
最後に、ボタンがクリックされたときのイベントハンドラ(コールバック関数)内でshowDeviceSetting()関数を実行させます。
"MainComponent.cpp"

class MainContentComponent   : public AudioAppComponent,
                                private Button::Listener  // Buttonコンポーネントのリスナークラス
{
public:
    //==============================================================================
    MainContentComponent()
    {
        // ボタンコンポーネントを子オブジェクトとして配置・表示する
        addAndMakeVisible(deviceSettingButton);
        deviceSettingButton.setButtonText("Device Setting");
        deviceSettingButton.addListener(this);            //TextButtonコンポーネントへのコールバックを登録

        setSize (800, 600);

        setAudioChannels (2, 2);
    }
    ~~~中略~~~

    // ボタンコンポーネントがクリックされたときのイベントハンドラ(コールバック関数)
    void buttonClicked (Button* button) override
    {
        if(button == &deviceSettingButton)
            showDeviceSetting();
    }

private:

    ~~~中略~~~

    TextButton deviceSettingButton;

    JUCE_DECLARE_NON_COPYABLE_WITH_LEAK_DETECTOR (MainContentComponent)
};
6. "MidiMessageCollector"でMIDI入出力データを管理する
JUCEライブラリにはMIDI入出力を扱うのに便利なクラスとして"MidiMessageCollector"が用意されています。
"MidiMessageCollector"クラスは、MIDI入出力のデータを一定時間貯めておく機能(キュー)と、貯めておいたMIDIデータを取り出す機能を持っています。
JUCEでは、オーディオデバイスからのコールバックをトリガーとしてオーディオ・MIDI処理を行う、イベントドリブンな仕組みを採用しているため、MidiMessageCollectorはイベントドリブンな仕組みと相性が良くなるよう設計されています。
また、MidiMessageCollectorは、オーディオ・MIDIデバイス(ハード機材)とのやり取りを統括する"AudioDeviceManager"クラスにその参照を登録することで、MIDI入出力イベントが発生した際にMIDIデータを受け取ることが出来ます。
"MainComponent.cpp"を次のように編集します。
"MainComponent.cpp"

class MainContentComponent   : public AudioAppComponent,
                                private Button::Listener
{
public:
    //==============================================================================
    MainContentComponent()
    {
    ~~~中略~~~

        // AudioDeviceManagerクラスのインスタンス"deviceManager"に midiCollectorの参照を登録する
        // deviceManagerは、基底クラス"AudioAppComponent"で定義されている
        deviceManager.addMidiInputCallback(String(), &midiCollector);

        setSize (800, 600);

        setAudioChannels (2, 2);
     }

    ~~~中略~~~

private:

    ~~~中略~~~

    MidiMessageCollector midiCollector;           // MidiMessageCollectorクラスのインスタンス

    JUCE_DECLARE_NON_COPYABLE_WITH_LEAK_DETECTOR (MainContentComponent)
};
7. GUI:MIDIKeyboardコンポーネントを配置する
MIDI入力の状態をモニタリングするために、GUIにMIDIKeyboadコンポーネントを配置します。
"MidiKeyboardComponent"オブジェクトは、"MidiKeyboardState"オブジェクトが保持するMIDIデータに合わせて、鍵盤の色を変更する機能が予め実装されています。"MidiKeyboardComponent"のnew時に引数として、MIDI入力デバイスから取得したMIDIデータを保持する"MidiKeyboardState"オブジェクトの参照を渡します。
"MainComponent.cpp"を次のように編集します。
"MainComponent.cpp"

class MainContentComponent   : public AudioAppComponent,
                                private Button::Listener
{
public:
    //==============================================================================
    MainContentComponent()
    {
        // MIDIKeyboadComponentクラスのインスタンスを作成. 引数には入力するMIDIデータを保持するオブジェクトを与える
        keyboardComponent = new MidiKeyboardComponent(keyboardState, MidiKeyboardComponent::horizontalKeyboard);

        // MIDIKeyboadComponentを子オブジェクトとして配置・表示する
        addAndMakeVisible(keyboardComponent);

        addAndMakeVisible(deviceSettingButton);
        deviceSettingButton.setButtonText("Device Setting");
        deviceSettingButton.addListener(this);

        deviceManager.addMidiInputCallback(String(), &midiCollector);

        setSize (800, 600);

        setAudioChannels (2, 2);
    }

private:

    ~~~中略~~~

    MidiKeyboardState keyboardState;              // MIDIデータをMIDIキーボードに最適なデータに変換して保持するクラス
    MidiKeyboardComponent* keyboardComponent;     // MIDIKeyboadComponentクラスのポインタ

    JUCE_DECLARE_NON_COPYABLE_WITH_LEAK_DETECTOR (MainContentComponent)
};
8. MIDI入力のモニタリング処理を実装する
正しくMIDI入力が受信できていることをモニタリングするために、以下の処理を実装します。
- "MidiMessageCollector"オブジェクトがMIDI入力をキューに貯めておく
- "MidiMessageCollector"オブジェクトから取り出したMIDIメッセージを"MidiKeyboardState"オブジェクトに渡す
- "MidiKeyboardState"が保持したMIDIデータから"MidiKeyboardComponent"の表示を更新する(鍵盤の色を変更する)
"MainComponent.cpp"を次のように編集します。
"MainComponent.cpp"

class MainContentComponent   : public AudioAppComponent,
                                private Button::Listener
{
public:

~~~中略~~~
    void getNextAudioBlock (const AudioSourceChannelInfo& bufferToFill) override
    {
        bufferToFill.clearActiveBufferRegion();

        // 入力されたMIDIデータをMIDIバッファ型に変換するためのオブジェクト
        MidiBuffer incomingMidi;

        // "MidiMessageCollector"のキューに貯まったMIDIデータを回収する(MIDIバッファオブジェクトに変換する)
        midiCollector.removeNextBlockOfMessages(incomingMidi, bufferToFill.numSamples);

        // "MidiKeyboardState"に回収したMIDIデータを渡す(MIDIバッファを渡す)
        keyboardState.processNextMidiBuffer(incomingMidi, 0, bufferToFill.numSamples, true);

    }
~~~中略~~~
9. GUI:コンポーネントの配置を調整する
"MainComponent.cpp"

class MainContentComponent   : public AudioAppComponent,
                                private Button::Listener
{
public:

    ~~~中略~~~

    void resized() override
    {

        deviceSettingButton.setBoundsRelative(0.3, 0.2, 0.4, 0.2);

        keyboardComponent->setBoundsRelative(0.0, 0.7, 1.0, 0.3);

    }

    ~~~中略~~~

};
10. GUI:iOS/Androidではフルスクリーン表示にする
JUCEでは、特に指定をしない限りウインドウ表示となっています。iOS/Androidでは基本的には1つのアプリが画面を占有するフルスクリーン表示が基本的な動作となっているので、iOS/Androidではアプリケーション起動時にフルスクリーン表示となるようにしておきます。
"Main.cpp"を次のように編集します。
"Main.cpp"

class (プロジェクト名)Application  : public JUCEApplication
{
public:

~~~中略~~~

    class MainWindow    : public DocumentWindow
    {
    public:
        MainWindow (String name)  : DocumentWindow (name,
                                                    Desktop::getInstance().getDefaultLookAndFeel()
                                                                          .findColour (ResizableWindow::backgroundColourId),
                                                    DocumentWindow::allButtons)
        {
            setUsingNativeTitleBar (true);
            setContentOwned (createMainContentComponent(), true);
            setResizable (true, true);

// iOS/Android向けのビルドであること判定するプリプロセッサ定義による分岐
# if JUCE_IOS || JUCE_ANDROID
            setFullScreen(true);
# endif

            centreWithSize (getWidth(), getHeight());
            setVisible (true);
        }

~~~中略~~~

};
11. ビルドと実機テスト
1. "Device Setting"ボタンを押す
ダイアログウインドウが表示されます。

2. ダイアログウインドウの"Bluetooth MIDI"を押す
MIDI over BLEに対応したデバイス一覧が表示されます。
接続したいデバイスを選択して"Not Connected" → "Connected"に切り替われば接続成功です。

3. MIDI入力を有効にする
MIDIデータの入力を有効にしたいMIDIコントローラーにチェックマークを入れます。

4. MIDIコントローラーからノートONを送信する
正しくMIDI入力が受信できていると、画面上のキーボードの鍵盤の色が変わります。


