今回は Angular の モジュール、ルーティング と、非同期処理の Promise、async/await、RxJS について説明します。
第2回 Angular勉強会を実施していない方は事前に実施しておいてください。
モジュール
モジュールを利用することで、コンポーネント、ディレクティブ、パイプ等の定義をまとめて管理することができます。
今までにも登場した app.module もモジュールで、アプリケーションのルートモジュールとなり、コンポーネントやディレクティブ等の定義を管理しています。
モジュールを利用すると、まとめて管理できる以外にも遅延ロードできるというメリットもあります。
遅延ロードについては後ほど説明します。
開発中は ng serve で実行中に保存すると自動的にビルドされますが、モジュール化していると変更したモジュールだけビルドされるようになるので、開発の効率もよくなります。
実際に簡単なモジュールを作成してみましょう。
以下のコンポーネントを作成してページに追加してください。
$ ng generate component study3/module-sample
const routes: Routes = [
    :
  { path: 'study3/module-sample', component: ModuleSampleComponent },
];
<h1>第3回 Angular勉強会</h1>
<ul>
  <li><a routerLink="/study3/module-sample">module-sample</a></li>
</ul>
郵便番号を入力するコンポーネントとディレクティブを管理するモジュールを作成します。
以下のコマンドでモジュール、コンポーネント、ディレクティブをそれぞれ生成してください。
$ ng generate module study3/zip-code
$ ng generate component study3/zip-code
$ ng generate directive study3/zip-code/zip-code
zip-code.module では、ZipCodeComponent と ZipCodeDirective を declarations へ追加し、外部からでも利用できるように exports にも追加します。
import { NgModule } from '@angular/core';
import { CommonModule } from '@angular/common';
import { ZipCodeComponent } from './zip-code.component';
import { ZipCodeDirective } from './zip-code.directive';

@NgModule({
  imports: [
    CommonModule
  ],
  declarations: [
    ZipCodeComponent,
    ZipCodeDirective
  ],
  exports: [
    ZipCodeComponent,
    ZipCodeDirective
  ]
})
export class ZipCodeModule { }
import { Directive, HostListener } from '@angular/core';

@Directive({
  selector: '[appZipCode]'
})
export class ZipCodeDirective {

  constructor() { }

  @HostListener('keyup', ['$event.target']) onKeyup(element: HTMLInputElement) {
    const value = element.value.replace('-', '');
    // 3桁入力している場合は「-」で区切る
    if (3 <= value.length) {
      element.value = `${value.substr(0, 3)}-${value.substr(3, 4)}`;
    }
  }
}
<input type="text" appZipCode>
import { Component, OnInit } from '@angular/core';

@Component({
  selector: 'app-zip-code',
  templateUrl: './zip-code.component.html',
  styleUrls: ['./zip-code.component.css']
})
export class ZipCodeComponent implements OnInit {

  constructor() { }

  ngOnInit() {
  }
}
モジュールの定義はこれで完了です。
では、このモジュールを使ってみましょう。
app.module の imports に ZipCodeModule を追加します。
  imports: [
    :
    ZipCodeModule,
  ]
ZipCodeModule 1つしか読み込むだけで ZipCodeComponent と ZipCodeDirective どちらも利用可能になります。
<div>
  <h3>Component</h3>
  〒<app-zip-code></app-zip-code>
</div>
<div>
  <h3>Directive</h3>
  〒<input type="text" appZipCode>
</div>
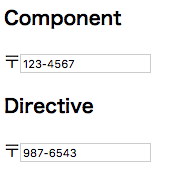
このように、関連したコンポーネント、ディレクティブ、パイプ等は、モジュールでまとめて管理しておくと、モジュール1つ読み込むだけで複数の関連パーツをまとめて読み込むことができるようになります。
チャレンジ
第2回の楽曲検索アプリ をモジュール化してください。
ルーティング
これまで各章ごとにページを作成してページ遷移を行ってきましたが、どのURLでどのページ(コンポーネント)を表示するのか管理する仕組みをルーティングと言います。
サーブレットやRailsなどサーバサイドでページを返すものとは違い、Angularは SPA(Single Page Application)のため、単一のページでコンテンツの切り替えを行うため、実際にはURLのページをリクエストするのではなく、DOM を書き換えてページの切り替えを実現しています。
ルーティング定義
ルーティング情報の定義はこれまでに何度も登場している app-routing.module.ts で行います。
import { NgModule } from '@angular/core';
import { Routes, RouterModule } from '@angular/router';

import { IndexComponent } from './index/index.component';

const routes: Routes = [
  { path: '', redirectTo: '/index', pathMatch: 'full' },
  { path: 'index', component: IndexComponent },
];

@NgModule({
  imports: [RouterModule.forRoot(routes)],
  exports: [RouterModule]
})
export class AppRoutingModule { }
ルートは @angular/router の Routes型で定義を行い、リクエストパスとなるpathの他、以下のようなプロパティを指定することで定義します。
| プロパティ | 内容 |
|---|---|
| pathMatch | パスの判定方法(prefix / full) |
| redirectTo | リダイレクト先のパス |
| component | 表示するコンポーネント |
| children | 子ルートのリスト |
| outlet | コンポーネントの表示先(router-outletタグの名前) |
それぞれのプロパティについて説明します。
以下のコンポーネントを生成してください。
$ ng generate component not-found
<p>
  ページがみつかりません。
</p>
app-routing.module.ts を以下のように変更してください。
const routes: Routes = [
  { path: '', redirectTo: '/index', pathMatch: 'full' },
  { path: 'index', component: IndexComponent },

    :

  { path: 'study3', children: [
    { path: 'module-sample', component: ModuleSampleComponent }
  ] },

  { path: '**', component: NotFoundComponent }
];
path: ''では、redirectTo: '/index'を指定しているため、http://localhost:4200/ のリクエストは http://localhost:4200/index へリダイレクトされます。
pathMatch: 'full' を指定しているため、完全一致で判定されます。fullではなくprefixを指定した場合は前方一致となり、index/testのようなパスでもリダイレクトされます。
componentは、そのまま指定したコンポーネントを表示します。
childrenは、子のルート情報を指定します。
上記の例の場合、study3/module-sample のパスで ModuleSampleComponent を表示します。
outletは、コンポーネント表示先を指定します。
ルーティングで設定したコンポーネントは <router-outlet>タグがある場所に表示されますが、router-outlet にnameプロパティを指定しておくと、複数の router-outlet があったときにどちらに表示するか outlet に name で指定することができます。
ページ遷移
SPAはページ遷移時にサーバにページをリクエストしているわけではなく、最初にページを表示したときに必要な情報を取得して、その後はクライアント側で DOM を書き換えることでページ遷移を実現しています。
一般的なWebページ遷移のように<a href="/page">リンク</a>としてしまうと、サーバにページをリクエストしてしまうため、Angular ではそれ用のページ遷移の仕組みを利用します。
以下のように新しいページを作成してください。
$ ng generate component study3/routing
<ul>
  <li><a routerLink="/study2/music-search">/study2/music-search</a></li>
  <li><button (click)="onLink('/study2/music-search')">/study2/music-search</button></li>
</ul>
import { Component, OnInit } from '@angular/core';
import { Router } from '@angular/router';

@Component({
  selector: 'app-routing',
  templateUrl: './routing.component.html',
  styleUrls: ['./routing.component.css']
})
export class RoutingComponent implements OnInit {

  constructor(private router: Router) {
  }

  ngOnInit() {
  }

  onLink(path: string) {
    this.router.navigate([path]);
  }
}
テンプレート(html)側でページ遷移するには、routerLinkプロパティを使用します。
hrefと同じように遷移先のパスを指定することで遷移できますが、大きな違いがあります。
routerLinkの場合にはクライアント側だけで処理するのですぐにページ遷移しますが、hrefに変更してみるとページ遷移時にサーバリクエストが発生し時間がかかるのがわかります。
コンポーネント側でページ遷移するには、Routerサービスを使用します。
this.router.navigate(パスの配列)のように指定し、パスの配列に['item', 33]のように渡すと、/item/33のページに遷移します。
パラメーター
URLで指定したパスパラメーターやクエリパラメーターを遷移先のコンポーネントで取得するには、ActivatedRouteサービスを使用します。
app-routing を以下のように変更してください。
  { path: 'study3', children: [
    { path: 'module-sample', component: ModuleSampleComponent },
    { path: 'routing', component: RoutingComponent },
    { path: 'routing/:id', component: RoutingComponent }
  ] },
ルーティング情報の path に指定した'routing/:id'の/:idがパスパラメーターの定義となり、routing/123のようにパラメーターを渡すことができるようになります。
routing.component を以下のように変更してください。
<div>
  <p>params: {{params | json}}</p>
  <p>query: {{query | json}}</p>
</div>
<ul>
  <li><a routerLink="/study2/music-search">/study2/music-search</a></li>
  <li><button (click)="onLink('/study2/music-search')">/study2/music-search</button></li>

  <li><a routerLink="/study3/routing/123" [queryParams]="{data: 'test'}">/study3/routing</a></li>
  <li><button (click)="onRouting()">/study3/routing</button></li>
</ul>
import { Component, OnInit } from '@angular/core';
import { Router, ActivatedRoute } from '@angular/router';

@Component({
  selector: 'app-routing',
  templateUrl: './routing.component.html',
  styleUrls: ['./routing.component.css']
})
export class RoutingComponent implements OnInit {

  params: any;
  query: any;

  constructor(private router: Router, private route: ActivatedRoute) {
    this.params = this.route.snapshot.params;
    this.query = this.route.snapshot.queryParams;
  }

  ngOnInit() {
  }

  onLink(path: string) {
    this.router.navigate([path]);
  }

  onRouting() {
    this.router.navigate(['/study3/routing', 456], { queryParams: { date: new Date() } });
  }
}
上記のようにroute.snapshot.paramsでパスパラメーター、route.snapshot.queryParamsクエリパラメーターをコンポーネントで取得することができます。
他のページから遷移したときにパラメーターを取得するは場合はこれでできるのですが、自分のページへ遷移したときは最初の1回しかパラメーターが渡せません。
これは、同じページ内で URLだけ変わった場合は constructor が呼ばれないためです。
以下のように変更すると、同じページ内でも URL が変更する度にパラメーターを取得することができるようになります。
※ subscribe については RxJS で説明します
  constructor(private router: Router, private route: ActivatedRoute) {
    this.route.params.subscribe(params => this.params = params);
    this.route.queryParams.subscribe(query => this.query = query);
  }
Guard
あるルートには特定のユーザのみアクセスを許可する場合などには Guard という仕組みが利用できます。
auth.guard.ts を生成して以下のように変更してください。
$ ng generate guard guard/auth
import { Injectable } from '@angular/core';
import { CanActivate, ActivatedRouteSnapshot, RouterStateSnapshot } from '@angular/router';
import { Observable } from 'rxjs';

@Injectable({
  providedIn: 'root'
})
export class AuthGuard implements CanActivate {
  canActivate(
    next: ActivatedRouteSnapshot,
    state: RouterStateSnapshot): Observable<boolean> | Promise<boolean> | boolean {

    // ローカルストレージに token が存在すればしない場合は許可しない(本来はトークンの中身を検証する)
    if (!localStorage.getItem('token')) {
      alert('ログインしてください');
      return false;
    }
    return true;
  }
}
今回はサンプルのため、ログインしているか確認するために、localStorage に token というキーがある場合はログイン中としています。
(本来はトークンの中身を検証したり等のログインチェック処理が必要です)
次に、app-routing.module.tsの path: 'study3' に canActivate: [ AuthGuard ] を追加してください。
canActivate には Guard を配列で複数指定できます。
  { path: 'study3', canActivate: [ AuthGuard ], children: [
   :
この状態で study3 のページへ遷移しようとすると、「ログインしてください」のアラートが表示されます。
Webブラウザの開発者ツールのコンソールに以下を入力して localStorage に token をセットすると、ページへ遷移できるようになります。
localStorage.setItem('token', 'xxxxxx')
チャレンジ
ダイアログに正しいパスワード入力した時のみページが表示できる Guard を作成してください。
$ ng generate guard guard/prompt
回答例
import { Injectable } from '@angular/core';
import { CanActivate, ActivatedRouteSnapshot, RouterStateSnapshot } from '@angular/router';
import { Observable } from 'rxjs';

@Injectable({
  providedIn: 'root'
})
export class PromptGuard implements CanActivate {
  canActivate(
    next: ActivatedRouteSnapshot,
    state: RouterStateSnapshot): Observable<boolean> | Promise<boolean> | boolean {
    return prompt('パスワードを入力してください') === 'password';
  }
}
遅延ロード
Angular では、最初のページ表示時に app.module で指定したモジュールやコンポーネント等を読み込んでいます。
特定の人は使用しないページなど不要なページもこのときに読み込みをしてしまうと、ページの表示が遅くなってしまいます。
これを解消するために遅延ロードという方法があります。
ルーティング情報にコンポーネントではなくモジュールを指定することで、最初のページ表示時にはモジュールを読み込まず、その画面へ遷移したときに初めて読み込むようにすることができます。
以下のようにstudy3.module.tsを作成してください。
$ ng generate module study3
import { NgModule } from '@angular/core';
import { CommonModule } from '@angular/common';
import { RouterModule } from '@angular/router';
import { ModuleSampleComponent } from './module-sample/module-sample.component';
import { RoutingComponent } from './routing/routing.component';
import { ZipCodeModule } from './zip-code/zip-code.module';

@NgModule({
  imports: [
    CommonModule,
    RouterModule.forChild([
      { path: '', redirectTo: '/module-sample', pathMatch: 'full' },
      { path: 'module-sample', component: ModuleSampleComponent },
      { path: 'routing', component: RoutingComponent },
      { path: 'routing/:id', component: RoutingComponent }
      ]),
    ZipCodeModule,
  ],
  declarations: [
    ModuleSampleComponent,
    RoutingComponent,
  ]
})
export class Study3Module { }
app-routing.module.ts の 'study3' のルートを以下のように変更してください。
{ path: 'study3', loadChildren: './study3/study3.module#Study3Module' },
app.module.ts で読み込んでいた ModuleSampleComponent、RoutingComponent の declarations を削除してください。
ZipCodeModule も study3 でしか使用していないので imports から削除してください。
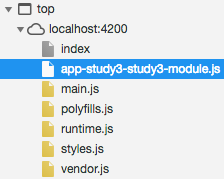
これで、Study3Module は初期ロード時には読み込まれず、study3ページを表示したときに初めて読み込まれるようになります。
Chrome のデベロッパーツールの Sourcesパネルを開いてください。
最初にページを表示したときは以下のようになっています。
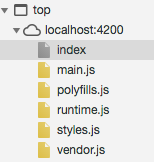
study3/module-sample ページに遷移したときに app-study3-study3-module.js が読み込まれていることがわかります。
チャレンジ
第2回Angular勉強会 の内容を遅延ロードに対応してください。
Promise
Promise は、Angular が提供している機能ではなく、JavaScript の ES6 の機能になりますが、Angular でも非同期処理を行うために必要となる知識のため説明します。
Promise を利用することで非同期処理を実現することができ、Promise で生成したオブジェクトはその処理が終わると then() で繋いだ関数に結果を渡し次の処理を開始します。
Promise を使用せずに非同期処理を実現する場合、コールバック関数を使用した手法がありましたが、この場合コールバック先でさらに非同期処理を行う場合に関数が入れ子になっていき煩雑なコードになってしまいます。
Promise と コールバックの違い
実際にコールバックとPromiseの違いを見てみましょう。
$ ng generate component study3/promise
<div>
  <button (click)="onCallback()">Callback</button>
  <button (click)="onPromise()">Promise</button>
</div>
<div>
  <ul>
    <li *ngFor="let res of result">{{res}}</li>
  </ul>
</div>
import { Component, OnInit } from '@angular/core';

@Component({
  selector: 'app-promise',
  templateUrl: './promise.component.html',
  styleUrls: ['./promise.component.css']
})
export class PromiseComponent implements OnInit {

  result: string[];

  constructor() { }

  ngOnInit() {
  }

  /**
   * コールバックパターン
   */
  onCallback() {
    this.result = [];
    setTimeout(() => {
      this.result.push(new Date().toTimeString());
      setTimeout(() => {
        this.result.push(new Date().toTimeString());
        setTimeout(() => {
          this.result.push(new Date().toTimeString());
          setTimeout(() => {
            this.result.push(new Date().toTimeString());
            setTimeout(() => {
              this.result.push(new Date().toTimeString());
            }, 1000);
          }, 1000);
        }, 1000);
      }, 1000);
    }, 1000);
  }

  /**
   * Promiseパターン
   */
  onPromise() {
    this.result = [];
    this.promiseTimeout(1000).then(() => {
      this.result.push(new Date().toTimeString());
      return this.promiseTimeout(1000);
    }).then(() => {
      this.result.push(new Date().toTimeString());
      return this.promiseTimeout(1000);
    }).then(() => {
      this.result.push(new Date().toTimeString());
      return this.promiseTimeout(1000);
    }).then(() => {
      this.result.push(new Date().toTimeString());
      return this.promiseTimeout(1000);
    }).then(() => {
      this.result.push(new Date().toTimeString());
    });
  }

  /**
   * setTimeout関数をPromise化
   */
  promiseTimeout(timeout) {
    return new Promise(resolve => setTimeout(() => resolve(), timeout));
  }
}
コールバック関数が入れ子になっていたのが入れ子にならず、then() でチェーン繋ぎできるようになりました。
then() には、前の Promise の処理結果を引数とした関数を指定します。
指定した関数が Promise を返す場合、その Promise の処理が完了した後に次の then() を呼び出し、前の Promise の結果が Promise 以外の場合はすぐに次の then() が呼ばれます。
    // 2000ms後に次の then が呼ばれる
    this.promiseTimeout(2000).then(() => {
      // すぐに次の then が呼ばれる
      return 3;
    }).then(param => {
      // 前の結果 3 が引数に渡される
      console.log(param);
    });
Promise の生成
新しい Promise を生成するには、new Promise(関数) でインスタンスを生成します。
Promise の引数には、第一引数にresolve(完了時に呼ぶ関数)、第二引数にreject(エラー時に呼ぶ関数)を持つ関数を指定します。
resolve(結果)を呼び出すと、次の the nへ結果を渡します。
reject(エラー)を呼び出すと、例外を発生します。
以下は、 promiseTimeout() を3回より多く呼び出すとエラーとするように変更しています。
export class PromiseComponent implements OnInit {

  result: string[];
  count = 0;

    :

  /**
   * setTimeout関数をPromise化
   */
  promiseTimeout(timeout) {
    return new Promise((resolve, reject) => {
      const timer = setTimeout(() => {
        if (this.count < 3) {
          this.count ++;
          // 次の then へ
          resolve(timer);
        } else {
          // 例外発生
          reject(`${this.count}回を超えました`);
        }
      }, timeout);
    });
  }
例外処理
Promise には、thenの他に例外のコールバック処理を行うcatchメソッドが用意されています。
onPromise()を以下のように変更(最後に cath を追加)すると、途中で例外が発生した場合にそれ以降の処理が中断され、catch()が呼ばれます。
  /**
   * Promiseパターン
   */
  onPromise() {
    this.result = [];
    this.promiseTimeout(1000).then(() => {
      this.result.push(new Date().toTimeString());
      return this.promiseTimeout(1000);
    }).then(() => {
      this.result.push(new Date().toTimeString());
      return this.promiseTimeout(1000);
    }).then(() => {
      this.result.push(new Date().toTimeString());
      return this.promiseTimeout(1000);
    }).then(() => {
      this.result.push(new Date().toTimeString());
      return this.promiseTimeout(1000);
    }).then(() => {
      this.result.push(new Date().toTimeString());
    }).catch(err => {
      // 例外処理
      this.result.push(err);
    });
  }
並列処理
複数の処理を順序通り実行したい場合は上のやり方でできますが、順序が決まっていない処理を複数同時に処理したい場合には Promise.all() が使えます。
引数に実行したい Promise の配列を渡すと、渡した順序に関係なく並列で処理します。
全ての Promise が完了すると、then が呼ばれ、1つでも失敗すると、catch が呼ばれます。
then の引数には、配列で渡した Promise の結果が、渡した順通りに配列で返ってきます。
以下の処理では、1000, 3000, 2000 の順で渡していますが、同時に実行されるため実際に実行される順序は 1000, 2000, 3000 となります。
  onPormiseAll() {
    this.result = [];
    Promise.all([
      this.promiseTimeout(1000).then(() => this.result.push('1000')),
      this.promiseTimeout(3000).then(() => this.result.push('3000')),
      this.promiseTimeout(2000).then(() => this.result.push('2000')),
    ]).then(result => {
      console.log(result);
      this.result.push('完了しました');
    });
  }
その他の Promise の使い方は以下を参照してください。
Promiseを使う - JavaScript | MDN
async/await
Promise は非同期処理を実装するのに便利ですが、多様しすぎると処理の流れがわかりにくく複雑なコードになってしまう場合があります。
その場合、async/await を利用することで、簡潔な処理にすることができます。
Promise を返す処理の前に await を付けると、Promise が完了するまで待ってから次の処理に行くようになります。
await を使用するには、その関数の定義の前に async を付けます。
onPromise()の内容を async/await に変更すると以下のようになります。
  async onAsyncAwait() {
    this.result = [];

    await this.promiseTimeout(1000);
    this.result.push(new Date().toTimeString());

    await this.promiseTimeout(1000);
    this.result.push(new Date().toTimeString());

    await this.promiseTimeout(1000);
    this.result.push(new Date().toTimeString());

    await this.promiseTimeout(1000);
    this.result.push(new Date().toTimeString());

    await this.promiseTimeout(1000);
    this.result.push(new Date().toTimeString());
  }
RxJS
Promise 以外で非同期処理を実現するのに RxJS を利用する方法があります。
RxJS は Promise より高機能で値やオブジェクトをストリームに流し、連続したデータを処理したり、イベントを処理したりすることができます。
RxJS には、データを流す Observable、流れてきたデータを加工する Operators があり、Observable で流れてきたデータを Operators で加工して、subscribe で処理をするというのが一般的な流れになります。
Subject
流れを知るために Subject というオブジェクトを使用して説明します。
以下のページを作成してください。
$ ng generate component study3/rxjs
import { Component, OnInit } from '@angular/core';
import { Subject } from 'rxjs';

@Component({
  selector: 'app-rxjs',
  templateUrl: './rxjs.component.html',
  styleUrls: ['./rxjs.component.css']
})
export class RxjsComponent implements OnInit {

  subject$ = new Subject<string>();
  subjectResult = [];

  constructor() { }

  ngOnInit() {
    this.subject$.subscribe(data => {
      // next() で呼ばれる
      this.subjectResult.push(data);
    }, err => {
      // error() で呼ばれる
      this.subjectResult.push(err);
    }, () => {
      // complete() で呼ばれる
      this.subjectResult.push('complete!');
    });
  }
}
<div class="content">
  <h3>Subject</h3>
  <input type="text" #input>
  <button (click)="subject$.next(input.value)">Next</button>
  <button (click)="subject$.error('Error!')">Error</button>
  <button (click)="subject$.complete()">Complete</button>
  <span *ngFor="let data of subjectResult">{{data}}</span>
</div>
.content {
    margin-top: 8px;
    border-top: 1px solid lightgray;
}
.content span {
    margin: 8px;
    padding: 4px 8px;
    border-radius: 16px;
    background-color: orange;
}
this.subject$.subscribe( Observer ) で subject に流れてくるデータを購読してデータを受け取る度に処理を実行します。
Observer は、第一引数にデータを受け取った時のコールバック関数、第二引数にエラー発生時のコールバック関数、第三引数に終了した時のコールバック関数を指定します。
rxjs.component.html では、以下の処理を行なっています。
- [Next]ボタンを押した時に next() で Observer にデータを通知
- [Error]ボタンを押した時に error() で Observer にエラーを通知して終了
- [Complete]ボタンを押した時に complete() で Observer の購読を終了
このように、次々と流れてくるデータを処理することができます。
Observable
of
値を Observable に変換します。
  onOf() {
    of(1, 2, 3)
      .subscribe(data => this.ofResult.push(data));
  }
from
Promise や iterable を Observable に変換します。
  onFrom() {
    from(Promise.resolve('Promise'))
      .subscribe(data => this.fromResult.push(data));
  }
fromEvent
イベントを Observable に変換します。
    fromEvent(this.fromEventButton.nativeElement, 'click')
      .subscribe(data => this.fromEventResult.push(data));
timer
指定時間後に値を流します。
  onTimer() {
    timer(1000)
      .subscribe(data => this.timerResult.push(data));
  }
interval
一定間隔で値を流します。
  onInterval() {
    const interval$ = interval(1000)
      .subscribe(data => {
        this.intervalResult.push(data);
        if (5 <= data) {
          interval$.unsubscribe();
        }
      });
  }
concat
Observable を結合します(順序を保つ)
    const interval1$ = interval(300).pipe(take(5), map(() => 1));
    const interval2$ = interval(1000).pipe(take(3), map(() => 2));

    concat(interval1$, interval2$)
      .subscribe(data => this.concatResult.push(data));
merge
Observable を結合します。
    const interval1$ = interval(300).pipe(take(5), map(() => 1));
    const interval2$ = interval(1000).pipe(take(3), map(() => 2));

    merge(interval1$, interval2$)
      .subscribe(data => this.mergeResult.push(data));
race
一番早い Observable を流します。
  onRace() {
    const timer1$ = timer(1500).pipe(map(() => 1500));
    const timer2$ = timer(2000).pipe(map(() => 2000));
    const timer3$ = timer(1000).pipe(map(() => 1000));

    race(timer1$, timer2$, timer3$)
      .subscribe(data => this.raceResult.push(data));
  }
Operators
map
値を加工して流します。
    of(1, 2, 3).pipe(
      map(data => data * 2)
    ).subscribe(data => this.mapResult.push(data));
tap
前の結果をそのまま流します。
  onTap() {
    of(1, 2, 3).pipe(
      map(data => data * 2),
      tap(data => console.log(data))
    ).subscribe(data => this.tapResult.push(data));
  }
filter
条件に一致する値を流します。
  onFilter() {
    of(1, 2, 3, 4, 5, 6).pipe(
      filter(data => data % 2 === 0)
    ).subscribe(data => this.filterResult.push(data));
  }
skip
指定した数の値を飛ばして流します。
    of(1, 2, 3, 4, 5, 6).pipe(
      skip(3)
    ).subscribe(data => this.skipResult.push(data));
take
指定した数だけ流します。
    of(1, 2, 3, 4, 5, 6).pipe(
      take(3)
    ).subscribe(data => this.takeResult.push(data));
startWith
最初に流す値を指定します。
    of(1, 2, 3, 4, 5, 6).pipe(
      startWith(0)
    ).subscribe(data => this.startWithResult.push(data));
takeUntil
値が流れたら処理を中断します。
    const timer$ = timer(5000);

    interval(1000).pipe(
      takeUntil(timer$)
    ).subscribe(data => this.takeUntilResult.push(data));
concatMap
値を加工して結合します(順序を保つ)
  onConcatMap() {
    from([300, 100, 200]).pipe(
      concatMap(time => timer(time).pipe(map(() => time)))
    ).subscribe(data => this.concatMapResult.push(data));
  }
mergeMap
値を加工して結合します。
    from([300, 100, 200]).pipe(
      mergeMap(time => timer(time).pipe(map(() => time)))
    ).subscribe(data => this.mergeMapResult.push(data));
switchMap
前の処理をキャンセルして流します。
    from([300, 100, 200]).pipe(
      switchMap(time => timer(time).pipe(map(() => time)))
    ).subscribe(data => this.switchMapResult.push(data));
rxjs.component.html
<div class="content">
  <h3>Subject</h3>
  <input type="text" #input>
  <button (click)="subject$.next(input.value)">Next</button>
  <button (click)="subject$.error('Error!')">Error</button>
  <button (click)="subject$.complete()">Complete</button>
  <span *ngFor="let data of subjectResult">{{data}}</span>
</div>

<h2>Observable</h2>

<div class="content">
  <h3>of</h3>
  <button (click)="onOf()">Go</button>
  <span *ngFor="let data of ofResult">{{data}}</span>
</div>

<div class="content">
  <h3>from</h3>
  <button (click)="onFrom()">Go</button>
  <span *ngFor="let data of fromResult">{{data}}</span>
</div>

<div class="content">
  <h3>fromEvent</h3>
  <button #fromEventButton>Go</button>
  <span *ngFor="let data of fromEventResult">{{data}}</span>
</div>

<div class="content">
  <h3>timer</h3>
  <button (click)="onTimer()">Go</button>
  <span *ngFor="let data of timerResult">{{data}}</span>
</div>

<div class="content">
  <h3>interval</h3>
  <button (click)="onInterval()">Go</button>
  <span *ngFor="let data of intervalResult">{{data}}</span>
</div>

<div class="content">
  <h3>concat</h3>
  <button (click)="onConcat()">Go</button>
  <span *ngFor="let data of concatResult">{{data}}</span>
</div>

<div class="content">
  <h3>merge</h3>
  <button (click)="onMerge()">Go</button>
  <span *ngFor="let data of mergeResult">{{data}}</span>
</div>

<div class="content">
  <h3>race</h3>
  <button (click)="onRace()">Go</button>
  <span *ngFor="let data of raceResult">{{data}}</span>
</div>

<h2>Operators</h2>

<div class="content">
  <h3>map</h3>
  <button (click)="onMap()">Go</button>
  <span *ngFor="let data of mapResult">{{data}}</span>
</div>

<div class="content">
  <h3>tap</h3>
  <button (click)="onTap()">Go</button>
  <span *ngFor="let data of tapResult">{{data}}</span>
</div>

<div class="content">
  <h3>filter</h3>
  <button (click)="onFilter()">Go</button>
  <span *ngFor="let data of filterResult">{{data}}</span>
</div>

<div class="content">
  <h3>skip</h3>
  <button (click)="onSkip()">Go</button>
  <span *ngFor="let data of skipResult">{{data}}</span>
</div>

<div class="content">
  <h3>take</h3>
  <button (click)="onTake()">Go</button>
  <span *ngFor="let data of takeResult">{{data}}</span>
</div>

<div class="content">
  <h3>startWith</h3>
  <button (click)="onStartWith()">Go</button>
  <span *ngFor="let data of startWithResult">{{data}}</span>
</div>

<div class="content">
  <h3>takeUntil</h3>
  <button (click)="onTakeUntil()">Go</button>
  <span *ngFor="let data of takeUntilResult">{{data}}</span>
</div>

<div class="content">
  <h3>concatMap</h3>
  <button (click)="onConcatMap()">Go</button>
  <span *ngFor="let data of concatMapResult">{{data}}</span>
</div>

<div class="content">
  <h3>mergeMap</h3>
  <button (click)="onMergeMap()">Go</button>
  <span *ngFor="let data of mergeMapResult">{{data}}</span>
</div>

<div class="content">
  <h3>switchMap</h3>
  <button (click)="onSwitchMap()">Go</button>
  <span *ngFor="let data of switchMapResult">{{data}}</span>
</div>
rxjs.component.ts
import { Component, OnInit, ViewChild, ElementRef } from '@angular/core';
import { Subject, of, from, fromEvent, merge, interval, timer, concat, race } from 'rxjs';
import { take, map, tap, filter, skip, startWith, takeUntil, concatMap, mergeMap, switchMap, debounceTime } from 'rxjs/operators';

@Component({
  selector: 'app-rxjs',
  templateUrl: './rxjs.component.html',
  styleUrls: ['./rxjs.component.css']
})
export class RxjsComponent implements OnInit {

  subject$ = new Subject<string>();
  subjectResult = [];

  @ViewChild('fromEventButton') fromEventButton: ElementRef;

  ofResult = [];
  fromResult = [];
  fromEventResult = [];
  timerResult = [];
  intervalResult = [];
  concatResult = [];
  mergeResult = [];
  raceResult = [];
  mapResult = [];
  tapResult = [];
  filterResult = [];
  skipResult = [];
  takeResult = [];
  startWithResult = [];
  takeUntilResult = [];
  concatMapResult = [];
  mergeMapResult = [];
  switchMapResult = [];
  debounceTimeResult = [];

  constructor() { }

  ngOnInit() {
    this.subject$.subscribe(data => {
      // next() で呼ばれる
      this.subjectResult.push(data);
    }, err => {
      // error() で呼ばれる
      this.subjectResult.push(err);
    }, () => {
      // complete() で呼ばれる
      this.subjectResult.push('complete!');
    });

    /**
     * fromEvent
     * イベントを Observable に変換
     */
    fromEvent(this.fromEventButton.nativeElement, 'click')
      .subscribe(data => this.fromEventResult.push(data));
  }

  /**
   * of
   * 値を Observable に変換
   */
  onOf() {
    of(1, 2, 3)
      .subscribe(data => this.ofResult.push(data));
  }

  /**
   * from
   * Promise や iterable を Observable に変換
   */
  onFrom() {
    from(Promise.resolve('Promise'))
      .subscribe(data => this.fromResult.push(data));
  }

  /**
   * timer
   * 指定時間後に値を流す
   */
  onTimer() {
    timer(1000)
      .subscribe(data => this.timerResult.push(data));
  }

  /**
   * interval
   * 一定間隔で値を流す
   */
  onInterval() {
    const interval$ = interval(1000)
      .subscribe(data => {
        this.intervalResult.push(data);
        if (5 <= data) {
          interval$.unsubscribe();
        }
      });
  }

  /**
   * concat
   * Observable を結合する(順序を保つ)
   */
  onConcat() {
    const interval1$ = interval(300).pipe(take(5), map(() => 1));
    const interval2$ = interval(1000).pipe(take(3), map(() => 2));

    concat(interval1$, interval2$)
      .subscribe(data => this.concatResult.push(data));
  }

  /**
   * merge
   * Observable を結合する
   */
  onMerge() {
    const interval1$ = interval(300).pipe(take(5), map(() => 1));
    const interval2$ = interval(1000).pipe(take(3), map(() => 2));

    merge(interval1$, interval2$)
      .subscribe(data => this.mergeResult.push(data));
  }

  /**
   * race
   * 一番早い Observable を流す
   */
  onRace() {
    const timer1$ = timer(1500).pipe(map(() => 1500));
    const timer2$ = timer(2000).pipe(map(() => 2000));
    const timer3$ = timer(1000).pipe(map(() => 1000));

    race(timer1$, timer2$, timer3$)
      .subscribe(data => this.raceResult.push(data));
  }

  /**
   * map
   * 値を加工して流す
   */
  onMap() {
    of(1, 2, 3).pipe(
      map(data => data * 2)
    ).subscribe(data => this.mapResult.push(data));
  }

  /**
   * tap
   * 前の結果をそのまま流す
   */
  onTap() {
    of(1, 2, 3).pipe(
      map(data => data * 2),
      tap(data => console.log(data))
    ).subscribe(data => this.tapResult.push(data));
  }

  /**
   * filter
   * 条件に一致する値を流す
   */
  onFilter() {
    of(1, 2, 3, 4, 5, 6).pipe(
      filter(data => data % 2 === 0)
    ).subscribe(data => this.filterResult.push(data));
  }

  /**
   * skip
   * 指定した数の値を飛ばして流す
   */
  onSkip() {
    of(1, 2, 3, 4, 5, 6).pipe(
      skip(3)
    ).subscribe(data => this.skipResult.push(data));
  }

  /**
   * take
   * 指定した数だけ流す
   */
  onTake() {
    of(1, 2, 3, 4, 5, 6).pipe(
      take(3)
    ).subscribe(data => this.takeResult.push(data));
  }

  /**
   * startWith
   * 最初に流す値を指定する
   */
  onStartWith() {
    of(1, 2, 3, 4, 5, 6).pipe(
      startWith(0)
    ).subscribe(data => this.startWithResult.push(data));
  }

  /**
   * takeUntil
   * 値が流れたら処理を中断する
   */
  onTakeUntil() {
    const timer$ = timer(5000);

    interval(1000).pipe(
      takeUntil(timer$)
    ).subscribe(data => this.takeUntilResult.push(data));
  }

  /**
   * concatMap
   * 値を加工して結合する(順序を保つ)
   */
  onConcatMap() {
    from([300, 100, 200]).pipe(
      concatMap(time => timer(time).pipe(map(() => time)))
    ).subscribe(data => this.concatMapResult.push(data));
  }

  /**
   * mergeMap
   * 値を加工して結合する
   */
  onMergeMap() {
    from([300, 100, 200]).pipe(
      mergeMap(time => timer(time).pipe(map(() => time)))
    ).subscribe(data => this.mergeMapResult.push(data));
  }

  /**
   * switchMap
   * 前の処理をキャンセルして流す
   */
  onSwitchMap() {
    from([300, 100, 200]).pipe(
      switchMap(time => timer(time).pipe(map(() => time)))
    ).subscribe(data => this.switchMapResult.push(data));
  }
}
参考
チャットボット作成
RxJS を利用して応答するチャットボットを作成してください。
$ ng generate component study3/chat-bot
$ ng generate service study3/chat-bot/chat-bot
<div class="chat-message">
  <div *ngFor="let chat of messages" class="message" [ngClass]="chat.target">
    <div class="date">{{chat.postDate | date: 'yyyy/MM/dd HH:mm:ss'}}</div>
    <div class="text">{{chat.message}}</div>
  </div>
</div>
<div class="post-message">
  <textarea type="text" [(ngModel)]="inputText"></textarea>
  <button (click)="onPost()">送信</button>
</div>
.chat-message {
    margin-bottom: 100px;
}

.post-message {
    width: 100%;
    position: fixed;
    bottom: 0;
    padding: 16px;
}

.post-message textarea {
    width: 80%;
}

.message {
    text-align: center;
}
.message.bot {
    text-align: left;
}
.message.user {
    text-align: right;
}
.message .date {
    font-size: 12px;
    color: gray;
}
import { Component, OnInit, ViewChild, ElementRef } from '@angular/core';
import { ChatBotService, ChatMessage } from './chat-bot.service';

@Component({
  selector: 'app-chat-bot',
  templateUrl: './chat-bot.component.html',
  styleUrls: ['./chat-bot.component.css']
})
export class ChatBotComponent implements OnInit {

  @ViewChild('postButton') postButton: ElementRef;

  inputText: string;
  messages: ChatMessage[] = [];

  constructor(private chatBot: ChatBotService) { }

  ngOnInit() {
    this.chatBot.observable.subscribe(message => {
      this.messages.push(message);
    });
    this.chatBot.start();
  }

  onPost() {
    this.chatBot.post(this.inputText);
    this.inputText = '';
  }
}
import { Injectable } from '@angular/core';
import { Subject } from 'rxjs';

export class ChatMessage {
  postDate: Date;
  constructor(public message: string, public target = '') {
    this.postDate = new Date();
  }
}

@Injectable({
  providedIn: 'root'
})
export class ChatBotService {

  private subject$ = new Subject<ChatMessage>();
  get observable() {
    return this.subject$.asObservable();
  }

  constructor() {
  }

  start() {
  }

  post(message: string) {
  }
}
Step1
画面を開いた時にチャットメッセージに「チャットを開始しました」を表示、
チャットを送信した時に送信内容をチャットメッセージに表示してください。
Step2
チャットに「終了」を送信した時にボットが「チャットを終了しました」を応答して、以降チャットを入力しても反応しないようにしてください。
Step3
チャットにメッセージを送信したらボットが「すみません。わかりません。」と応答するようにしてください。
Step4
チャットに「おはよう」、「こんにちは」、「こんばんは」を送信したら同じ挨拶を応答するようにしてください。
Step5
チャットに「時間」を送信したら現在の時間を応答するようにしてください。
Step6
チャットに「タイマー 5000」を送信したら「5000ms のタイマーを開始しました。」、5秒後に「5000ms 経過しました。」と応答するようにしてください。
Step7
チャットに「カウント 5」を送信したら「5秒カウントします。」と応答した後に、1秒ずつ5回カウントして、「5秒カウントししました。」と応答するようにしてください。
Step8
チャットに「トップページ」を送信したら「5秒後にトップページへ遷移します。」を表示して、5秒後にトップページへ遷移してください。
回答例
import { Injectable } from '@angular/core';
import { Subject, interval, timer } from 'rxjs';
import { take, map, startWith, endWith } from 'rxjs/operators';

export class ChatMessage {
  postDate: Date;
  constructor(public message: string, public target = '', public type?: string) {
    this.postDate = new Date();
  }
}

@Injectable({
  providedIn: 'root'
})
export class ChatBotService {

  private subject$ = new Subject<ChatMessage>();
  get observable() {
    return this.subject$.asObservable();
  }

  constructor() {
  }

  start() {
    this.subject$.next(new ChatMessage('チャットを開始しました'));
  }

  stop() {
    this.subject$.next(new ChatMessage('チャットを終了しました'));
    this.subject$.complete();
  }

  post(message: string) {
    // ユーザーのメッセージを流す
    this.subject$.next(new ChatMessage(message, 'user'));

    const greetings = ['おはよう', 'こんにちは', 'こんばんは'];

    if (message === '終了') {
      // ストリームを終了する
      this.subject$.next(new ChatMessage('さようなら。', 'bot'));
      this.stop();

    } else if (greetings.find(greeting => greeting === message)) {
      // 同じ挨拶を流す
      this.subject$.next(new ChatMessage(message, 'bot'));

    } else if (message === '時間') {
      // 現在の時間を流す
      this.subject$.next(new ChatMessage(`現在の時間は ${new Date().toTimeString()} です。`, 'bot'));

    } else if (message.match(/^タイマー \d+/)) {
      const time = Number(message.match(/\d+/)[0]);
      timer(time).pipe(
        map(() => `${time}ms 経過しました。`),
        startWith(`${time}ms のタイマーを開始しました。`),
      ).subscribe((chat: string) => {
        this.subject$.next(new ChatMessage(chat, 'bot'));
      });

    } else if (message.match(/^カウント \d+/)) {
      const count = Number(message.match(/\d+/)[0]);
      interval(1000).pipe(
        take(count),
        map(time => `${time + 1}`, 'bot'),
        startWith(`${count}秒カウントします。`),
        endWith(`${count}秒カウントししました。`),
      ).subscribe(chat => {
        this.subject$.next(new ChatMessage(chat, 'bot'));
      });

    } else if (message === 'トップページ') {
      timer(5000).pipe(
        map(() => new ChatMessage('', '', 'top')),
        startWith(new ChatMessage('5秒後にトップページへ遷移します。')),
      ).subscribe((chat: ChatMessage) => {
        this.subject$.next(chat);
      });

    } else {
      this.subject$.next(new ChatMessage('すみません。わかりません。', 'bot'));
    }
  }
}
import { Component, OnInit, ViewChild, ElementRef } from '@angular/core';
import { ChatBotService, ChatMessage } from './chat-bot.service';
import { Router } from '@angular/router';

@Component({
  selector: 'app-chat-bot',
  templateUrl: './chat-bot.component.html',
  styleUrls: ['./chat-bot.component.css']
})
export class ChatBotComponent implements OnInit {

  @ViewChild('postButton') postButton: ElementRef;

  inputText: string;
  messages: ChatMessage[] = [];

  constructor(private chatBot: ChatBotService, private router: Router) { }

  ngOnInit() {
    this.chatBot.observable.subscribe(message => {
      if (message.type === 'top') {
        this.router.navigate(['/']);
      } else {
        this.messages.push(message);
      }
    });
    this.chatBot.start();
  }

  onPost() {
    this.chatBot.post(this.inputText);
    this.inputText = '';
  }
}