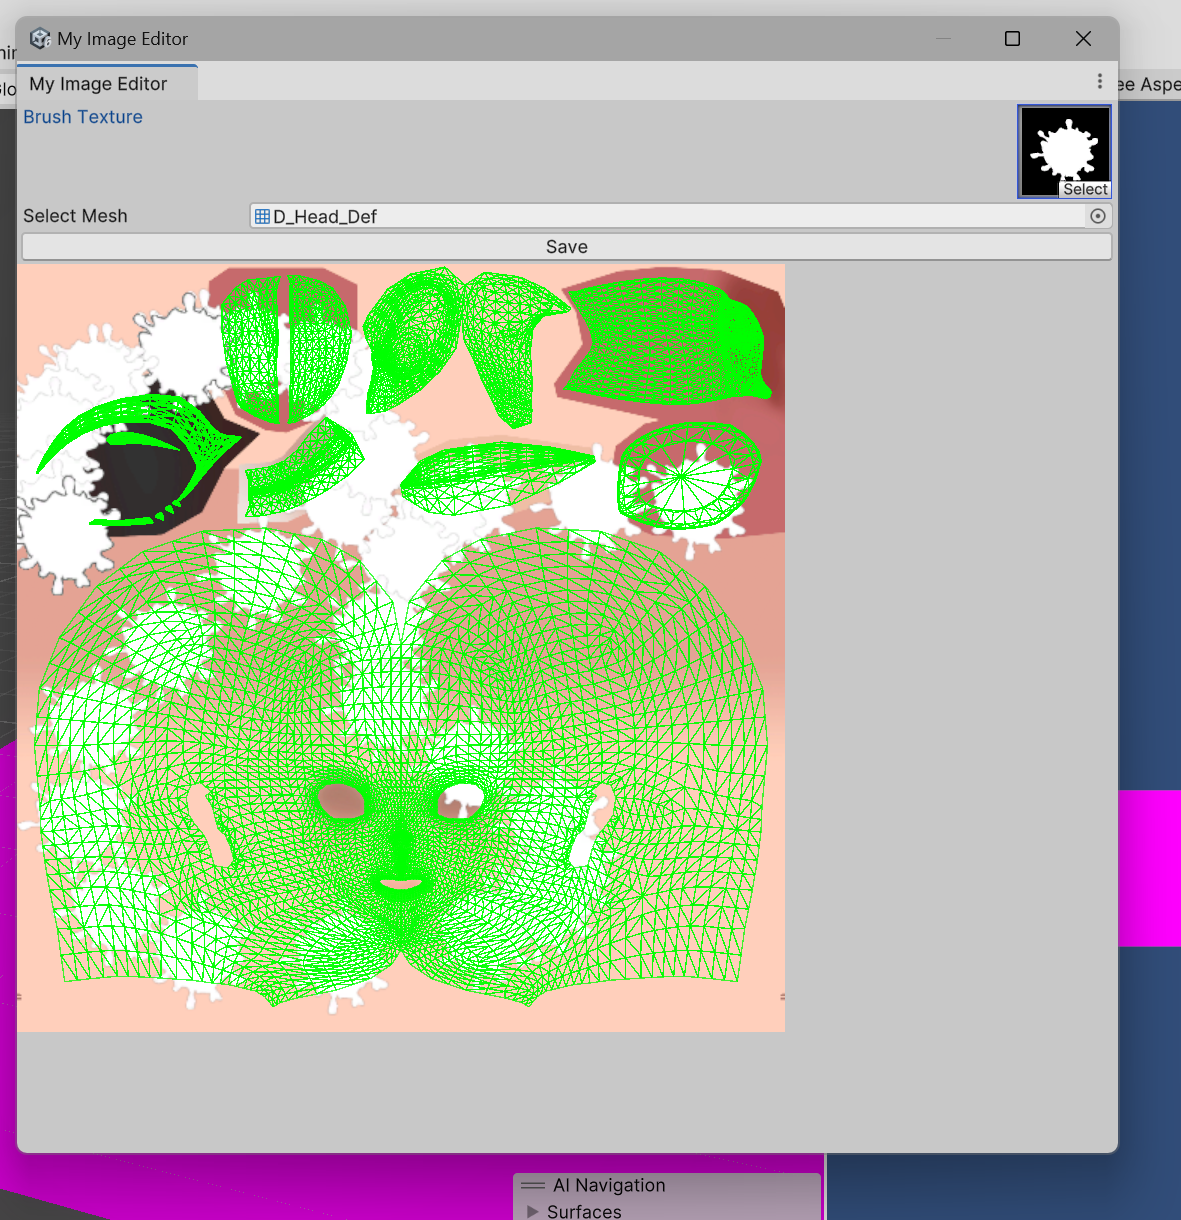
前回の続き
前回UnityEditorでお絵描き機能を実装する方法をご紹介しました。
今回はこの続きで、UV展開図をレイヤーとして重ねる方法をご紹介します。
UV展開図を重ねることによる恩恵
これをすることの恩恵はまぁまぁデカくて、例えばある3Dのアセットモデルを使おうと思うのですが、ここのこの部分の色だけ気に入らない、ただ、ほかのペイントソフトで開くとモデルのUVが見れなくてほんとにこの位置を修正すればいいのかが明確にはわからない。
そういう時ガイドとしてのUV展開図があれば、必要な部分が明確にわかることで失敗しないお手軽お絵描きウィンドウが作れるわけです。
そのほかに自身でオリジナルモデルを作成した場合も同様に、トゥーンシェーディングなどであれば、UVが表示されていることで簡単にオリジナルのテクスチャペイントができるわけです。
また、お絵描きシェーダーを自分でいじれるということもメリットで簡単にXミラー表現や書くペイントの色を他のテクスチャから参照して模様付けなども簡単にできたりします。
UI部分実装
ではUI部分について前回作成してたImageEditorExtension.csに追記していきます。
public static Texture2D importImage;

public Texture2D brushTexture;
private Rect imageRect;
private static Material material;
private static RenderTexture renderTexture;
private static string paintPath;
private Vector2 mousePosition;

+private Mesh selectMesh; // UV展開図を表示したいメッシュを保持する
+private Vector2[] meshUV; // MeshのUVのキャッシュ
+private int[] meshIndex; // Meshの三角形の番号のキャッシュ

private void OnGUI()
{
    brushTexture = (Texture2D)EditorGUILayout.ObjectField("Brush Texture",brushTexture, typeof(Texture2D), false);
    // 前回のbrushTextureと同様、クリックするとプロジェクト内のMeshを選択できるようにする
+    selectMesh = (Mesh)EditorGUILayout.ObjectField("Select Mesh", selectMesh, typeof(Mesh), false);
.
.    割愛(前回と同じ)
.
    // selectMeshが選択されていればUV展開図を描く処理を実行
+    if(selectMesh != null)
+    {
+        DrawUVLines();
+    }
}
上のように書くと前回同様GUI部分にメッシュを選択できるフィールドが追加され、そこからプロジェクト内のメッシュを参照することができます。
メッシュを選択した場合は、そのメッシュのUV通りに線が引かれる処理が呼び出されます。
描画処理
Unityのシーンで線を引くにはOnDrawGizmos(),Gizmos.DrawLine()があるようにUnityEditor拡張で線を引くにはHandles.DrawLine()があります。
この関数を使ってEditor上に線を引いていきます。
private void DrawUVLines()
{
    // GUIにHandleを使って描画しますという指示
    Handles.BeginGUI();
    // 線の色を決めてる。これを決めない場合はデフォルトで白
    Handles.color = Color.green;
    // 現在描画している画像のサイズを取得します。(縮尺合わせや描画位置を合わせるため)
    Vector2 size = new Vector2(imageRect.width, imageRect.height);

    // メッシュのUVと頂点情報を取得
    if (meshUV == null || meshIndex == null)
    {
        meshUV = selectMesh.uv;
        meshIndex = selectMesh.triangles;
    }

    // 三角形をひとつづつ書いていくので、3飛ばしに処理をしていく。
    for(int i = 0; i < meshIndex.Length; i += 3)
    {
        // メッシュの三角形情報から三角形の頂点を取得
        int index0 = meshIndex[i];
        int index1 = meshIndex[i + 1];
        int index2 = meshIndex[i + 2];

        // その三角形のUV座標を取得(uv座標と元画像の縮尺を合わせておく)
        // 1-yにしているのはエディターでは描画方向が反対になるから
        Vector2 uv0 = new Vector2(meshUV[index0].x, 1 - meshUV[index0].y) * size;
        Vector2 uv1 = new Vector2(meshUV[index1].x, 1 - meshUV[index1].y) * size;
        Vector2 uv2 = new Vector2(meshUV[index2].x, 1 - meshUV[index2].y) * size;

        // その取得した三角形の点を結んで線を引いてやる。
        // 何もしないと(0,0)を基準とするため、現在の絵が表示されている位置までずらしてやる
        Handles.DrawLine(uv0 + imageRect.position, uv1 + imageRect.position);
        Handles.DrawLine(uv1 + imageRect.position, uv2 + imageRect.position);
        Handles.DrawLine(uv2 + imageRect.position, uv0 + imageRect.position);
    }
    // GUI書き込み処理はこれで最後ですよという呼び出し
    Handles.EndGUI();
}
これでメッシュを選択したらUV展開図が表示されるようになります。
完成コード
using UnityEngine;
using UnityEditor;
using System.Collections.Generic;
using System.IO;
using System;
using System.Net;

public class ImageEditorExtension : EditorWindow
{
    public static Texture2D importImage;

    public Texture2D brushTexture;
    private Rect imageRect;
    private static Material material;
    private static RenderTexture renderTexture;
    private static string paintPath;
    private Vector2 mousePosition;

    private Mesh selectMesh;
    private Vector2[] meshUV;
    private int[] meshIndex;

    // 右クリックからの起動処理
    [MenuItem("Assets/Custom/My Image Editor")]
    public static void SetSelectedObject()
    {
        importImage = Selection.activeObject as Texture2D;
        paintPath = AssetDatabase.GetAssetPath(importImage);
        if(importImage != null)
        {
            ShowWindow();
        }
    }
    // EditorWindow作成処理
    public static void ShowWindow()
    {
        material = AssetDatabase.LoadAssetAtPath<Material>("Assets/PaintMat.mat");
        if (material != null)
        {
            material.SetVector("_BrushUV", new Vector4(0, 0, 1, 1));
        }
        renderTexture = SetRenderTexture(importImage);
        GetWindow<ImageEditorExtension>("My Image Editor");
    }
    // GUI描画処理
    private void OnGUI()
    {
        brushTexture = (Texture2D)EditorGUILayout.ObjectField("Brush Texture",brushTexture, typeof(Texture2D), false);
        selectMesh = (Mesh)EditorGUILayout.ObjectField("Select Mesh", selectMesh, typeof(Mesh), false);

        bool isBrushSet = false;

        if(brushTexture != null || !isBrushSet)
        {
            material.SetTexture("_BrushTex", brushTexture);
            isBrushSet = true;
        }

        if (renderTexture != null)
        {
            if (GUILayout.Button("Save"))
            {
                SaveRenderTextureToPNG(paintPath, renderTexture);
            }
            imageRect = GUILayoutUtility.GetRect(renderTexture.width, renderTexture.height, GUILayout.ExpandWidth(false));
            EditorGUI.DrawPreviewTexture(imageRect, renderTexture);

            Event e = Event.current;
            if (e.type == EventType.MouseDrag)
            {
                mousePosition = e.mousePosition;
                Repaint();
            }
        }
        if(selectMesh != null)
        {
            DrawUVLines();
        }
    }
    // マウスの位置取得処理
    private void Update()
    {
        if (renderTexture != null && brushTexture != null)
        {
            // クリック位置が画像の領域内か確認
            if (imageRect.Contains(mousePosition))
            {
                // UV座標の計算
                float u = (mousePosition.x - imageRect.x) / imageRect.width;
                float v = 1-(mousePosition.y - imageRect.y) / imageRect.height;
                Debug.Log($"X:{u},Y:{v}");
                material.SetVector("_BrushUV", new Vector4(u, v, 1f, 1f));
                PaintRenderTexture();
            }
        }
    }
    // RenderTexture作成処理
    private static RenderTexture SetRenderTexture(Texture2D baseTexture)
    {
        var rt = new RenderTexture(baseTexture.width/2, baseTexture.height/2, 0, RenderTextureFormat.ARGB32, RenderTextureReadWrite.Linear);
        rt.filterMode = baseTexture.filterMode;
        Graphics.Blit(baseTexture, rt);
        return rt;
    }
    // ペイント処理
    private void PaintRenderTexture()
    {
        var renderTextureBuffer = RenderTexture.GetTemporary(renderTexture.width, renderTexture.height);

        Graphics.Blit(renderTexture, renderTextureBuffer, material);
        Graphics.Blit (renderTextureBuffer, renderTexture);
    }
    // 画像保存処理
    private void SaveRenderTextureToPNG(string paintPath, RenderTexture renderTexture)
    {
        string path = paintPath;
        if (path.Length != 0)
        {
            var newTex = new Texture2D(renderTexture.width, renderTexture.height);
            RenderTexture.active = renderTexture;
            newTex.ReadPixels(new Rect(0, 0, renderTexture.width, renderTexture.height), 0, 0);
            newTex.Apply();

            byte[] pngData = newTex.EncodeToPNG();
            if (pngData != null)
            {
                File.WriteAllBytes(path, pngData);
                AssetDatabase.Refresh();
            }

            Debug.Log(path);
        }
    }
    // UV描画処理
    private void DrawUVLines()
    {
        Handles.BeginGUI();
        Handles.color = Color.green;
        Vector2 size = new Vector2(imageRect.width, imageRect.height);

        // MeshからUVと三角形の頂点番号を取得
        if (meshUV == null || meshIndex == null)
        {
            meshUV = selectMesh.uv;
            meshIndex = selectMesh.triangles;
        }

        // 頂点3つを取り出して線を引いていくので3ステップずつ実行
        for(int i = 0; i < meshIndex.Length; i += 3)
        {
            // 三角形の頂点番号を取得
            int index0 = meshIndex[i];
            int index1 = meshIndex[i + 1];
            int index2 = meshIndex[i + 2];

            // 頂点番号からUVを取得(取り込んだ画像と縮尺を合わせる)
            // 1-yとしているのはエディターの上下がUVの上下と反転しているのでそれを直すため
            Vector2 uv0 = new Vector2(meshUV[index0].x, 1 - meshUV[index0].y) * size;
            Vector2 uv1 = new Vector2(meshUV[index1].x, 1 - meshUV[index1].y) * size;
            Vector2 uv2 = new Vector2(meshUV[index2].x, 1 - meshUV[index2].y) * size;

            // 取得した頂点3つを順番につないで線を引く
            // 取り込んだ画像と位置が合うようにずらす
            Handles.DrawLine(uv0 + imageRect.position, uv1 + imageRect.position);
            Handles.DrawLine(uv1 + imageRect.position, uv2 + imageRect.position);
            Handles.DrawLine(uv2 + imageRect.position, uv0 + imageRect.position);
        }
        Handles.EndGUI();
    }
}
注意
取り込むモデルによりますが描画するのは若干重たいです。
あとMeshのUVと頂点情報をキャッシュしてますがこれがないとかなり重たくなります。(OnGUI()が毎回呼ばれているため)
