VisualStudio拡張
C#はVisualStudioの拡張機能を作ることができます。
普段プログラミングとか書いているときに思うことは英数入力なのか日本語入力なのか入力しないとわからないことが結構あり困っています。
それを解決するため、英数入力の時は、デフォルトのまま、日本語入力の時は入力のカーソルの色を変えれば解決するのではないかと思い作ってみようと思いました。
実はこの機能サクラエディタには標準で搭載されているんですよね、、、
ただ普段使うIDEはVisual Studioなのでその拡張を作ってみたという話です。
VisualStudio拡張テンプレートを使う
Visual Studio Installerの変更のワークロードからVisual Studio 拡張機能の開発にチェックをつけているか確認してください。
これにチェックが入っているとVisualStudioにVisualStudio拡張のテンプレートVSIX Projectというテンプレートが入ってきます。
プロジェクトを新規作成し、テンプレートをVSIX Projectにして任意のプロジェクト名を付けて開いてください。
最初の構成はこのような形になります。
-
{プロジェクト名}Package.csVisualStudioが呼び出すエントリーポイントになります。 -
source.extension.vsixmanifestパッケージの名前や作成者の名前などを決めることができます。
{}Package.csについては今回は触りませんが、
protected override async Task InitializeAsync(CancellationToken cancellationToken, IProgress<ServiceProgressData> progress)
{
    // When initialized asynchronously, the current thread may be a background thread at this point.
    // Do any initialization that requires the UI thread after switching to the UI thread.
    await this.JoinableTaskFactory.SwitchToMainThreadAsync(cancellationToken);
}
で初期化されます。
右クリックでの拡張の実装などはここに処理を書いていく形になります。
IWpfTextViewをオーバーライド
Visual Studioのテキストビューを拡張するためにはIWpfTextViewをオーバーライドする必要があります。
そのためのテンプレートも用意されていますのでそれを使っていきましょう。
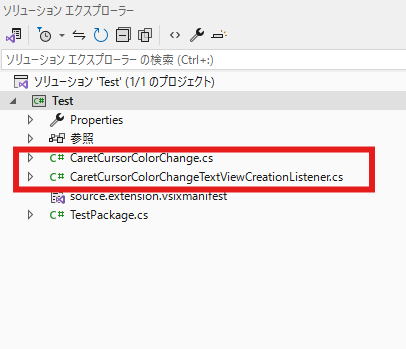
ソリューションエクスプローラーでプロジェクトを右クリック,追加,新しい項目で右の欄のExtensibilityを選択し、その中のEditor Text Adornmentをクリックし、名前を任意に設定して(ここではCaretCursorColorChange.cs)追加します。
すると以下のようにファイルが作成されます。

この中のCaretCursorColorChangeTextViewCreationListener.csによってIWpfTextViewがオーバーライドされる形となります。
実際に見ていきましょう。
    /// <summary>
    /// Establishes an <see cref="IAdornmentLayer"/> to place the adornment on and exports the <see cref="IWpfTextViewCreationListener"/>
    /// that instantiates the adornment on the event of a <see cref="IWpfTextView"/>'s creation
    /// </summary>
    // IWpfTextViewCreationListenerを実装してます。
    [Export(typeof(IWpfTextViewCreationListener))]
    [ContentType("text")]
    [TextViewRole(PredefinedTextViewRoles.Document)]
    internal sealed class CaretCursorColorChangeTextViewCreationListener : IWpfTextViewCreationListener
    {
        // Disable "Field is never assigned to..." and "Field is never used" compiler's warnings. Justification: the field is used by MEF.
#pragma warning disable 649, 169

        /// <summary>
        /// Defines the adornment layer for the adornment. This layer is ordered
        /// after the selection layer in the Z-order
        /// </summary>
        [Export(typeof(AdornmentLayerDefinition))]
        [Name("CaretCursorColorChange")]
        // ↓のOrder()はレイヤーを差し込む順番。今回は選択描写の後で、テキスト描写の前に挟むよという意味
        [Order(After = PredefinedAdornmentLayers.Selection, Before = PredefinedAdornmentLayers.Text)]
        private AdornmentLayerDefinition editorAdornmentLayer;

#pragma warning restore 649, 169

        #region IWpfTextViewCreationListener

        /// <summary>
        /// Called when a text view having matching roles is created over a text data model having a matching content type.
        /// Instantiates a CaretCursorColorChange manager when the textView is created.
        /// </summary>
        /// <param name="textView">The <see cref="IWpfTextView"/> upon which the adornment should be placed</param>
        // ここでデフォルトでは、テキストビューワーが作られたとき(VisualStudioで言えばコードファイルを開いたとき)
        // の処理をオーバーライドしています。
        public void TextViewCreated(IWpfTextView textView)
        {
            // The adornment will listen to any event that changes the layout (text changes, scrolling, etc)
            // このクラスを呼び出して実行しています。
            new CaretCursorColorChange(textView);
        }

        #endregion
    }
}
このオーバーライドから呼び出されたクラスが今回手を加えていくクラスになります。
AdornmentLayerDefinitionはレイヤーみたいなものです。
今回の実装は、文字カーソルがあるところにIMEのON,OFFによって色を付け、それを塗り重ねる形で実装をしてます。
その作成した画像をどこに塗り重ねているかを指しているのがOrderになります。
描画処理
では本題の描画処理に移ります。
CaretCursorColorChange.csを以下のようにします。
using Microsoft.VisualStudio.Text;
using Microsoft.VisualStudio.Text.Editor;
using Microsoft.VisualStudio.Text.Formatting;
using System;
using System.Windows.Controls;
using System.Windows.Media;


namespace CaretCursorColorChange
{
    internal sealed class CaretCursorColorChange
    {
        public CaretCursorColorChange(IWpfTextView textView)
        {
            if (textView == null)
            {
                throw new ArgumentNullException("view");
            }
            // 上記で作ったレイヤーを取得している。
            // 引数の""は上記dornmentLayerDefinitionの[Name("")]と合わせる
            var layer = textView.GetAdornmentLayer("CaretCursorColorChange");

            // テキストビューの文字カーソルが変わったとき、テキストビューのレイアウトが変わったときに下の処理を実行
            textView.Caret.PositionChanged += (sender, e) => CaretColorChange(layer, textView);
            textView.LayoutChanged += (sender, e) => CaretColorChange(layer, textView);
        }

        private void CaretColorChange(IAdornmentLayer layer, IWpfTextView textView)
        {
            // 既存の装飾をクリア(描画した内容がいつまでも残り続けるので)
            layer.RemoveAllAdornments();
            // IMEのOn,Offを読み、Onなら以下を処理
            if (IMEHelper.IsIMEOn())
            {
                // キャレットの現在位置を取得
                var caretPosition = textView.Caret.Position.BufferPosition;

                // キャレットの周囲の文字の範囲を取得
                var line = textView.GetTextViewLineContainingBufferPosition(caretPosition);

                // キャレットがある文字の範囲を取得
                var characterBounds = line.GetCharacterBounds(caretPosition);

                // 範囲が取得できた場合、その範囲に背景色を追加
                if (characterBounds != null)
                {
                    // このborderの範囲と色でAdornmentLayerDefinitionを塗りつぶすというイメージ
                    var border = new Border
                    {
                        Background = new SolidColorBrush(Color.FromArgb(0x20, 0xEA, 0x00, 0x8C)),  // キャレット位置の背景色(任意の色)
                        Width = characterBounds.Width /2 * 1.5,
                        Height = characterBounds.Height
                    };

                    // 背景色を描画するために矩形をその位置に配置
                    Canvas.SetLeft(border, characterBounds.Left);
                    Canvas.SetTop(border, characterBounds.Top);

                    // 塗りつぶし設定のborderをLine.Extentの位置に追加する。
                    layer.AddAdornment(AdornmentPositioningBehavior.TextRelative, line.Extent, null, border, null);
                }
            }
        }
    }
}
以下はIMEのOn,Offを検知するヘルパークラス
public static class IMEHelper
    {
        [DllImport("user32.dll")]
        public static extern IntPtr GetForegroundWindow();

        [DllImport("imm32.dll")]
        public static extern IntPtr ImmGetContext(IntPtr hWnd);

        [DllImport("imm32.dll")]
        public static extern bool ImmGetOpenStatus(IntPtr hIMC);

        [DllImport("imm32.dll")]
        public static extern bool ImmReleaseContext(IntPtr hWnd, IntPtr hIMC);
        // On,Offを検知する関数
        public static bool IsIMEOn()
        {
            IntPtr hWnd = GetForegroundWindow();
            IntPtr hIMC = ImmGetContext(hWnd);
            bool isIMEOn = ImmGetOpenStatus(hIMC);
            ImmReleaseContext(hWnd, hIMC);
            return isIMEOn;
        }
    }
これで文字カーソルを動かしたり、文字を書いたりするとIMEのチェック判定が起こり、それによってその周りが塗りつぶされるようになります。
課題
カーソルを動かしたときや文字を入力したときは反映されるのですが、半角/全角キーが押されたときはこのイベントは呼び出されないので、その場で半角/全角キーを押したときに今IMEがOnなのかOffなのかわからないという問題点があります。
このへんはおいおい対応できればと思います。
デバッグとビルド
私のVisualStudioではデバッグしようとしたのに、ファイルを開こうとするとインスタンスがありませんなどのエラーがありできませんでした。
ビルドについてはソリューションエクスプローラーのプロジェクトを右クリックでビルドを選べばソリューションフォルダのbinファイルのDebugやReleaseなどのフォルダにvsixパッケージが作られるので、それをダブルクリックすることでVisualStudioにインストールできます。

