RenderTextureについて
UnityにはRenderTextureという神機能があります。
一般的にはカメラでレンダリングした画像をテクスチャとして使ったりするということが一般的なイメージで強力なツールであるという認識を持っていない人がほとんどなのではないでしょうか?
しかし、実はこのRenderTextureの本質はカメラの情報をテクスチャにすることではなく、
シェーダーおよびマテリアルで画像が作成できるというところなのです。
Graphics.Blit()について
このRenderTextureが"最強"たらしめることにGraphics.Blit()というUnityの組み込み関数の説明が不可欠です。
このGraphics.Blit()ですが、テクスチャの情報をGPUを使用して一気にRenderTextureにコピーするというものです。
GPUを使用してコピーするので当然速く、リアルタイムで画像をコピーできるものとして一般的に認知されています。
そしてこのGraphics.Blit()ですが、実はテクスチャをコピーする際、Material、いわばShaderを使用して画像を加工してRenderTextureにコピーできるのです。
つまりShaderを使って簡単でめちゃくちゃ早く画像加工ができるというものです。
UnityのTerrainについて
UnrealEngineとか他のゲームエンジンはどうかしりませんがUnityのTerrainは画像(HeightMap)ベースで地形が成型されます。
テクスチャの1ドットの値によって高さが決まってくるわけです。
この画像(HeightMap)ベースというところが、リアルタイムに画像加工ができるRenderTextureとすこぶる相性が良いのです。
今回はこのRenderTexture,Graphics.Blit(),UnityTerrainを使って以下のようなリアルタイムに地形を生成できる機能を実装して、なぜRenderTextureとGraphics.Blit()が最強であるのかご紹介しようと思います。
Terrainの組み込み関数
Unityには以下の組み込み関数やプロパティで現在のHeightMapを取得したり、HeightMapとして読み込ませたりできます。
TerrainのHeightMap取得
// Terrain.terrainDataでTerrainの情報を取得
TerrainData terrainData = GetComponent<Terrain>().terrainData;

// TerrainData.heightmapTextureでHeightMapを取得
RenderTexture sourceTerrainHeight = terrainData.heightmapTexture;
TerrainにHeightMapの情報を与えて高さを変更させる
// HeightMapにしたいRenderTextureをアクティブ化
RenderTexture.active = renderTexture;

// 反映させたい範囲(幅高さ)
RectInt sourceRect = new RectInt(0, 0, sourceTerrainHeight.width, sourceTerrainHeight.height);
// 反映させたい範囲のオフセット
Vector2Int dest = new Vector2Int(0, 0);
// ↑HeightMap全体を反映させたいのでオフセット0で範囲をHeightMapの幅と高さにしている

// アクティブ化されたRenderTextureから高さ情報を反映させる
terrainData.CopyActiveRenderTextureToHeightmap(sourceRect, dest, TerrainHeightmapSyncControl.HeightAndLod);
これだけ理解できれば画像からTerrainを作成するのは簡単ですね。
プログラム実装~Shader~
それではいよいよ実装です。
まず今回は、以前作ったProjectionShaderを参考にします。
山を作るRawデータをブラシとして元の画像にプロジェクションします。
Shader"Unlit/ProjectionShader"
{
    Properties
    {
        // 元の画像
        _MainTex ("Base (RGB)", 2D) = "black" {}
        // ブラシの画像(反映させる山の画像)
        _BrushTex ("Brush (RGB)", 2D) = "white" {}
        // 出現させたいポイントをUVで指定
        _BrushUV ("Brush UV", Vector) = (0, 0, 0, 0)
        // 色の反映度合(山の高さ)
        _Magnitude("HeightMagnitude", float) = 0
    }
    SubShader
    {
        Tags { "RenderType"="Opaque" }
        LOD 200

        Pass
        {
            CGPROGRAM
            #pragma vertex vert
            #pragma fragment frag

            #include "UnityCG.cginc"

            struct appdata_t
            {
                float4 vertex : POSITION;
                float2 uv : TEXCOORD0;
            };

            struct v2f
            {
                float2 uv : TEXCOORD0;
                float4 vertex : SV_POSITION;
            };

            // プロパティの宣言
            sampler2D _MainTex;
            sampler2D _BrushTex;
            float4 _BrushUV;
            float _Magnitude;

            v2f vert(appdata_t v)
            {
                v2f o;
                o.vertex = UnityObjectToClipPos(v.vertex);
                o.uv = v.uv;
                return o;
            }

            float4 frag(v2f i) : SV_Target
            {
                // テクスチャの取得
                fixed4 mainTex = tex2D(_MainTex, i.uv);
                float2 buv = float2(_BrushUV.x - 0.5 / _BrushUV.z, _BrushUV.y - 0.5 / _BrushUV.w);

                // ブラシの位置を計算
                float2 brushUV = clamp((i.uv - buv) * _BrushUV.zw, 0.0, 1.0);

                // ブラシテクスチャの取得
                float4 brushTex = tex2D(_BrushTex, brushUV);

                // ブラシを適用、影響度の適用
                return (mainTex * (1.0 - brushTex.r) + brushTex * brushTex.r) * _Magnitude;
            }
            ENDCG
        }
    }
    FallBack"Diffuse"
}
これで与えたUVの場所に山の画像が指定した影響度でプロジェクション(上書き)されるShaderの完成です。
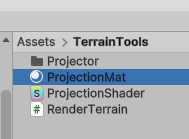
忘れずにMaterialを作成してセットしておいてください。

Projectorの作成
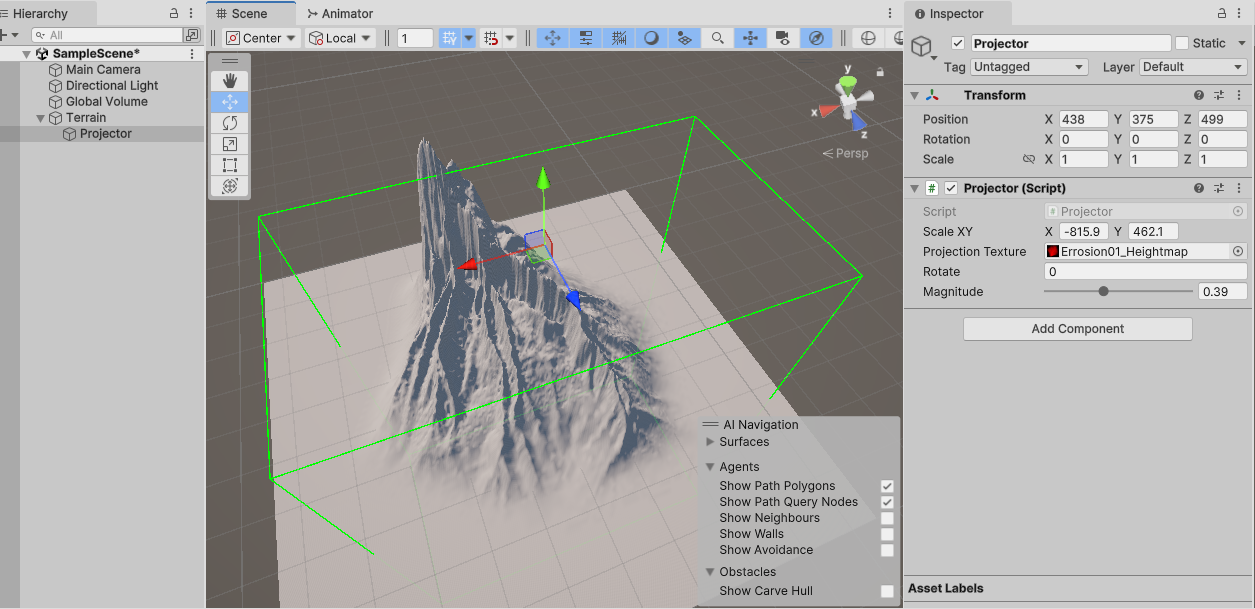
UVを指定させるためにTerrainの直下に空のオブジェクトを置きProjectorとします。
こいつから下にRayCastしてhitしたポイントのUVを取得して指定させるわけです。
Projectorにアタッチするスクリプトは以下です。
public class Projector : MonoBehaviour
{
    // ブラシの影響範囲の大きさを決定する値
    [SerializeField]
    public Vector2 scaleXY;
    // 反映させたい山のテクスチャを保持
    [SerializeField]
    public Texture2D projectionTexture;
    // 今回は使わないが一応入れておいた。回転に追従させるために、、、
    [SerializeField]
    public float rotate;
    // 画像の影響度(山の高さ)を指定
    [SerializeField, Range(0, 1.0f)]
    public float magnitude;

    // Gizmoを表示させるための値(sizeのx,zはscaleXYで指定するので箱の高さだけ)
    // 任意で、なくても別に問題ない、箱が表示されないだけ
    private Vector3 size;
    private float length = 1000;

    // 影響範囲が見やすいように箱を表示する
    private void OnDrawGizmos()
    {
        size = new Vector3(scaleXY.x, length, scaleXY.y);
        rotate = transform.rotation.y;
        Gizmos.color = Color.green;

        // 回転をオブジェクトのy軸の値だけを反映させるためいろいろやっている。なくても問題ない
        Matrix4x4 originalMatrix = Gizmos.matrix; // 新しい行列を設定:位置、回転(Y軸)、スケールを含む
        var currentRotation = transform.rotation;
        Quaternion rotation = Quaternion.Euler(0, currentRotation.eulerAngles.y, 0);
        Gizmos.matrix = Matrix4x4.TRS(transform.position, rotation * Quaternion.Euler(0, transform.rotation.y, 0), transform.lossyScale);
        // ボックスの中心をオブジェクトの下方向に移動
        Vector3 boxCenter = new Vector3(0, -length / 2, 0);
        // 箱の描画
        Gizmos.DrawWireCube(boxCenter, size);
        // 元のギズモ行列を復元
        Gizmos.matrix = originalMatrix;
    }
}
このProjectorはTransformやブラシテクスチャの画像の情報を持つのみです。
ここで設定したプロパティを動かすことで山の高さを変えたり、山の形を別のテクスチャに置き換えたりできます。
RenderTextureとBlit()を使ってTerrainに反映させる。
マテリアルもUVを与えるためのオブジェクトも作成できたので、あとはこの情報をTerrainに反映させるだけです。
[ExecuteInEditMode]// ←再生ボタンを押さなくても動いてほしいので[ExecuteInEditMode]を付けている
public class RenderTerrain : MonoBehaviour
{
    // TerrainのHeightMap
    [SerializeField]
    private RenderTexture sourceTerrainHeight;

    // TerrainDataとTerrainのサイズを取得
    private TerrainData terrainData;
    private Vector2 terrainSize;

    // 作成したプロジェクションマテリアルを取得
    private Material projectionMaterial;

    // 高さの影響範囲
    private RectInt sourceRect;
    private Vector2Int dest;

    // 上記で作ったプロジェクター
    [SerializeField]
    private GameObject projecter;

    // SceneViewで動かすのでStart()が使えないゆえの初期化をしたかどうかを判定するもの
    private bool isInitialize = false;

#if UNITY_EDITOR
    // SceneViewでの動作のためStart()が使えないので自分で初期化関数を作成
    void Initialize()
    {
        // Terrain情報の取得
        terrainData = GetComponent<Terrain>().terrainData;
        terrainSize = new Vector2(terrainData.size.x, terrainData.size.y);

        // 現在のHeightMapの取得
        sourceTerrainHeight = terrainData.heightmapTexture;
        // 作成したマテリアルをLoadAssetAtPathで取得
        projectionMaterial = AssetDatabase.LoadAssetAtPath<Material>("Assets/TerrainTools/ProjectionMat.mat");

        // 影響範囲をあらかじめ設定
        sourceRect = new RectInt(0, 0, sourceTerrainHeight.width, sourceTerrainHeight.height);
        dest = new Vector2Int(0, 0);
        isInitialize = true;
    }

    // Update is called once per frame
    void Update()
    {
        // プロジェクターがアタッチされていなかったら動かないようにする
        if(projecter == null){
            // プロジェクターが外れたら初期化していない状態に移行
            isInitialize = false;
            return;
        }

        // 初期化されてなければ初期化処理
        if (!isInitialize)
            Initialize();

        // 何も設定されていない空のRenderTextureを生成、Terrainに利用するため、FormatはR16で
        RenderTexture tmpRt = new RenderTexture(sourceTerrainHeight.width, sourceTerrainHeight.height, 0, RenderTextureFormat.R16);

        // アタッチされたプロジェクターから下方向にRayCastしてhitしたらその位置を取得
        RaycastHit hit;
        if(Physics.Raycast(projecter.transform.position, Vector3.down, out hit))
        {
            var terrain = hit.collider.gameObject.GetComponent<Terrain>();
            // ヒットしたTerrainが今回いじるTerrainDataか判定(複数Terrainがあったら別のTerrainに反映される可能性があるため)
            if (terrain.terrainData == terrainData)
            {
                // Projectorコンポーネントを取得
                var p = projecter.GetComponent<Projector>();
                // hitしたポイントからUVを求める
                Vector2 uv = GetTerrainUV(terrain, hit.point);
                Debug.Log(uv);
                // Materialのプロパティに情報を入れ込む
                SetMaterialProperty(uv, p.projectionTexture, p.scaleXY, p.magnitude);
                // 情報を入れ込んだマテリアルを使ってBlit()し、画像加工されたRenderTextureを取得する
                PaintRenderTexture(tmpRt);
                // HeightMapに入れて高さを更新させる
                UpdateHightMap(tmpRt);
            }
        }
    }

    // プロジェクターの情報をマテリアルに反映させる
    private void SetMaterialProperty(Vector2 brushUV, Texture2D brushTexture, Vector2 brushScale, float magnitude)
    {
        // プロジェクターで指定した範囲にブラシサイズが変更されるようにスケールを計算する
        var calculateScale = new Vector2(terrainSize.x/ brushScale.x, terrainSize.y/ brushScale.y);
        // マテリアルにプロパティ情報を入れ込む
        projectionMaterial.SetVector("_BrushUV", new Vector4(brushUV.x, brushUV.y, calculateScale.x, calculateScale.y));
        projectionMaterial.SetTexture("_BrushTex", brushTexture);
        projectionMaterial.SetFloat("_Magnitude", magnitude);
    }

    // Blit()でマテリアルの情報でRenderTextureを作成
    private void PaintRenderTexture(RenderTexture renderTexture)
    {
        // バッファーを用意
        var renderTextureBuffer = RenderTexture.GetTemporary(renderTexture.width, renderTexture.height);

        // マテリアルで加工したデータをバッファーにコピー
        Graphics.Blit(renderTexture, renderTextureBuffer, projectionMaterial);
        // バッファーをもう一度RenderTextureに戻す
        Graphics.Blit(renderTextureBuffer, renderTexture);
    }

    // hitしたポイントからUVを算出
    Vector2 GetTerrainUV(Terrain terrain, Vector3 worldPos)
    {
        Vector3 terrainPos = terrain.transform.position;

        // ハイトマップの相対座標を計算
        float relativeX = (worldPos.x - terrainPos.x) / terrainData.size.x;
        float relativeZ = (worldPos.z - terrainPos.z) / terrainData.size.z;

        // UV座標を計算
        Vector2 uv = new Vector2(relativeX, relativeZ);
        return uv;
    }

    // RenderTextureをHeightMapに反映させ高さを更新させる
    private void UpdateHightMap(RenderTexture renderTexture)
    {
        // RenderTextureをアクティブにする
        RenderTexture.active = renderTexture;

        // 現在アクティブなRenderTextureをHightMapにして高さを更新させる
        terrainData.CopyActiveRenderTextureToHeightmap(sourceRect, dest, TerrainHeightmapSyncControl.HeightAndLod);
    }
#endif
}
これでGraphics.Blit()によってマテリアルの情報で画像が加工され、HightMapに反映することができます。
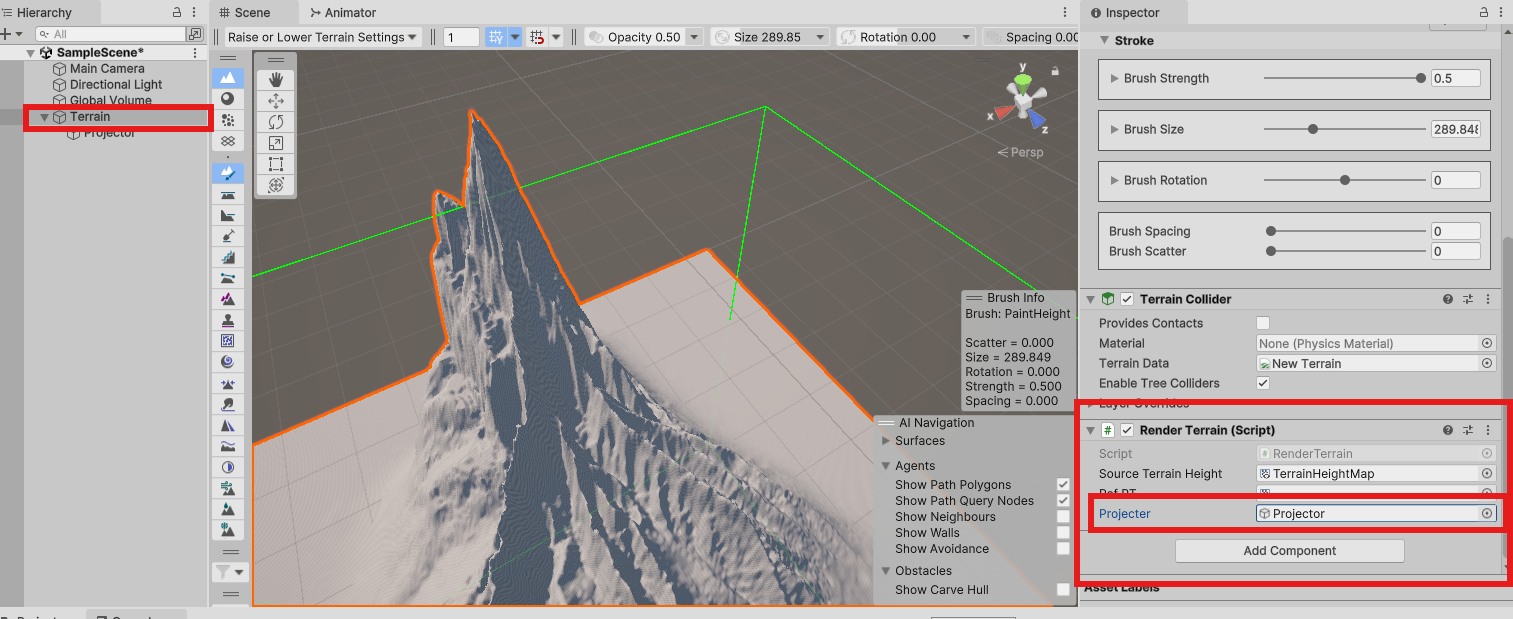
あとはこのスクリプトをTerrainにアタッチします。
アタッチしたら赤枠のようにプロジェクターもアタッチします。
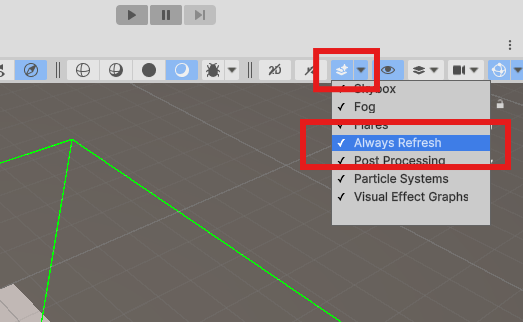
またSceneViewで即時動いてほしいので、SceneViewの右上のキラキラしたレイヤーマークからAlways Refreshを選択するとプロジェクターの情報により、地形がいろんな形に動いてくれます。
(この機能は再生ボタンを押さなくてもシェーダーとかのUVスクロールの反映とかもしてくれるので便利なので覚えておきましょう)

C# × Shader = 最強
いかがだったでしょうか?
今回の記事でRenderTextureやGraphics.Blit()の可能性を理解することができたのではないでしょうか?
今回はTerrainを使った拡張でしたが、前回行ったようにお絵描き機能の実装やほかにもShaderでできることはたくさんあり、その可能性は無限大です。
またこのBlit()はDirectXなどのGraphicAPI組み込みの関数なのですが、こういうのはC++とかでしか使えないし、ある程度の知識がないと簡単にはいかないです。
C#でこれを簡単に実装してくれたUnityには感謝しかなく、Unityがプログラマに好かれるゲームエンジンである由縁だと思います。
最近のUnityC#はUnrealのC++よりも1000倍速いのでもはやC++を使ってゲーム開発をするのは慣れ以外の理由はないかもしれないですね。
Unityは世界最強のゲームエンジンということでこの記事を閉めさせていただければと思います。

