# Introduction ・ はじめに
In fact there are already many applications and services on the market in Japan.
Personnaly I used Mimori.
There is a small device to insert in the bag of your kid and an application to follow the position of your kid(s).

There is a alert button but it's not possible to contact or speak to the kid, and that's why I tried to create my own. 実は、日本の市場には既に多くのアプリケーションやサービスが存在しています。 子供のカバンに入れる小さなデバイスと、子供の位置を追跡するためのアプリケーションがあります。
The other reason is the cost of the service, for Mimori : 7000円 the device and 748円 per month for the service.
日本語
個人的には、みもりを使用しました。
警報ボタンはありますが、子供と連絡を取ったり話をすることはできません。そのため、私は自分で作成しようと試みました。
もう一つの理由は、サービスのコストです。Mimoriの場合、デバイスに7000円、サービスに月額748円がかかります。
# Preparation ・ 準備
1 - Hardware ・ ハードウェア
So for this project we need :
- A device (on Android) with a GPS
- A Sim Card.
The choice of the device is important and different factors have to be taken into account :
- The battery life : the device has to be able to work for a long time without charging
- The size : the device has to be small enough to be put in a bag or hold in the hand for a kid
- The price : the device has to be cheap enough to be affordable
- The GPS : the device has to be able to get the position of the kid
- Android version : last version is better to be able to use the last features of Android, specially for the battery life.
The Sim Card is also important because a GPS device needs to be connected to the internet to send the position to the server.
There are some providers who offer cheap Sim Card, like https://www.nihontsushin.com/ : 1 GB of data per month for 290円.
日本語
このプロジェクトには以下が必要です:
- GPS付きのAndroidデバイス
- SIMカード
デバイスの選択は重要で、いくつかの要因を考慮する必要があります:
- バッテリー寿命:デバイスは長時間充電せずに動作可能である必要があります
- サイズ:デバイスは、バッグに入れたり子供が手に持つのに十分小さくなければなりません
- 価格:デバイスは、手頃な価格である必要があります
- GPS:デバイスは子供の位置を特定できる必要があります
- Androidバージョン:最新バージョンが望ましいです。特にバッテリー寿命に関するAndroidの最新機能を利用するために
SIMカードも重要です。GPSデバイスはインターネットに接続してサーバーに位置情報を送信する必要があるためです。
https://www.nihontsushin.com/ のように、安価なSIMカードを提供するプロバイダーもあります:1GBのデータで月額290円。
2 - Software ・ ソフトウェア
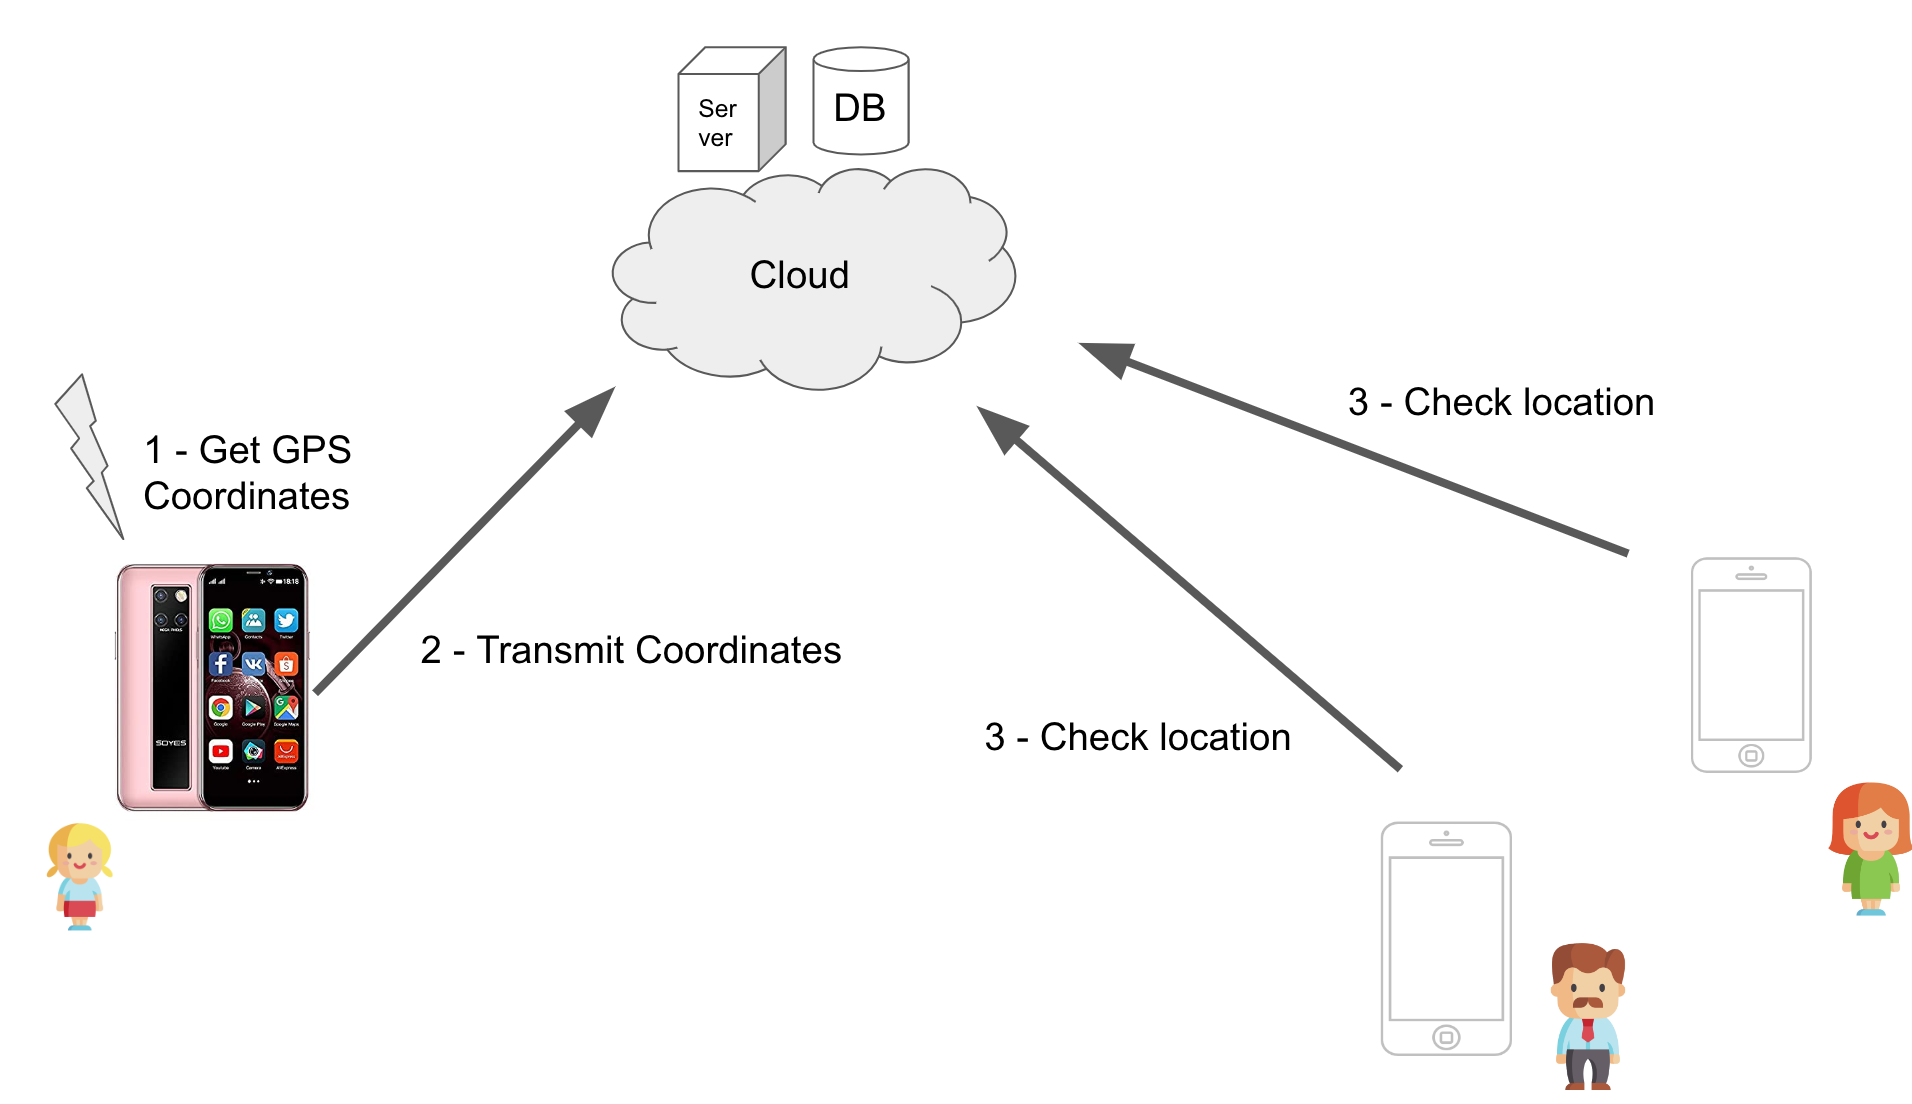
Now for the software part, we need :
- A client application for the kid smartphone to send the position to the cloud
- A second client application for the parent smartphone to retrieve the position of the kid
- A database to store the position of the kid and a server to expose the data to the parent application.
日本語
ソフトウェア部分については、以下が必要です:
- 子供のスマートフォンから位置情報をクラウドに送信するためのクライアントアプリケーション
- 親のスマートフォンで子供の位置を取得するための別のクライアントアプリケーション
- 子供の位置を保存するデータベースと、親アプリケーションにデータを公開するサーバー
# The Server and Database ・ サーバーとデータベース
To reduce the cost of the project, we will use firebase for the server and the database.
I want a Database with a full R/W access in realtime for the client application and Apis to access it for free.
Also it is compatible with Android, iOS or browser.
日本語
プロジェクトのコストを削減するために、サーバーとデータベースにFirebaseを使用します。
クライアントアプリケーションがリアルタイムで完全な読み書きアクセスを行えるデータベースと、それに無料でアクセスするためのAPIが欲しいです。
また、これはAndroid、iOS、ブラウザと互換性があります。
1 - Create a Firebase project ・ Firebaseプロジェクトを作成する
Go to Firebase console : https://console.firebase.google.com
Create a new project.
日本語
Firebaseコンソールにアクセスしてください:https://console.firebase.google.com
新しいプロジェクトを作成します。
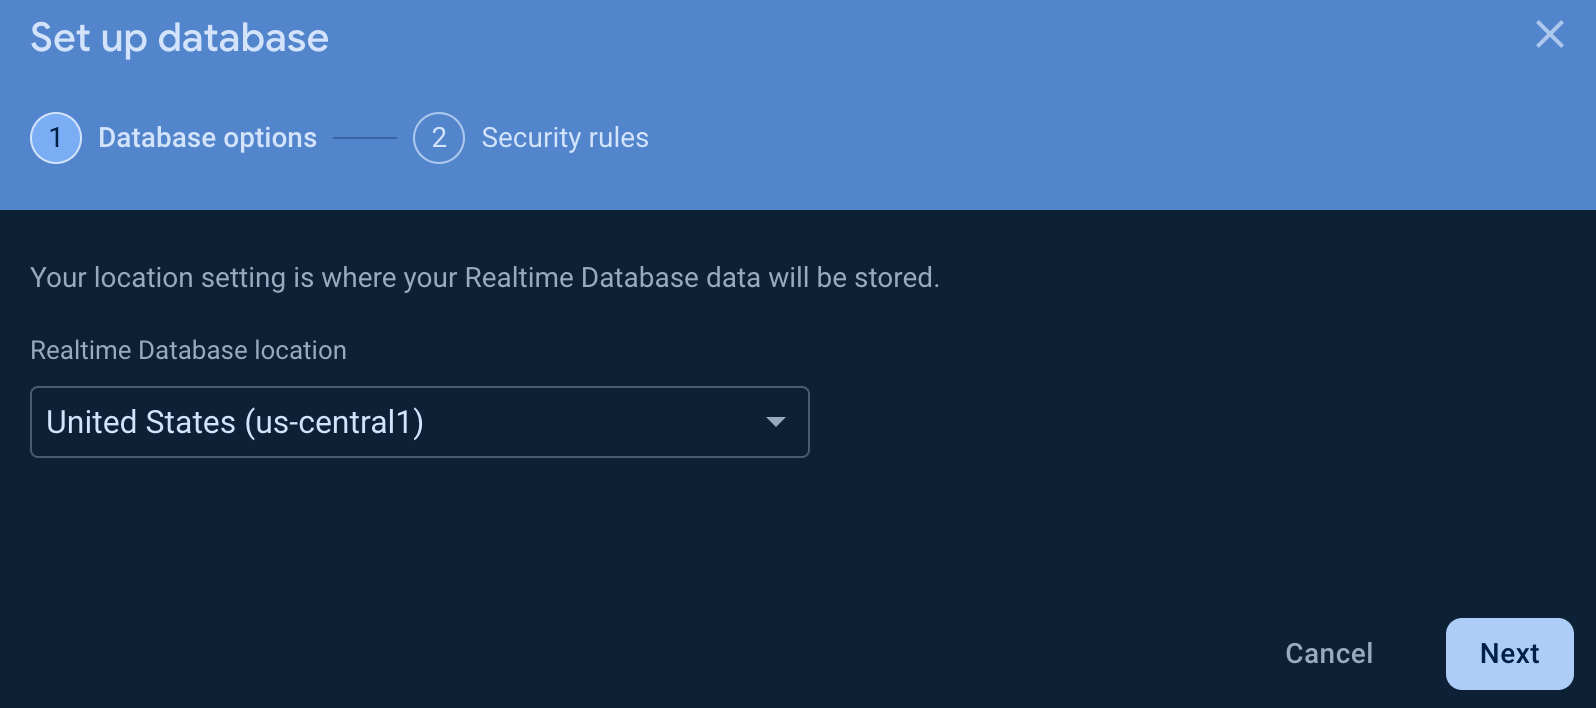
2 - Add a realtime database ・ リアルタイムデータベースを追加する
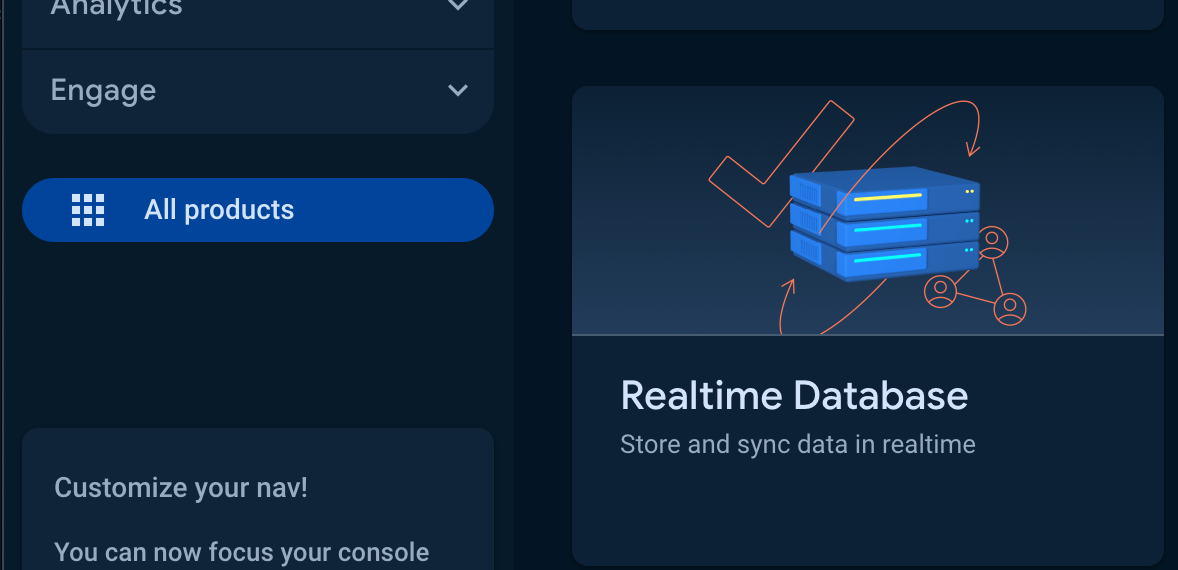
And setup the database :
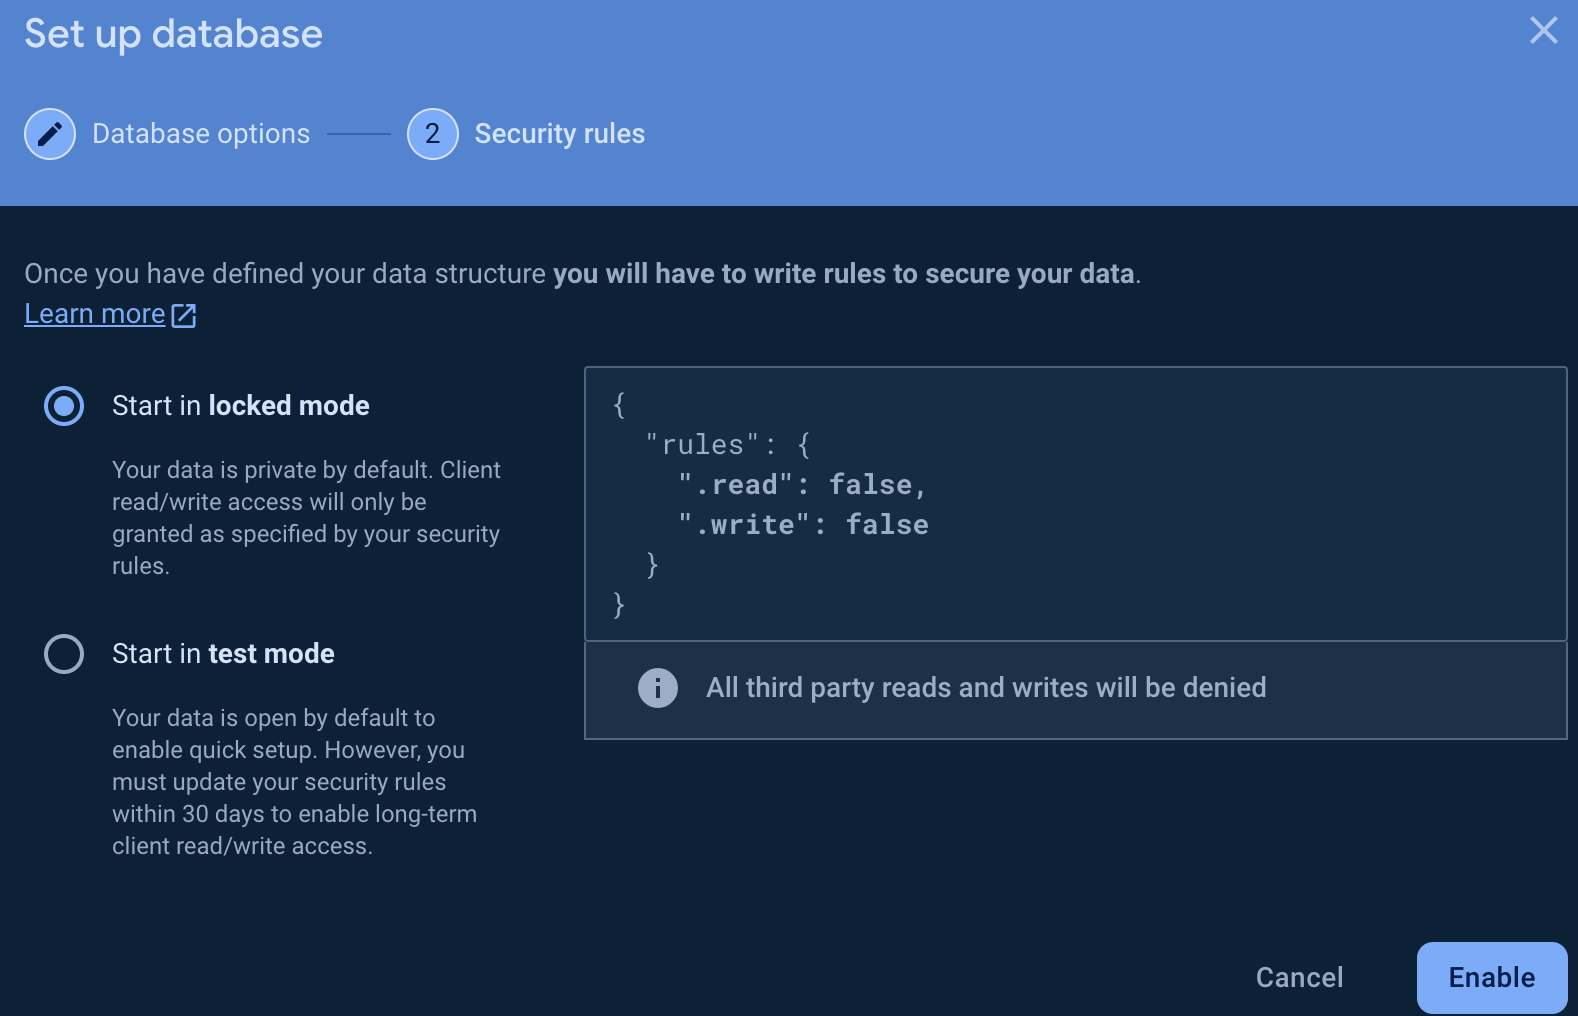
We will modify the rules later, for now we keep the default :
The firebase database is a bit special, it's a NoSQL database, so there is no table, but a tree of data like a JSON file.
The tree I decided to use is the following :
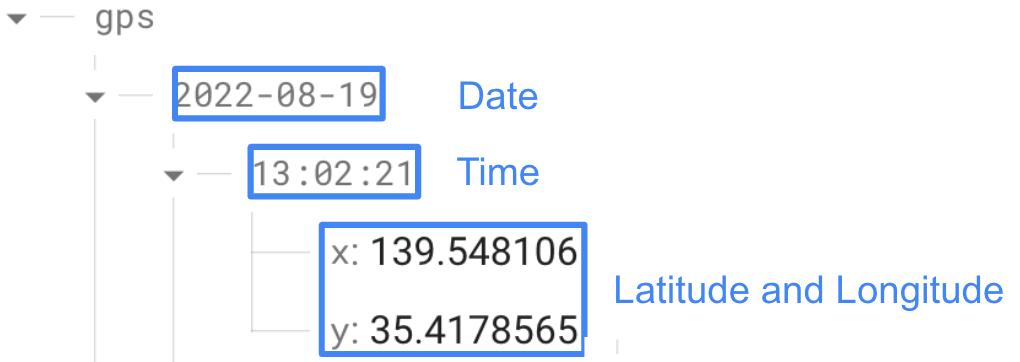
(It will be created automatically when we will add data)
日本語
そして、データベースを設定します:
今はデフォルトの設定をそのままにしますが、後でルールを変更します:
Firebaseデータベースは少し特殊で、NoSQLデータベースなのでテーブルはなく、JSONファイルのようなデータツリーがあります。
私が使用することに決めたツリーは次の通りです:
(データを追加する際に自動的に作成されます)
3 - Add a Authentication provider ・ 認証プロバイダーを追加する
To authenticate the user, we will use Google provider.
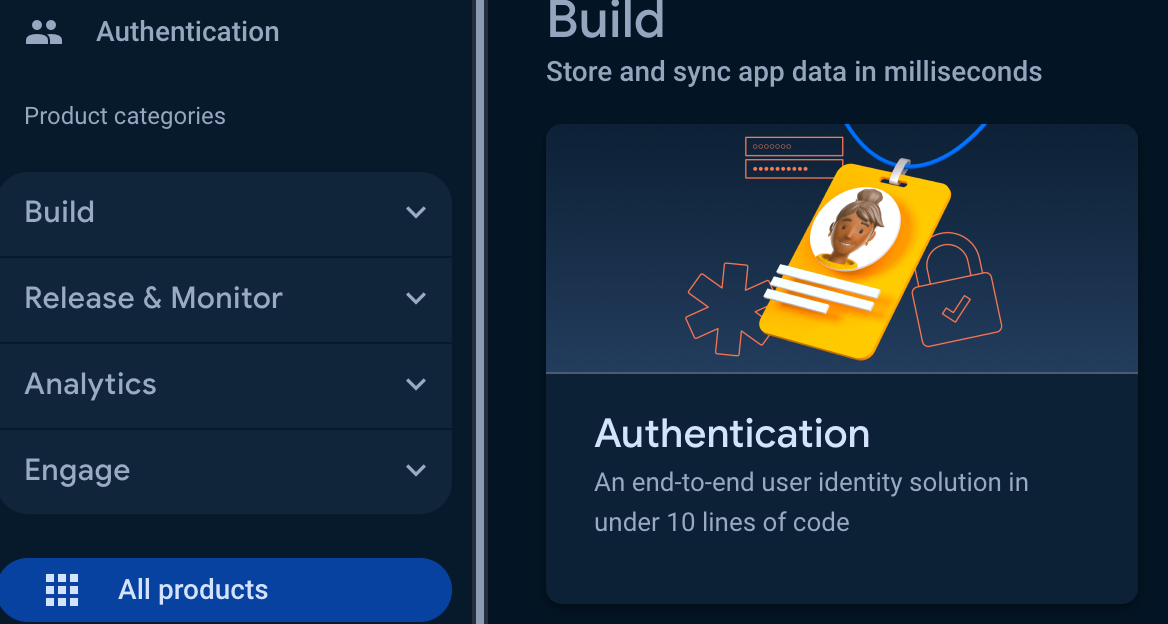
Add a Google provider :
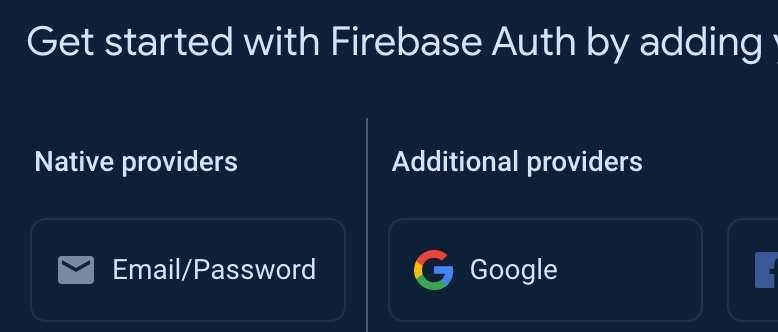
And enable it.
日本語
ユーザー認証には、Googleプロバイダーを使用します。
Googleプロバイダーを追加します:
そして、それを有効にします。
# The sender application (kid's one) ・ 送信アプリケーション(子供用のもの)
I will not present all the code here, but you can find it on my github : https://github.com/bbertolucci/localization
I will just present the most important parts.
At first we have to understand how the database is working.
Before being able to write data in the database, we have to authenticate the user.
日本語
ここでは全てのコードを紹介しませんが、私のGitHubで見ることができます:https://github.com/bbertolucci/localization
ここでは最も重要な部分だけを紹介します。
まず、データベースの動作方法を理解する必要があります。
データベースにデータを書き込む前に、ユーザーを認証する必要があります。
1 - Authenticate the user ・ ユーザーを認証する
To do so, we will use
 private lateinit var auth: FirebaseAuth
 private lateinit var googleSignInClient: GoogleSignInClient
 override fun onCreate(..) {
    ..
    val gso = GoogleSignInOptions.Builder(GoogleSignInOptions.DEFAULT_SIGN_IN)
        .requestIdToken(getString(R.string.default_web_client_id))
        .requestEmail()
        .build()

    googleSignInClient = GoogleSignIn.getClient(this, gso)
    auth = Firebase.auth
    ..
 }
override fun onStart() {
    ..
    updateUI(auth.currentUser)
}
private fun updateUI(user: FirebaseUser?) {
    Log.d(TAG, "Firebase user : ${user?.uid}")
    if (user == null) {
        signIn()
    }
}
private fun signIn() {
    val startForResult =
        registerForActivityResult(ActivityResultContracts.StartActivityForResult()) { result: ActivityResult? ->
            if (result?.resultCode == Activity.RESULT_OK) {
                val task = GoogleSignIn.getSignedInAccountFromIntent(result.data)
                try {
                    // Google Sign In was successful, authenticate with Firebase
                    val account = task.getResult(ApiException::class.java)!!
                    Log.d(TAG, "firebaseAuthWithGoogle:" + account.id)
                    firebaseAuthWithGoogle(account.idToken!!)
                } catch (e: ApiException) {
                    Log.w(TAG, "Google sign in failed", e)
                }
            } else {
                Log.e(TAG, "ResultCode: ${result?.resultCode}")
            }
        }

    startForResult.launch(googleSignInClient.signInIntent)
}
private fun firebaseAuthWithGoogle(idToken: String) {
    val credential = GoogleAuthProvider.getCredential(idToken, null)
    auth.signInWithCredential(credential)
        .addOnCompleteListener(this) { task ->
            if (task.isSuccessful) {
                val user = auth.currentUser
                updateUI(user)
            } else {
                updateUI(null)
            }
        }
}
Here how it works :
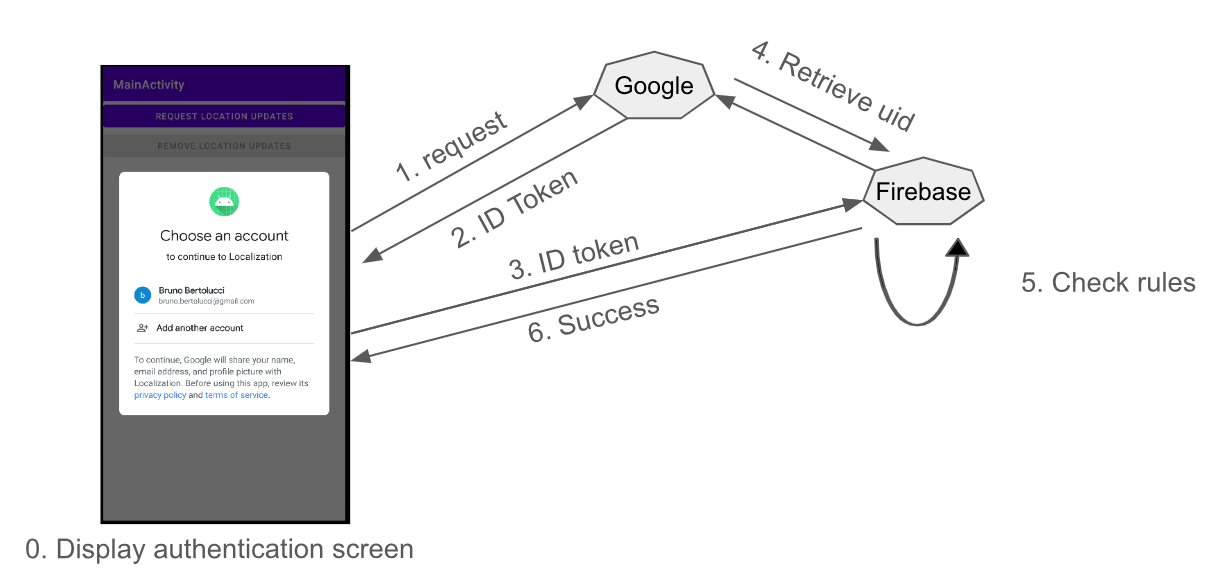
1 - The code check if the user is already authenticated.
2 - If not, it will display the Google Sign In page.
3 - If the user is authenticated, it will retrieve the token.
4 - It will use this token to authenticate the user in Firebase.
5 - Firebase will check the internal rules to allow or not the user to access the database.
Currently the rules are the default ones, so no one can access the database.
We will change this now.
In firebase console, go to the database tab and click on the rules tab.
{
  "rules": {
    ".read": "'<uid1>>' === auth.uid || '<uid2>' === auth.uid",
    ".write": "'<uid1>' === auth.uid || '<uid2>' === auth.uid"
  }
}
uid1 and uid2 are the uid of google account when you are logged in.
To identify the uid, you can check the logcat : firebaseAuthWithGoogle as shown earlier.
Now when proceeding the code, the user will be logged with an user who is allowed to access the database.
Alternatively you can modify this part and use different providers or simple login/password.
The idea is to have a way to authenticate the user to access the database.
日本語
それを行うために、私たちは以下を使用します。
 private lateinit var auth: FirebaseAuth
 private lateinit var googleSignInClient: GoogleSignInClient
 override fun onCreate(..) {
    ..
    val gso = GoogleSignInOptions.Builder(GoogleSignInOptions.DEFAULT_SIGN_IN)
        .requestIdToken(getString(R.string.default_web_client_id))
        .requestEmail()
        .build()

    googleSignInClient = GoogleSignIn.getClient(this, gso)
    auth = Firebase.auth
    ..
 }
override fun onStart() {
    ..
    updateUI(auth.currentUser)
}
private fun updateUI(user: FirebaseUser?) {
    Log.d(TAG, "Firebase user : ${user?.uid}")
    if (user == null) {
        signIn()
    }
}
private fun signIn() {
    val startForResult =
        registerForActivityResult(ActivityResultContracts.StartActivityForResult()) { result: ActivityResult? ->
            if (result?.resultCode == Activity.RESULT_OK) {
                val task = GoogleSignIn.getSignedInAccountFromIntent(result.data)
                try {
                    // Google Sign In was successful, authenticate with Firebase
                    val account = task.getResult(ApiException::class.java)!!
                    Log.d(TAG, "firebaseAuthWithGoogle:" + account.id)
                    firebaseAuthWithGoogle(account.idToken!!)
                } catch (e: ApiException) {
                    Log.w(TAG, "Google sign in failed", e)
                }
            } else {
                Log.e(TAG, "ResultCode: ${result?.resultCode}")
            }
        }

    startForResult.launch(googleSignInClient.signInIntent)
}
private fun firebaseAuthWithGoogle(idToken: String) {
    val credential = GoogleAuthProvider.getCredential(idToken, null)
    auth.signInWithCredential(credential)
        .addOnCompleteListener(this) { task ->
            if (task.isSuccessful) {
                val user = auth.currentUser
                updateUI(user)
            } else {
                updateUI(null)
            }
        }
}
こちらが動作方法です:
1 - コードはユーザーが既に認証されているかを確認します。
2 - そうでない場合は、Googleサインインページが表示されます。
3 - ユーザーが認証されている場合は、トークンを取得します。
4 - このトークンを使用してFirebaseでユーザーを認証します。
5 - Firebaseは内部ルールに基づいて、ユーザーがデータベースにアクセスできるかどうかをチェックします。
現在のルールはデフォルトのものなので、誰もデータベースにアクセスできません。
これを今変更しましょう。
Firebaseコンソールでデータベースタブに移動し、ルールタブをクリックします。
{
  "rules": {
    ".read": "'<uid1>' === auth.uid || '<uid2>' === auth.uid",
    ".write": "'<uid1>' === auth.uid || '<uid2>' === auth.uid"
  }
}
uid1とuid2は、ログインしているときのGoogleアカウントのuidです。
uidを確認するには、以前に示したようにlogcatで firebaseAuthWithGoogle をチェックできます。
これでコードを実行すると、ユーザーはデータベースにアクセスできるユーザーとしてログインされます。
あるいは、この部分を変更して異なるプロバイダーや単純なログイン/パスワードを使用することもできます。
重要なのは、データベースにアクセスするためにユーザーを認証する方法を持つことです。
2 - Access the GPS data ・ GPSデータにアクセスする
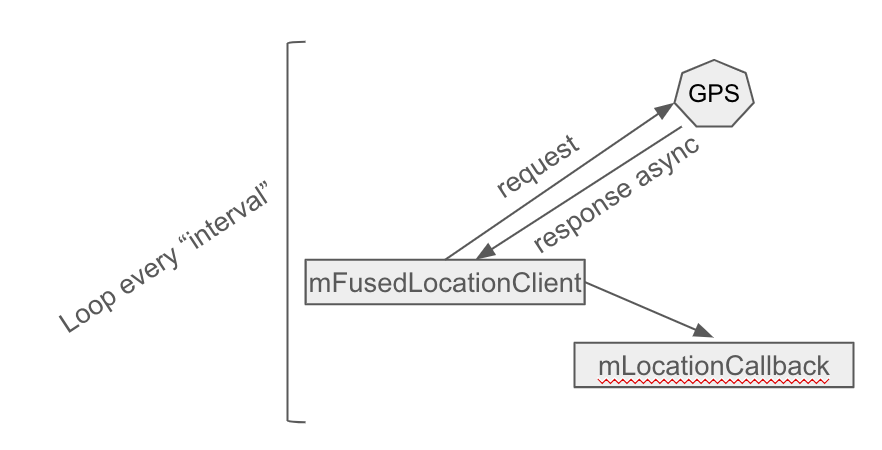
In modern version of Android (>9), the GPS can’t be use as an one time request.
It has to be in a running service with an interval of time.
The response is asynchronous and may be never received depending on the position of kid.
GPS is independent of the sim card but use a lot of battery to access satellite position.
mLocationCallback = object: LocationCallback() {
    override fun onLocationResult(locationResult: LocationResult) {
        super.onLocationResult(locationResult)
        Log.i(TAG, "New location: ${locationResult.lastLocation}")
    }
}
mFusedLocationClient = LocationServices.getFusedLocationProviderClient(this)
mLocationRequest = LocationRequest.create().apply {
   interval = UPDATE_INTERVAL_IN_MILLISECONDS
   fastestInterval = FASTEST_UPDATE_INTERVAL_IN_MILLISECONDS
   priority = Priority.PRIORITY_HIGH_ACCURACY
   maxWaitTime = MAX_WAIT_TUNE
}
mFusedLocationClient!!.requestLocationUpdates(
   mLocationRequest!!,
   mLocationCallback!!,
   Looper.myLooper()
)
This code will request the GPS position every n milliseconds.
You have to calibrate the interval to have a good balance between battery life and precision.
日本語
現代のAndroidバージョン(>9)では、GPSを一回限りのリクエストとして使用することはできません。 時間間隔を持つ実行中のサービス内でなければなりません。 応答は非同期であり、子供の位置によっては受信されない場合もあります。 GPSはSIMカードとは独立していますが、衛星位置にアクセスするために多くのバッテリーを消費します。mLocationCallback = object: LocationCallback() {
override fun onLocationResult(locationResult: LocationResult) {
super.onLocationResult(locationResult)
Log.i(TAG, "New location: ${locationResult.lastLocation}")
}
}
mFusedLocationClient = LocationServices.getFusedLocationProviderClient(this)
mLocationRequest = LocationRequest.create().apply {
interval = UPDATE_INTERVAL_IN_MILLISECONDS
fastestInterval = FASTEST_UPDATE_INTERVAL_IN_MILLISECONDS
priority = Priority.PRIORITY_HIGH_ACCURACY
maxWaitTime = MAX_WAIT_TUNE
}
mFusedLocationClient!!.requestLocationUpdates(
mLocationRequest!!,
mLocationCallback!!,
Looper.myLooper()
)
このコードはnミリ秒ごとにGPS位置を要求します。
バッテリー寿命と精度の良いバランスをとるために、間隔を調整する必要があります。
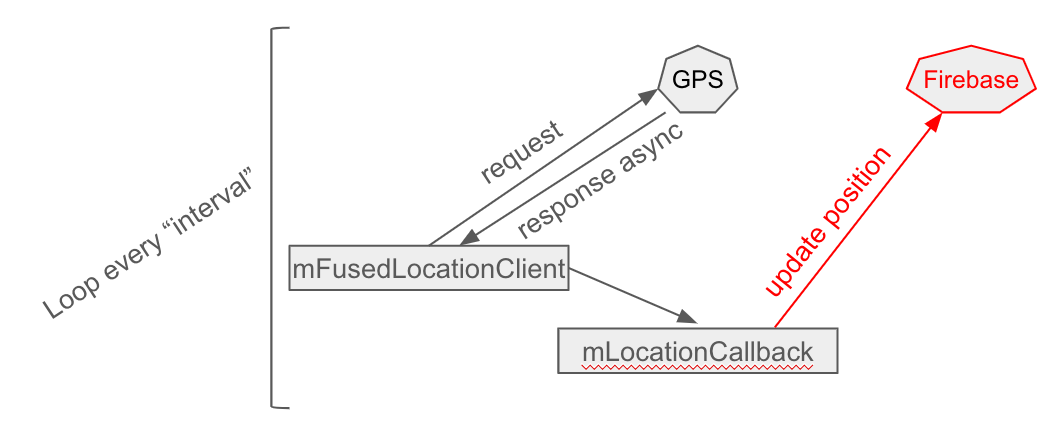
3 - Send the data to the server ・ データをサーバーに送信する
Now we have the position of the kid, we have to send it to the server.
To do so, we will use the firebase database.
FirebaseApp.initializeApp(applicationContext)
val database = Firebase.database
database
   .getReference("gps")
   .child(“2022-08-19”)
   .child(“13:02:21”)
   .updateChildren(
        mapOf(
            Pair("x",longitude),
            Pair("y",latitude)
        )
   )
This code will create a new node in the database with the current date and time and the position of the kid.
日本語
子供の位置がわかったので、次にそれをサーバーに送信する必要があります。
そのために、Firebaseデータベースを使用します。
FirebaseApp.initializeApp(applicationContext)
val database = Firebase.database
database
   .getReference("gps")
   .child(“2022-08-19”)
   .child(“13:02:21”)
   .updateChildren(
        mapOf(
            Pair("x", longitude),
            Pair("y", latitude)
        )
   )
このコードはデータベースに新しいノードを作成し、現在の日付と時間と子供の位置を記録します。
4 - Run the application in Background ・ バックグラウンドでアプリケーションを実行する
On Android, applications are paused when they are not in foreground (when you are using them or when the screen is turned off).
To be able to run the application in background, we have to use a service.
We need 3 permissions :
- ACCESS_BACKGROUND_LOCATION : To access GPS coordinates in background.
- FOREGROUND_SERVICE : To display a notification in the task bar when a service is running (It’s required when an application is tracking GPS activity in background.
- WAKE_LOCK : To force the application to stay awake.
The service will be displayed as a notification in the task bar :

日本語
Androidでは、アプリケーションはフォアグラウンド(使用中または画面がオフのとき)にないときに一時停止されます。
バックグラウンドでアプリケーションを実行するためには、サービスを使用する必要があります。
以下の3つの許可が必要です:
- ACCESS_BACKGROUND_LOCATION:バックグラウンドでGPS座標にアクセスするため。
- FOREGROUND_SERVICE:サービスが実行中のときにタスクバーに通知を表示するため(バックグラウンドでGPSアクティビティを追跡するアプリケーションには必要です)。
- WAKE_LOCK:アプリケーションを起動状態に保つため。
サービスはタスクバーに通知として表示されます:
# The receiver application (parent's one) ・ 受信アプリケーション(親のもの)
The receiver application is simpler than the sender one. You can find it on my github : https://github.com/bbertolucci/localization-receiver.
It will just display the position of the kid on a map.
日本語
受信アプリケーションは送信アプリケーションよりも簡単です。私のGitHubで見つけることができます:https://github.com/bbertolucci/localization-receiver。
これは単に地図上に子供の位置を表示するだけです。
1 - Authenticate the user ・ ユーザーを認証する
Same as the sender application, we have to authenticate the user to access the database.
日本語
送信アプリケーションと同様に、データベースにアクセスするためにはユーザーを認証する必要があります。
2 - Retrieve the data from the server ・ サーバーからデータを取得する

In this code the values represent a list of time object for a specific date.
The time object contains the latitude and longitude of the kid at this time.
日本語
このコードでは、値は特定の日付の時間オブジェクトのリストを表しています。
時間オブジェクトには、その時点での子供の緯度と経度が含まれています。
3 - Display the data on a map ・ 地図上にデータを表示する
Google offers an API service and a SDK to display an embedded map in an application.
The basic usage cost is Free for the map API.
日本語
Googleはアプリケーション内に埋め込まれた地図を表示するためのAPIサービスとSDKを提供しています。
地図APIの基本的な使用料金は無料です。
a - Map initialization : to display the embedded map ・ 地図の初期化:埋め込まれた地図を表示するため
val mapFragment = supportFragmentManager.findFragmentById(R.id.map) as SupportMapFragment
mapFragment.getMapAsync(this)

override fun onMapReady(googleMap: GoogleMap) {
  mMap = googleMap
}
b - Move the camera to a position ・ カメラを特定の位置に移動する
mMap.moveCamera(CameraUpdateFactory.newLatLngZoom(LatLng(35.68, 139.76), 10.0f))
Here we move the camera to the latitude 35.68 and longitude 139.76 with a zoom of 10.0f.
The camera will be centered on this position.
日本語
mMap.moveCamera(CameraUpdateFactory.newLatLngZoom(LatLng(35.68, 139.76), 10.0f))
ここでは、カメラを緯度35.68、経度139.76に移動し、ズームを10.0fに設定します。
カメラはこの位置を中心に配置されます。
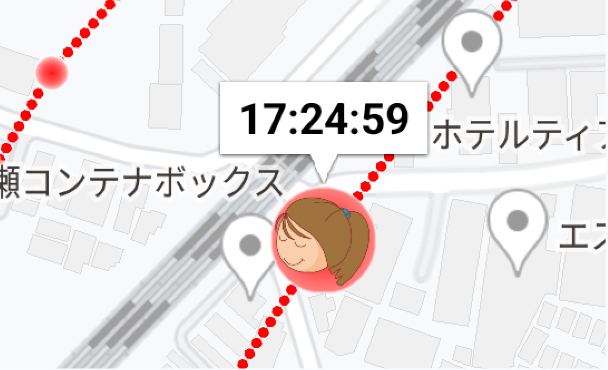
c - Add a marker on the map ・ 地図上にマーカーを追加する
A marker is a point on the map with a title and a description.
val currentKidsMarker = mMap.addMarker(
   MarkerOptions()
	.position(currentPos)
	.icon(BitmapFromVector(applicationContext, R.drawable.ic_girl2)
)
.anchor(0.5f,0.5f)
.title(point.key)
.zIndex(zindex))
currentKidsMarker?.showInfoWindow()
Here we:
- add a marker on the map with the position
currentPos - set an icon to the marker
- set the anchor to the center of the icon
- set the title (time of the position
- show the info window (title)
The result will looks like this :
日本語
マーカーは、タイトルと説明が付いた地図上の点です。
val currentKidsMarker = mMap.addMarker(
   MarkerOptions()
	.position(currentPos)
	.icon(BitmapFromVector(applicationContext, R.drawable.ic_girl2)
)
.anchor(0.5f,0.5f)
.title(point.key)
.zIndex(zindex))
currentKidsMarker?.showInfoWindow()
ここでは次の操作を行います:
-
currentPosの位置に地図上にマーカーを追加 - マーカーにアイコンを設定
- アイコンの中心にアンカーを設定
- タイトル(位置の時間)を設定
- 情報ウィンドウ(タイトル)を表示
結果は以下のようになります:
4 - Display the path of the kid ・ 子供の経路を表示する
To display the segment between points, we will use a polyline.
val polyOpt = PolylineOptions()
  .width(10f)
  .pattern(listOf(Dot()))
  .color(Color.RED)
val currentPos = LatLng(point.value["y"]!!, point.value["x"]!!)
polyOpt.add(currentPos)
…
mMap.addPolyline(polyOpt)
Here we draw a polyline with a width of 10f, a red color and a dot pattern between each point.
As a result we have straight lines between each points :
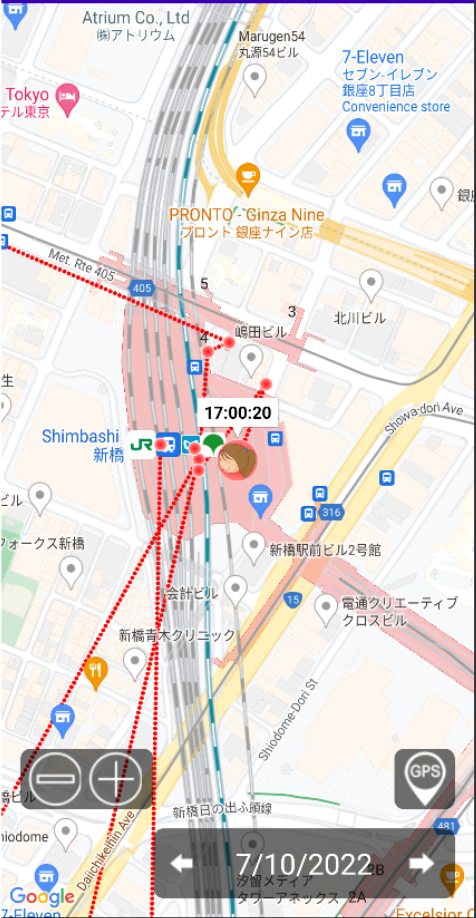
Of course your kid is not a bird and can’t fly.
Google map offers a way to draw a line between each point passing by the road, but this feature is not free and I will not explain it here.
日本語
点と点の間のセグメントを表示するために、ポリラインを使用します。
val polyOpt = PolylineOptions()
  .width(10f)
  .pattern(listOf(Dot()))
  .color(Color.RED)
val currentPos = LatLng(point.value["y"]!!, point.value["x"]!!)
polyOpt.add(currentPos)
…
mMap.addPolyline(polyOpt)
ここでは、幅10f、赤色、各点間にドットパターンのポリラインを描きます。
その結果、各点間に直線が引かれます:
もちろん、お子様は鳥ではなく飛ぶことはできません。
Googleマップには、道路を通って各点間に線を引く方法がありますが、この機能は無料ではないため、ここでは説明しません。
5 - GPS tracking ・ GPS追跡
We can also track the position of the parent to display it on the map.
We retrieve the GPS like we did for the kid application.
日本語
また、親の位置を追跡し、それを地図上に表示することもできます。
子供用アプリケーションと同様に、GPSを取得します。
# Conclusion ・ 結論
This is simple example of the minimal features to create a GPS tracking application for low cost.
Many other features can be added like :
- history
- Alert button
- Danger zone
- Phone call
- Battery level
- Multiple kids app
日本語
これは、低コストでGPS追跡アプリケーションを作成するための最小限の機能の単純な例です。
以下のような多くの他の機能を追加することができます:
- 履歴
- アラートボタン
- 危険地帯
- 電話通話
- バッテリーレベル
- 複数の子供用アプリ
# References
Kid application : https://github.com/bbertolucci/localization
Parent application : https://github.com/bbertolucci/localization-receiver
日本語
# 参考資料
子供用アプリケーション:https://github.com/bbertolucci/localization
親用アプリケーション:https://github.com/bbertolucci/localization-receiver