この記事の方法はもう使えません
この記事で使用していたOAuthの方法(帯域外(OOB)リダイレクト方法)が使用できなくなりました1.
内容を読む(この内容のものは使えません)
Gmail,SMTPを使って送る記事が多いですが,パスワード直書きしたくないですよね.
本記事ではOAuthで認証をし,比較的安全なAPIを用いた方法でメールを送信する方法を紹介します.
※自分自身で認証する方法を記載していますので,これをこのままプロダクトに起こすのはあまりよろしくないです.実際のプロダクションに使うときは,OAuthの仕組みについてよく調べてからにしましょう.
下準備
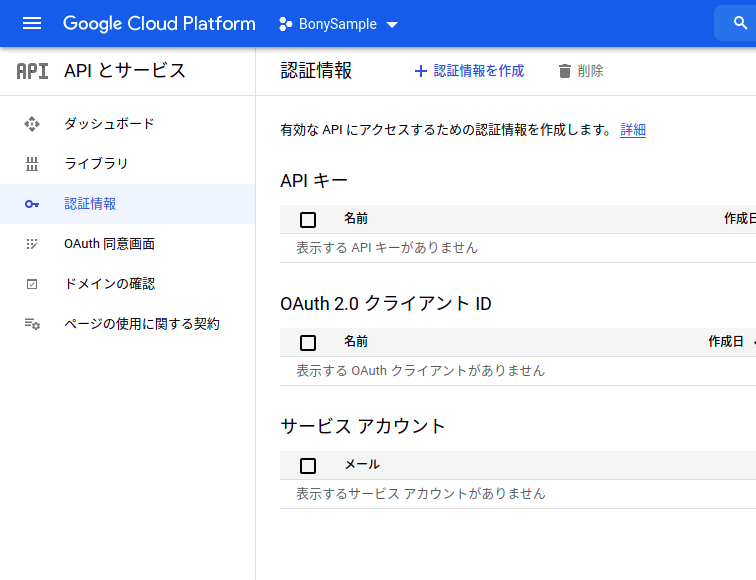
GCPを使います.プロジェクトがない人は作ってください.無料枠などはいりませんので,クレジットカード情報は一切必要ないです.
https://console.cloud.google.com/

- 新しいプロジェクトより作成
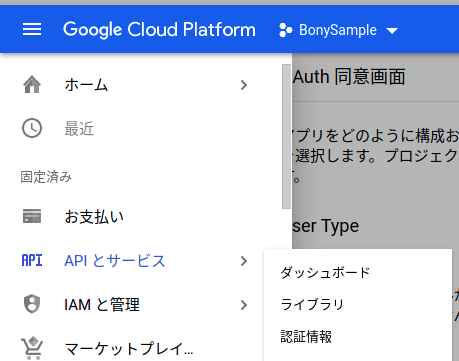
- メニュー→APIとサービス→認証情報→OAuth 同意画面
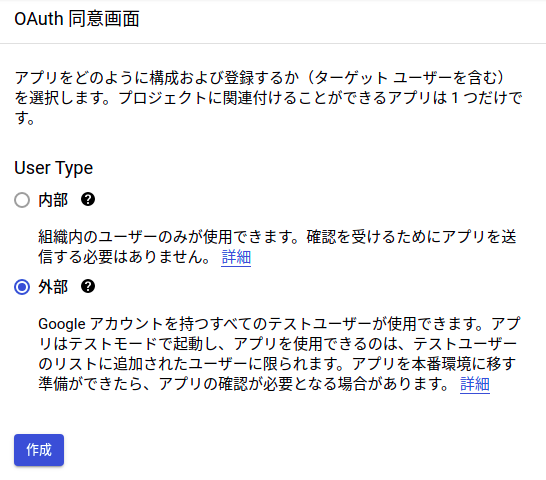
- 外部より作成.ただし学校から与えられたアカウントなどGoogle Workspaceにより管理されているアカウントで作成する場合は,内部のオプションが有効ですのでそちらを使っても良いと思います(自分が認証する前提で作成するのでどちらでもよいです).
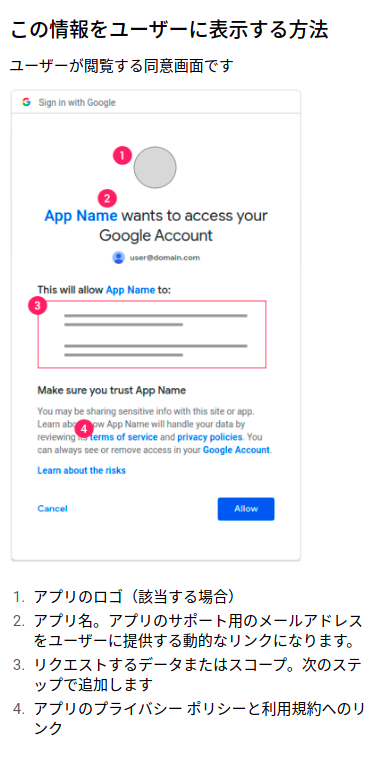
- ここにあるとおり,ユーザーの同意画面です.が,今回は自分のみがつかうので何をかいても大丈夫です.sample-appとかにしておきましょう.
- スコープはあとで追加するため保留.次のページへ
- テストユーザーは,プロジェクトを作成した以外のアカウントを認証したい際に追加してください.つまり,送信元にしたいアドレスをここに追加します.
- これで完成

- 次にGmail APIを有効にします.上の検索窓にGmail APIと入力してください
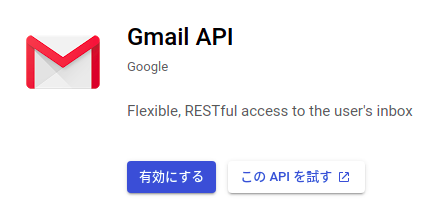
- 有効にしましょう
OAuthの認証情報を作成する
認証情報のページに戻ってきたら,
-
- 認証情報の作成 → OAuth クライアント ID
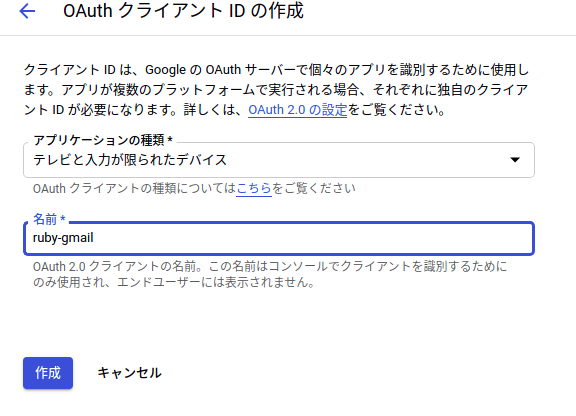
- 通常,OAuthで認証した際は自動的にアプリケーションに対して認証に必要な
codeがGETのクエリパラメータに付与されて送信されますが,今回はそれが難しいアプリケーションです(できないことはないけど...).よって,向けのオプションを選びます.テレビと入力が限られたデバイスを選択します.名前は何でもいいです. - これで作成できました.クライアントIDとシークレットは後から確認できるので閉じてOKです.
- 画面右端より認証情報をダウンロードします.これで準備完了.
- アプリ用のディレクトリを作成します
mkdir mailtest
cd mailtest
- 次に,このディレクトリ内に先程の認証情報を持ってきてください.
その際のファイル名をclient_secret_***からcredentials.jsonに変更します
いよいよアプリ構築
まず,.
Gemfileに以下を記載してbundle installを実行
gem "google-api-client"
gem "rmail"
Ruby quickstart | Gmail API | Google Developersをちょっと変えたソースを書きました.
mailtest.rb
require "google/apis/gmail_v1"
require "googleauth"
require "googleauth/stores/file_token_store"
require "fileutils"
require 'rmail'

OOB_URI = "urn:ietf:wg:oauth:2.0:oob".freeze
APPLICATION_NAME = "Gmail API Ruby Quickstart".freeze
CREDENTIALS_PATH = "credentials.json".freeze
# The file token.yaml stores the user's access and refresh tokens, and is
# created automatically when the authorization flow completes for the first
# time.
TOKEN_PATH = "token.yaml".freeze
SCOPE = Google::Apis::GmailV1::AUTH_GMAIL_MODIFY

##
# Ensure valid credentials, either by restoring from the saved credentials
# files or intitiating an OAuth2 authorization. If authorization is required,
# the user's default browser will be launched to approve the request.
#
# @return [Google::Auth::UserRefreshCredentials] OAuth2 credentials
def authorize
  client_id = Google::Auth::ClientId.from_file CREDENTIALS_PATH
  token_store = Google::Auth::Stores::FileTokenStore.new file: TOKEN_PATH
  authorizer = Google::Auth::UserAuthorizer.new client_id, SCOPE, token_store
  user_id = "default"
  credentials = authorizer.get_credentials user_id
  if credentials.nil?
    url = authorizer.get_authorization_url base_url: OOB_URI
    puts "Open the following URL in the browser and enter the " \
         "resulting code after authorization:\n" + url
    code = gets
    credentials = authorizer.get_and_store_credentials_from_code(
      user_id: user_id, code: code, base_url: OOB_URI
    )
  end
  credentials
end

# Initialize the API
service = Google::Apis::GmailV1::GmailService.new
service.client_options.application_name = APPLICATION_NAME
service.authorization = authorize

# Show the user's labels
user_id = "me"

message = RMail::Message.new
message.header['To'] = "宛先アドレス"
# ↓あくまでも表示上のアドレスであるため,ここを好き勝手変えても実質的なアドレスを変えることはできません
message.header['From'] = "送信元アドレス"
message.header['Subject'] = "件名"
message.body = "Hello World!"

service.send_user_message('me',
                        upload_source: StringIO.new(message.to_s),
                        content_type: 'message/rfc822')
準備ができたら,bundle exec ruby mailtest.rb
Open the following URL in the browser and enter the resulting code after authorization:
https://accounts.google.com/o/oauth2/auth?access_type=offline&approval_prompt=force&client_id=***&include_granted_scopes=true&redirect_uri=urn:ietf:wg:oauth:2.0:oob&response_type=code&scope=https://www.googleapis.com/auth/gmail.modify
↑こんな感じに出てくるので,上記のリンクをCtrl + クリック,もしくはブラウザに貼り付けます
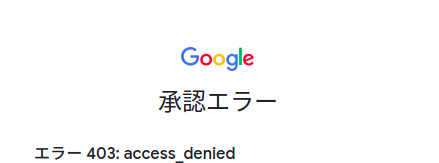
- このとき,テストユーザーに追加されていないユーザーの場合は403が返ってきます.やり方は見返してください.
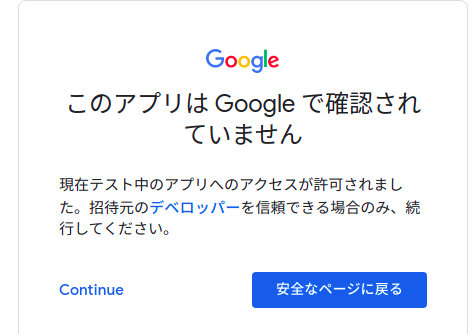
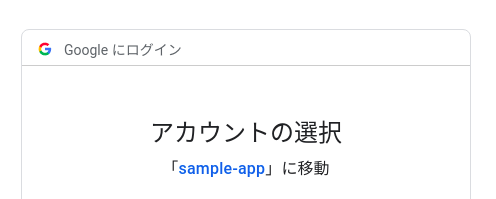
- Continueを押してください(本来GoogleのOAuthの機能を使うにはGoogleの承認が必要です.しかし,今回は自分のみが認証するために作ったものであるため,テストモードのままで大丈夫です.これにより通常よりセキュリティリスクが高まることはありませんのでご安心ください).
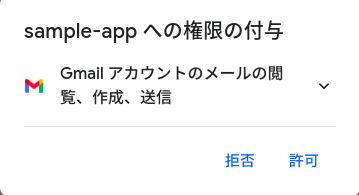
- 許可します.

- codeを,先程Rubyを実行したコンソールにそのまま貼り付けます.
- これで完了です.うまく行けばメールが送信されていると思います.
token.yamlにトークンが保存され,次回以降の実行は認証なしでメールが送信されます(誤送信に注意!).