はじめに
今年の海の日三連休は、、、諸事情により遠出はできず、夜更かしする時間ができたので、小ネタをば。
仕事の都合でJupyter on Podmanを試したくなったので、その過程を紹介してゆきます。
が、結論を言うと、本稿で紹介する方式はJupyterHub本家さんからサポートされていません!
DockerSpawnerでPodmanを使えなくはないよ。。。というようなニュアンスでしょう。
では、さっそく参ります。
本稿で紹介すること
- CentOS Stream 8のインストール
- Podmanのインストール
- JupyterHubの起動
参考記事
以下の記事、「Using Podman1」の節を手元PCで試します。
原文ままを記載すると、、、再掲ですが、JupyterHub本家さんからサポートされていません!
Podman is an alternative to Docker for running containers, and supports running containers without root access. It is not officially supported by JupyterHub, but it can be used with DockerSpawner by running a podman service:
podman system service --time=0 &
export DOCKER_HOST=unix://$XDG_RUNTIME_DIR/podman/podman.sock
# Run jupyterhub as normal
jupyterhub --config=jupyterhub_config.py
There are several other ways of running the Podman service.
Not all Docker features are supported by Podman.
CentOS Stream 8のインストール
過去の投稿記事で準備した手元PCのLinuxを使います。
もう少し詳しく言うと、
- ホストOS:CentOS 7
- ゲストOS:CentOS Stream 8
という構成で、KVMで仮想化したCentOS Streamを使ってJupyterHub on Podmanを試します。
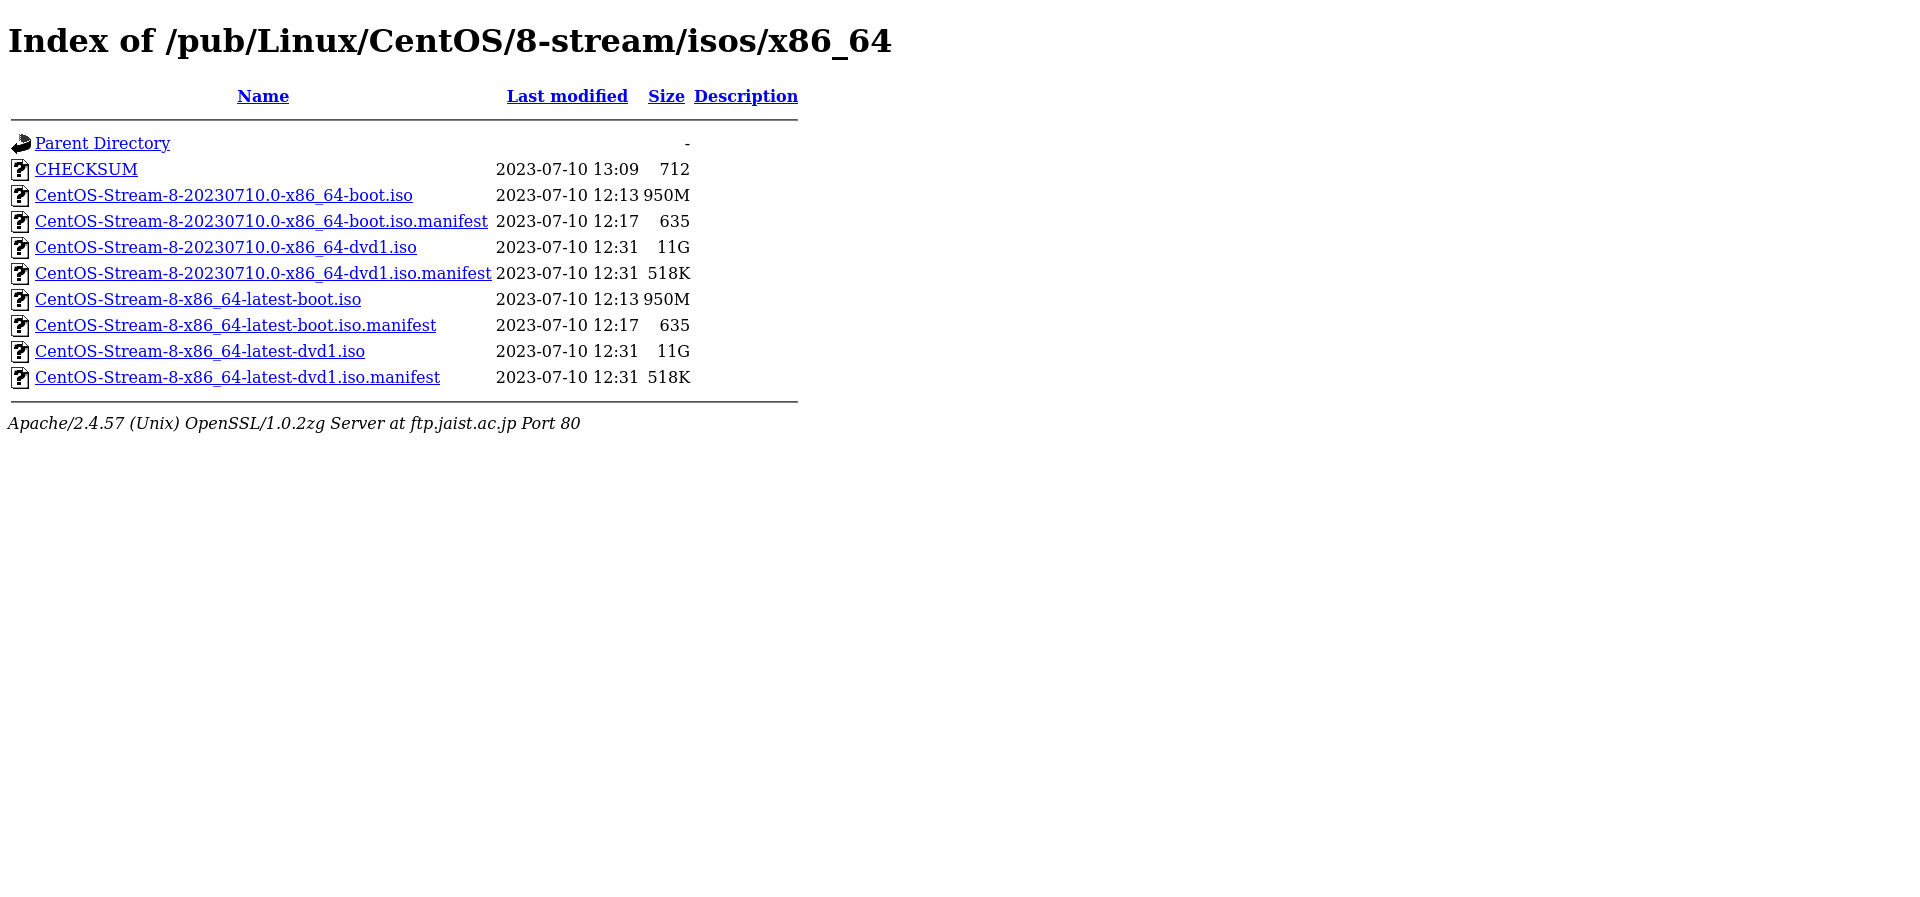
ホストOS上で、CentOS公式23からISOファイルをDownloadします。
本稿執筆時点だと、ファイル名はCentOS-Stream-8-20230710.0-x86_64-dvd1.iso、サイズは約11GBでした。
あとは、インストールウィザードに沿ってインストールするだけです。
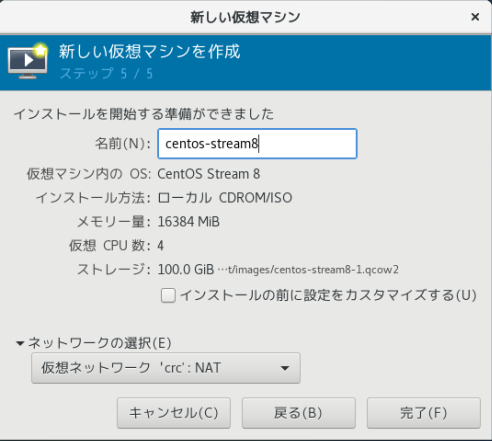
以下、筆者のKVM(仮想マシンマネージャー)における設定値です。
- CPU:4Core
- MEM:16GB
- DISK:100GB
- NW:NAT(192.168.130.0/24)
以下、筆者のCentOSのインストールウィザードにおける設定値です。
- 言語:日本語
- タイムゾーン:アジア/東京
- ソフトウェア選択:最小限のインストール
- ホスト名:centos8
- NW:NAT(IPAddr 192.168.130.100, Mask 255.255.255.0, Gateway 192.168.130.1, DNS 192.168.130.1)
OSインストールを終えると、以下の状態です。
[root@centos8 ~]# cat /etc/redhat-release
CentOS Stream release 8
[root@censot8 ~]# dnf info centos-release-stream
利用可能なパッケージ
名前         : centos-release-stream
バージョン   : 8.1
リリース     : 1.1911.0.7.el8
Arch         : x86_64
サイズ       : 11 k
ソース       : centos-release-stream-8.1-1.1911.0.7.el8.src.rpm
リポジトリー : extras
概要         : CentOS-Stream release file
ライセンス   : GPLv2
説明         : CentOS-Stream release files
Podmanのインストール
ここからは、ゲストOS上で進めます。
以下のコマンドを実行するだけです。(他には、、、Firewallを無効化したり、VIMやZIP/UNZIPをインストールしています。)
[root@centos8 ~]# dnf -y install podman
依存関係が解決しました。
=============================================================================================================================================================================================================================================
 パッケージ                                                        アーキテクチャー                            バージョン                                                               リポジトリー                                   サイズ
=============================================================================================================================================================================================================================================
インストール:
 podman                                                            x86_64                                      3:4.5.1-5.module_el8+461+0c6b54ea                                        appstream                                       15 M
依存関係のインストール:
 checkpolicy                                                       x86_64                                      2.9-1.el8                                                                baseos                                         348 k
 conmon                                                            x86_64                                      3:2.1.7-1.module_el8+454+d7ef4b8d                                        appstream                                       57 k
 container-selinux                                                 noarch                                      2:2.218.0-1.module_el8+454+d7ef4b8d                                      appstream                                       69 k
 containernetworking-plugins                                       x86_64                                      1:1.3.0-2.module_el8+461+0c6b54ea                                        appstream                                       21 M
 containers-common                                                 x86_64                                      2:1-51.module_el8+454+d7ef4b8d                                           appstream                                      136 k
 criu                                                              x86_64                                      3.18-4.module_el8+454+d7ef4b8d                                           appstream                                      564 k
 fuse-common                                                       x86_64                                      3.3.0-17.el8                                                             baseos                                          22 k
 fuse-overlayfs                                                    x86_64                                      1.12-1.module_el8+454+d7ef4b8d                                           appstream                                       70 k
 fuse3                                                             x86_64                                      3.3.0-17.el8                                                             baseos                                          54 k
 fuse3-libs                                                        x86_64                                      3.3.0-17.el8                                                             baseos                                          95 k
 libnet                                                            x86_64                                      1.1.6-15.el8                                                             appstream                                       67 k
 libslirp                                                          x86_64                                      4.4.0-1.module_el8+454+d7ef4b8d                                          appstream                                       70 k
 podman-catatonit                                                  x86_64                                      3:4.5.1-5.module_el8+461+0c6b54ea                                        appstream                                      360 k
 policycoreutils-python-utils                                      noarch                                      2.9-24.el8                                                               baseos                                         260 k
 protobuf-c                                                        x86_64                                      1.3.0-8.el8                                                              appstream                                       37 k
 python3-audit                                                     x86_64                                      3.0.7-5.el8                                                              baseos                                          87 k
 python3-libsemanage                                               x86_64                                      2.9-9.el8                                                                baseos                                         128 k
 python3-policycoreutils                                           noarch                                      2.9-24.el8                                                               baseos                                         2.3 M
 python3-setools                                                   x86_64                                      4.3.0-3.el8                                                              baseos                                         624 k
 runc                                                              x86_64                                      1:1.1.7-2.module_el8+463+b24391b1                                        appstream                                      3.1 M
 shadow-utils-subid                                                x86_64                                      2:4.6-18.el8                                                             baseos                                         113 k
 slirp4netns                                                       x86_64                                      1.2.0-3.module_el8+454+d7ef4b8d                                          appstream                                       54 k
弱い依存関係のインストール:
 tar                                                               x86_64                                      2:1.30-9.el8                                                             baseos                                         847 k
モジュールストリームの有効化中:
 container-tools                                                                                               rhel8

トランザクションの概要
=============================================================================================================================================================================================================================================
インストール  24 パッケージ

ダウンロードサイズの合計: 46 M
インストール後のサイズ: 139 M
:
企業ネットワークの場合は、Proxy設定なり証明書導入なり、適宜実施しましょう。
Podmanインストールを終えると、以下の状態です。
[root@centos8 ~]# which podman
/usr/bin/podman
[root@centos8 ~]# podman --version
podman version 4.5.1
JupyterHubの起動
まずは、JupyterHubをゲストOSにインストールします。
JupyterHub(ユーザ単位でJupyterLabコンテナを起動する側)は単なるPythonライブラリです。その他の必要なPythonライブラリ群とまとめてインストールします。
dnf -y install python38 python38-pip
python3 -m pip install pip -U
python3 -m pip install jupyterhub==3.1.1 IPython jupyter_client notebook jupyterlab docker dockerspawner escapism
次に、プロキシ(configurable-http-proxy)をゲストOSにインストールします。
WebブラウザとJupyterHubの間にプロキシが入って、WebブラウザからのHTTPリクエストを受け渡しています。
dnf -y install nodejs npm
npm install -g configurable-http-proxy
最後に、JupyterLab(JupyterHubから起動される側)のコンテナイメージをいくつかDownloadします。
podman pull docker.io/jupyter/minimal-notebook:python-3.8.8
podman pull quay.io/jupyteronopenshift/s2i-minimal-notebook-py36:2.5.1
podman pull quay.io/thoth-station/s2i-minimal-py38-notebook:v1.0.0
よく使うPythonライブラリをいろいろと詰め込んでもよいのですが、取り急ぎはJupyterHubとのつなぎ役になるPythonライブラリだけ入れ直します。
冒頭に示した参考記事に加えて、JupyterHubのReleaseNote4およびDockerSpawnerのReleaseNote5から、JupyterHubを1つ前のMajorVer.で最新の3.1.1を採用ました。
そのため、JupyterLabにも連動して「jupyterhub==3.1.1」を導入します。
FROM jupyter/minimal-notebook:python-3.8.8
RUN python3 -m pip install jupyterhub==3.1.1
Dockerfileの準備ができたら、以下のコマンドでコンテナイメージをBuildします。
podman image build -t jupyter/minimal-notebook:python-3.8.8-podman -f Dockerfile.lab . --no-cache
あとは、お馴染みの「jupyterhub_config.py」を定義して、JupyterHubの細かな挙動を設定します。
振返りを兼ねて、いくつかポイントを記載します。
- 認証はダミー、どんなID・PWを入力してもログイン可能
- 管理ユーザとして「admin」を指定(ログイン後に管理メニューを利用可能)
- コンテナイメージの選択肢は4つ、UbuntuベースとRHEL(CentOS、RHCOS)ベースのイメージを起動可能
- 永続ボリュームの割当て、各コンテナイメージ(JupyterLab)のHomeディレクトリ配下にマウント
from jupyter_client.localinterfaces import public_ips
ip = public_ips()[0]

c.JupyterHub.authenticator_class = 'jupyterhub.auth.DummyAuthenticator'
c.JupyterHub.hub_ip = ip
c.JupyterHub.ip = ip
c.Authenticator.admin_users = {'admin'}

c.ServerApp.iopub_data_rate_limit = 100000000.0
c.ServerApp.rate_limit_window = 1.0

from dockerspawner import DockerSpawner

class DemoFormSpawner(DockerSpawner):
  def _options_form_default(self):
    default_stack = 'thoth-station/s2i-minimal-notebook(Python 3.8)'
    return """
    <label for="stack">Select your desired stack</label>
    <select name="stack" size="1">
      <option value="jupyter/minimal-notebook:python-3.8.8">jupyter/minimal-notebook(Python 3.8)</option>
      <option value="jupyter/minimal-notebook:python-3.8.8-podman">jupyter/minimal-notebook(Python 3.8 w/jupyterhub==3.1.1)</option>
      <option value="quay.io/jupyteronopenshift/s2i-minimal-notebook-py36:2.5.1">jupyteronopenshift/s2i-minimal-notebook(Python 3.6)</option>
      <option value="quay.io/thoth-station/s2i-minimal-py38-notebook:v1.0.0">thoth-station/s2i-minimal-notebook(Python 3.8)</option>
    </select>
    """.format(stack=default_stack)

  def options_from_form(self, formdata):
    options = {}
    options['stack'] = formdata['stack']
    container_image = ''.join(formdata['stack'])
    print('SPAWN: ' + container_image + 'IMAGE')
    self.image = container_image
    self.log.info( "<<options_from_form>> %s", self.image)
    return options

  def start(self):
    self.log.info( "<<start>> %s", self.image)
    notebook_dir = '/home/jovyan'
    if self.image == 'quay.io/jupyteronopenshift/s2i-minimal-notebook-py36:2.5.1':
       notebook_dir = '/opt/app-root/src'
    elif self.image == 'quay.io/thoth-station/s2i-minimal-py38-notebook:v1.0.0':
       notebook_dir = '/opt/app-root/src'
    else:
       notebook_dir = '/home/jovyan'
    self.notebook_dir = notebook_dir
    self.volumes = {'jupyterhub-user-{username}':notebook_dir}
    self.volumes['jupyterhub-user-{username}'] = notebook_dir + '/work'
    self.log.info( "<<start self.volumes>> %s", self.volumes)
    return super().start()

c.JupyterHub.spawner_class = DemoFormSpawner
c.DemoFormSpawner.remove = True
c.DemoFormSpawner.default_url = '/lab'
c.DemoFormSpawner.start_timeout = 300
c.DemoFormSpawner.http_timeout = 120
c.DemoFormSpawner.network_name = 'jupyterhub'
c.DemoFormSpawner.debug = True
「jupyterhub_config.py」の準備ができたら、以下のコマンドでJupyterHubをOSプロセスとして起動します。
- プロキシはJupyterHubを起動すると、その裏側で起動されます。
- JupyterLabはユーザがログイン&コンテナイメージを選択すると、JupyterHubから起動されます。
jupyterhub --config=jupyterhub_config.py
動作確認
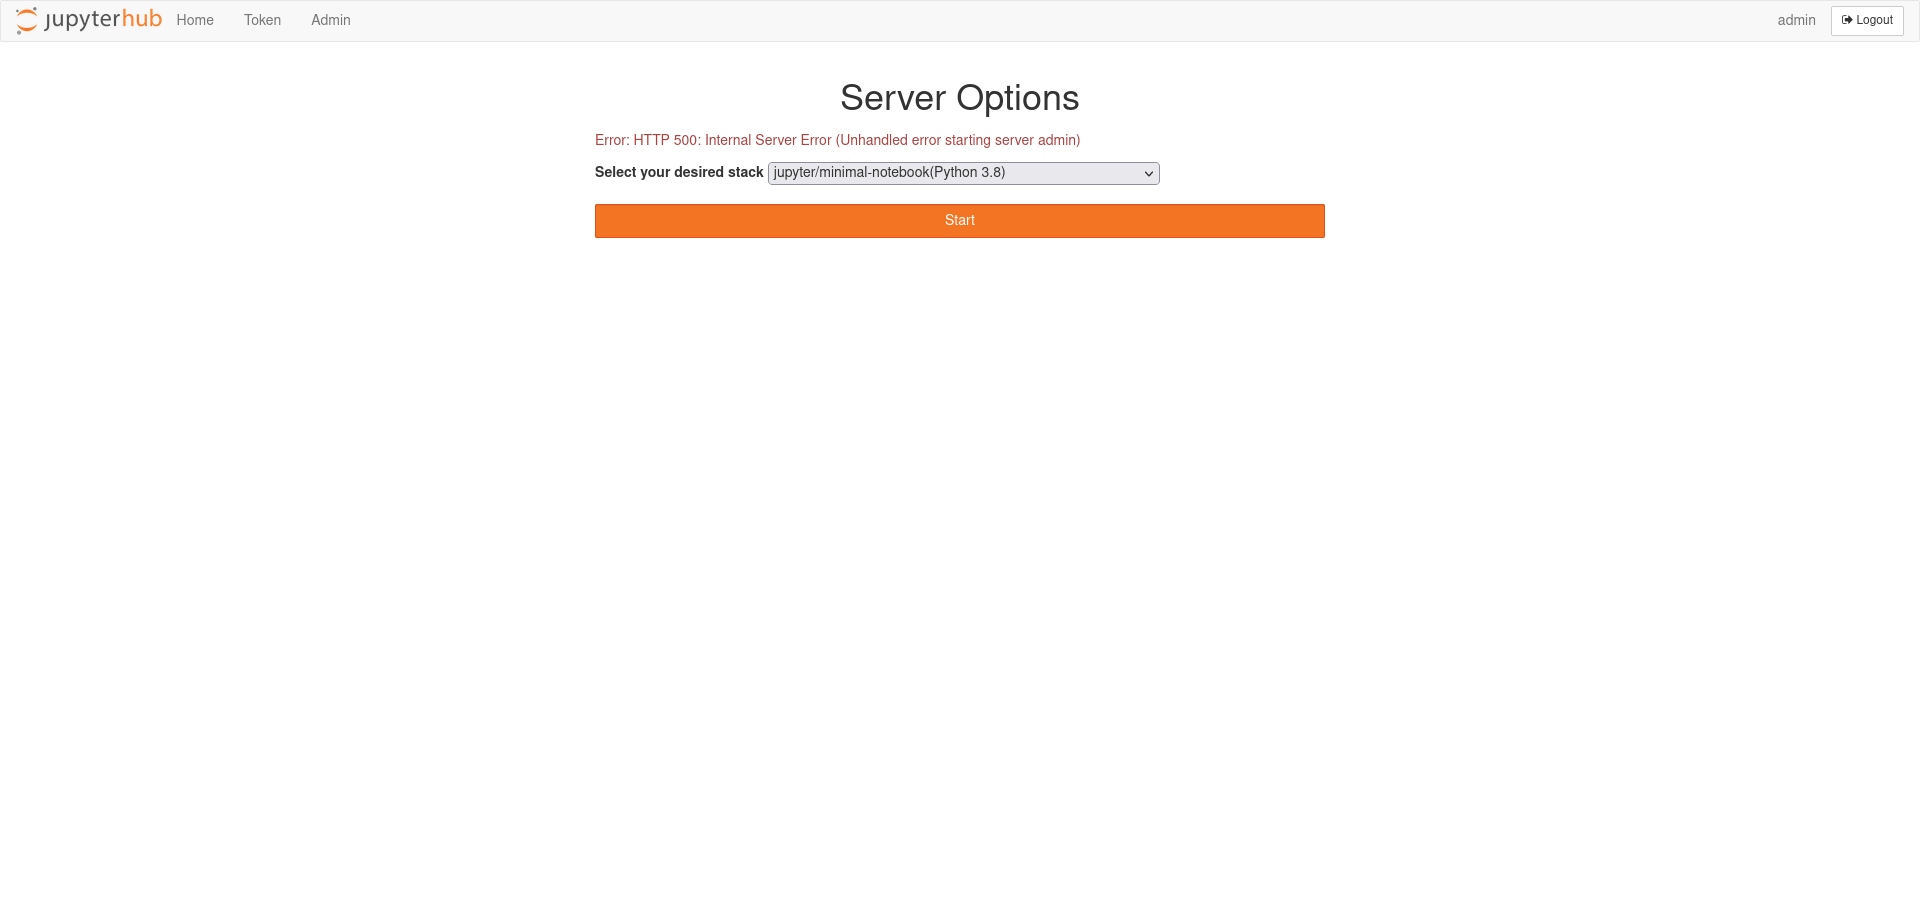
Webブラウザで接続してみると、、、
ログインはOK。コンテナイメージを選択して「Start」ボタンを押下してみると、、、
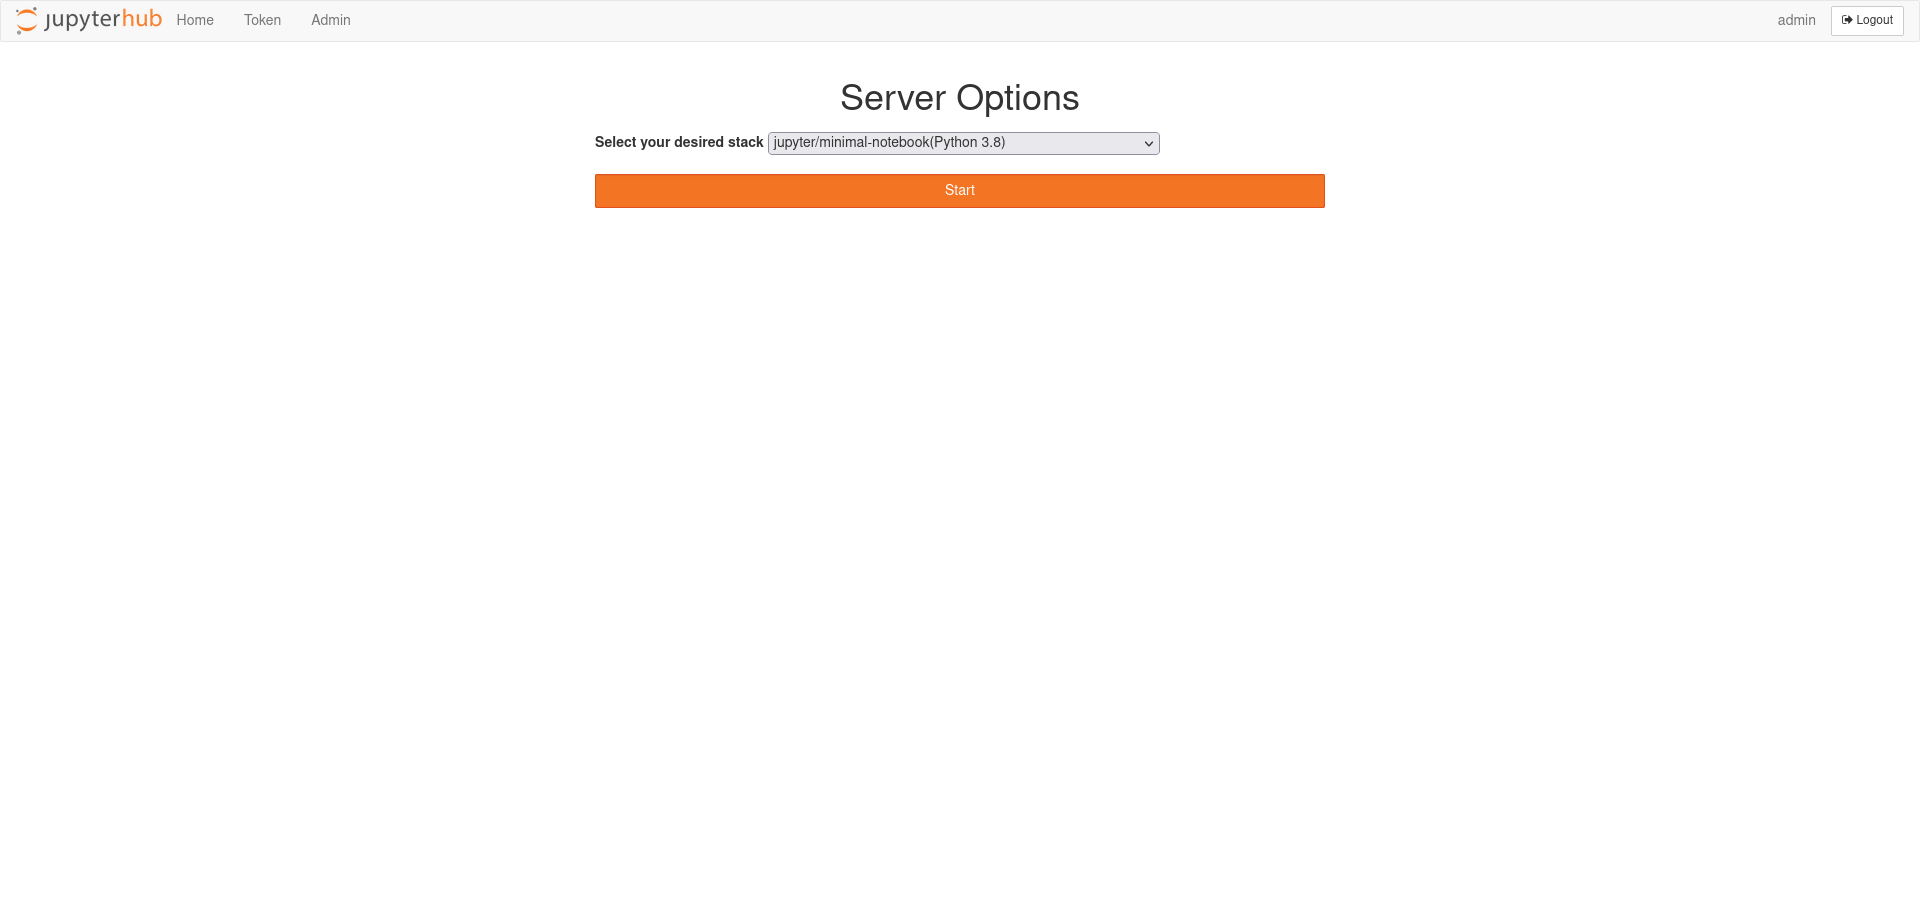
JupyterLabコンテナ起動はNG。
Podmanのインストール その②
「Using Podman1」の節で案内する設定を施してゆきます。
podman system service --time=0 &
export DOCKER_HOST=unix://$XDG_RUNTIME_DIR/podman/podman.sock
# Run jupyterhub as normal
jupyterhub --config=jupyterhub_config.py
Podmanをサービングして、、、
(設定方法はいくつかあるため6、好きな方法でOKです。)
[root@centos8 ~]# systemctl status podman.socket
● podman.socket - Podman API Socket
   Loaded: loaded (/usr/lib/systemd/system/podman.socket; disabled; vendor preset: disabled)
   Active: inactive (dead)
     Docs: man:podman-system-service(1)
   Listen: /run/podman/podman.sock (Stream)
[root@centos8 ~]# systemctl --now enable podman.socket
Created symlink /etc/systemd/system/sockets.target.wants/podman.socket → /usr/lib/systemd/system/podman.socket.
[root@centos8 ~]# systemctl status podman.socket
● podman.socket - Podman API Socket
   Loaded: loaded (/usr/lib/systemd/system/podman.socket; enabled; vendor preset: disabled)
   Active: active (listening) since Tue 2023-07-16 14:34:36 JST; 1s ago
     Docs: man:podman-system-service(1)
   Listen: /run/podman/podman.sock (Stream)
    Tasks: 0 (limit: 100620)
   Memory: 0B
   CGroup: /system.slice/podman.socket

 7月 16 14:34:36 centos8 systemd[1]: Listening on Podman API Socket.
環境変数を定義して、、、
(直前のコマンド実行結果、Listenの項目値です。)
export DOCKER_HOST=unix://run/podman/podman.sock
改めて、以下のコマンドでJupyterHubをOSプロセスとして起動します。
jupyterhub --config=jupyterhub_config.py
動作確認 その②
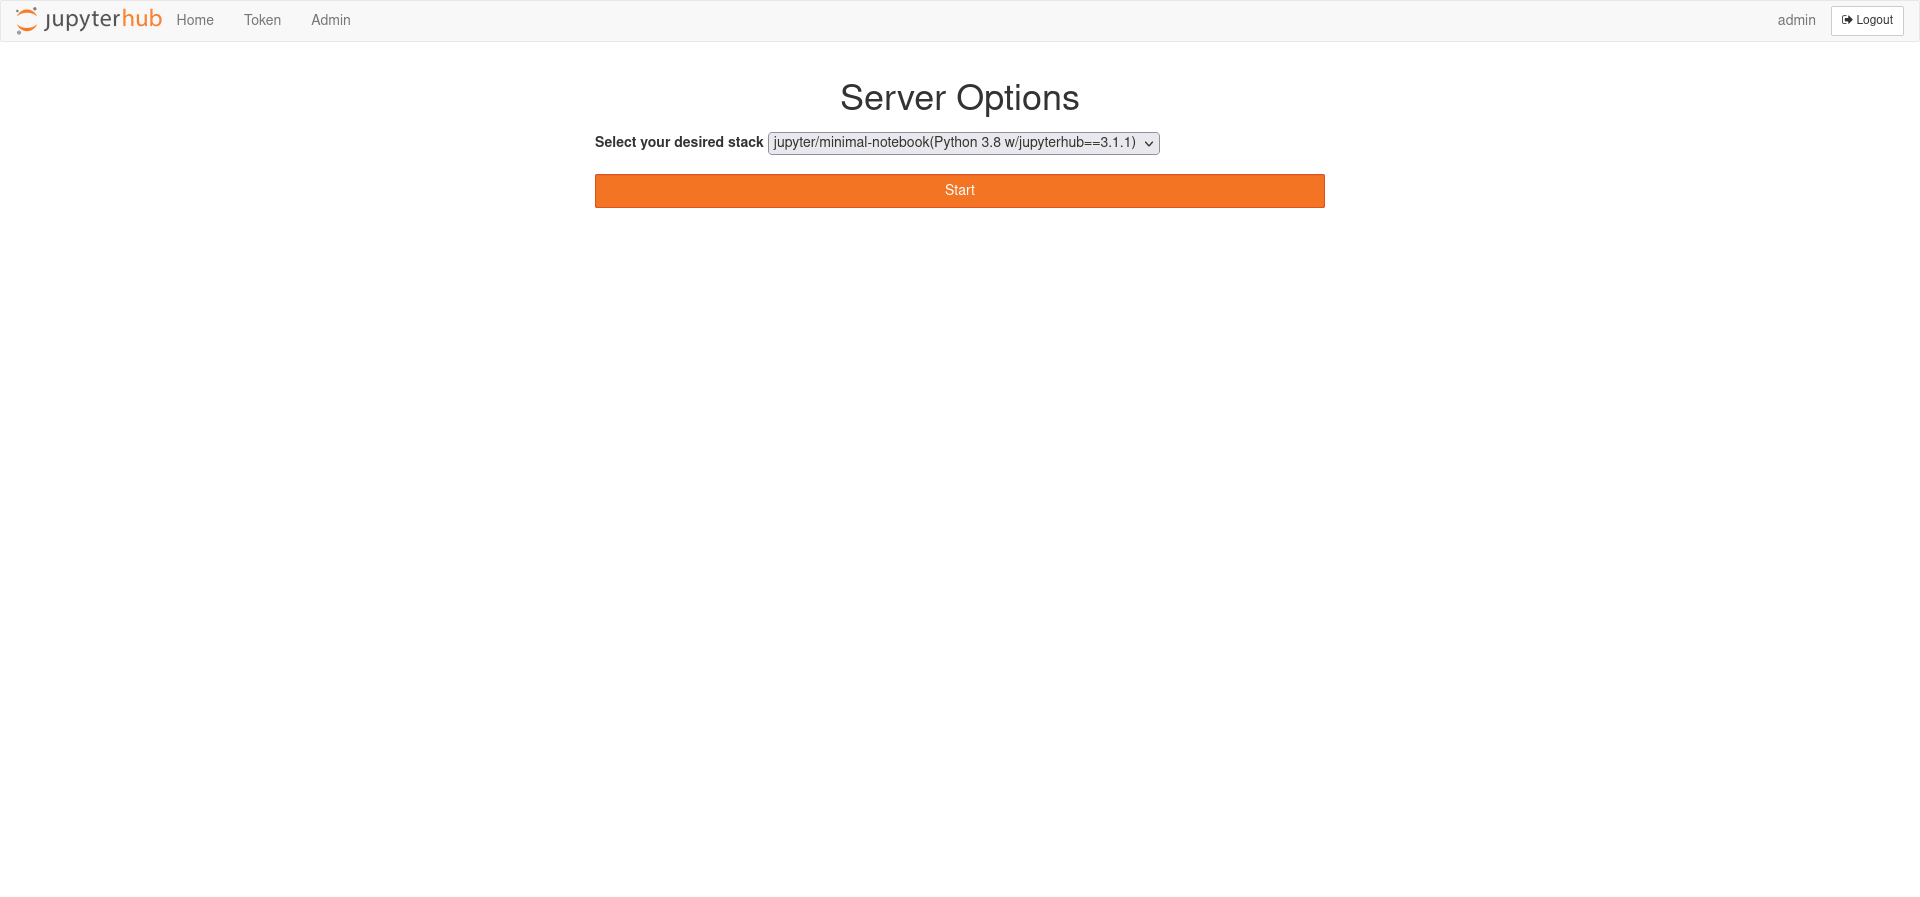
コンテナイメージを選択して「Start」ボタンを押下してみると、、、
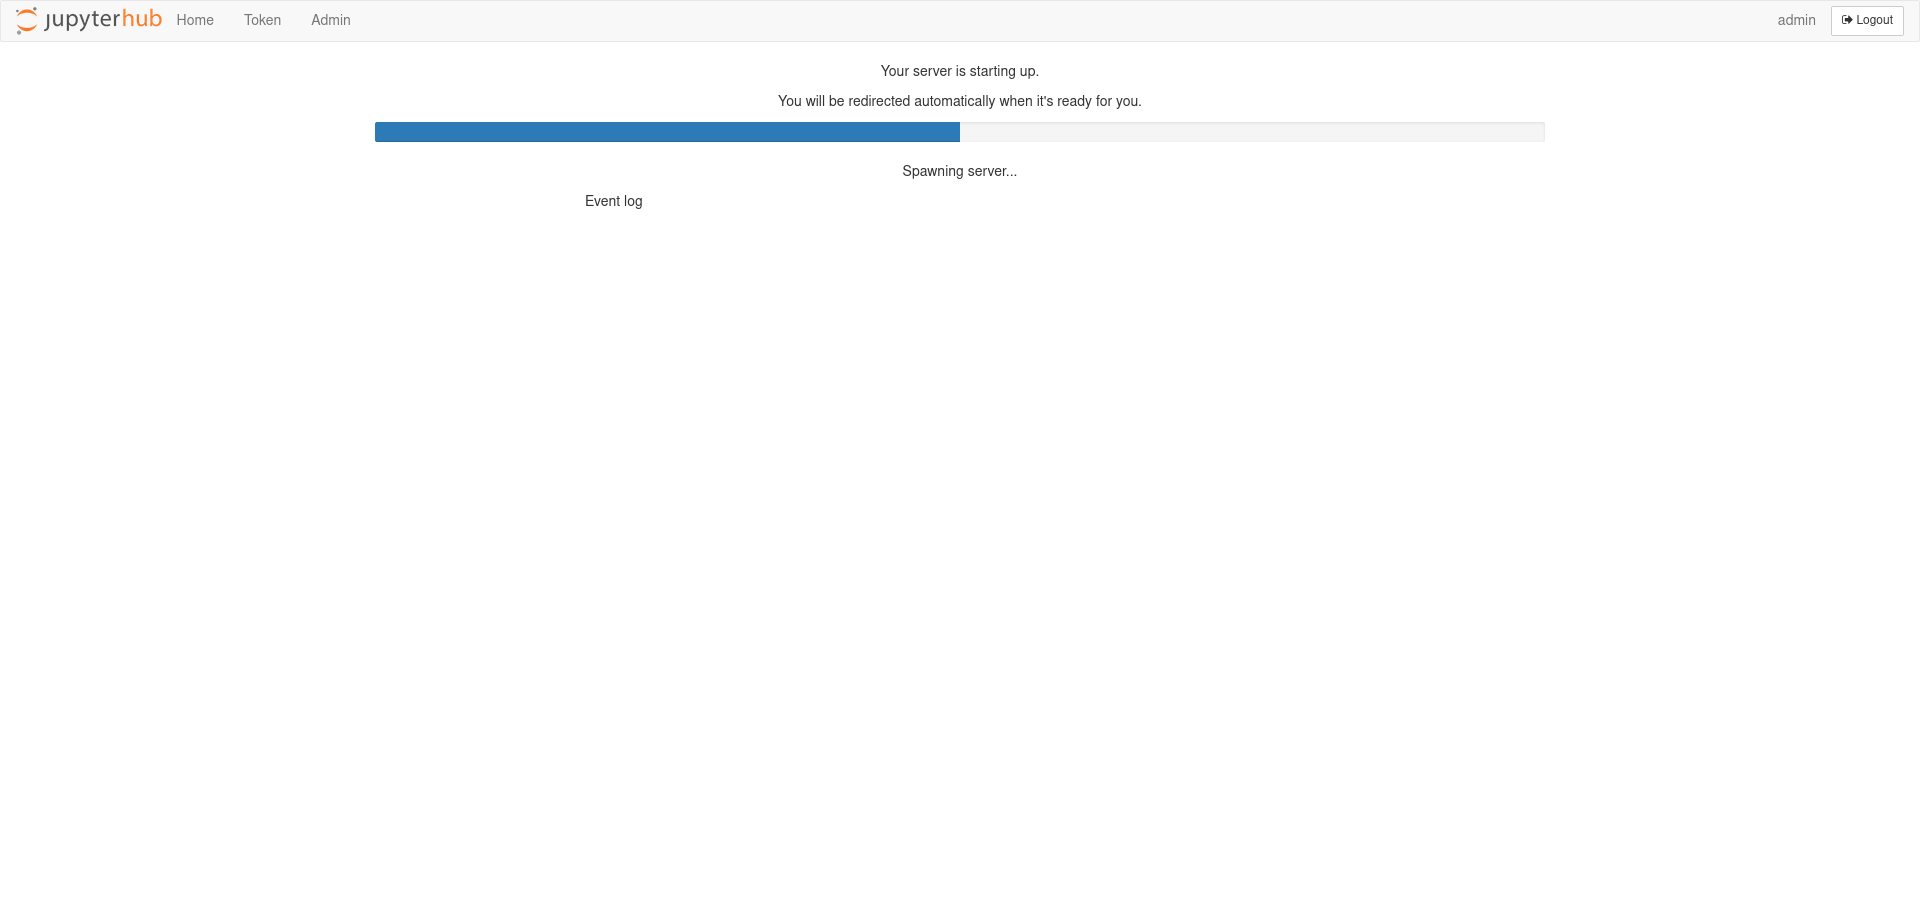
Errorで同じ画面に留まることなく、JupyterLabコンテナを起動して、、、
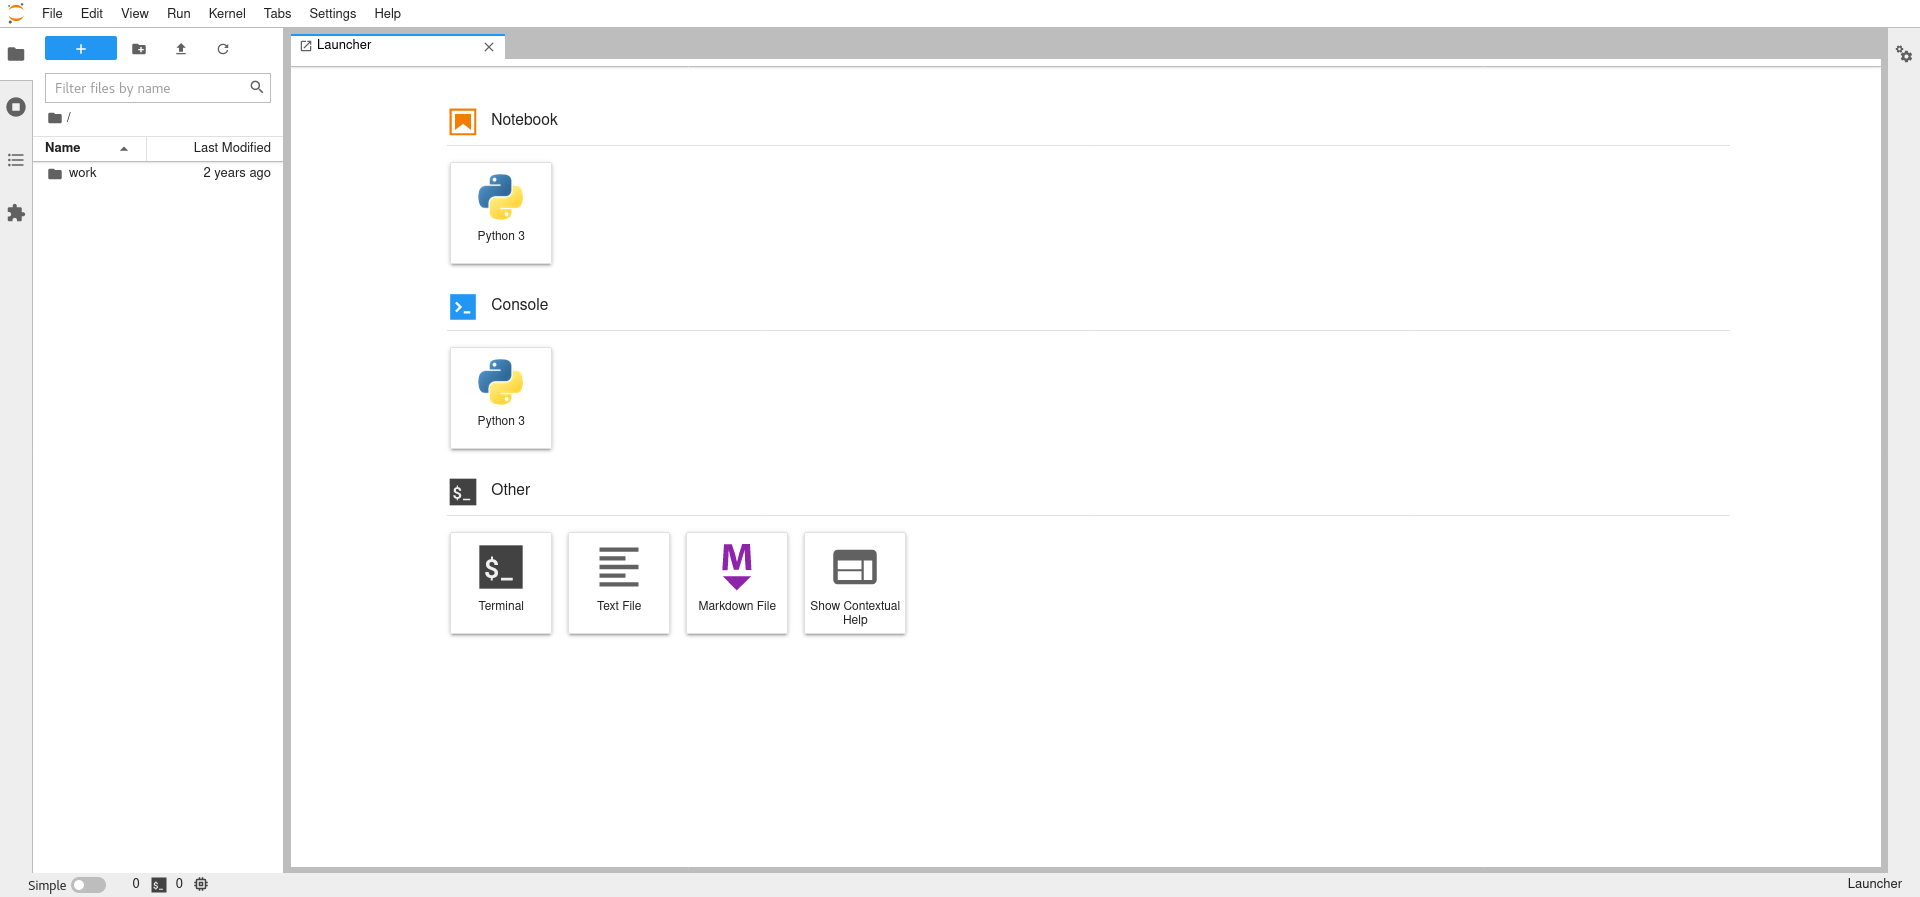
JupyterLabコンテナ起動が無事に完了!おめでとう!!
Notebook(Pythonコード)
GitHubで公開しています。
まとめ
本稿ではCentOS Stream 8のインストールおよびPodmanのインストールを進めました。
そして、JupyterHub on Podmanに挑戦し、何とか動く状態を確認できました。
が、JupyterHubさん本家からサポートされない方式ではあるので、注意が必要という結論でした。
JupyterHubさん本家のDoc78にて、公式サポートの吉報をみんなで待ちましょう!
あと、細々とした設定方式(podman.sockのアクセス権やら、JupyterHub自体のコンテナ起動やら)が残ってそうですが、それらはまた機会があれば。
-
Using Podman | https://jupyterhub-dockerspawner.readthedocs.io/en/latest/spawner-types.html#using-podman ↩ ↩2
-
CentOS Download | https://www.centos.org/download/ ↩
-
CentOS Mirrors List | http://isoredirect.centos.org/centos/8-stream/isos/x86_64/ ↩
-
Changelog - JupyterHub documentation | https://jupyterhub.readthedocs.io/en/stable/reference/changelog.html ↩
-
Changes in DockerSpawner | https://jupyterhub-dockerspawner.readthedocs.io/en/latest/changelog.html ↩
-
podman-system-service - Podman documentation | https://docs.podman.io/en/latest/markdown/podman-system-service.1.html ↩
-
JupyterHub - JupyterHub documentation | https://jupyterhub.readthedocs.io/en/stable/ ↩
-
GitHub - jupyterhub/jupyterhub: Multi-user server for Jupyter notebooks | https://github.com/jupyterhub/jupyterhub ↩