はじめに
この2~3か月くらい、筆者は仕事でデータ収集(BeautifulSoupやSeleniumを使ったWebスクレイピング)と自然言語処理(MeCabを使った形態素解析とgensim使った単語の分散表現と感情分析)をする機会が増えてます。
過去の記事(※1)では、WSL上でGPUの使える分析環境を整備したのですが、用途に合わせた環境がまだまだ整っておらずちょっと仕事関係のプログラミングには使えてませんでした。
Pythonライブラリはpipコマンドで(PyPI参照して)インストールも簡単なのですが、SeleniumやMeCabはpipコマンド以外のインストール作業があったりで正直大変。。。
というわけで、SeleniumとMeCabを使えるコンテナイメージをビルドして、分析環境で使えるようにしようと思い立ちました。
Webブラウザ(Google Chrome)のVerupが進むと、Selenium(ChromeDriver)との整合性が崩れて動かなくなったりもするので、環境凍結という意味でもコンテナイメージに押し固めておくと便利かもと思った次第でして。
そこで、本稿では、**「SeleniumおよびMeCabを使えるJupyterLabのコンテナイメージをビルド&コンテナ起動するJupyterHubへの環境設定」**を順に紹介してゆく。
本稿で紹介すること
- JupyterHub/JupyterLabの環境設定
- Dockerコンテナイメージのビルド based on Jupyter
- JupyterHub/JupyterLabの起動
- SeleniumおよびMeCabの動作確認
jupyterhub | Read the Docs
JupyterHub — JupyterHub 1.0.0 documentation
GitHub - jupyter/docker-stacks: Ready-to-run Docker images containing Jupyter applications
本稿で紹介しないこと
- WSL2のインストール
- Ubuntuのインストール(From Microsoft Store) ※Ubuntu 18.04.5 LTSを使用
- Dockerのインストール ※Docker Community Edition 20.10.8を使用
- Pythonライブラリ(JupyterHub、JupyterLab、Selenium、MeCab)の全般
環境構築
大きく、3ステップです。これら、WSL2/Ubuntu上で実行します。
- JupyterHub/JupyterLabの環境設定
- Dockerコンテナイメージのビルド based on Jupyter
- JupyterHub/JupyterLabの起動
事前準備
過去の記事(※1)で紹介した内容、分析環境の整備をしていること。
以下、筆者の環境です。
C:\>ver

Microsoft Windows [Version 10.0.22000.376]
C:\>nvidia-smi
Thu Jan  6 13:25:46 2022
+-----------------------------------------------------------------------------+
| NVIDIA-SMI 472.08       Driver Version: 472.08       CUDA Version: 11.4     |
|-------------------------------+----------------------+----------------------+
| GPU  Name            TCC/WDDM | Bus-Id        Disp.A | Volatile Uncorr. ECC |
| Fan  Temp  Perf  Pwr:Usage/Cap|         Memory-Usage | GPU-Util  Compute M. |
|                               |                      |               MIG M. |
|===============================+======================+======================|
|   0  NVIDIA GeForce ... WDDM  | 00000000:01:00.0  On |                  N/A |
| 42%   21C    P8    13W / 125W |    372MiB /  6144MiB |      2%      Default |
|                               |                      |                  N/A |
+-------------------------------+----------------------+----------------------+
$ cat /etc/lsb-release
DISTRIB_ID=Ubuntu
DISTRIB_RELEASE=18.04
DISTRIB_CODENAME=bionic
DISTRIB_DESCRIPTION="Ubuntu 18.04.5 LTS"
$ docker version
Client: Docker Engine - Community
 Version:           20.10.8
 API version:       1.41
 Go version:        go1.16.6
 Git commit:        3967b7d
 Built:             Fri Jul 30 19:54:08 2021
 OS/Arch:           linux/amd64
 Context:           default
 Experimental:      true

Server: Docker Engine - Community
 Engine:
  Version:          20.10.8
  API version:      1.41 (minimum version 1.12)
  Go version:       go1.16.6
  Git commit:       75249d8
  Built:            Fri Jul 30 19:52:16 2021
  OS/Arch:          linux/amd64
  Experimental:     false
 containerd:
  Version:          1.4.9
  GitCommit:        e25210fe30a0a703442421b0f60afac609f950a3
 nvidia:
  Version:          1.0.1
  GitCommit:        v1.0.1-0-g4144b63
 docker-init:
  Version:          0.19.0
  GitCommit:        de40ad0
$ sudo dpkg -l | grep -i nvidia
ii  libnvidia-container-tools      1.4.0-1                             amd64        NVIDIA container runtime library (command-line tools)
ii  libnvidia-container1:amd64     1.4.0-1                             amd64        NVIDIA container runtime library
ii  nvidia-container-runtime       3.5.0-1                             amd64        NVIDIA container runtime
ii  nvidia-container-toolkit       1.5.1-1                             amd64        NVIDIA container runtime hook
ii  nvidia-docker2                 2.6.0-1                             all          nvidia-docker CLI wrapper
DockerHub(※2)より、JupyterLabのコンテナイメージを取得しておきます。
Python 3.6を使いたいため、本稿ではjupyter/minimal-notebook:9e8682c9ea54を取得し、ビルド作業での元コンテナイメージとして利用してゆきます。
$ docker images
REPOSITORY                         TAG                       IMAGE ID       CREATED         SIZE
jupyterhub/jupyterhub              1.0-gpu                   79c33e7d70df   3 hours ago     420MB
postgres                           9.6                       131ab388dac1   4 months ago    200MB
nvcr.io/nvidia/pytorch             20.11-py3-gpu             dd53c8b61c4b   4 months ago    15.3GB
nvcr.io/nvidia/tensorflow          20.11-tf2-py3-gpu         f6aa8098fc48   4 months ago    12.3GB
adminer                            4.8.1                     4727f36d62d9   5 months ago    90MB
nvcr.io/nvidia/tensorflow          21.07-tf2-py3             887093b5693e   5 months ago    11.1GB
nvcr.io/nvidia/pytorch             21.07-py3                 7beec3ff8d35   5 months ago    15GB
nvcr.io/nvidia/tensorflow          20.11-tf2-py3             98a7952f7f9c   14 months ago   11.6GB
nvcr.io/nvidia/pytorch             20.11-py3                 ae35b2b3cad1   14 months ago   13.2GB
jupyterhub/jupyterhub              1.0                       c399e04fda3c   2 years ago     283MB
osixia/phpldapadmin                0.9.0                     78148b61fdb5   2 years ago     302MB
jupyter/minimal-notebook           2343e33dec46              c3bbd3471e39   3 years ago     2.72GB
jupyter/minimal-notebook           9e8682c9ea54              400c44c4a7a7   3 years ago     2.79GB
hrektts/fusiondirectory-openldap   1.1.9-1.2-1               7f2e4370509d   4 years ago     226MB
hrektts/fusiondirectory            0.2.0                     b56f1086a08d   4 years ago     345MB
Dockerネットワーク「jupyterhub」を作成しておきます。形態はBridgeです。
$ docker network ls
NETWORK ID     NAME         DRIVER    SCOPE
d880009721fa   bridge       bridge    local
dc9d83b0f49c   host         host      local
d26548c59f23   jupyterhub   bridge    local
18e4f9062739   none         null      local
1. JupyterHub/JupyterLabの環境設定
以下、過去の記事(※1)からの変更点です。
- SeleniumおよびMeCabを使えるJupyterLabのコンテナイメージを選択肢に登録 (該当は、先頭に*を打った2行)
以下、環境設定ファイル(jupyterhub_config.py)です。
c.JupyterHub.authenticator_class = 'ldapauthenticator.LDAPAuthenticator'
c.LDAPAuthenticator.valid_username_regex = r'^[a-z0-9][.a-z0-9_-]*$'
c.LDAPAuthenticator.use_ssl = False
c.LDAPAuthenticator.server_address = '${WSL2/Ubuntuのeth0}'
c.LDAPAuthenticator.server_port = 389
c.LDAPAuthenticator.bind_dn_template = 'uid={username},ou=people,ou=jhub,dc=hoge,dc=com'
c.LDAPAuthenticator.lookup_dn = False

c.JupyterHub.hub_connect_ip = 'jupyterhub'
c.JupyterHub.hub_ip = '0.0.0.0'
c.Authenticator.admin_users = {'admin', 'jupyter'}

from dockerspawner import DockerSpawner

class DemoFormSpawner(DockerSpawner):
  def _options_form_default(self):
    default_stack = 'jupyter/minimal-notebook'
    return """
    <label for="stack">Select your desired stack</label>
    <select name="stack" size="1">
*     <option value="jupyter/minimal-notebook:9e8682c9ea54-MeCab">jupyter/minimal-notebook(w/MeCab)</option>
*     <option value="jupyter/minimal-notebook:9e8682c9ea54-MeCab-Slum">jupyter/minimal-notebook(w/MeCab/Selenium)</option>
      <option value="nvcr.io/nvidia/tensorflow:20.11-tf2-py3-custom">nvcr.io/nvidia/tensorflow</option>
      <option value="nvcr.io/nvidia/pytorch:20.11-py3-custom">nvcr.io/nvidia/pytorch</option>
    </select>
    """.format(stack=default_stack)

  def options_from_form(self, formdata):
    options = {}
    options['stack'] = formdata['stack']
    container_image = ''.join(formdata['stack'])
    print('SPAWN: ' + container_image + 'IMAGE')
    self.image = container_image
    return options

c.JupyterHub.spawner_class = DemoFormSpawner

notebook_dir = '/home/jovyan'
c.DemoFormSpawner.notebook_dir = notebook_dir
c.DemoFormSpawner.volumes = {'jupyterhub-user-{username}':notebook_dir}
c.DemoFormSpawner.remove = True
c.DemoFormSpawner.default_url = '/lab'
c.DemoFormSpawner.start_timeout = 300
c.DemoFormSpawner.http_timeout = 120
c.DemoFormSpawner.network_name = 'jupyterhub'
2. Dockerコンテナイメージのビルド based on Jupyter
コンテナイメージは2つビルドしますが、元コンテナイメージは共通です。
jupyter/minimal-notebook
その①:MeCab版
以下、コンテナイメージのビルド用環境設定ファイル(MeCab版)です。
必要なソフトウェア(含むPythonライブラリ)は全てインターネットで取得しています。
FROM jupyter/minimal-notebook:9e8682c9ea54

USER jovyan
RUN python3 -m pip install pip==21.2.2
RUN python3 -m pip install notebook==6.0.2
RUN python3 -m pip install nbformat==5.1.3
RUN python3 -m pip install nbconvert==5.6.0
RUN python3 -m pip install nbclient==0.5.3
RUN python3 -m pip install tornado==6.0.3
RUN python3 -m pip install jupyter_client==6.1.12
RUN python3 -m pip install jupyter-core==4.6.1
RUN python3 -m pip install jupyterhub==1.0.0
RUN python3 -m pip install jupyterlab==1.2.3
RUN python3 -m pip install jupyterlab-server==1.0.6
RUN python3 -m pip install ldap3==2.7
RUN python3 -m pip install mecab-python3==1.0.1

USER root
RUN cat /etc/lsb-release
RUN apt-get update
RUN apt-get install -y iputils-ping net-tools
RUN apt-get install -y mecab libmecab-dev
RUN apt-get install -y mecab-ipadic mecab-ipadic-utf8
RUN apt-get install -y libc6-dev build-essential
以下、ビルドコマンドです。
$ docker build -t jupyter/minimal-notebook:9e8682c9ea54-MeCab -f Dockerfile.mecab.lab .
その②:MeCab+Selenium版
以下、コンテナイメージのビルド用環境設定ファイル(MeCab+Selenium版)です。
必要なソフトウェア(含むPythonライブラリ)は一部インターネットで取得しています。
SeleniumはPythonライブラリのためpipコマンドでPyPIからインストールも可能ですが、Google ChromeおよびChromeDriverと合わせて予めダウンロードしてインストールする方法としています。
Google ChromeおよびChromeDriverについては、Ver.90.0.4430.*で揃えています。
Download older versions of Google Chrome for Windows, Linux and Mac
ChromeDriver - WebDriver for Chrome - Downloads
FROM jupyter/minimal-notebook:9e8682c9ea54

COPY ./google-chrome-stable_current_amd64.deb /home/jovyan/
COPY ./selenium-3.141.0.tar.gz /home/jovyan/
COPY ./chromedriver_linux64.zip /home/jovyan/

USER jovyan
RUN python3 -m pip install pip==21.2.2
RUN python3 -m pip install notebook==6.0.2
RUN python3 -m pip install nbformat==5.1.3
RUN python3 -m pip install nbconvert==5.6.0
RUN python3 -m pip install nbclient==0.5.3
RUN python3 -m pip install tornado==6.0.3
RUN python3 -m pip install jupyter_client==6.1.12
RUN python3 -m pip install jupyter-core==4.6.1
RUN python3 -m pip install jupyterhub==1.0.0
RUN python3 -m pip install jupyterlab==1.2.3
RUN python3 -m pip install jupyterlab-server==1.0.6
RUN python3 -m pip install ldap3==2.7
RUN python3 -m pip install mecab-python3==1.0.1
RUN python3 -m pip install /home/jovyan/selenium-3.141.0.tar.gz

USER root
RUN cat /etc/lsb-release
RUN apt-get update
RUN apt-get install -y iputils-ping net-tools
RUN apt-get install -y mecab libmecab-dev
RUN apt-get install -y mecab-ipadic mecab-ipadic-utf8
RUN apt-get install -y libc6-dev build-essential
RUN dpkg -i /home/jovyan/google-chrome-stable_current_amd64.deb
RUN unzip /home/jovyan/chromedriver_linux64.zip
RUN mv /home/jovyan/chromedriver /usr/local/bin/
RUN chown root:root /usr/local/bin/chromedriver

RUN rm -rf /home/jovyan/google-chrome-stable_current_amd64.deb
RUN rm -rf /home/jovyan/selenium-3.141.0.tar.gz
RUN rm -rf /home/jovyan/chromedriver_linux64.zip
以下、ビルドコマンドです。
$ docker build -t jupyter/minimal-notebook:9e8682c9ea54-MeCab-Slum -f Dockerfile.selenium.lab .
3. JupyterHub/JupyterLabの起動
以下、環境設定(環境変数の定義)を含む起動コマンドです。
過去の記事(※1)からの変更なしです。
$ docker run -v /var/run/docker.sock:/var/run/docker.sock -p 8000:8000 -p 8001:8001 -p 8081:8081 \
  -d --name jupyterhub --net jupyterhub jupyterhub/jupyterhub:1.0-gpu
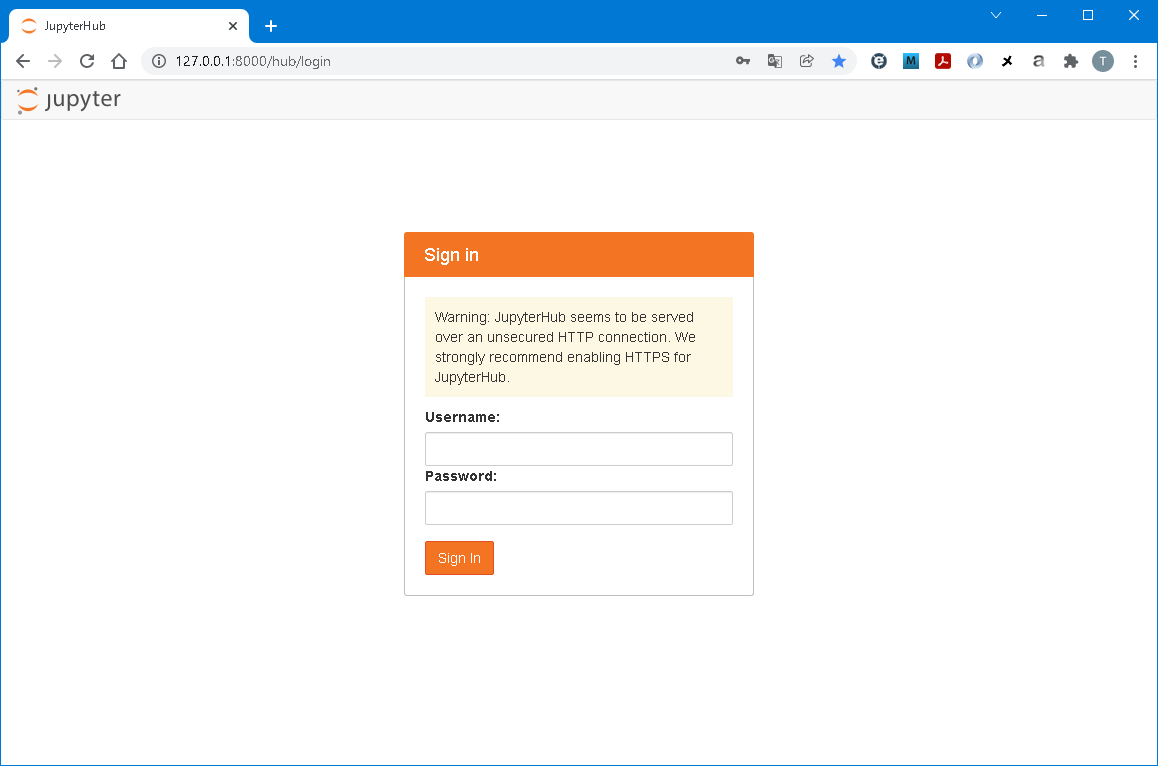
Webブラウザで http://127.0.0.1:8000/hub/login にアクセスし、JupyterHubのログイン画面が表示できればOKです。
そして、ログインすると、(起動対象の)コンテナイメージ選択画面が表示されます。
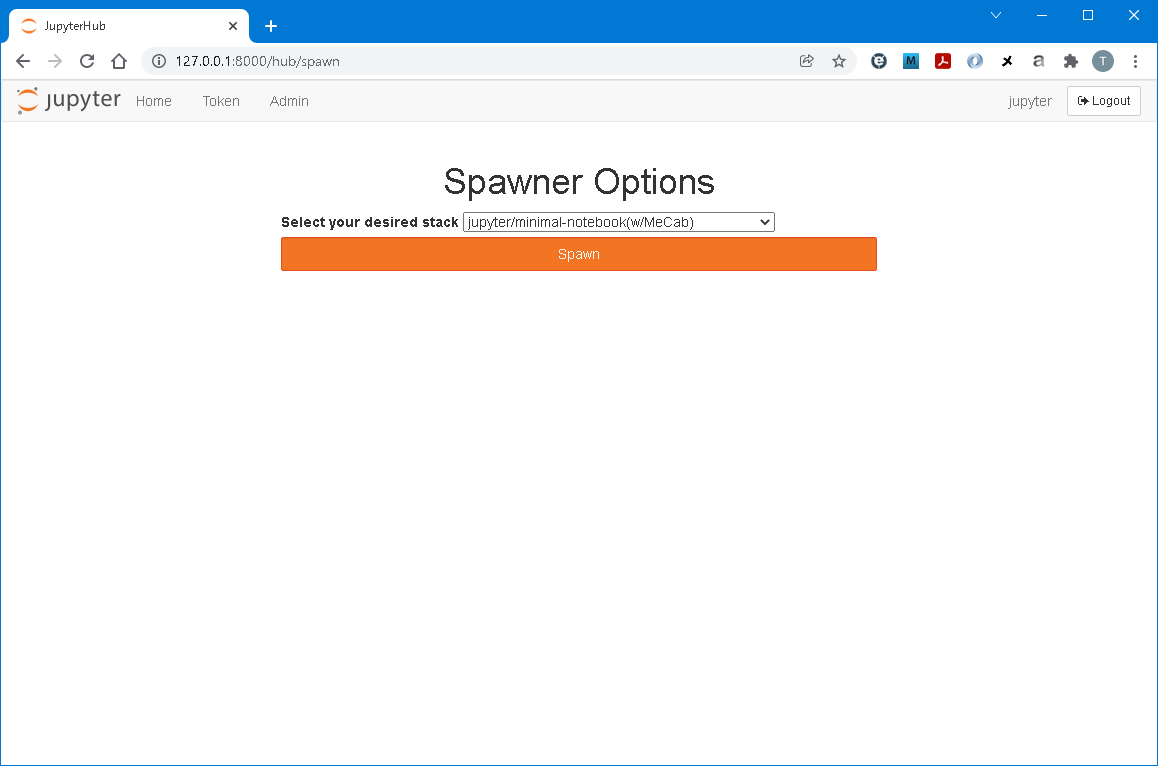
用途を鑑みてコンテナイメージを選択し、JupyterLabコンテナを起動します。

では早速、動作確認
MeCab編
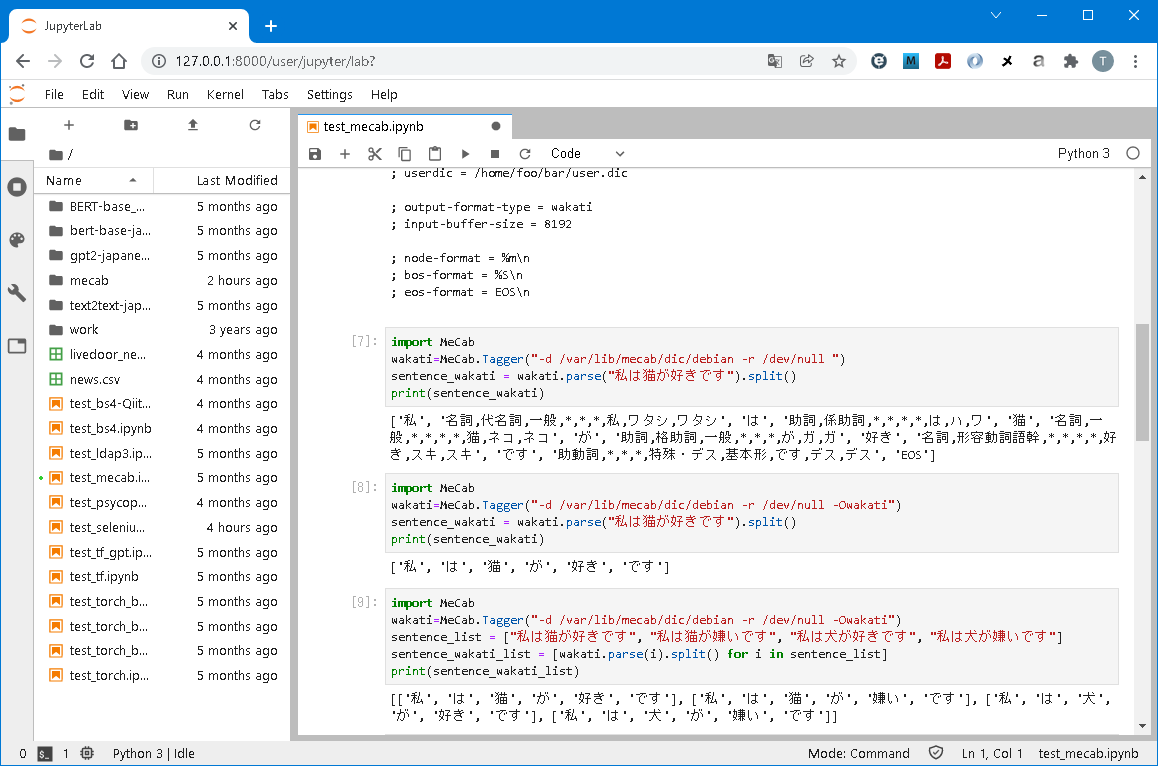
形態素解析を実行します。
以下、確認用のCode例です。分かち書きの形式で出力しています。
ポイントは、Taggerのインスタンス化オプションです。筆者環境だと、システム辞書を指定しただけだとエラーになるため、リソースファイルを指定しています(-r /etc/mecabrcでもOK)。
import MeCab
wakati = MeCab.Tagger("-d /var/lib/mecab/dic/debian -r /dev/null -Owakati")
sentence_wakati = wakati.parse("私は猫が好きです").split()
print(sentence_wakati)

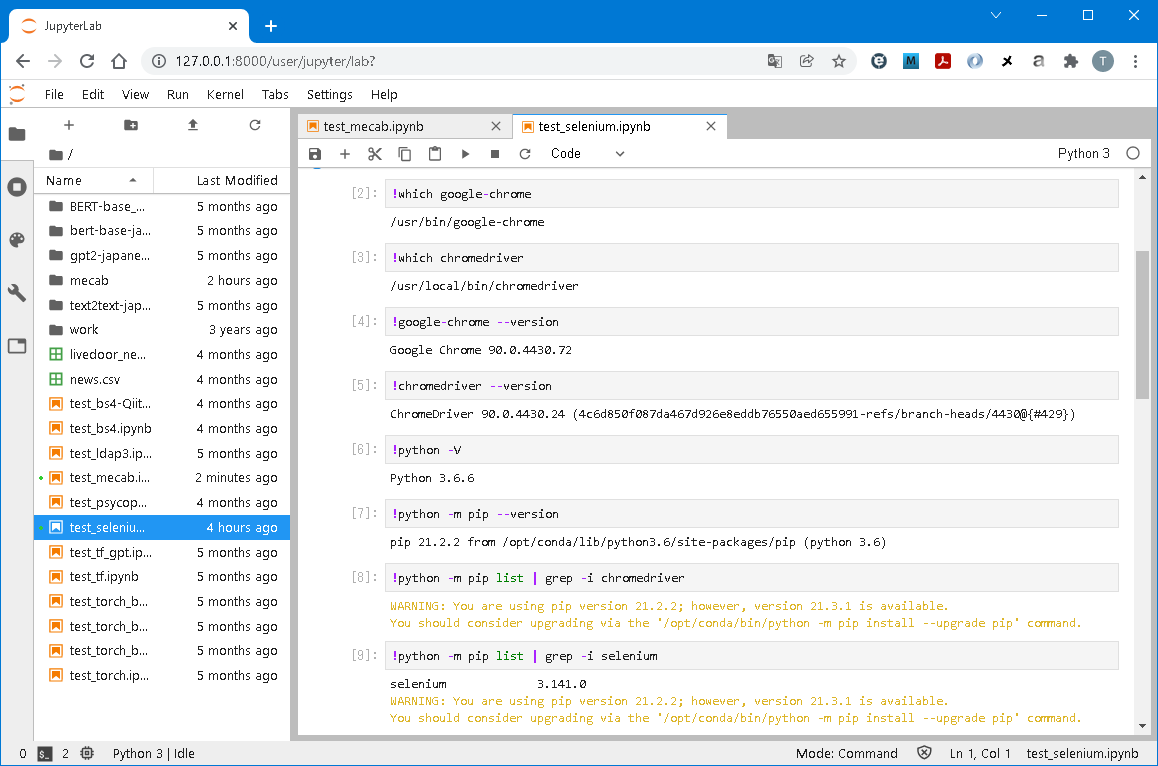
Selenium編
Webスクレイピング(元ネタは**コチラ**)を実行します。
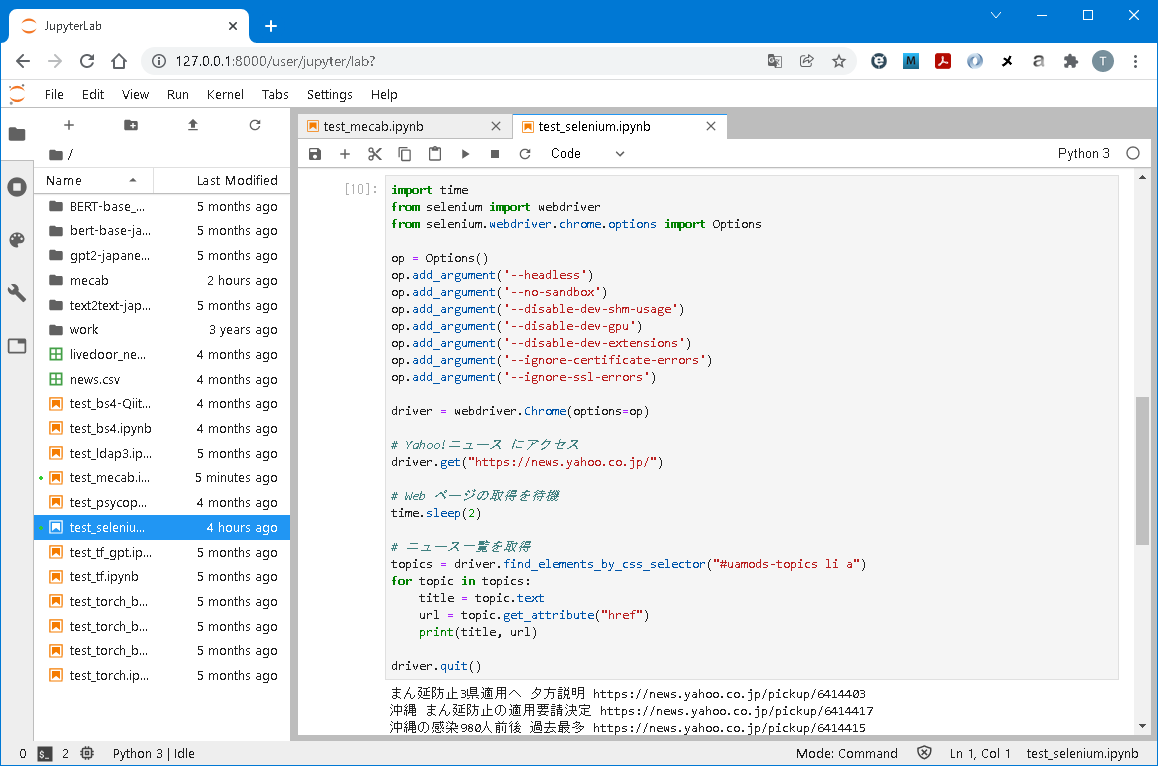
以下、確認用のCode例です。Yahoo! ニュースTopの見出しとリンク先URLを出力しています。
ポイントは、Google Chromeの起動オプションです。ヘッドレスはMUSTで、いくつか元ネタに対し追加しています。
from selenium import webdriver
from selenium.webdriver.chrome.options import Options

op = Options()
op.add_argument('--headless')
op.add_argument('--no-sandbox')
op.add_argument('--disable-dev-shm-usage')
op.add_argument('--disable-dev-gpu')
op.add_argument('--disable-dev-extensions')
op.add_argument('--ignore-certificate-errors')
op.add_argument('--ignore-ssl-errors')

driver = webdriver.Chrome(options=op)
まとめ
とりあえずは、SeleniumとMeCabを使えるJupyterLabコンテナイメージを作ることができました。問題なく、使えています。
データ分析でよく使うPythonライブラリ群を内包したコンテナイメージ(jupyter/scipy-notebook
)を使うのも一手かな。あと、Pythonのバージョンも新しくするとか。