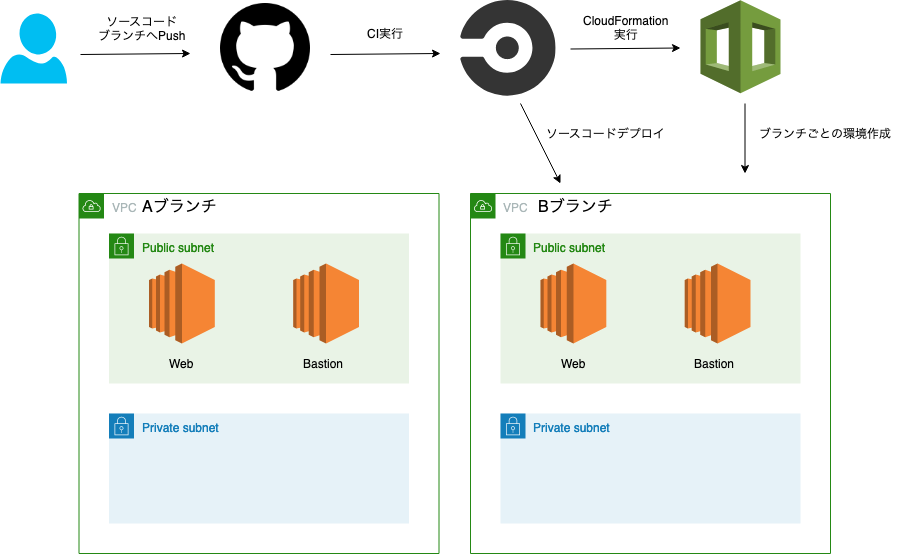
ソースコードをgithubのブランチにpushしたタイミングでAWS環境を構築したかったので試しました。
以下サンプルコードに手を加えて作成した備忘録です。
公式ドキュメント
全体構成
事前準備
CDKをローカルにインストール
npm install -g aws-cdk
雛形を作成
言語は、Typescript, Python, Java, C#から選択可能
$ mkdir cdk-ec2-builder
$ cd cdk-ec2-builder
$ cdk init app --language=typescript
ライブラリをインストール
npm i -s @aws-cdk/aws-ec2
ソースコードを編集
bin/cdk-ec2-builder.ts
# !/usr/bin/env node
import "source-map-support/register";
import cdk = require("@aws-cdk/core");
import { CdkEc2BuilderStack } from "../lib/cdk-ec2-builder-stack";

const app = new cdk.App();
new CdkEc2BuilderStack(app, "CdkEc2BuilderStack", {
  env: {
    region: "ap-northeast-1"
  }
});
最初に呼ばれるファイルです。
スタックを増やす場合、ここに記述を追加してファイル読み込みを追加します。
lib/cdk-ec2-builder-stack.ts
import { Vpc } from "@aws-cdk/aws-ec2";
import ec2 = require("@aws-cdk/aws-ec2");
import cdk = require("@aws-cdk/core");

export class CdkEc2BuilderStack extends cdk.Stack {
  constructor(scope: cdk.Construct, id: string, props?: cdk.StackProps) {
    const nameSuffix = "-" + scope.node.tryGetContext("BRANCH"); // コマンドからパラメータ BRANCH を送信したものを取得
    const stackName = "CdkEc2BuilderStack" + nameSuffix;
    super(scope, stackName, props);

    const cidrIp = "10.0.0.0/16";
    const vpc = new Vpc(this, "ExampleVpc" + nameSuffix, {
      cidr: cidrIp
    });

    const bastionSG = new ec2.SecurityGroup(
      this,
      "BastionSecurityGroup" + nameSuffix,
      {
        vpc
      }
    );
    bastionSG.addEgressRule(ec2.Peer.anyIpv4(), ec2.Port.allTraffic());
    bastionSG.addIngressRule(ec2.Peer.ipv4("0.0.0.0/0"), ec2.Port.tcp(22));

    const webSG = new ec2.SecurityGroup(this, "WebSecurityGroup" + nameSuffix, {
      vpc
    });
    webSG.addEgressRule(ec2.Peer.anyIpv4(), ec2.Port.allTraffic());
    webSG.addIngressRule(ec2.Peer.ipv4(cidrIp), ec2.Port.tcp(22));
    webSG.addIngressRule(ec2.Peer.ipv4("0.0.0.0/0"), ec2.Port.tcp(80));

    const ec2Bastion = new ec2.CfnInstance(
      this,
      "BastionInstance" + nameSuffix,
      {
        imageId: "ami-xxxxxxxxxxxxx",
        // もしAMIを使わずAmazonLinuxの標準イメージを使う場合は下記を使用
        // imageId: new ec2.AmazonLinuxImage().getImage(this).imageId,

        instanceType: "t2.micro", // インスタンスタイプを設定
        keyName: "your-aws-key-pair-name", // あらかじめキーペアを作成しておく
        networkInterfaces: [
          {
            associatePublicIpAddress: true,
            deviceIndex: "0",
            groupSet: [bastionSG.securityGroupId],
            subnetId: vpc.publicSubnets[0].subnetId
          }
        ]
      }
    );

    const ec2Instance = new ec2.CfnInstance(this, "WebInstance" + nameSuffix, {
      imageId: "ami-hogehoge",
      instanceType: "t2.micro",
      keyName: "your-aws-key-pair-name",
      networkInterfaces: [
        {
          associatePublicIpAddress: true,
          deviceIndex: "0",
          groupSet: [webSG.securityGroupId],
          subnetId: vpc.publicSubnets[0].subnetId
        }
      ]
    });

    new cdk.CfnOutput(this, "WebEC2Id", { value: ec2Instance.ref });
    new cdk.CfnOutput(this, "WebPublicIp", { value: ec2Instance.attrPublicIp });
    new cdk.CfnOutput(this, "BastionPublicIp", {
      value: ec2Bastion.attrPublicIp
    });
  }
}
ここでVPC、EC2インスタンス、セキュリティグループを作成しています。
ローカルから実行
あらかじめ、アクセスキーを使ってAWS CLIを利用できるようにしておく必要があります。
ビルド
$ yarn build
AWS上へデプロイ
$ cdk deploy -c BRANCH=hogehoge --profile hogehoge
-c オプションを用いることでパラメータを渡すことができます
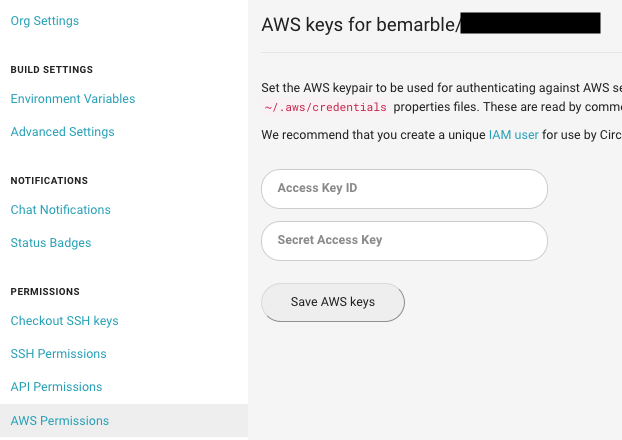
CircleCIの設定を追加
circleCI で自動的に構築するよう設定をします。
.circleci/config.yml
# Javascript Node CircleCI 2.0 configuration file
#
# Check https://circleci.com/docs/2.0/language-javascript/ for more details
#
version: 2
jobs:
  build:
    docker:
      # specify the version you desire here
      - image: circleci/node:10.15

    working_directory: ~/repo

    steps:
      - checkout

      # Download and cache dependencies
      - restore_cache:
          keys:
            - v1-dependencies-{{ checksum "package.json" }}
            # fallback to using the latest cache if no exact match is found
            - v1-dependencies-

      - run: yarn install

      - save_cache:
          paths:
            - node_modules
          key: v1-dependencies-{{ checksum "package.json" }}

      - run:
          name: Install aws-cli
          command: |
            sudo apt update
            sudo apt install -y awscli

      - run:
          name: Build
          command: |
            yarn run build

      - run:
          name: doctor
          command: |
            yarn run cdk doctor

      - deploy:
          name: Deployment
          command: |
            yarn run cdk deploy -c BRANCH=${CIRCLE_BRANCH} --require-approval never --profile default
       # ソースコードの設置は割愛

