はじめに
前回は最小構成でコードを組んでいました。
様々なケースに対抗できるように組んでもいいですが、構成を複雑にし過ぎても理解するのも大変なので、前回は起動の最小構成でしたが、運用するうえで最低限の構成を組みます。
Flask の運用構成
Electronで1つのアプリケーションとして用いるため、階層は浅く、それでいて設定や操作をその都度構成を変更しなくて済む構成を作る。
flask_electron_app
├ common
│ └ models --- モデル
│ └ model.py --- 名称は各項目に合わせる。
├ instance
│ └ config --- 設定フォルダ
│ ├ development.py --- 開発環境用設定
│ └ production.py --- 本番環境用設定
├ logic --- コントローラ
│ ├ auth.py
│ └ ・・・
├ static --- 静的ファイル置き場所
│ └ css --- CSS フォルダ
│ └ js --- Javascript フォルダ
│ └ img --- 画像フォルダ
├ templates --- テンプレート
│ ├ common
│ │ └ layout.html
│ └ index.html
├ app.py --- アプリ起動からルーティング用ファイル
└ setting.py --- 開発・本番用の環境設定
Electron の運用構成
Electronの起動とファイル起動、バージョン確認ができるように構成。それにならってElectronのAPIが起動できる。
Electronの設定したファイル構成が以下の通りです。
flask_electron_app
├ static --- 静的ファイル置き場所
│ └ js --- Javascript フォルダ
│ │ app.js --- アプリ起動後用のJavascriptファイル
│ └ preload.js --- レンダラープロセスが読み込まれる前に実行される定義・設定ファイル
├ templates --- テンプレート
│ ├ common
│ │ └ layout.html
│ └ index.html
└ index.js --- electron起動ファイル
ソースコードサンプル
全体のサンプルコードはGithubにて掲載しています。ここでは主要な変更点のみ説明します。
1. Flask: app.py 設定ファイル
開発用と本番用で setteings.py ファイルからパラメータ分け、起動前に「ENV」のパラメータを「development」(開発)または「production」(本番)に設定することで起動時のパラメータが変わる。
サンプルコードの以下ので制御している。
# 標準設定ファイル読み込み
app.config.from_object("settings")

# 非公開設定ファイル読み込み
if app.config["ENV"] == "development":
    app.config.from_pyfile(os.path.join("config", "development.py"), silent=True)
else:
    app.config.from_pyfile(os.path.join("config", "production.py"), silent=True)
設定ファイルは以下のような書き方をして指定する。
# 開発用
class Development(object):
    ENV = 'development'
    DEBUG=True
    MYSQL_ADDRESS='127.0.0.1'
    MYSQL_USER='root'
    MYSQL_PASSWORD='password'
    MYSQL_PORT=3306
    MYSQL_DATABASE='hogepiyodb'

# 本番用
class Production(Development):
    ENV = 'production'
    DEBUG = False
    MYSQL_ADDRESS='63.31.125.212'
2. Flask: HTMLファイルの全体レイアウト作成・読み込み
layout.html に全体の共通項目を出し、それぞれのページで読み込むことで書く量と保守がしやすいFlask的な構成に変更。
以下のようにファイルを作る。
<!doctype html>
<html lang="en">
<head>
    <!-- Required meta tags -->
    <meta charset="utf-8">
    <meta name="viewport" content="width=device-width, initial-scale=1">

    <!-- Bootstrap CSS -->
    <link href="https://cdn.jsdelivr.net/npm/bootstrap@5.0.2/dist/css/bootstrap.min.css" rel="stylesheet" integrity="sha384-EVSTQN3/azprG1Anm3QDgpJLIm9Nao0Yz1ztcQTwFspd3yD65VohhpuuCOmLASjC" crossorigin="anonymous">

    <title>QiitaSample</title>
</head>
<body>
    <div class="collapse" id="navbarToggleExternalContent">
    <div class="bg-dark p-4">
        <h5 class="text-white h4">Collapsed content</h5>
        <span class="text-muted">Toggleable via the navbar brand.</span>
        <div><a href="/"  class="btn btn-outline-danger">Home</a></div>
        <div><a href="/dashboard" class="btn btn-outline-danger">dashboard</a></div>
    </div>
    </div>
    <nav class="navbar navbar-dark bg-dark">
    <div class="container-fluid">
        <button class="navbar-toggler" type="button" data-bs-toggle="collapse" data-bs-target="#navbarToggleExternalContent" aria-controls="navbarToggleExternalContent" aria-expanded="false" aria-label="Toggle navigation">
        <span class="navbar-toggler-icon"></span>
        </button>
    </div>
    </nav>

    {% block content %}{% endblock %}

    <!-- Optional JavaScript; choose one of the two! -->

    <!-- Option 1: Bootstrap Bundle with Popper -->
    <script src="https://cdn.jsdelivr.net/npm/bootstrap@5.0.2/dist/js/bootstrap.bundle.min.js" integrity="sha384-MrcW6ZMFYlzcLA8Nl+NtUVF0sA7MsXsP1UyJoMp4YLEuNSfAP+JcXn/tWtIaxVXM" crossorigin="anonymous"></script>

    <!-- Option 2: Separate Popper and Bootstrap JS -->
    <!--
    <script src="https://cdn.jsdelivr.net/npm/@popperjs/core@2.9.2/dist/umd/popper.min.js" integrity="sha384-IQsoLXl5PILFhosVNubq5LC7Qb9DXgDA9i+tQ8Zj3iwWAwPtgFTxbJ8NT4GN1R8p" crossorigin="anonymous"></script>
    <script src="https://cdn.jsdelivr.net/npm/bootstrap@5.0.2/dist/js/bootstrap.min.js" integrity="sha384-cVKIPhGWiC2Al4u+LWgxfKTRIcfu0JTxR+EQDz/bgldoEyl4H0zUF0QKbrJ0EcQF" crossorigin="anonymous"></script>
    -->
    <script src="{{ url_for("static", filename="js/app.js") }}"></script>
  </body>
</html>
layout.html にある 「content」をに挿入するファイルを書き込む
また、「extends」で layout.html ファイルを指定して読み込む
{% extends "common/layout.html" %}

{% block content %}
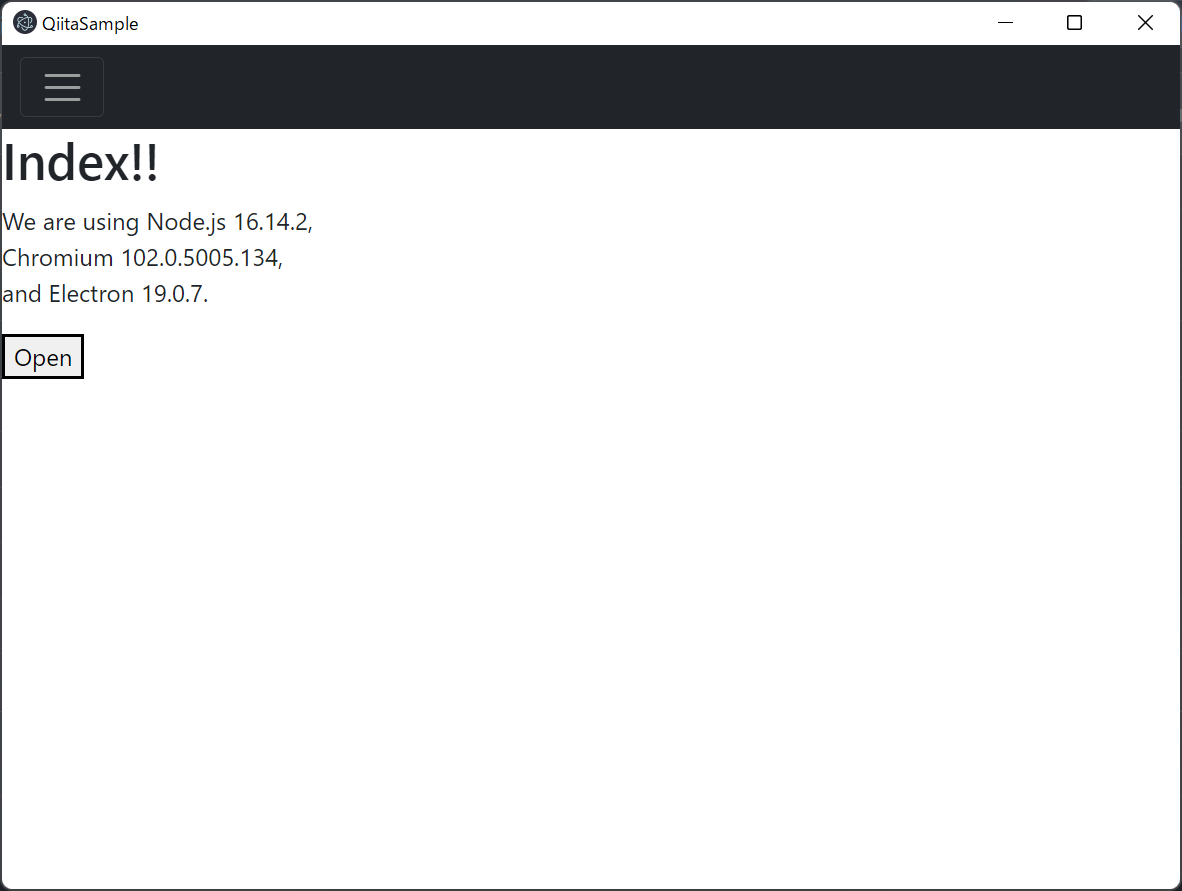
  <h1>Index!!</h1>
  <p>
    We are using Node.js <span id="node-version"></span>,<br />
    Chromium <span id="chrome-version"></span>,<br />
    and Electron <span id="electron-version"></span>.
  </p>
  <button id="button">Open</button>
  <p id="text"></p>
{% endblock %}
3. Electron: 全てのウィンドウが閉じたときの処理を追加
この処理で Window が閉じたとき、アプリが終了するように制御する。
app.on("window-all-closed", () => {
  // macOSのとき以外はアプリケーションを終了させます
  if (process.platform !== "darwin") {
    app.quit();
  }
});
4. Electron: ダイアログ作成
ファイル選択をするダイアログを出力する用のイベント制御を追加。BootStrap5にダイアログの機能はあるのですが、Bootstrapを使わなかったり、他にElelctronの機能を足す参考にするために構成に入れておきます。
const { app, BrowserWindow, ipcMain, dialog } = require('electron');
  ipcMain.handle('open-dialog', async (_e, _arg) => {
    return dialog
      .showOpenDialog(mainWindow, {
        properties: ['openFile'],
      })
      .then((result) => {
        if (result.canceled) return '';
        return result.filePaths[0];
      });
  });
const { ipcRenderer, contextBridge } = require('electron');

contextBridge.exposeInMainWorld('myAPI', {
  openDialog: async () => ipcRenderer.invoke('open-dialog'),
});
イベント操作の制御
const button = document.getElementById('button');
const text = document.getElementById('text');

button.addEventListener('click', async () => {
  text.textContent = await window.myAPI.openDialog();
});
4. Electron: バージョン表示
開発バージョン表示のための値をセット
window.addEventListener("DOMContentLoaded", () => {
  // DOM要素のテキストを変更
  const replaceText = (selector, text) => {
    const element = document.getElementById(selector);
    if (element) {
      element.textContent = text;
    }
  };

  for (const dependency of ["chrome", "node", "electron"]) {
    // HTMLページ内の文言を差し替え
    replaceText(`${dependency}-version`, process.versions[dependency]);
  }
});
各それぞれの span に preload.js で設定した値が入る。
  <p>
    We are using Node.js <span id="node-version"></span>,<br />
    Chromium <span id="chrome-version"></span>,<br />
    and Electron <span id="electron-version"></span>.
  </p>
結果
まとめ
今回、Electron から API が起動できるようにし、実際に落ちた時の処理も書きました。Flaskからは設定ファイルを用意し、開発と本番用に分け、開発時にのみ動作させてい処理を書き込めるようにいたしました。また、HTMLの構成も変更したので、よりFlask的になったのではないでしょうか。
次回はできれば実際に何か作って紹介しようと思いますが、時間が思いのほか経ってしまった場合は何か挟む予定です。
では、また次回に。。

