追記 2020.01.22
画像も投稿できるようにしました。
(https://qiita.com/BIG_LARGE_STONE/items/1de2120a318539d33650)
はじめに
研究室でSlackを導入してから2年くらい経ちました。
話題でチャンネルを分けれるので非常に便利です。
雑談用のチャンネルもあるのですが、特定の人ばかり話していて盛り上がりに欠けます。
「匿名ならみんな発言してくれるかも」と思ったのがきっかけで、匿名用のチャンネルを作りました。
Googleで検索したら3年前のQiitaの以下の記事がヒットしました。
「超簡単にSlackで匿名の意見を投稿できるようにする」 @shibukk
**「超簡単」**とありますが、記事通りにやっても上手くいかず、少しだけ苦労しました。
BotKitのバージョンが上がって中身が変わっていたのが原因でした。
修正した部分を自分の備忘録としてまとめておきます。
実行環境はUbuntu16.04。
node.js, javascriptが動けばどこでも大丈夫なはずです。
SlackのBotの作成
ここは元の記事と一緒です。
「Botを追加する」
ここをクリックすると、現在ログインしているワークスペースでBotを作ることができます。
(「ワークスペースの管理者」じゃないと作れないかも・・・)
今回はBotの名前を"anonymous_bot"にします。
API Tokenを後で使うのでコピーしておいてください。
漏れると悪用される恐れがあるので扱いには注意してください。(もしもの場合は再発行してください)
チャンネルIDを取得
ここから手順が少し変わります。
以下のURLから匿名で会話したいチャンネルのIDを探してください。
https://slack.com/api/channels.list?token=さっき取得したAPI_Token
※2020/05/18修正
上記のURLの使用は現在、非推奨となっているそうです。
代わりに以下のURLからIDを取得してください。
https://slack.com/api/conversations.list?token=さっき取得したAPI_Token
ちなみにチャンネル以外にも、特定のユーザーやプライベートチャンネルのIDも取得できます。
BotKitのインストール
次にBotKitをインストールします。
以下の手順に従ってください。
//ディレクトリの作成
$ cd ~
$ mkdir slack_anonymous_bot
$ cd slack_anonymous_bot

//botkitをclone
$ git clone https://github.com/howdyai/botkit.git
$ cd botkit

//branchを移動
$ git checkout origin/legacy

//インストール
$ npm install

//もしインストールできなかったら・・・
$ npm audit fix
$ npm install
~/botkit/example/slack_bot.js が生成されていれば成功です。
プログラムの作成
以下の手順に従ってください。
//ディレクトリの移動
$ cd ~
$ cd slack_anonymous_bot/botkit/

//anonymous_bot.jsの作成
$ touch anonymous_bot.js
anonymous_bot.jsに以下のコードをコピペしてください。
var Botkit = require("./lib/Botkit.js"); //パス注意
var os = require("os");

var controller = Botkit.slackbot({
    debug: true,
});

var bot = controller.spawn({
    token: "先ほど取得したAPI_TOKEN"
}).startRTM();

controller.on("direct_message", (bot, message) => {
    var now = new Date(); //時刻の取得
    var user_name = "名無しさん: "+ now.getFullYear()+"/"+(now.getMonth()+1)+"/"+now.getDate()+"/ "+now.getHours()+":"+now.getMinutes()+":"+now.getSeconds();

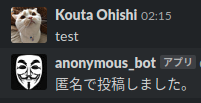
    bot.reply(message, "匿名で投稿しました.");

    bot.startConversation({  channel : "先ほど取得したチャンネルID" }, (err, convo) => {
        var send_message = {
          type: "message",
          channel: "先ほど取得したチャンネルID",
          text: message.text,
          username: user_name,
          thread_ts: null,
          reply_broadcast: null,
          parse: null,
          link_names: null,
          attachments: null,
          unfurl_links: null,
          unfurl_media: null,
          icon_url: null,
          icon_emoji: ":robot_face:",
          as_user: true
        }
        convo.say(send_message);
    });
});
スクリプトの実行方法
//デバッグしたいときは
$ cd ~/slack_anonymous_bot/botkit
$ node anonymous_bot.js

//通常時
$ cd ~/slack_anonymous_bot/botkit
$ forever start anonymous_bot.js
$ forever stop anonymous_bot.js ←止めたい場合
実行結果
Botが起動している間は、Botの名前の横の○が緑色になります。

チャンネルIDを登録したチャンネルで匿名で投稿されます。(チャンネルのアプリにanonymous_botを追加するのをお忘れなく)

終わりに
無事に匿名で発言できるようになりました。
研究室のメンバーにも好評でした。
(若干チャンネルが荒れましたが・・・)
