Azure AD B2Cのベストプラクティスに下記のように記載されている通り、Azure AD B2Cは開発向け、運用向けなどの環境ごとに別テナントで管理する場面が多いです。
操作とデプロイのロールアウトをより簡単に行えるように、開発、テスト、実稼働前、運用向けに個別の環境を作成します。 それぞれのために Azure AD B2C テナントを作成します。
参考:https://learn.microsoft.com/ja-jp/azure/active-directory-b2c/best-practices#operations
特にカスタムポリシーを利用する場合、カスタマイズする内容が多くなるほどコード量も多くなりがちで、各環境の差分の反映ミスや環境変数の見落としが起こりやすくなります。
今回ご紹介するVisual Studio Code拡張機能を活用することで、カスタムポリシーを環境変数と実コードとで分けて管理でき、上記のようなミスを防ぐことができます。
Visual Studio Code拡張機能
Visual Studioマーケットプレースでは、AD B2Cカスタムポリシー開発者向けのVisual Studio Code拡張機能が提供されています。
参考:https://marketplace.visualstudio.com/items?itemName=AzureADB2CTools.aadb2c
今回ご紹介する環境変数管理機能の他にも、オートコンプリート機能やエクスプローラー機能などといったカスタムポリシーの開発者には必須とも言える様々な機能が利用できます。
環境変数の切り出し手順
例として、下記カスタムポリシースターターパックの「LocalAccounts」フォルダ直下のカスタムポリシーを利用します。
参考:https://github.com/Azure-Samples/active-directory-b2c-custom-policy-starterpack
このフォルダ配下をコピーし、Visual Studio Codeで開きます。
1.appsettings.jsonの追加
初めに、Visual Studio Codeで開いたフォルダ直下でappsettings.jsonを追加し、下記JSONデータを作成します。
{
  "Environments": [
    {
      "Name": "Development",
      "Production": false,
      "Tenant": "your-develop-tenant.onmicrosoft.com",
      "PolicySettings": {
        "IdentityExperienceFrameworkAppId": "Develop IdentityExperienceFrameworkAppId",
        "ProxyIdentityExperienceFrameworkAppId": "Develop ProxyIdentityExperienceFrameworkAppId"
      }
    },
    {
      "Name": "Production",
      "Production": true,
      "Tenant": "your-production-tenant.onmicrosoft.com",
      "PolicySettings": {
        "IdentityExperienceFrameworkAppId": "Production IdentityExperienceFrameworkAppId",
        "ProxyIdentityExperienceFrameworkAppId": "Production ProxyIdentityExperienceFrameworkAppId"
      }
    }
  ]
}
上記の例では、DevelopとProductionの2環境での運用を想定した定義としており、共通的に下記のような構造となっています。
- Name: 環境の名前。後述のビルド後に作成されるフォルダ名になります。
- Tenant: B2CテナントID。
your-tenant.onmicrosoft.comの形式です。 - PolicySettings
- IdentityExperienceFrameworkAppIdおよびProxyIdentityExperienceFrameworkAppId: B2Cチュートリアルで設定した各ID
- 他にも、独自APIのエンドポイントや外部IDPのクライアントIDなどの環境変数はこちらにKey-Valueの形式で追加していきます。
詳細は下記の「Policy settings」の項目をご参照ください。
参考:https://marketplace.visualstudio.com/items?itemName=AzureADB2CTools.aadb2c
2.カスタムポリシーのテンプレート化
次に、既存のカスタムポリシーをテンプレート化します。
環境によって切り替えたい箇所を{Settings:要素名}に書き換えることで、後述のビルド後にappsettings.jsonに定義した内容に変えられます。
- 各ポリシーファイル
- テナントIDを環境変数に切り出した値に動的に適用するよう、
yourtenant.onmicrosoft.comと記載された箇所を{Settings:Tenant}に置き換えます。
<TrustFrameworkPolicy TenantId="{Settings:Tenant}" PublicPolicyUri="http://{Settings:Tenant}/B2C_1A_signup_signin" ...> <BasePolicy> <TenantId>{Settings:Tenant}</TenantId> ... </BasePolicy> ... </TrustFrameworkPolicy> - テナントIDを環境変数に切り出した値に動的に適用するよう、
- TrustFrameworkExtensions.xml
-
login-NonInteractiveのTechnicalProfileで定義しているIDを下記の通り書き換えます。-
ProxyIdentityExperienceFrameworkAppId⇒{Settings:ProxyIdentityExperienceFrameworkAppId} -
IdentityExperienceFrameworkAppId⇒{Settings:IdentityExperienceFrameworkAppId}
-
<ClaimsProvider> <DisplayName>Local Account SignIn</DisplayName> <TechnicalProfiles> <TechnicalProfile Id="login-NonInteractive"> <Metadata> <Item Key="client_id">{Settings:ProxyIdentityExperienceFrameworkAppId}</Item> <Item Key="IdTokenAudience">{Settings:IdentityExperienceFrameworkAppId}</Item> </Metadata> <InputClaims> <InputClaim ClaimTypeReferenceId="client_id" DefaultValue="{Settings:ProxyIdentityExperienceFrameworkAppId}" /> <InputClaim ClaimTypeReferenceId="resource_id" PartnerClaimType="resource" DefaultValue="{Settings:IdentityExperienceFrameworkAppId}" /> </InputClaims> </TechnicalProfile> </TechnicalProfiles> </ClaimsProvider> -
3.カスタムポリシーのビルド
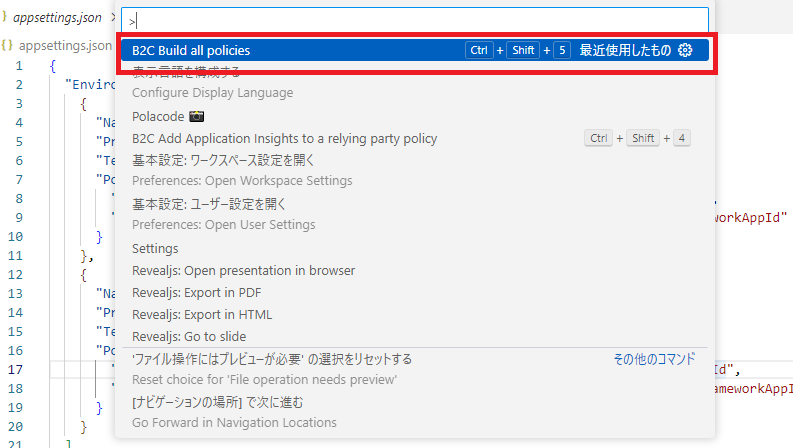
最後に、Visual Studio Codeのコマンドパレット(Ctrl + Shift + P)を開き、「B2C Build all policies」を実行します。
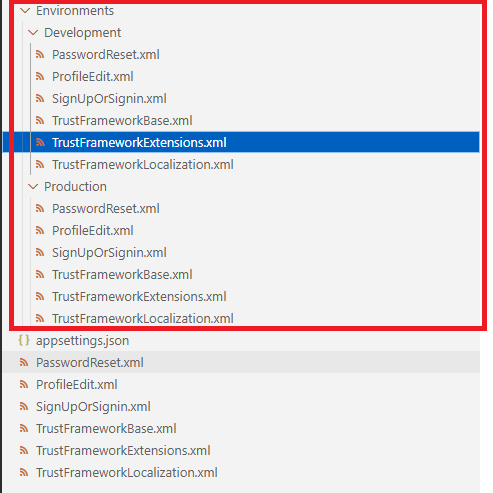
実行するとEnvironmentsフォルダが作成され、その配下には各環境向けのカスタムポリシーがそれぞれ追加されています。
試しにDevelopmentのTrustFrameworkExtensions.xmlファイルを確認すると、テナントIDやlogin-NonInteractiveの各IDがDevelopment環境向けの値に書き変わっていることが確認できます。
<?xml version="1.0" encoding="utf-8" ?>
<TrustFrameworkPolicy
  xmlns:xsi="http://www.w3.org/2001/XMLSchema-instance"
  xmlns:xsd="http://www.w3.org/2001/XMLSchema"
  xmlns="http://schemas.microsoft.com/online/cpim/schemas/2013/06"
  PolicySchemaVersion="0.3.0.0"
  TenantId="your-develop-tenant.onmicrosoft.com"
  PolicyId="B2C_1A_TrustFrameworkExtensions"
  PublicPolicyUri="http://your-develop-tenant.onmicrosoft.com/B2C_1A_TrustFrameworkExtensions">

  <BasePolicy>
    <TenantId>your-develop-tenant.onmicrosoft.com</TenantId>
    <PolicyId>B2C_1A_TrustFrameworkLocalization</PolicyId>
  </BasePolicy>

  <BuildingBlocks>
  </BuildingBlocks>

  <ClaimsProviders>
    <ClaimsProvider>
      <DisplayName>Local Account SignIn</DisplayName>
      <TechnicalProfiles>
         <TechnicalProfile Id="login-NonInteractive">
          <Metadata>
            <Item Key="client_id">Develop ProxyIdentityExperienceFrameworkAppId</Item>
            <Item Key="IdTokenAudience">Develop IdentityExperienceFrameworkAppId</Item>
          </Metadata>
          <InputClaims>
            <InputClaim ClaimTypeReferenceId="client_id" DefaultValue="Develop ProxyIdentityExperienceFrameworkAppId" />
            <InputClaim ClaimTypeReferenceId="resource_id" PartnerClaimType="resource" DefaultValue="Develop IdentityExperienceFrameworkAppId" />
          </InputClaims>
        </TechnicalProfile>
      </TechnicalProfiles>
    </ClaimsProvider>

  </ClaimsProviders>

</TrustFrameworkPolicy>
まとめ
今回ご紹介した機能でB2Cカスタムポリシーをテンプレートと環境変数とで切り分けて管理することができます。
また、最初にご紹介した通りAD B2CのVisual Studio Code拡張機能はB2Cカスタムポリシーの開発者向けに様々な機能が提供されているため、活用してみてください。

