こんにちは!!Asterです!!!
今回はUnity+AR Foundation4+Barracuda+Mediapipeの組み合わせでiOSでハンドトラッキングをできるようにしてみました!!
参考記事はこちら
ARfoundationとは
ARFoundationは、AndroidとiOSの両方で拡張現実(AR)アプリケーションを構築するための共通フレームワークを提供するUnityパッケージのセットです。 これにより、開発者は両プラットフォームで動作するAR体験を1つのコードベースを使用して構築できます。
ARFoundationは、次の機能を提供します。
- ・GoogleとAppleが提供するARプラットフォームであるARCoreとARKitのサポート
- ・ARを操作するための一般的なAPIセット、実世界に仮想オブジェクトを配置、デバイスの位置と向きをトラッキング、ジェスチャー入力を処理するサポートを含む
- ・ARユーザーインターフェイスを構築するためのプレハブとコンポーネントのセット、3Dモデル、テキストラベル、画像オーバーレイの表示をサポートする
ARFoundationは、ARCoreやARKitを扱う低レベルの詳細について心配することなく、豊富でインタラクティブなAR体験を作成することを簡単にするように設計されています。これにより、開発者はARコンテンツや体験を構築することに集中できます。
Barracudaとは
Barracudaは、深層学習モデルを構築、トレーニング、デプロイするために使用できる高度に最適化されたニューラルネットワークエンジンです。 Unityで使用するために特別に設計されており、Unityプロジェクトに簡単に統合できるようになっています。
Barracudaは次の機能を提供します。
- ・畳み込みニューラルネットワーク(CNN)、再帰型ニューラルネットワーク(RNN)、長期短期記憶(LSTM)ネットワークなど、幅広い深層学習アーキテクチャのサポート
- ・GPUアクセラレーションとマルチスレッドに対応した高性能
- ・Unityのマシンラーニング(ML)APIとの統合、開発者がUnityプロジェクト内でMLモデルを簡単に構築、トレーニング、デプロイできるようにする
- ・モバイルデバイスとデスクトッププラットフォームでのトレーニングと推論のサポート
Barracudaは、画像分類、自然言語処理、予測分析など、さまざまなアプリケーションに使用できます。特に、ゲームやその他のインタラクティブな体験などのリアルタイムアプリケーションにおいて、高速な性能と低レイテンシーが重要な場合に特に適しています。
Mediapipeとは
Mediapipeは、Googleが開発したオープンソースのマルチメディア処理プラットフォームです。 ビデオやオーディオを含むさまざまなメディアデータを処理し、リアルタイムで複雑な機能を実現することができます。
Mediapipeは、さまざまな用途に使用できる柔軟でカスタマイズ可能なツールセットを提供します。 例えば、顔検出や手検出、体姿検出、表情分析、音声認識などができます。 また、Mediapipeを使用することで、カメラやマイクを使用したARやVRアプリケーションの構築も可能です。
Mediapipeは、C++を使用して書かれており、さまざまなプラットフォームで使用できます。 Googleが提供するTensorFlowとの統合もサポートされており、深層学習を使用したアプリケーションの構築もできます。
HandTrackingの導入
HandTrackingはこちらのgithubを使用します。
BarracudaはGraphicsAPIとしてValkanを使用しており、ARCoreはOpenGLES3を使用しているため、Androidを使ったARFoudationでは、動作しません。(ARfoundationを使わないなら動作可能)
コードの追加・修正
ARFoundationで、カメラのテクスチャを取得するコードを書きます。
これは,XRCpuImageを使うことで、簡単にカメラのテクスチャを取得することができます。
using System;
using Unity.Collections.LowLevel.Unsafe;
using UnityEngine;
using UnityEngine.XR.ARFoundation;
using UnityEngine.XR.ARSubsystems;

public class CameraImageController : MonoBehaviour
{
    public ARCameraManager cameraManager;

    public Texture2D m_Texture;
    //private MeshRenderer mRenderer;

    private void Start()
    {
        //mRenderer = GetComponent<MeshRenderer>();
    }

    void OnEnable()
    {
        cameraManager.frameReceived += OnCameraFrameReceived;
    }

    void OnDisable()
    {
        cameraManager.frameReceived -= OnCameraFrameReceived;
    }

    unsafe void OnCameraFrameReceived(ARCameraFrameEventArgs eventArgs)
    {
        XRCpuImage image;
        if (!cameraManager.TryAcquireLatestCpuImage(out image))
            return;

        var conversionParams = new XRCpuImage.ConversionParams
        (
            image,
            TextureFormat.RGBA32,
            XRCpuImage.Transformation.MirrorY

        );

        if (m_Texture == null || m_Texture.width != image.width || m_Texture.height != image.height)
        {
            m_Texture = new Texture2D(conversionParams.outputDimensions.x,
                                     conversionParams.outputDimensions.y,
                                     conversionParams.outputFormat, false);
        }

        var buffer = m_Texture.GetRawTextureData<byte>();
        image.Convert(conversionParams, new IntPtr(buffer.GetUnsafePtr()), buffer.Length);

        m_Texture.Apply();
        //mRenderer.material.mainTexture = m_Texture;

        buffer.Dispose();
        image.Dispose();
    }


}
次にSampleのHandAnimator.csを改修してARfoudationで取得したテクスチャを使用できるようにします.
SampleのHandAnimatorではLateUpdate()関数でWebcameraからのTextureを取得し、それをMediapipeに投げているので、そこを改修していきます。
    void LateUpdate()
    {
        // Feed the input image to the Hand pose pipeline.
        _pipeline.UseAsyncReadback = _useAsyncReadback;
        _pipeline.ProcessImage(_webcam.Texture);

        var layer = gameObject.layer;

        // Joint balls
        for (var i = 0; i < HandPipeline.KeyPointCount; i++)
        {
            var xform = CalculateJointXform(_pipeline.GetKeyPoint(i));
            Graphics.DrawMesh(_jointMesh, xform, _jointMaterial, layer);
        }

        // Bones
        foreach (var pair in BonePairs)
        {
            var p1 = _pipeline.GetKeyPoint(pair.Item1);
            var p2 = _pipeline.GetKeyPoint(pair.Item2);
            var xform = CalculateBoneXform(p1, p2);
            Graphics.DrawMesh(_boneMesh, xform, _boneMaterial, layer);
        }

        // UI update
        _monitorUI.texture = _webcam.Texture;
    }
ここの部分を変え、またそれぞれの関節の座標をScreen座標からWorld座標に変換する関数も追加します。
using System.Collections.Generic;
using UnityEngine;
using UnityEngine.UI;

namespace MediaPipe.HandPose {

public sealed class HandAnimator : MonoBehaviour
{
        [SerializeField] private GameObject _jointPrefab;

        [SerializeField] private Transform _handParent;

        [SerializeField] CamerImageController _cameraTransfar = null;

        [SerializeField] ResourceSet _resources = null;
        [SerializeField] bool _useAsyncReadback = true;

        private HandPipeline _pipeline;

        private Dictionary<HandPipeline.KeyPoint, GameObject> _handJoints =
            new Dictionary<HandPipeline.KeyPoint, GameObject>();

        void Start()
        {
            _pipeline = new HandPipeline(_resources);
            initalizeHandJoint();
        }

        private void OnDestroy()
        {
            _pipeline.Dispose();
        }

        private void LateUpdate()
        {
            _pipeline.UseAsyncReadback = _useAsyncReadback;
            var cameraTexture = _cameraTransfar.m_Texture;
            if (cameraTexture == null) return;
            _pipeline.ProcessImage(cameraTexture);

            //手の座標更新
            updateHandPose();
        }

        /// <summary>
        /// 手のパーツの初期化
        /// </summary>
        private void initalizeHandJoint()
        {
            for (int i = 0; i < HandPipeline.KeyPointCount; i++)
            {
                var go = Instantiate(_jointPrefab, _handParent);
                var keyPoint = (HandPipeline.KeyPoint)i;
                _handJoints.Add(keyPoint, go);
            }
        }

        /// <summary>
        /// 手の座標更新
        /// </summary>
        private void updateHandPose()
        {
            for (int i = 0; i < HandPipeline.KeyPointCount; i++)
            {
                if(i == 4 || i == 8)
                {
                    //手の各パーツの座標の取得
                    var position = _pipeline.GetKeyPoint(i);
                    var keyPoint = (HandPipeline.KeyPoint)i;
                    //ワールド座標に変換する
                    float xPos = Screen.width * normalize(position.x);
                    float yPos = Screen.height * normalize(position.y);
                    float zPos = 0.3f + position.z;
                    Vector3 cameraPos = new Vector3(xPos, yPos, zPos);
                    var screenPosition = Camera.main.ScreenToWorldPoint(cameraPos);
                    //それぞれの手のパーツに座標を代入
                    _handJoints[keyPoint].transform.position = screenPosition;
                }

            }

            //ローカル関数:座標の正規化
            float normalize(float value)
            {
                float min = -0.5f;
                float max = 0.5f;
                float cValue = Mathf.Clamp(value, min, max);
                return (cValue - min) / (max - min);
            }
        }
    }

} // namespace MediaPipe.HandPose
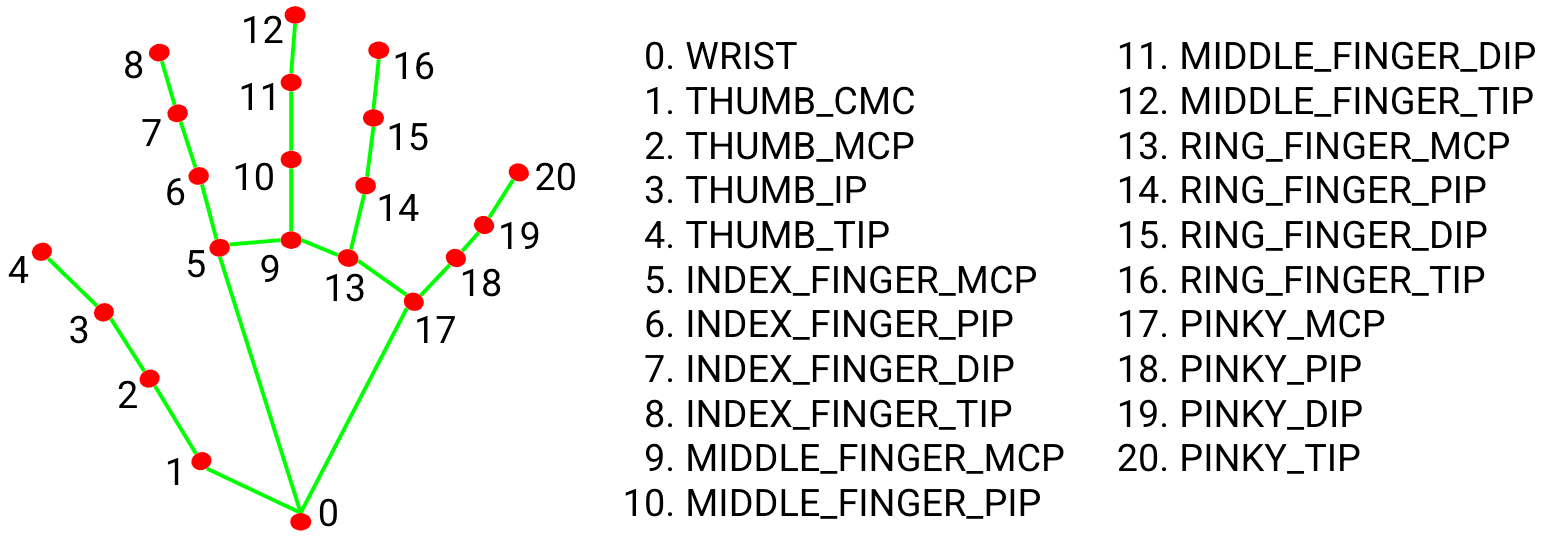
_pipeline.GetKeyPointの配列は下記の図の順番になります。
そのため、自身が使いたい関節だけを表示することも可能です。
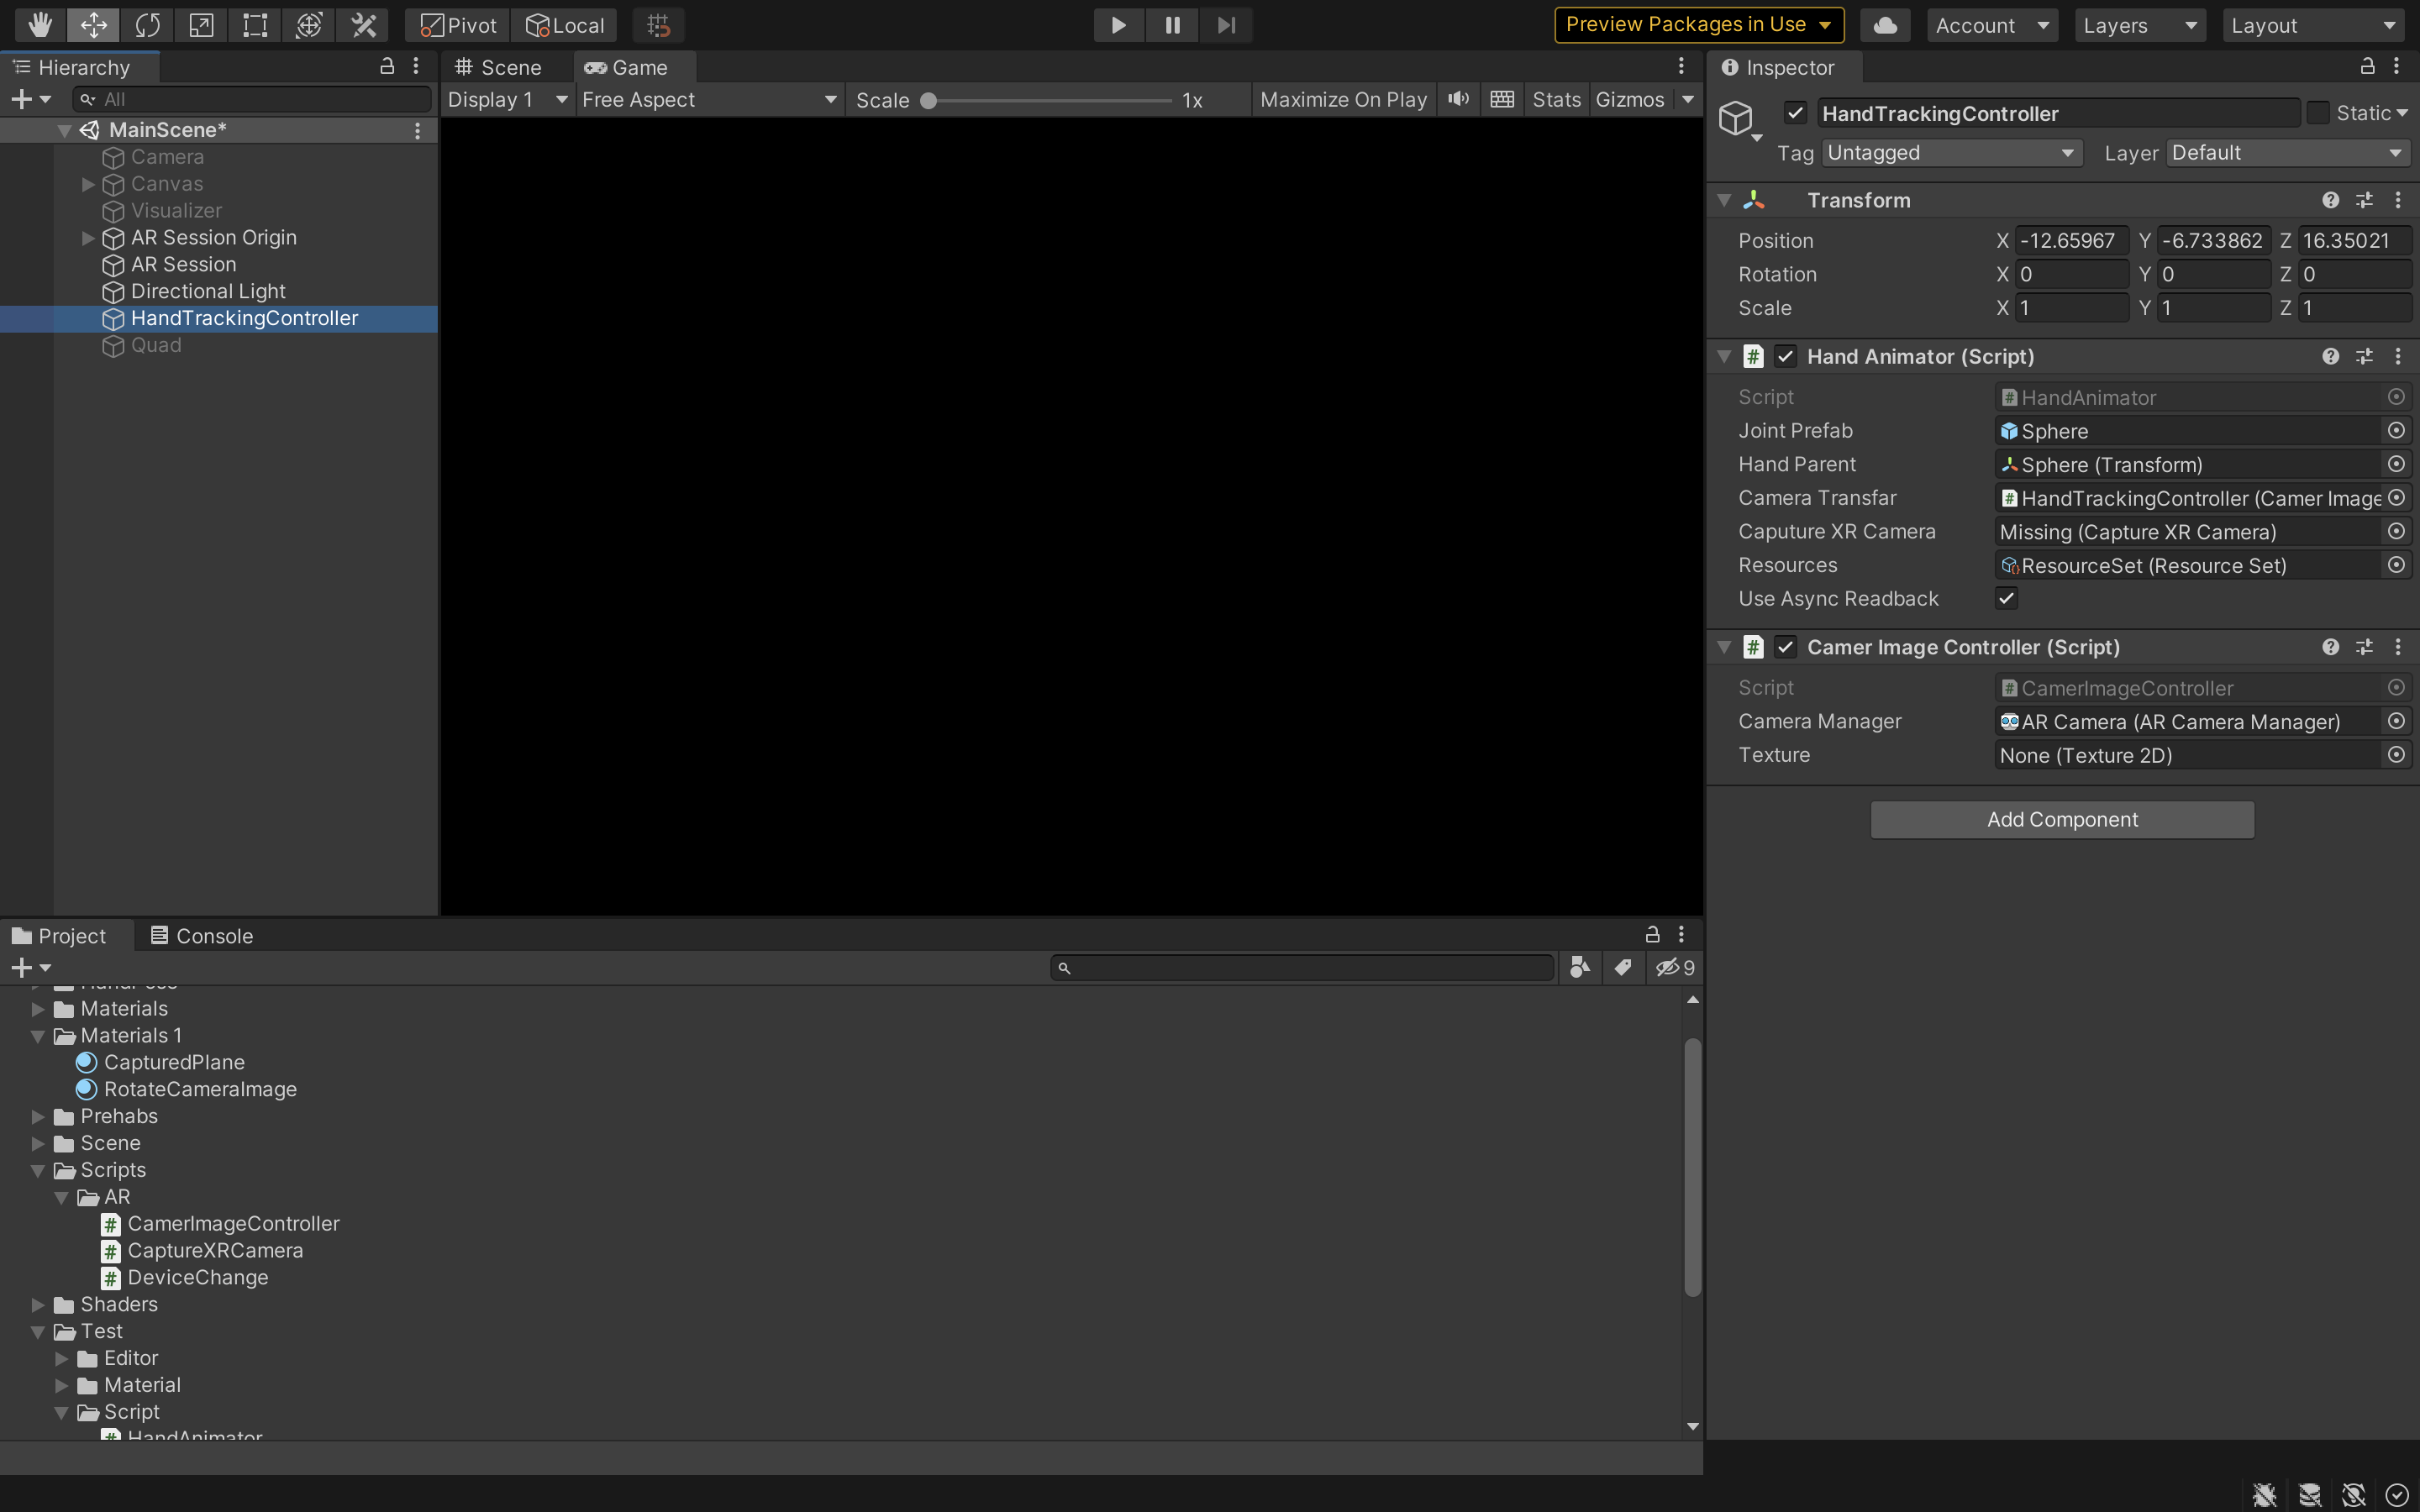
Unity側の設定は以下のようになります.
iOSでのARfoudationのビルドに関してはこちらを参考にしましょう.
実際にやってみた!
実際にやってみると以下の動画のようになります。
しかし、カメラの画角から外れるとそれぞれの関節の位置がおかしくなってしまうのが、難点です。。。
縦画面で動くようにShaderを追加してみた
ここまでは,横画面でしか動作がしませんでした.しかし,縦画面でも動かせるようにしたいですよね.
縦画面にする時には,MediaPipeに渡すテクスチャを縦画面のテクスチャにしてしまえばいいはずです.しかし,どういうわけかXRCpuImageでは,縦画面のテクスチャを取得することができません.
そこで,この記事を参考にShaderを使って縦画面に変更したテクスチャをMediaPipeに渡すことで縦画面でもHandTrackingをすることができます.
この縦画面にする流れは以下のようになります.
- 画像を取得する全体のフローを以下に示します。
- 1.XRCameraImageを取得する
- 2.XRCameraImage#Convertを利用してデータを取り出す
- 3.取り出したデータをTexture2Dに読み込ませる
- 4.Texture2Dの画像を適切に回転しRenderTextureに書き出す
という流れになります。
CameraImageControllerとHandAnimatorを少し変えましょう.
using System;
using Unity.Collections.LowLevel.Unsafe;
using UnityEngine;
using UnityEngine.XR.ARFoundation;
using UnityEngine.XR.ARSubsystems;

public class CamerImageController : MonoBehaviour
{
    public ARCameraManager cameraManager;

    public Texture2D m_Texture;
    //private MeshRenderer mRenderer;

    private void Start()
    {
        //mRenderer = GetComponent<MeshRenderer>();
    }

    void OnEnable()
    {
        cameraManager.frameReceived += OnCameraFrameReceived;
    }

    void OnDisable()
    {
        cameraManager.frameReceived -= OnCameraFrameReceived;
    }

    unsafe void OnCameraFrameReceived(ARCameraFrameEventArgs eventArgs)
    {
        XRCpuImage image;
        if (!cameraManager.TryAcquireLatestCpuImage(out image))
            return;

        var conversionParams = new XRCpuImage.ConversionParams
        (
            image,
            TextureFormat.RGBA32,
            XRCpuImage.Transformation.MirrorY

        );

        if (m_Texture == null || m_Texture.width != image.width || m_Texture.height != image.height)
        {
            m_Texture = new Texture2D(conversionParams.outputDimensions.x,
                                     conversionParams.outputDimensions.y,
                                     conversionParams.outputFormat, false);
        }

        var buffer = m_Texture.GetRawTextureData<byte>();
        image.Convert(conversionParams, new IntPtr(buffer.GetUnsafePtr()), buffer.Length);

        m_Texture.Apply();
        //mRenderer.material.mainTexture = m_Texture;

        buffer.Dispose();
        image.Dispose();
    }


}
using System.Collections.Generic;
using UnityEngine;
using UnityEngine.UI;

namespace MediaPipe.HandPose {

public sealed class HandAnimator : MonoBehaviour
{
        [SerializeField] private GameObject _jointPrefab;

        [SerializeField] private Transform _handParent;

        [SerializeField] CamerImageController _cameraTransfar = null;
        [SerializeField] CaptureXRCamera _CaputureXRCamera;

        [SerializeField] ResourceSet _resources = null;
        [SerializeField] bool _useAsyncReadback = true;

        private HandPipeline _pipeline;

        private Dictionary<HandPipeline.KeyPoint, GameObject> _handJoints =
            new Dictionary<HandPipeline.KeyPoint, GameObject>();

        void Start()
        {
            _pipeline = new HandPipeline(_resources);
            initalizeHandJoint();
        }

        private void OnDestroy()
        {
            _pipeline.Dispose();
        }

        private void LateUpdate()
        {
            _pipeline.UseAsyncReadback = _useAsyncReadback;
            //var cameraTexture = _cameraTransfar.m_Texture;
            var cameraTexture = _CaputureXRCamera._previewTexture;
            if (cameraTexture == null) return;
            _pipeline.ProcessImage(cameraTexture);

            //手の座標更新
            updateHandPose();
        }

        /// <summary>
        /// 手のパーツの初期化
        /// </summary>
        private void initalizeHandJoint()
        {
            for (int i = 0; i < HandPipeline.KeyPointCount; i++)
            {
                var go = Instantiate(_jointPrefab, _handParent);
                var keyPoint = (HandPipeline.KeyPoint)i;
                _handJoints.Add(keyPoint, go);
            }
        }

        /// <summary>
        /// 手の座標更新
        /// </summary>
        private void updateHandPose()
        {
            for (int i = 0; i < HandPipeline.KeyPointCount; i++)
            {
                if(i == 4 || i == 8)
                {
                    //手の各パーツの座標の取得
                    var position = _pipeline.GetKeyPoint(i);
                    var keyPoint = (HandPipeline.KeyPoint)i;
                    //ワールド座標に変換する
                    float xPos = Screen.width * normalize(position.x);
                    float yPos = Screen.height * normalize(position.y);
                    float zPos = 0.3f + position.z;
                    Vector3 cameraPos = new Vector3(xPos, yPos, zPos);
                    var screenPosition = Camera.main.ScreenToWorldPoint(cameraPos);
                    //それぞれの手のパーツに座標を代入
                    _handJoints[keyPoint].transform.position = screenPosition;
                }

            }

            //ローカル関数:座標の正規化
            float normalize(float value)
            {
                float min = -0.5f;
                float max = 0.5f;
                float cValue = Mathf.Clamp(value, min, max);
                return (cValue - min) / (max - min);
            }
        }
    }

} // namespace MediaPipe.HandPose
次にShaderを追加しましょう.
Shader "Hidden/RotateCameraImage"
{
    Properties
    {
        _MainTex ("Texture", 2D) = "white" {}
    }
    SubShader
    {
        Cull Off ZWrite Off ZTest Always

        Pass
        {
            CGPROGRAM
            #pragma vertex vert
            #pragma fragment frag

            #include "UnityCG.cginc"

            struct appdata
            {
                float4 vertex : POSITION;
                float2 uv : TEXCOORD0;
            };

            struct v2f
            {
                float2 uv : TEXCOORD0;
                float4 vertex : SV_POSITION;
            };

            v2f vert (appdata v)
            {
                v2f o;
                o.vertex = UnityObjectToClipPos(v.vertex);
                o.uv = v.uv;
                return o;
            }

            sampler2D _MainTex;

            fixed4 frag (v2f i) : SV_Target
            {
                float x = 1.0 - i.uv.y;
                float y = i.uv.x;
                float2 uv = float2(x, y);
                fixed4 col = tex2D(_MainTex, uv);
                return col;
            }
            ENDCG
        }
    }
}
また,カメラの回転の検出を行うことで,縦横両画面ともで使えるようにしましょう.
using System;
using System.Collections;
using System.Collections.Generic;
using Unity.Collections;
using Unity.Collections.LowLevel.Unsafe;
using UnityEngine;
using UnityEngine.UI;
using UnityEngine.XR.ARFoundation;
using UnityEngine.XR.ARSubsystems;

public class CaptureXRCamera : MonoBehaviour
{
    [SerializeField] private ARCameraManager _cameraManager = null;
    [SerializeField] private GameObject _target = null;
    [SerializeField] private Texture2D _sampleTexture = null;
    [SerializeField] private Material _transposeMaterial = null;


    [SerializeField] public Texture2D _texture = null;
    [SerializeField] public RenderTexture _previewTexture = null;
    [SerializeField] public  Renderer _renderer = null;
    private Material _material = null;

    private bool _needsRotate = true;

    private void Start()
    {
        Debug.Log(">>>>>>>>> START <<<<<<<<<<");

        _cameraManager.frameReceived += OnCameraFrameReceived;
        _renderer = _target.GetComponent<Renderer>();

        _material = _renderer.material;
        _material.mainTexture = _sampleTexture;

        _previewTexture = new RenderTexture(_sampleTexture.width, _sampleTexture.height, 0, RenderTextureFormat.BGRA32);
        _previewTexture.Create();

        DeviceChange.Instance.OnOrientationChange += HandleOnOnOrientationChange;

    }

    private void HandleOnOnOrientationChange(DeviceOrientation orientation)
    {
        ResizePreviewPlane();
        CheckRotation();
    }

    private void Update()
    {

    }

    private void OnCameraFrameReceived(ARCameraFrameEventArgs eventArgs)
    {
        RefreshCameraFeedTexture();
    }

    private void CheckRotation()
    {
        _needsRotate = Input.deviceOrientation == DeviceOrientation.Portrait;
    }


    private void RefreshCameraFeedTexture()
    {

        if (!_cameraManager.TryAcquireLatestCpuImage(out XRCpuImage cameraImage))
        {
            Debug.Log("Failed to get the last image.");
            return;
        }

        RecreateTextureIfNeeded(cameraImage);

        var imageTransformation = (Input.deviceOrientation == DeviceOrientation.LandscapeRight)
            ? XRCpuImage.Transformation.MirrorY
            : XRCpuImage.Transformation.MirrorX;
        var conversionParams =
            new XRCpuImage.ConversionParams(cameraImage, TextureFormat.RGBA32, imageTransformation);

        NativeArray<byte> rawTextureData = _texture.GetRawTextureData<byte>();

        try
        {
            unsafe
            {
                cameraImage.Convert(conversionParams, new IntPtr(rawTextureData.GetUnsafePtr()), rawTextureData.Length);
            }
        }
        finally
        {
            cameraImage.Dispose();
        }

        _texture.Apply();
        PreviewTexture(_texture);
    }

    private void RecreateTextureIfNeeded(XRCpuImage cameraImage)
    {
        if (_texture != null && _texture.width == cameraImage.width && _texture.height == cameraImage.height)
        {
            return;
        }

        if (_texture != null)
        {
            DestroyImmediate(_texture);
        }

        if (_previewTexture != null)
        {
            _previewTexture.Release();
        }

        _texture = new Texture2D(cameraImage.width, cameraImage.height, TextureFormat.RGBA32, false);
        _previewTexture = new RenderTexture(_texture.width, _texture.height, 0, RenderTextureFormat.BGRA32);
        _previewTexture.Create();

        ResizePreviewPlane();
    }

    private void ResizePreviewPlane()
    {
        float aspect = 1f;

        if (Input.deviceOrientation == DeviceOrientation.Portrait)
        {
            aspect = (float)_texture.width / (float)_texture.height;
        }
        else
        {
            aspect = (float)_texture.height / (float)_texture.width;
        }

        _target.transform.localScale = new Vector3(1f, aspect, 1f);
    }

    private void PreviewTexture(Texture2D texture)
    {
        if (_needsRotate)
        {
            Graphics.Blit(texture, _previewTexture, _transposeMaterial);
        }
        else
        {
            Graphics.Blit(texture, _previewTexture);
        }

        _renderer.material.mainTexture = _previewTexture;

    }

}
これでスクリプトの準備ができました.Unity側の設定も行いましょう,
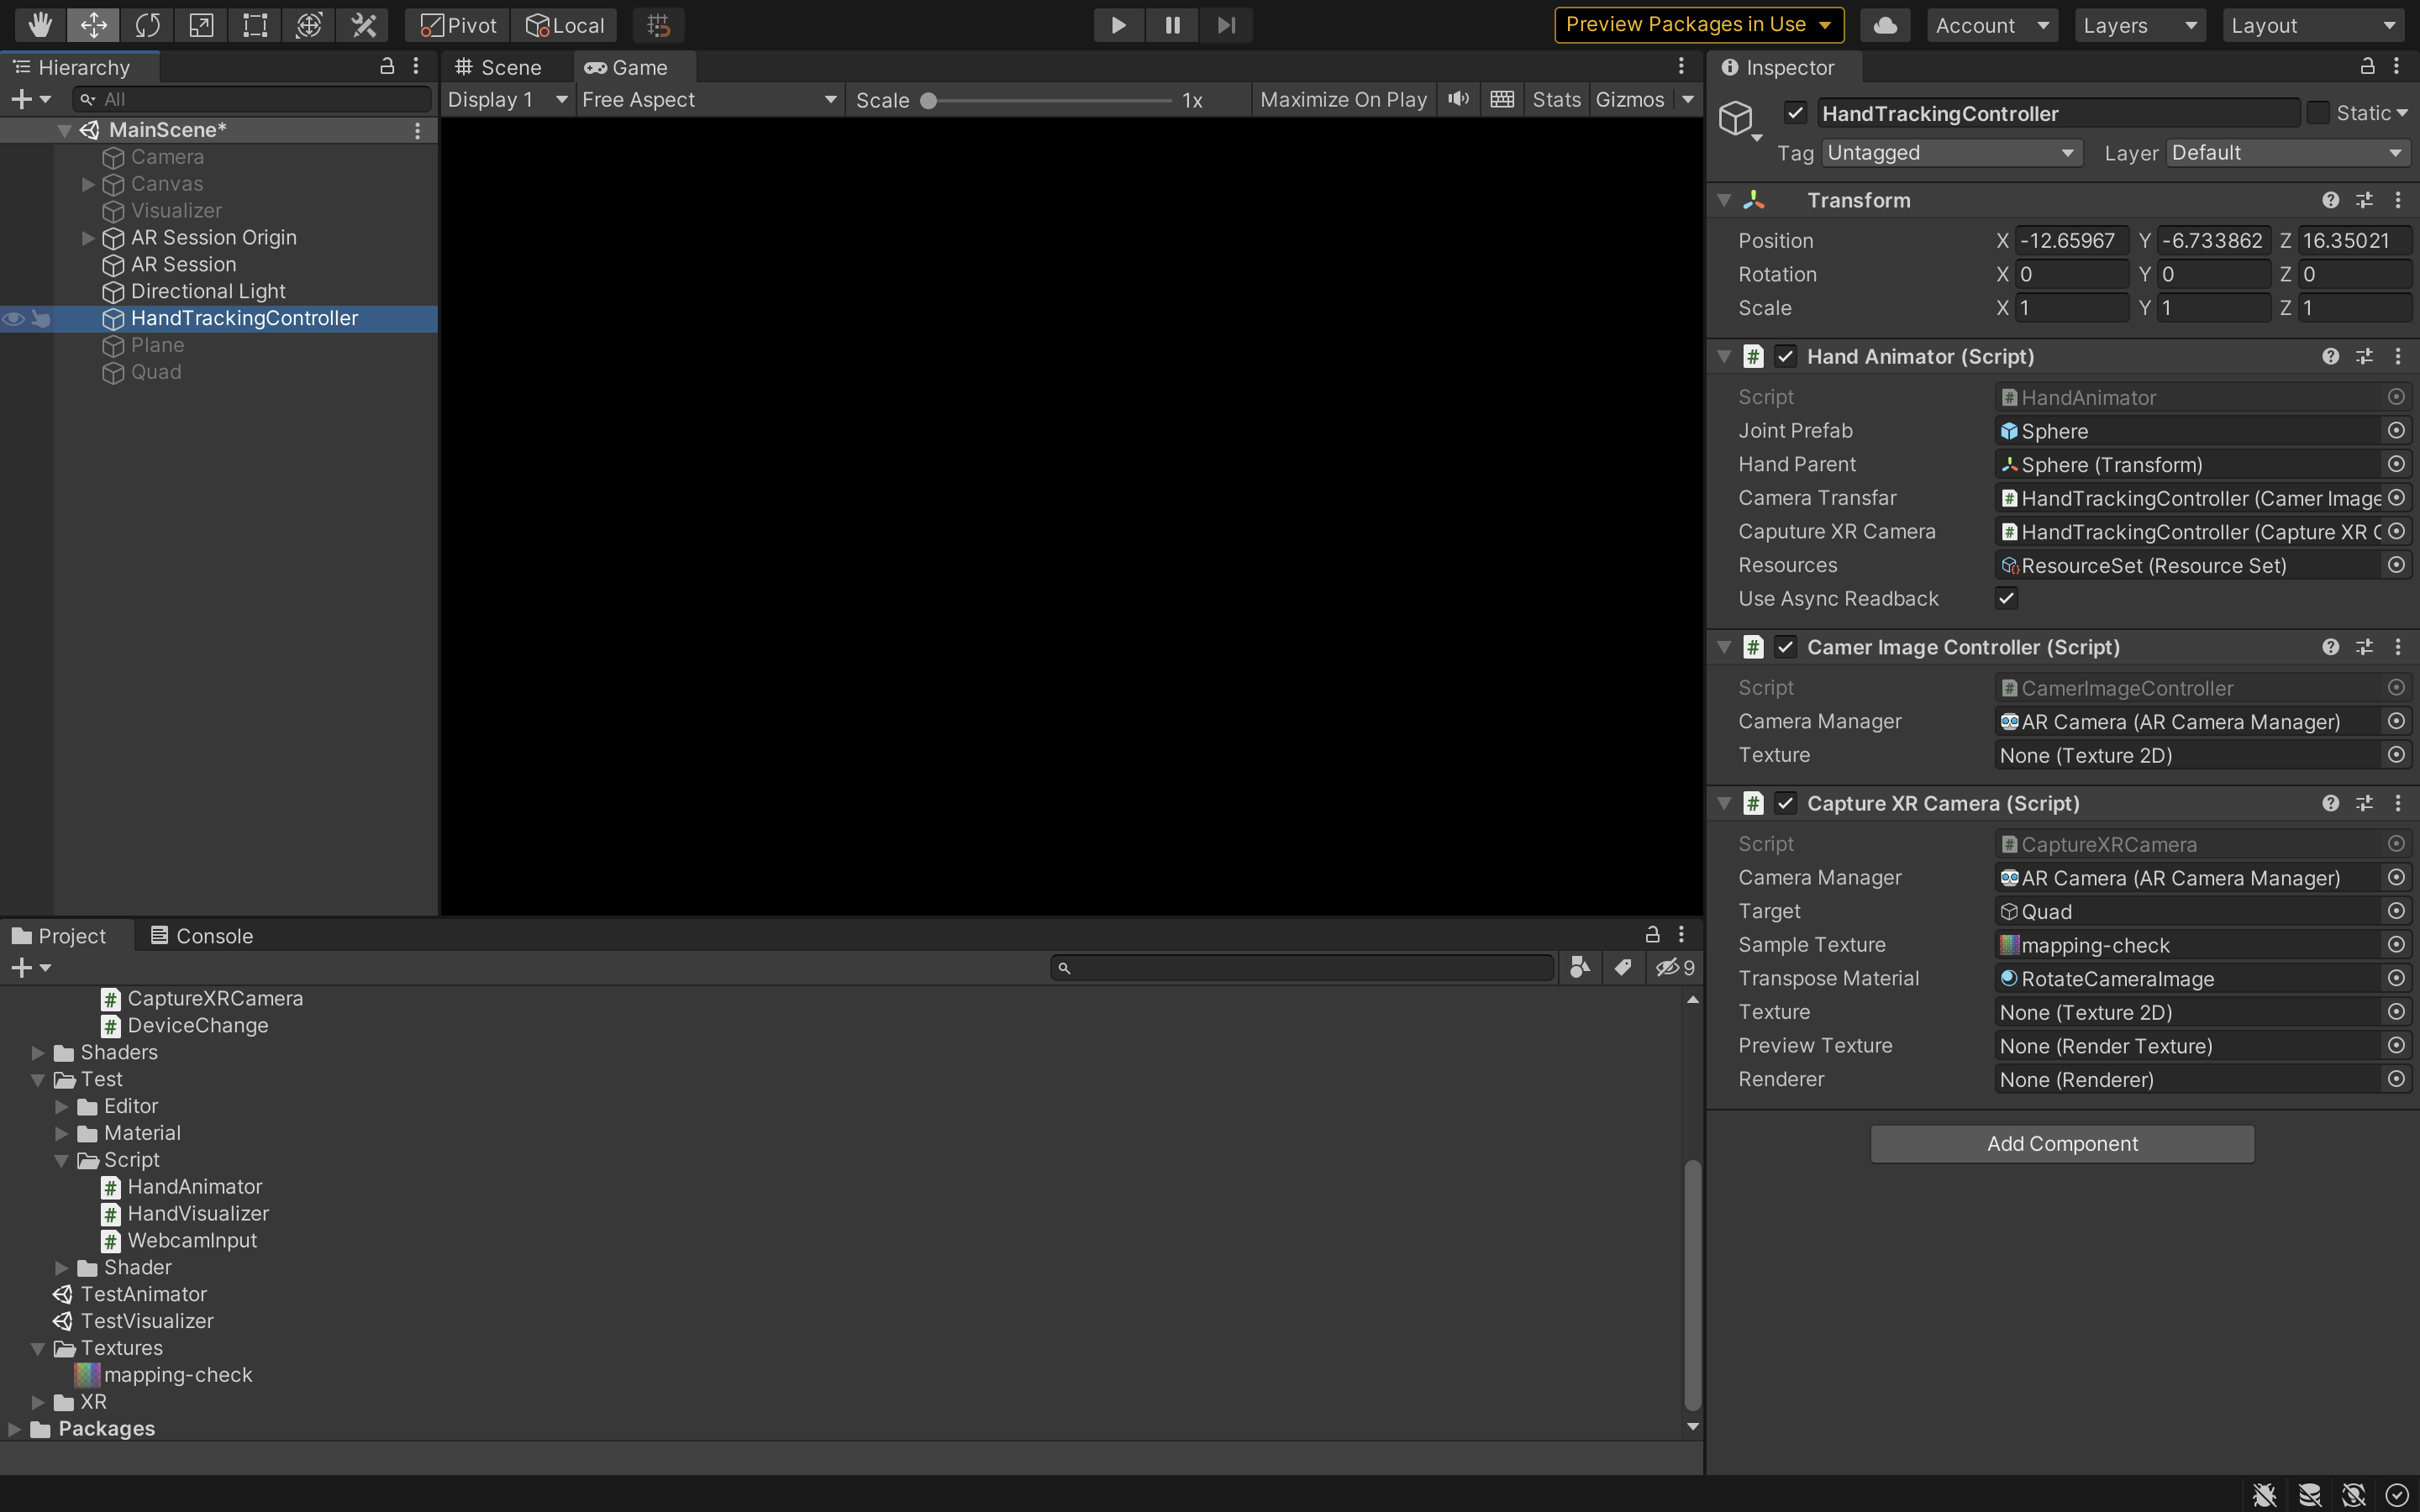
これで全ての準備ができました.
実際に動かしてみよう
まとめ
これでスマホでハンドトラッキングをすることが可能になりました!!
しかし,検出精度が悪いのが難点です....