概要
LIFFアプリでクライアントと自分のサーバ間で安全に認証するにはアクセストークンやIDトークンをサーバに送って認証する必要があります。
今回はLIFFのアクセストークンとRailsのdevise_auth_token Gemを利用することで安全な認証を行います。
今回のコードはGitHubに置いています。
ちなみに、RailsではなくFirebaseを利用したバージョンの記事はこちらになります。
使用ライブラリ
Devise
Railsのデファクトの認証ライブラリ(gem)
認証関連は自作する部分はできるだけ減らして、デファクトを活用
devise_auth_token
Deviseを利用しつつ、APIによる認証を可能にするライブラリ(gem)
LIFFアプリのセキュリティについて
LIFFを使うと簡単にユーザ情報を取得できますが、そのユーザ情報をサーバに送ってそのまま信頼してしまうと、なりすましやその他の攻撃に対して脆弱になってしまいます。
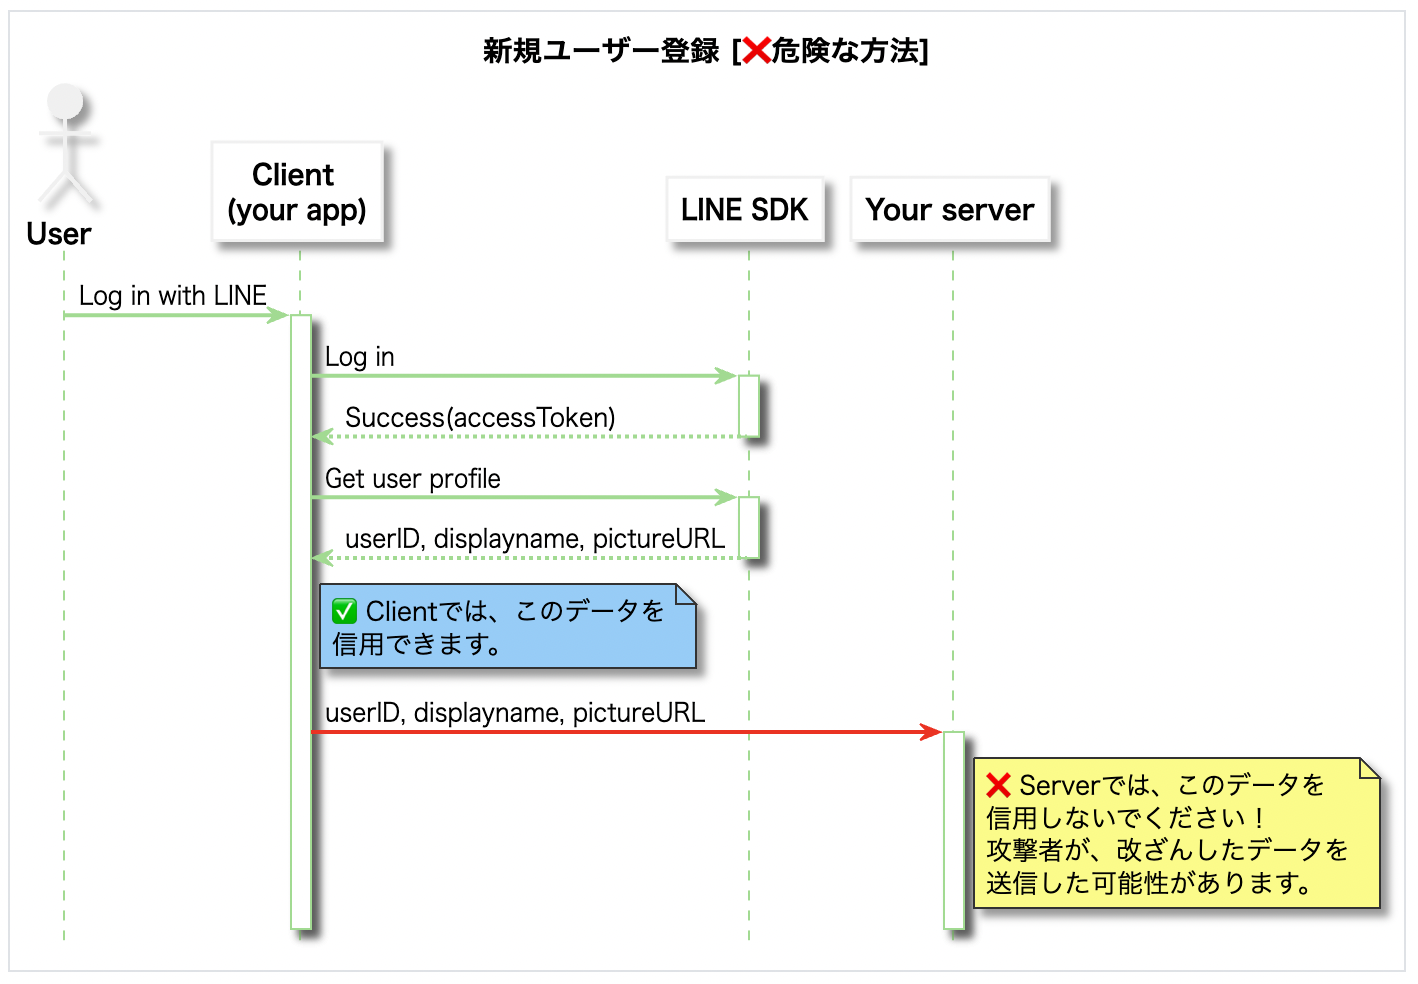
↑(LINE公式ページより引用)
安全のためにアクセストークンを使いましょう。
大まかな処理の流れ
- LIFFでアクセストークンを取得
- アクセストークンをサーバに送信
- サーバでLINEの認証処理
- userIdに対応するトークン作成(devise_auth_token)
- クライアントからサーバにアクセスする時にトークンをヘッダにつける
これは下記のLINE公式に載っているシーケンス図にのっとった流れになっています。
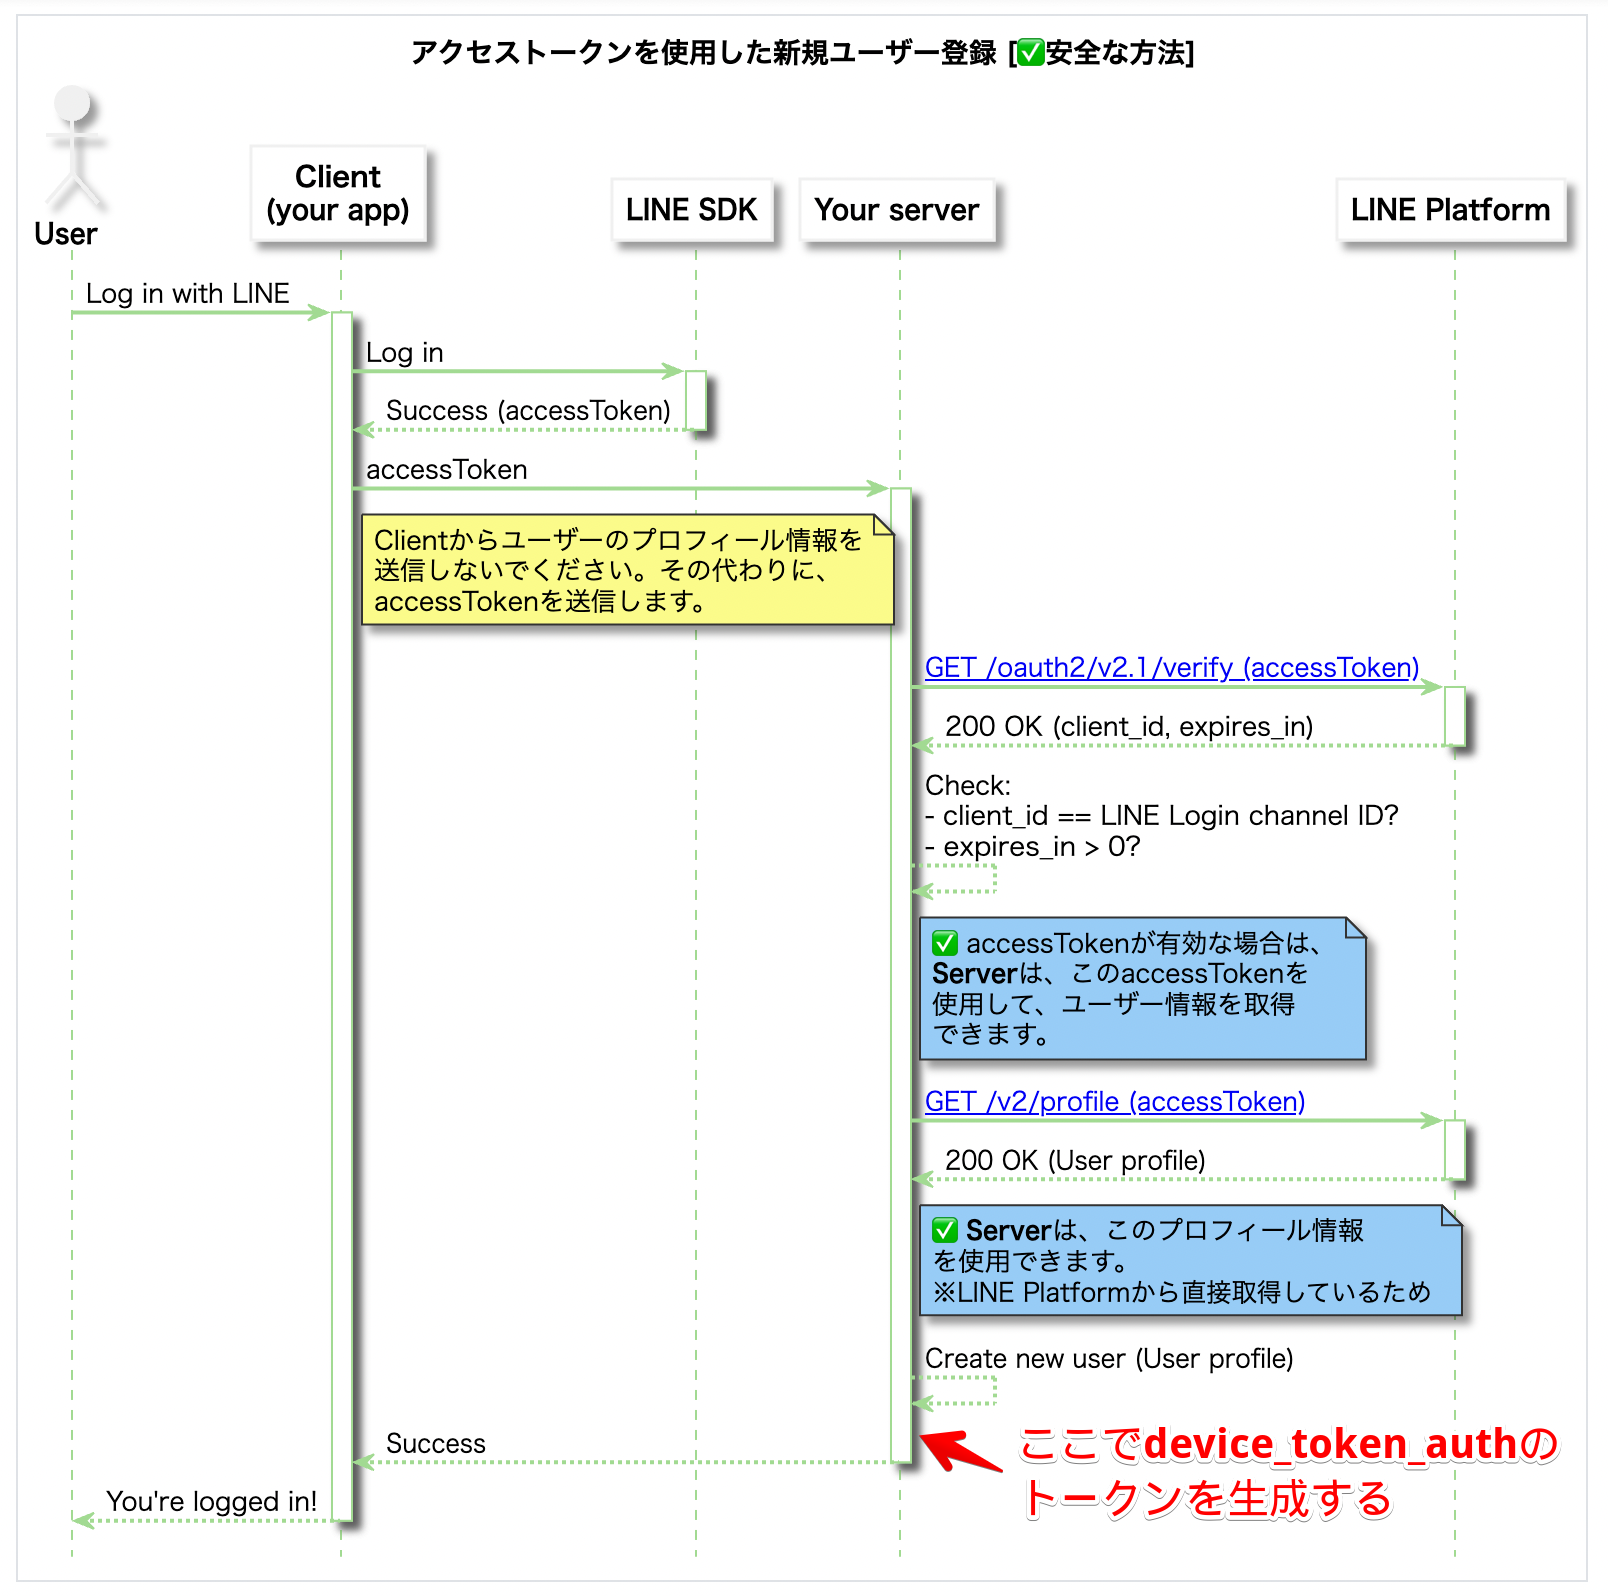
ただ、「Create new user」の後にdevise_token_authのトークンを生成する処理を追加しています。
Devise、devise_auth_tokenの導入
まずはdevise_auth_tokenを使える状態に持っていきます。
Deviseとdevise_token_authのインストール
Gemfileに下記のgemを追加します。
gem 'jbuilder'
gem 'devise'
gem 'devise_token_auth'
gemをインストールします。
$ bundle install
Deviseとdevise_token_authの初期化
下記のコマンドでDeviseの設定ファイルやUserテーブルのマイグレーションファイルが生成されます。
$ rails g devise:install
$ rails g devise_token_auth:install User auth
マイグレーションを実行してUserテーブルを作成します。
$ rails db:migrate
devise_auth_tokenはデフォルトだと、リクエスト毎にtokenが更新されてしまうので、configを修正します。
# By default the authorization headers will change after each request. The
# client is responsible for keeping track of the changing tokens. Change
# this to false to prevent the Authorization header from changing after
# each request.
config.change_headers_on_each_request = false # <= コメントアウトを外す

# By default, users will need to re-authenticate after 2 weeks. This setting
# determines how long tokens will remain valid after they are issued.
config.token_lifespan = 2.weeks # <= コメントアウトを外す

# コメントアウトを外す
config.headers_names = {:'access-token' => 'access-token',
                        :'client' => 'client',
                        :'expiry' => 'expiry',
                        :'uid' => 'uid',
                        :'token-type' => 'token-type' }
これでdevise_token_authによる認証APIが動く状態になりました。
動作確認をしていきましょう。
認証APIの確認
まず、名前、メールアドレス、パスワードの項目だけのユーザをDBに登録します。
$ rails c
> User.create!(name: 'テストユーザー', email: 'example@example.com', password: 'password')
テストサーバを起動します。
$ rails s
以下のcurlコマンドで認証APIを叩きます。
$ curl -D - localhost:3000/auth/sign_in -X POST \
  -d '{"email":"example@example.com", "password":"password"}' \
  -H "content-type:application/json"
認証に成功すれば、結果は下記のようになるはずです。(見やすいように少し整形してます。)
HTTP/1.1 200 OK
X-Frame-Options: SAMEORIGIN
X-XSS-Protection: 1; mode=block
X-Content-Type-Options: nosniff
X-Download-Options: noopen
X-Permitted-Cross-Domain-Policies: none
Referrer-Policy: strict-origin-when-cross-origin
Content-Type: application/json; charset=utf-8
access-token: q1wL0eAS3IwKGcs5-8vEyA
token-type: Bearer
client: sd74van0pd3Sxs4O-fowvQ
expiry: 1641540499
uid: example@example.com
ETag: W/"12ac3053b26f91ca234280ac13a0790c"
Cache-Control: max-age=0, private, must-revalidate
X-Request-Id: 707fe01b-d25a-4167-b0f2-95e009c9271a
X-Runtime: 0.403161
Vary: Origin
Transfer-Encoding: chunked

{
  "data": {
    "id": 1,
    "email": "example@example.com",
    "provider": "email",
    "uid": "example@example.com",
    "allow_password_change": false,
    "name": "テストユーザー"
  }
}
返ってきたヘッダのaccess-token, client, expiry, uid をリクエストのヘッダにつければ、認証状態でAPIにアクセスすることができます。
トークン検証APIの確認
devise_auth_tokenはトークンの検証用のAPIもあるので試してみましょう。
YOUR_ACCESS_TOKEN, YOUR_CLIENT, YOUR_EXPIRY, YOUR_UID には先ほど取得したものに置き換えてください。
$ curl localhost:3000/auth/validate_token -D - \
-H "access-token:YOUR_ACCESS_TOKEN" \
-H "client:YOUR_CLIENT" \
-H "expiry:YOUR_EXPIRY" \
-H "uid:YOUR_UID" \
-H "content-type:application/json"
うまくいけば、下記のような結果になるはずです。
HTTP/1.1 200 OK
X-Frame-Options: SAMEORIGIN
X-XSS-Protection: 1; mode=block
X-Content-Type-Options: nosniff
X-Download-Options: noopen
X-Permitted-Cross-Domain-Policies: none
Referrer-Policy: strict-origin-when-cross-origin
Content-Type: application/json; charset=utf-8
access-token: q1wL0eAS3IwKGcs5-8vEyA
token-type: Bearer
client: sd74van0pd3Sxs4O-fowvQ
expiry: 1641540499
uid: test-user+1@gmail.com
ETag: W/"f3e45c8f2942619bd67981aead0bc740"
Cache-Control: max-age=0, private, must-revalidate
X-Request-Id: 0b9e57df-1f3b-4597-9c0f-01a6b3f904be
X-Runtime: 0.086486
Vary: Origin
Transfer-Encoding: chunked

{
  "success": true,
  "data": {
    "id": 1,
    "provider": "email",
    "uid": "example@example.com",
    "allow_password_change":false,
    "name":"テストユーザー"
  }
}
独自APIで認証機能が使えることを確認
独自に作成したAPIでもdevise_token_authの認証機能が使えることを確認しましょう。
まずは、route.rbに下記を追加してください。
get '/hello', to: 'hello#index'
下記コマンドでHelloコントローラを作成しましょう。
rails g controller hello
コントローラを下記のように入力してください。
class HelloController < ApplicationController
  before_action :authenticate_user!
  def index
    message = "こんにちは、#{current_user.name}さん"
    render json: { message: message }, status: :ok
  end
end
before_action :authenticate_user!を冒頭に書くことでこのコントローラへのアクセスは認証を必須にしています。
まずはアクセストークンなしでリクエストしてみます。
$ curl localhost:3000/hello -D - \
-H "content-type:application/json"
結果は下記のように401エラーが返ってきます。
HTTP/1.1 401 Unauthorized
...

{"errors":["You need to sign in or sign up before continuing."]}
次にアクセストークンありでリクエストしてみます。
$ curl localhost:3000/hello \
-H "access-token:YOUR_ACCESS_TOKEN" \
-H "client:YOUR_CLIENT" \
-H "expiry:YOUR_EXPIRY" \
-H "uid:YOUR_UID" \
-H "content-type:application/json"
下記のようなメッセージが表示されれば成功です。
HTTP/1.1 200 OK
...

{"message":"こんにちは、テストユーザーさん"}
devise_token_authをLINEのアクセストークンに対応させる
今のままでは普通のEmail認証になってしまっているので、これをLINEに対応させていきます。
devise_token_authのコントローラをオーバーライドする形で対応していきましょう。
devise_token_authのオーバーライドする方法の詳細はこちらを参照してください。
まずは、下記のようにroute.rb を編集します。
    mount_devise_token_auth_for 'User', at: 'auth', controllers: {
      registrations: 'line_token_auth/registrations',
      sessions: 'line_token_auth/sessions'
    }
registrationsとsessionsではオーバーライドしたコントローラで処理するように修正しています。
Deviseの設定の修正
config/initializers/devise.rbを編集してDeviseの設定を修正します。
デフォルトでは認証キーがemailに設定されているので、これをuidに修正します。
-   #config.authentication_keys = [:email]
+   config.authentication_keys = [:uid]
ApplicationControllerの修正
application_controller.rbを下記のように書き換えましょう。
Devise関連の処理でパラメータとしてアクセストークンを受け入れるように修正しています。
class ApplicationController < ActionController::Base
  include DeviseTokenAuth::Concerns::SetUserByToken
  before_action :authenticate_user!, unless: :devise_controller?
  before_action :configure_permitted_parameters, if: :devise_controller?
  skip_before_action :verify_authenticity_token, if: :devise_controller? # skip CSRF check if API

  protected

  def configure_permitted_parameters
    devise_parameter_sanitizer.permit(:sign_up, keys: [:uid, :access_token])
    devise_parameter_sanitizer.permit(:sign_in, keys: [:uid, :access_token])
  end
end
LineTokenAuth::RegistrationsControllerの作成
LineTokenAuth::RegistrationsController(認証用コントローラ)を作成していきます。
まずは下記コマンドでコントローラを作成してください。
$ rails g controller LineTokenAuth::registrations
次に、内容を下記のように入力してください。
module LineTokenAuth
  # DeviseTokenAuthのコントローラを継承している
  class RegistrationsController < DeviseTokenAuth::RegistrationsController
    include LineTokenAuth::Concerns::LineAuthenticator

    def create
      build_resource

      unless @resource.present?
        raise DeviseTokenAuth::Errors::NoResourceDefinedError,
              "#{self.class.name} #build_resource does not define @resource,"\
              ' execution stopped.'
      end

      # if whitelist is set, validate redirect_url against whitelist
      return render_create_error_redirect_url_not_allowed if blacklisted_redirect_url?(@redirect_url)

      auth_result = authenticate(@resource[:uid], sign_up_params[:access_token])
      if auth_result[:error]
        return render_error(auth_result[:error][:code], auth_result[:error][:message])
      end
      @resource.name = auth_result[:profile][:name]
      @resource.image = auth_result[:profile][:image]
      if @resource.save
        yield @resource if block_given?

        if active_for_authentication?
          # email auth has been bypassed, authenticate user
          @token = @resource.create_token
          @resource.save!
          update_auth_header
        end

          render_create_success
      else
        clean_up_passwords @resource
        render_create_error
      end
    end
    protected

    def build_resource
      @resource            = resource_class.new(uid: sign_up_params[:uid])
      @resource.provider   = provider
    end

    private

    def provider
      'line'
    end
  end
end
DeviseTokenAuthのコントローラを継承して、create, build, provider メソッドをオーバーライドしています。
それぞれのメソッドを簡単にみていきます。
LineTokenAuth::RegistrationsController#create
create メソッドが長いですが、DeviseTokenAuthのコントローラとの差分は下記となっており、追加したのは5行だけになります。
    def create
      build_resource

      unless @resource.present?
        raise DeviseTokenAuth::Errors::NoResourceDefinedError,
              "#{self.class.name} #build_resource does not define @resource,"\
              ' execution stopped.'
      end
-
-     # give redirect value from params priority
-     @redirect_url = params.fetch(
-       :confirm_success_url,
-       DeviseTokenAuth.default_confirm_success_url
-     )
-
-     # success redirect url is required
-     if confirmable_enabled? && !@redirect_url
-       return render_create_error_missing_confirm_success_url
-     end

       # if whitelist is set, validate redirect_url against whitelist
       return render_create_error_redirect_url_not_allowed if blacklisted_redirect_url?(@redirect_url)


+      auth_result = authenticate(@resource[:uid], sign_up_params[:access_token])
+      if auth_result[:error]
+        return render_error(auth_result[:error][:code], auth_result[:error][:message])
-      # override email confirmation, must be sent manually from ctrl
-      callback_name = defined?(ActiveRecord) && resource_class < ActiveRecord::Base ? :commit : :create
-      resource_class.set_callback(callback_name, :after, :send_on_create_confirmation_instructions)
-      resource_class.skip_callback(callback_name, :after, :send_on_create_confirmation_instructions)
-
-      if @resource.respond_to? :skip_confirmation_notification!
-        # Fix duplicate e-mails by disabling Devise confirmation e-mail
-        @resource.skip_confirmation_notification!
       end
+      @resource.name = auth_result[:profile][:name]
+      @resource.image = auth_result[:profile][:image]
-
-       if @resource.save
-         yield @resource if block_given?
-
-         unless @resource.confirmed?
-         # user will require email authentication
-         @resource.send_confirmation_instructions({
-           client_config: params[:config_name],
-           redirect_url: @redirect_url
-         })
-       end

        if active_for_authentication?
          # ここでトークンを生成している
          @token = @resource.create_token
          update_auth_header
        end

        render_create_success
      else
        clean_up_passwords @resource
        render_create_error
      end
    end
authenticate メソッドでIDとトークンを渡し、認証の結果が返ってきています。
authenticate メソッドは冒頭のLineTokenAuth::Concerns::LineAuthenticatorの中で定義されています。
また、@resource.create_tokenの部分でトークンを生成していることが確認できます。
LineTokenAuth::RegistrationsController#build_resource
build_resourceはUserモデルを生成しています。
もともとはemailベースなので関連するものを削除し、uidのみを使用するように修正しています。
    def build_resource
+      @resource            = resource_class.new(uid: sign_up_params[:uid])
-      @resource            = resource_class.new(sign_up_params)
      @resource.provider   = provider
-
-      # honor devise configuration for case_insensitive_keys
-      if resource_class.case_insensitive_keys.include?(:email)
-        @resource.email = sign_up_params[:email].try(:downcase)
-      else
-        @resource.email = sign_up_params[:email]
-      end
    end
LineTokenAuth::RegistrationsController#provider
デフォルトはemailなのでproviderをlineに修正しています。
def provider
  'line'
end
LineTokenAuth::Concerns::LineAuthenticatorの作成
先程のcreateメソッドでも使用したLineTokenAuth::Concerns::LineAuthenticatorを作成していきます。
このConcernに具体的なLINEの認証処理を書いています。
まずは下記コマンドでConcernファイルを作成してください。
$ mkdir app/controllers/line_token_auth/concerns
$ touch app/controllers/line_token_auth/concerns/line_authenticator.rb
内容は下記のようになります。
require 'net/http'
require 'uri'

module LineTokenAuth::Concerns::LineAuthenticator
  extend ActiveSupport::Concern

  protected

  def authenticate(uid, access_token)
    verify_result = verify_line_token(access_token)
    if verify_result[:code] != 200
      return fail_authenticate(verify_result[:code], verify_result[:body]["error_description"])
    end
    if verify_result[:body]["client_id"] != line_channel_id
      return fail_authenticate(401, 'LINE Channel ID is not matched.')
    end
    if verify_result[:body]["expires_in"] <= 0
      return fail_authenticate(401, 'LINE access token is expired')
    end
    profile_result = get_profile_by_line_token(access_token)
    if profile_result[:code] != 200
      return fail_authenticate(profile_result[:code], profile_result[:body][:error_description])
    end
    if profile_result[:body]["userId"] != uid
      return fail_authenticate(401, 'uid is not matched.')
    end
    success_authenticate({
      uid: uid,
      name: profile_result[:body]["displayName"],
      image: profile_result[:body]["pictureUrl"]
    })
  end
  private
  def line_channel_id
    @line_channel_id ||=  ENV["LINE_CHANNEL_ID"]
  end
  def verify_line_token(access_token)
    uri = URI.parse("https://api.line.me/oauth2/v2.1/verify")
    uri.query = URI.encode_www_form(access_token: access_token)
    http = Net::HTTP.new(uri.host, uri.port)
    http.use_ssl = true
    req = Net::HTTP::Get.new uri.request_uri
    res = http.request req
    {
      code: res.code.to_i,
      body: JSON.parse(res.body)
    }
  end
  def get_profile_by_line_token(access_token)
    uri = URI.parse("https://api.line.me/v2/profile")
    http = Net::HTTP.new(uri.host, uri.port)
    http.use_ssl = true
    req = Net::HTTP::Get.new uri.request_uri
    req[:Authorization] = "Bearer #{access_token}"
    res = http.request req
    {
      code: res.code.to_i,
      body: JSON.parse(res.body)
    }
  end
  def fail_authenticate(code, message)
    { error: { code: code, message: message }, profile: nil }
  end
  def success_authenticate(profile)
    { error: nil, profile: profile }
  end
end
authenticateメソッドでLINEログインAPIのアクセストークンの有効性を検証するAPIとユーザープロフィールを取得するAPIを使っていることが確認できると思います。
また、環境変数LINE_CHANNEL_IDを使用しているので自分のLINEチャネルのチャネルIDを設定するする必要があります。
LineTokenAuth::SessionsControllerの作成
LineTokenAuth::SessionsController(セッションコントローラ)を作成していきます。
まずは下記コマンドでコントローラを作成してください。
$ rails g controller LineTokenAuth::sessions
次に、内容を下記のように入力してください。
module LineTokenAuth
  class SessionsController < DeviseTokenAuth::SessionsController
    include LineTokenAuth::Concerns::LineAuthenticator

    def create
      # Check
      field = (resource_params.keys.map(&:to_sym) & resource_class.authentication_keys).first
      @resource = nil
      if field
        q_value = get_case_insensitive_field_from_resource_params(field)
        @resource = find_resource(field, q_value)
      end

      if @resource && valid_params?(field, q_value) && (!@resource.respond_to?(:active_for_authentication?) || @resource.active_for_authentication?)
        auth_result = authenticate(@resource[field], resource_params[:access_token])
        if auth_result[:error]
          return render_error(auth_result[:error][:code], auth_result[:error][:message])
        end

        @token = @resource.create_token
        @resource.save

        sign_in(:user, @resource, store: false, bypass: false)

        yield @resource if block_given?

        render_create_success
      elsif @resource && !(!@resource.respond_to?(:active_for_authentication?) || @resource.active_for_authentication?)
        if @resource.respond_to?(:locked_at) && @resource.locked_at
          render_create_error_account_locked
        else
          render_create_error_not_confirmed
        end
      else
        render_create_error_bad_credentials
      end
    end
    def valid_params?(key, val)
      resource_params[:access_token] && key && val
    end
    def provider
      'line'
    end
  end
end
LineTokenAuth::SessionsController#create
createメソッドの差分は下記です。
    def create
      # Check
      field = (resource_params.keys.map(&:to_sym) & resource_class.authentication_keys).first
      @resource = nil
      if field
        q_value = get_case_insensitive_field_from_resource_params(field)
        @resource = find_resource(field, q_value)
      end

      if @resource && valid_params?(field, q_value) && (!@resource.respond_to?(:active_for_authentication?) || @resource.active_for_authentication?)
+       auth_result = authenticate(@resource[field], + resource_params[:access_token])
+       if auth_result[:error]
+         return render_error(auth_result[:error][:code], auth_result[:error][:message])
-       valid_password = @resource.valid_password?(resource_params[:password])
-       if (@resource.respond_to?(:valid_for_authentication?) && !@resource.valid_for_authentication? { valid_password }) || !valid_password
-         return render_create_error_bad_credentials
        end
-
-       create_and_assign_token
+       @token = @resource.create_token
+       @resource.save

        sign_in(:user, @resource, store: false, bypass: false)

        yield @resource if block_given?

        render_create_success
      elsif @resource && !(!@resource.respond_to?(:active_for_authentication?) || @resource.active_for_authentication?)
        if @resource.respond_to?(:locked_at) && @resource.locked_at
          render_create_error_account_locked
        else
          render_create_error_not_confirmed
        end
      else
        render_create_error_bad_credentials
      end
    end
RegistrationsControllerと同様、Email認証の部分をconcernsで定義したLINE認証の処理に差し替えていることがわかると思います。
LineTokenAuth::SessionsController#valid_params?
差分は下記です。
    def valid_params?(key, val)
+      resource_params[:access_token] && key && val
-      resource_params[:password] && key && val
    end
パラメータチェックでアクセストークンを必須にしています。
LineTokenAuth::SessionsController#provider
RegistrationsControllerと同様です。
デフォルトはemailなのでproviderをlineに修正しています。
def provider
  'line'
end
サーバサイドは完了🎉
以上でdevise_auth_tokenのオーバーライド処理は完了です🎉
この状態でLINEのアクセストークンで認証し、認証状態を保持することができるようになっているはずです。
フロント側(LIFFアプリ)の実装
次に肝心のLIFFアプリを作っていきます。
LIFFアプリの管理画面での細かい設定は省略します。
まずはHTMLです。本当に必要最低限のものにしてあります。
<!DOCTYPE html>
<html lang="ja">
<head>
    <meta charset="utf-8"/>
    <meta name="viewport" content="width=device-width, initial-scale=1.0">
    <title>hello</title>
</head>
<body>
	<h1>Loading...</h1>
	<script charset="utf-8" src="https://static.line-scdn.net/liff/edge/2/sdk.js"></script>
	<script src="./app.js"></script>
</body>
</html>
CDNからLIFFのSDKを呼んで、自分のapp.jsを呼んでるだけですね。
次にjavascriptです。こちらも説明のため最低限の素のjsになっています。
const store = {
    userId: "",
    client: "",
    accessToken: "",
    expiry: 0
};
const LIFF_ID = "YOUR_LIFF_ID";

window.onload = async function() {
    await liff.init({ liffId: LIFF_ID });
    // LINEアプリ外で開いた時はログイン処理をする
    if (!liff.isLoggedIn()) {
        liff.login();
    }
    const { userId } = liff.getContext();
    store.userId = userId;
    console.log(LIFF_ID, liff.getContext());
    const accessToken = await liff.getAccessToken();
    await signIn(store.userId, accessToken);
    if (!store.accessToken) {
        console.log(accessToken);
        await signUp(store.userId, accessToken);
    }
    const message = await getHelloMessage();
    console.log(message);
    document.getElementsByTagName('h1')[0].innerText = message;
};
async function signIn(userId, accessToken) {
    const res = await fetch('/auth/sign_in', {
        method: 'POST',
        headers: {
            'Content-Type': 'application/json'
        },
        body: JSON.stringify({
            uid: userId,
            access_token: accessToken
        })
    });
    if (res.status === 200) {
        store.client = res.headers.get('client');
        store.accessToken = res.headers.get('access-token');
        return;
    }
    if (res.status !== 401 && res.status !== 404) {
        const data = await res.json();
        console.error(data);
        throw new Error(`Status Code: ${res.status}.`)
    }
}
async function signUp(userId, accessToken) {
    const res = await fetch('/auth', {
        method: 'POST',
        headers: {
            'Content-Type': 'application/json'
        },
        body: JSON.stringify({
            uid: userId,
            access_token: accessToken
        })
    });
    if (res.status !== 200) {
        const data = await res.json();
        console.error(data);
        throw new Error(`Status Code: ${res.status}.`);
    }
    // 認証に成功したときにアクセストークンなどを保存
    store.client = res.headers.get('client');
    store.accessToken = res.headers.get('access-token');
    store.expiry = res.headers.get('expiry');
}
async function getHelloMessage() {
    // 保存したアクセストークンを使用し認証必須のAPIを呼んでいる
    const res = await fetch('/hello', {
        headers: {
            'Content-Type': 'application/json',
            ...getAuthHeaders()
        }
    });
    if (res.status !== 200) {
        const data = await res.json();
        console.error(data);
        throw new Error(`Status Code: ${res.status}.`);
    }
    const data = await res.json();
    return data.message;
}
// 保存しているアクセストークンなどからリクエストヘッダを生成
function getAuthHeaders() {
    return {
        uid: store.userId,
        client: store.client,
        expiry: store.expiry,
        'access-token': store.accessToken
    }
}
/auth/sign_in APIにユーザIDとLINEのアクセストークンを渡し、取得したdevise_auth_tokenのアクセストークンを保存していることが確認できると思います。
(2種類のアクセストークンが出てきてややこしいですね。。。)
その後、認証必須の/hello APIをアクセストークン(devise_auth_token)を使って呼び出し、取得したメッセージを画面に表示しています。
「こんにちは、"LINE名"さん」というメッセージが表示されたら成功です。
おわりに
ちょっとややこしいですが、一度この基盤を整えてしまえば、あとは普通のRailsのWeb開発になります。
ベースはDeviseになっているので、後からLIFFの認証以外を使いたくなっても柔軟に対応することができるはずです。
参考記事