発売当初から品切れが続き、2021年3月現在でも入手困難な商品であるPlaystation5。私はそのコントローラを購入しました。ROS2ロボットのコントローラとして使用する予定です。Dualshock3からDualshock4に乗り換えた方なら分かるかもしれませんが、ボタンの割り当ては大体の場合前世代と互換性がありません。しかも、この世代(4→5)は結構変わっている…
そこで、この記事ではDualsense(PS5純正コントローラ)の従来との変更点を示しながら、ROS2用に作成したライブラリの使い方の解説をします。
ほぼ同じ解説をGitHubリポジトリに載せています。
各世代のコントローラの違い
ここでは、無線で接続できる最初の世代であるDualshock3から最新のDualsenseについて比較します。特に、Dualsenseは前のバージョンよりもサイズが大きくなっています。重量相応(?)に質感もアップしており、Dualshockのようなプラスチック感を感じさせないデザインとなっています。充電方法もスタンダードになりつつあるType-Cが使われています。
Ubuntuでの使用を想定している私には無縁ですが、新しい振動体験もできるそうで名称にもその意気が感じられます。(個人的にはRe〇lsenseを連想してしまう)
| Name | DUALSHOCK3 | DUALSHOCK4 | DUALSENSE |
|---|---|---|---|
| Model number | CECHZC2xxx | CUH-ZCT1(2) | CFI-ZCT1J |
| Weight[g] | 193 | 210 | 280 |
| Battery | Lithium-ion 300?[mAh] | Lithium-ion 1000[mAh] | Lithium-ion 1560[mAh] |
| Dimensions[mm] | 160x55x97 | 161x57x100 | 160x66x106 |
| Bluetooth Connection | Bluetooth Ver 2.0? | Bluetooth Ver 2.1 | Bluetooth Ver 5.1 |
| USB Connection | Mini USB Type-B | micro USB Type-B | Type-C |
Ubuntuでの違い
Dualsenseは前世代のDualshock4と似て非なる機能の「タッチパッド」があります。Dualshock4では、タッチパッドがそのまま左クリック付きのタッチパッドとしてマウスのように利用できましたが、このタッチパッドがマウスとして利用できなくなりました。その代わり、タッチパッドの押し込みがそのままボタン入力として使えるようになりました。これにより、Dualsenseは16個のボタンと2つのアナログジョイスティックを搭載したコントローラになりました(このシリーズでは最多)。ちなみに、マイクのミュートボタンもついていますが、それは使えないみたいです。
ROS2におけるコントローラの割り当て(ROS2用)
私が作成したライブラリは、joy_nodeの出力において各世代で異なるコントローラのボタンの割り当てを共通化させてROS2プログラムの書き換え手間を省くライブラリです。コントローラを変更する際はコンパイルし直さないといけませんが、その手間を最小限に抑えることができます。以下にそれぞれのボタン(ジョイスティック)の説明とその変数への割り当てを示します。
ROS2-Foxy用に作成しました。
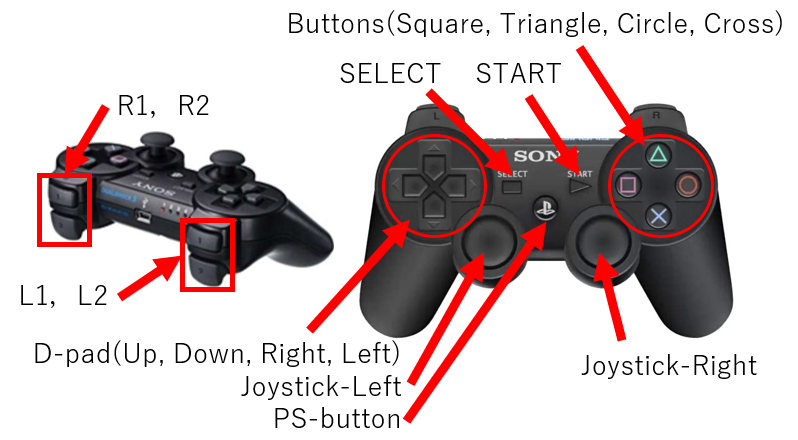
DUALSHOCK3
| Button (Joy) name | joy-msgs (sensor_msgs/msg/joy) | Handling with "joy/ps3.h" |
|---|---|---|
| Cross btn | buttons[0] | cross_btn |
| Circle btn | buttons[1] | circle_btn |
| Triangle btn | buttons[2] | triangle_btn |
| Square btn | buttons[3] | square_btn |
| L1 btn | buttons[4] | L1_btn |
| R1 btn | buttons[5] | R1_btn |
| L2 analog | buttons[6], axes[2] | L2_btn, L2 |
| R2 analog | buttons[7], axes[5] | R2_btn, R2 |
| SELECT btn | buttons[8] | select_btn |
| SHARE btn | None | share_btn=buttons[8] |
| CREATE btn | None | create_btn=buttons[8] |
| START btn | buttons[9] | start_btn |
| OPTIONS btn | None | options_btn=buttons[9] |
| PS btn | buttons[10] | PS_btn |
| Up btn | buttons[13] | up_btn, d_pad_x |
| Down btn | buttons[14] | down_btn, d_pad_x |
| Left btn | buttons[15] | left_btn, d_pad_y |
| Right btn | buttons[16] | right_btn, d_pad_y |
| Joystick left x | axes[0] | joy_left_x |
| Joystick left y | axes[1] | joy_left_y |
| Joystick right x | axes[3] | joy_right_x |
| Joystick right y | axes[4] | joy_right_y |
| Touch-pad | None | touch_pad=0 |
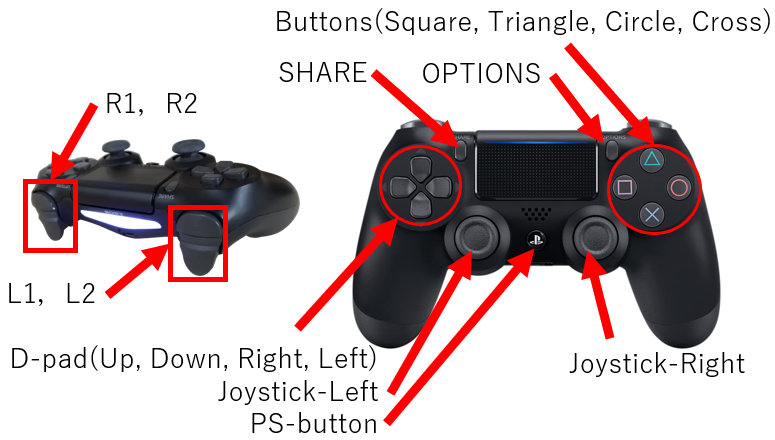
DUALSHOCK4
- 十字キーがjoyメッセージにおいてbuttonからaxes扱いになりました。ただし、ライブラリ内に変換を行うメソッドを備えているため、Dualshock3と同じプログラムでも問題なく動きます。
| Button (Joy) name | joy-msgs (sensor_msgs/msg/joy) | Handling with "joy/ps4.h" |
|---|---|---|
| Cross btn | buttons[0] | cross_btn |
| Circle btn | buttons[1] | circle_btn |
| Triangle btn | buttons[2] | triangle_btn |
| Square btn | buttons[3] | square_btn |
| L1 btn | buttons[4] | L1_btn |
| R1 btn | buttons[5] | R1_btn |
| L2 analog | buttons[6], axes[2] | L2_btn, L2 |
| R2 analog | buttons[7], axes[5] | R2_btn, R2 |
| SELECT btn | None | select_btn=buttons[8] |
| SHARE btn | buttons[8] | share_btn |
| CREATE btn | None | create_btn=buttons[8] |
| START btn | None | start_btn=buttons[9] |
| OPTIONS btn | buttons[9] | options_btn |
| PS btn | buttons[10] | PS_btn |
| Up btn | axes[6]= 1 | up_btn, d_pad_x |
| Down btn | axes[6]= -1 | down_btn, d_pad_x |
| Left btn | axes[7]= 1 | left_btn, d_pad_y |
| Right btn | axes[7]= -1 | right_btn, d_pad_y |
| Joystick left x | axes[0] | joy_left_x |
| Joystick left y | axes[1] | joy_left_y |
| Joystick right x | axes[3] | joy_right_x |
| Joystick right y | axes[4] | joy_right_y |
| Touch-pad | None | touch_pad=0 |
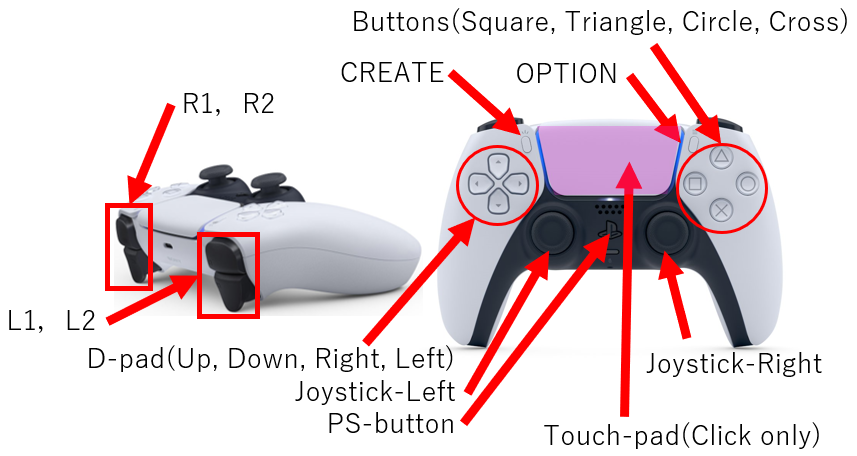
Dualsense
- buttonの配列が四角ボタンから始まったり、L2・R2の位置が変わったりと大きく変わっています。
また、タッチパッドがボタンとして使用できます。最近のLinuxカーネルのアップデートによって使えなくなったそうです。
| Button (Joy) name | joy-msgs (sensor_msgs/msg/joy) | Handling with "joy/ps5.h" |
|---|---|---|
| Cross btn | buttons[1] | cross_btn |
| Circle btn | buttons[2] | circle_btn |
| Triangle btn | buttons[3] | triangle_btn |
| Square btn | buttons[0] | square_btn |
| L1 btn | buttons[4] | L1_btn |
| R1 btn | buttons[5] | R1_btn |
| L2 analog | buttons[6], axes[3] | L2_btn, L2 |
| R2 analog | buttons[7], axes[4] | R2_btn, R2 |
| SELECT btn | None | select_btn=buttons[8] |
| SHARE btn | None | share_btn=buttons[8] |
| CREATE btn | buttons[8] | create_btn |
| START btn | None | start_btn=buttons[9] |
| OPTIONS btn | buttons[9] | options_btn |
| PS btn | buttons[12] | PS_btn |
| Up btn | axes[6]= 1 | up_btn, d_pad_x |
| Down btn | axes[6]= -1 | down_btn, d_pad_x |
| Left btn | axes[7]= 1 | left_btn, d_pad_y |
| Right btn | axes[7]= -1 | right_btn, d_pad_y |
| Joystick left x | axes[0] | joy_left_x |
| Joystick left y | axes[1] | joy_left_y |
| Joystick right x | axes[2] | joy_right_x |
| Joystick right y | axes[5] | joy_right_y |
接続方法
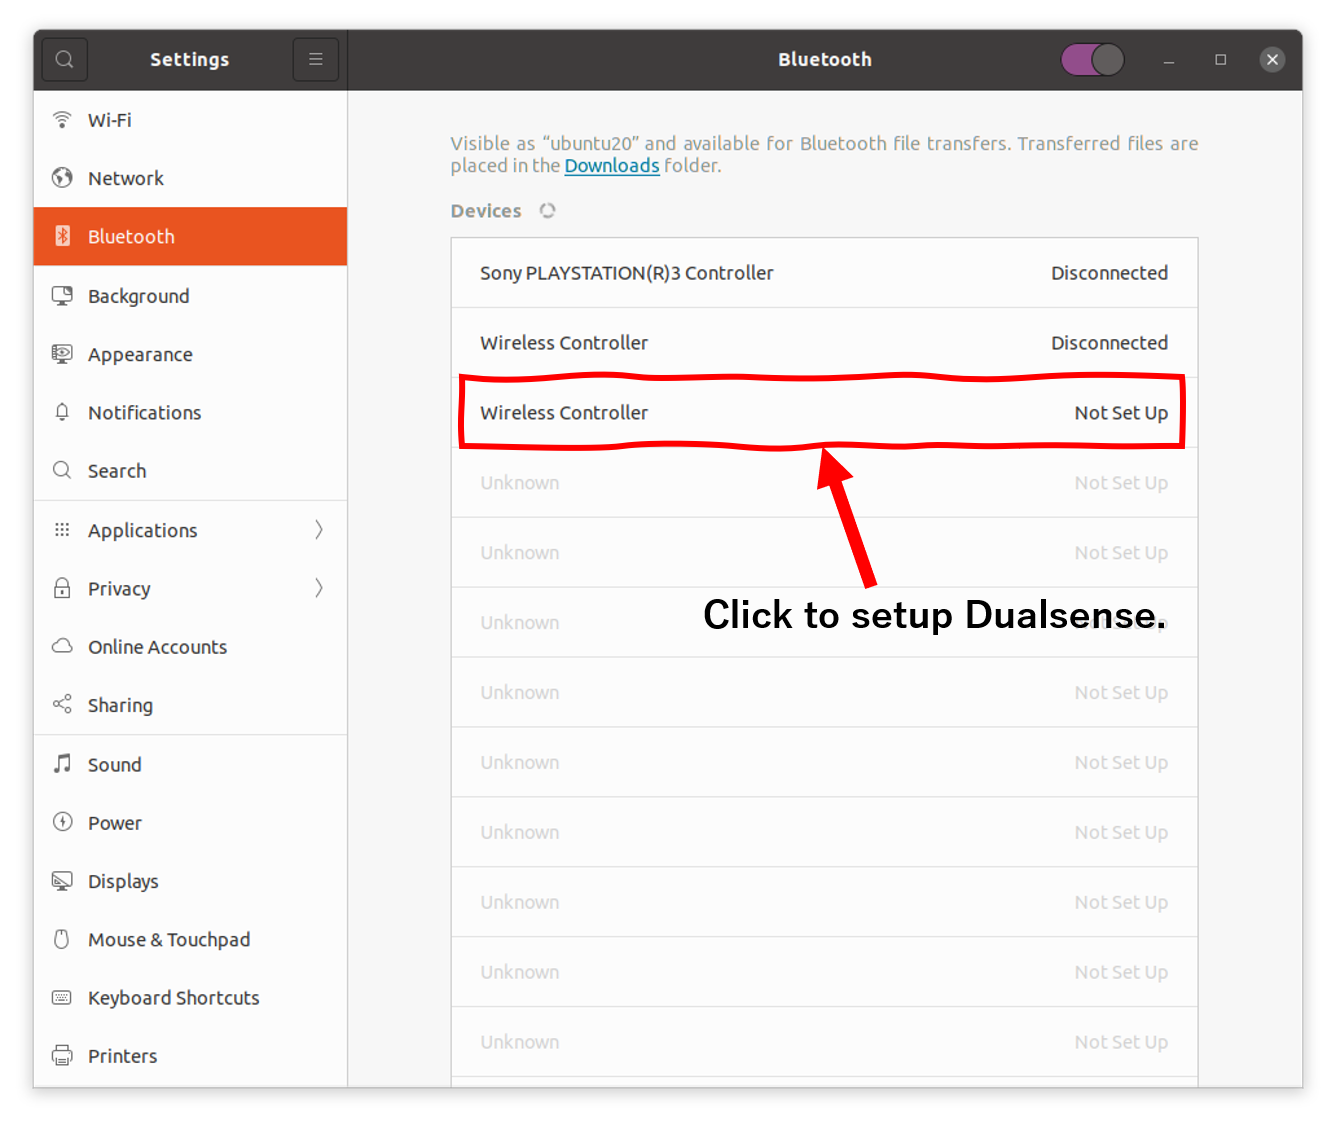
- Bluetooth接続可能なPCとコントローラを無線接続する方法を示します。Ubuntu 20.04 LTSを前提にしています。
Dualshock4 & Dualsense (Wireless)
Dualshock3 (Wireless)
- Dualshock3とPCをUSB接続します。
- PSボタンを押します。
- 設定->Bluetoothを開きます。
- 対象のDualshock3を押してセットアップします。(Dualsenseの方法とほぼ同じ)
- USBを外します。
コントローラの切断とデバイス削除
-
設定->Bluetoothを開きます。
-
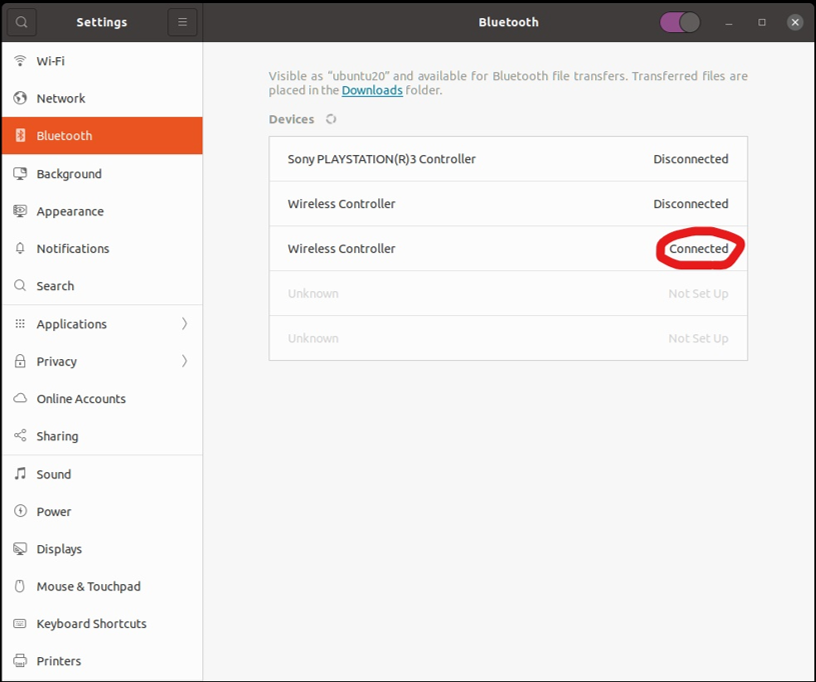
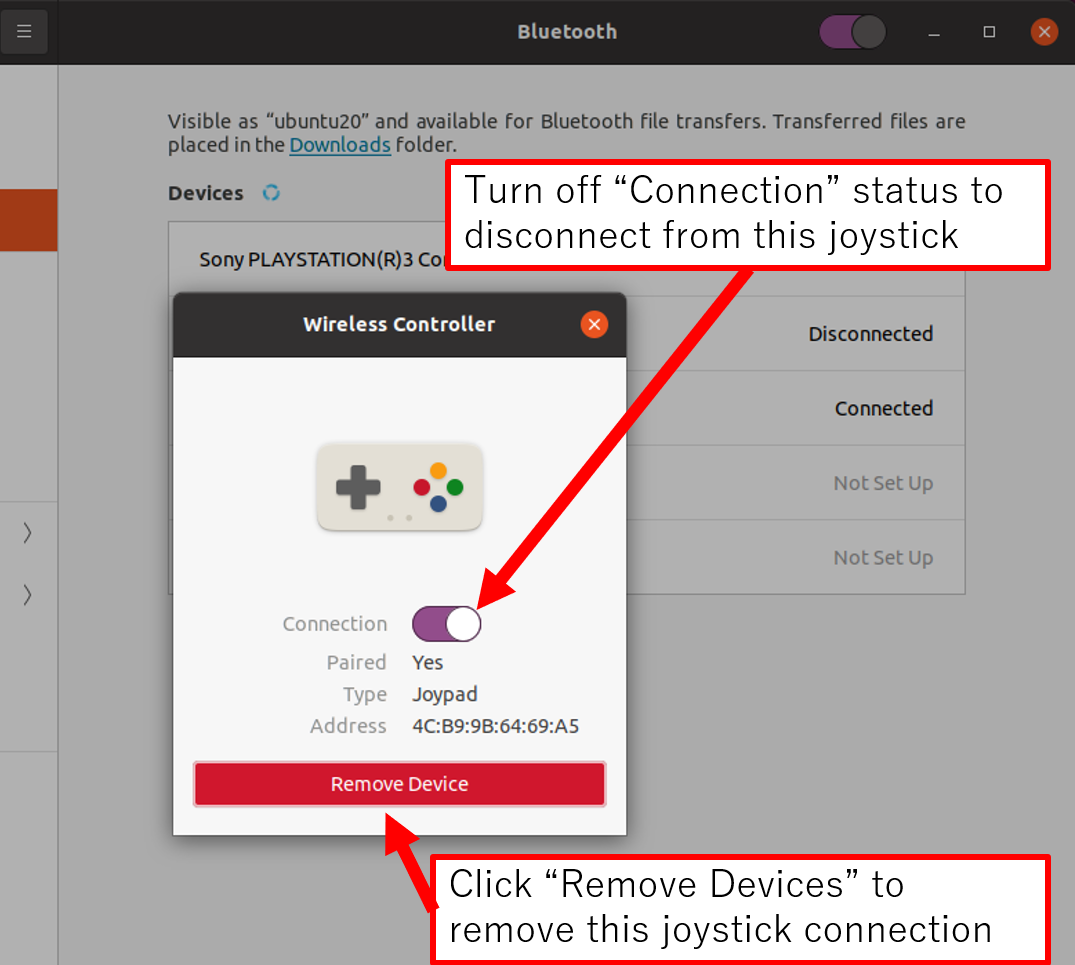
(コントローラの切断) : "Connection"のステータスをOFFにしてコントローラを切断します。
-
(コントローラの削除) : "Remove Device -> Remove Device"と押して削除します。
ライブラリの使用法
チュートリアル
- ros-foxy-desktopがインストールされた状態を想定します。まず、パッケージ等をインストールし、ビルドします。
$ cd ~
$ sudo apt install -y ros-foxy-joy*
$ mkdir -p ros2_ws/src/
$ cd ros2_ws/src/
$ git clone https://github.com/Ar-Ray-code/ps_ros2_common.git
$ cd ps_ros2_common/
$ git checkout foxy-devel
$ cd ~/ros2_ws/
$ colcon build
$ source install/local_setup.bash
- サンプルプログラムを実行します。
## Terminal 1
$ ros2 run joy joy_node

## Terminal 2
$ ros2 run ps_ros2_common joy_test

## Terminal 3
$ ros2 topic echo /output
"/dev/input/js0"にコントローラの入力があれば、"/output"から何かしらの出力があると思います。 ![]()
![]()
Dualshock4 や Dualsenseでプログラムを利用したい場合は、"src/example_joy.cpp"の1行目を変更してください。
# include "joy/ps_base.hpp"
# define JOY_VERSION PS3
//                   ^ PS3 or PS4 or PS5 (Comment)

# include <example_interfaces/msg/int32.hpp>

# if JOY_VERSION == PS5
    #include "joy/ps5.hpp"
    using namespace ps5;
# elif JOY_VERSION == PS4
    #include "joy/ps4.hpp"
    using namespace ps4;
# elif JOY_VERSION == PS3
    #include "joy/ps3.hpp"
    using namespace ps3;
# endif

...
ライブラリの使用法
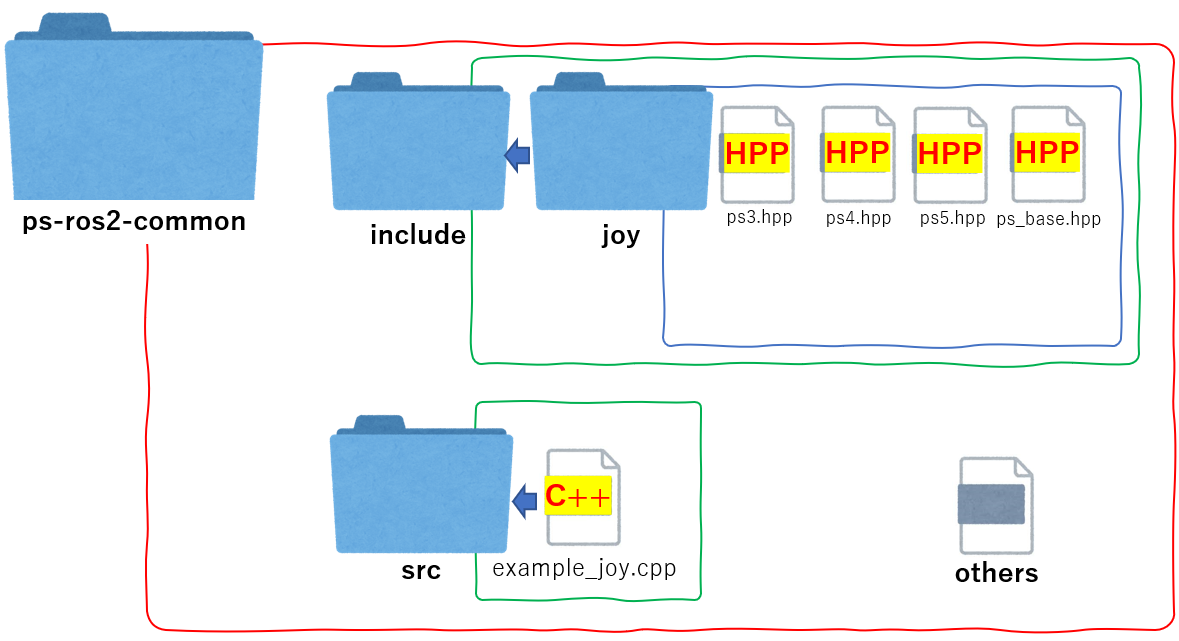
フォルダ構造を以下に示します。仮に上に示したGigHubリポジトリを使用している場合、 "include/joy/*"以下のファイルをコピペしてパスを通すことでライブラリを使用することができます。
"ps3.hpp"and"ps4.hpp","ps5.hpp"は"ps_base.hpp"の関数をオーバーライドするための関数です。他のコントローラで使用したい場合はこれに似たファイルを作成してください。
簡単なプログラムの例を示します。
# include "joy/ps_base.hpp"
# define JOY_VERSION PS3

# if JOY_VERSION == PS5
    #include "joy/ps5.hpp"
    using namespace ps5;
# elif JOY_VERSION == PS4
    #include "joy/ps4.hpp"
    using namespace ps4;
# elif JOY_VERSION == PS3
    #include "joy/ps3.hpp"
    using namespace ps3;
# endif

class example_joy:public rclcpp::Node, public ps
{
    public:
        void sub_joy_thread(const sensor_msgs::msg::Joy::SharedPtr msg)
        {
            get_data(msg);

            std::system("clear");
            std::cout << "square_btn:" << square_btn << std::endl;
			// Write your code !
        }

        example_joy(const std::string name, const rclcpp::NodeOptions & options):Node(name, options)
        {
            sub_joy = this->create_subscription<sensor_msgs::msg::Joy>("/joy", 1, std::bind(&ps::sub_joy_thread, this, std::placeholders::_1));
        }
};

int main(int argc, char** argv)
{
    rclcpp::init(argc, argv);
    rclcpp::NodeOptions options;
    auto node = std::make_shared<example_joy>("joy_test",options);

    rclcpp::spin(node);
    rclcpp::shutdown();
    return 0;
}
クラスについて(ps_base.hpp)
メソッド一覧
- ps_base::ps_base()
- ps_baseクラスの初期化
- virtual void ps_base::get_data(const sensor_msgs::msg::Joy::SharedPtr msg)=0
- "sensor_msgs::msg::Joy"のメッセージをメンバ変数に代入する関数です。
- virtual void ps_base::sub_joy_thread(const sensor_msgs::msg::Joy::SharedPtr msg)
- コールバック用関数です。オーバーライドして使います。
- void ps_base::btn2d_pad()
- 十字キーについて、ボタンのデータを軸のデータに変換する関数です。
- void ps_base::d_pad2btn()
- 十字キーについて、軸のデータをボタンのデータに変換する関数です。
- void ps_base::init_data()
- メンバ変数を初期化します。
メンバ変数一覧
-
rclcpp::Subscription<sensor_msgs::msg::Joy>::SharedPtr sub_joy -
bool up_btn
-
bool down_btn
-
bool right_btn
-
bool left_btn
-
bool square_btn
-
bool square_btn
-
bool circle_btn
-
bool triangle_btn
-
bool cross_btn
-
bool L1_btn
-
bool R1_btn
-
bool select_btn
-
bool start_btn
-
bool PS_btn
-
bool share_btn
-
bool options_btn
-
bool create_btn
-
bool touch_pad
-
bool R2_btn
-
bool L2_btn
-
float R2
-
float L2
-
float d_pad_x
-
float d_pad_y
-
float joy_left_x
-
float joy_left_y
-
float joy_right_x
-
float joy_right_y

