目次
- はじめに
- 実行環境
- ソースコードの解説
3.1 Google Colaboratoryとの連携
3.2 画像データの入手
3.3 学習用データと検証用データの作成
3.4 モデルの定義と学習
3.5 画像分類の結果と出力 - 実行結果と考察
- 製作したアプリ
- おわりに
1. はじめに
こちらはAidemyさんのAIアプリ開発講座(6ヵ月)を受講した成果報告となります。
製作したアプリのソースコードと解説をブログという形で投稿させていただきます。
テーマ「犬と猫の画像分類」
受講中に学んだ男女識別のアプリ作成を基にして、身近な動物である犬と猫の画像分類アプリを製作しました。

2. 実行環境
OS:Windows10
・Google Colaboratory
・Visual Studio Code(Flask利用のため)
3. ソースコードの解説
3.1 Google Colaboratoryとの連携
ソースコードを実行した際にGoogleドライブの画像データをGoogle Colaboratoryから参照できるように、下記コードを実行します。詳細なやり方は下記リンクを参照。
参考記事:【超簡単】GoogleColabでGoogleドライブをマウント
from google.colab import drive
drive.mount('/content/drive')
3.2 画像データの入手
学習及び検証に必要な画像は、kaggle.comにてデータセットを検索して入手しました。
◆Cat and Dog(kaggle.com)
犬・猫ともに学習データ4000枚ずつ、検証データ1000枚ずつのデータセットです。
今回はデータセットの中から1000枚ずつに絞り、Googleドライブに格納しました。
※今回はデータセットから画像を入手しましたが、Webページから必要な情報を自動で抜き出すスクレイピング(icrawlerやBeautifulSoupなど)でも多くの画像データを収集可能です。
3.3 学習用データと検証用データの作成
必要なライブラリをインポートしたら、Googleドライブから犬と猫の画像を読み込み、画像サイズを変換してリストに格納します。
# ライブラリのインポート
import os
import cv2
import numpy as np
import matplotlib.pyplot as plt
from tensorflow.keras.utils import to_categorical
from tensorflow.keras.layers import Dense, Dropout, Flatten, Input
from tensorflow.keras.applications.vgg16 import VGG16
from tensorflow.keras.models import Model, Sequential
from tensorflow.keras import optimizers

# Googleドライブのファイルパスを指定する。
path_cats = os.listdir("/content/drive/MyDrive/Seikabutsu/dataset/cats_1000/")
path_dogs = os.listdir("/content/drive/MyDrive/Seikabutsu/dataset/dogs_1000/")

# 画像を格納するリストの作成
img_cats = []
img_dogs = []

# 各カテゴリの画像サイズを変換してリストに保存
img_size = 50 # 画像サイズ:50×50
for i in range(len(path_cats)):
    img = cv2.imread("/content/drive/MyDrive/Seikabutsu/dataset/cats_1000/"
                     + path_cats[i])
    b,g,r = cv2.split(img)
    img = cv2.merge([r,g,b])
    img = cv2.resize(img, (img_size,img_size))
    img_cats.append(img)

for i in range(len(path_dogs)):
    img = cv2.imread("/content/drive/MyDrive/Seikabutsu/dataset/dogs_1000/"
                     + path_dogs[i])
    b,g,r = cv2.split(img)
    img = cv2.merge([r,g,b])
    img = cv2.resize(img, (img_size,img_size))
    img_dogs.append(img)
犬と猫の学習用データを1つに集約します。正解ラベルの付け方は、コンピュータが理解出来るように"犬","猫"ではなく、"0","1"という値を与えます。
※3種類以上の分類の場合は、"2","3"...と正解ラベルを増やしていきます。
# 犬と猫の画像を一つのリストに集約、及び正解ラベルを設定する。
X = np.array(img_cats + img_dogs)
y = np.array([0]*len(img_cats)  # 0:cats
           + [1]*len(img_dogs)) # 1:dogs
集約した学習用データをランダムに並び替えることで、学習の偏りを防止します。
データセットの画像データは学習用として80%、検証用として20%に分割して、データリストを作成しました。
#ラベルをランダムに並び変える。
rand_index = np.random.permutation(np.arange(len(X)))
X = X[rand_index]
y = y[rand_index]

# 学習データを80%、検証データを20%に分割する。
X_train = X[:int(len(X)*0.8)]
y_train = y[:int(len(y)*0.8)]
X_test = X[int(len(X)*0.8):]
y_test = y[int(len(y)*0.8):]
one-hot表現は、クラス数(今回は犬・猫の2つ)と同じ長さの配列を用意し、正解のクラスに対応するインデックスのみを1、それ以外を0にすることで、全てのクラスの値を平等に扱うことができるエンコーディング手法です。
# 正解ラベルをone-hotの形にする。
y_train = to_categorical(y_train)
y_test = to_categorical(y_test)
3.4 モデルの定義と学習
VGG16を読み込んで転移学習を行います。
VGG16モデルから出力を受け取り、Sequentialモデルを用いて追加の層を定義します。
Flatten(input_shape=vgg16.output_shape[1:])
→VGG16から出力を1次元のベクトルに変換します。
Dense(256, activation='relu')
→256ノードの全結合層を追加。活性化関数はReLUを使用。
sigmoid関数を試したが、ReLU関数の方が正解率が高かったためこちらを採用。
Dropout(rate=0.5)
→過学習を防止するためのドロップアウト層を追加。
50%の学習データを訓練時に無効とすることで、モデルの汎用性を高める。
~中略~
Dense(2, activation='softmax')
→2ノードの全結合層を追加。ここのノード数は分類するクラス数と同じ数とする。
input_tensor = Input(shape=(img_size, img_size, 3))
vgg16 = VGG16(include_top=False, weights='imagenet', input_tensor=input_tensor)

# モデルの定義
top_model = Sequential()
top_model.add(Flatten(input_shape=vgg16.output_shape[1:]))
top_model.add(Dense(256, activation='relu'))
top_model.add(Dropout(rate=0.5))
top_model.add(Dense(32, activation='relu'))
top_model.add(Dropout(rate=0.5))
top_model.add(Dense(2, activation='softmax'))
VGG16に含まれる全ての層を学習に取り込むと、データ量が多いうえ学習時間がかかるため、15層までを使用する。
# VGG16モデルと追加層top_modelの連結。
model = Model(inputs=vgg16.input, outputs=top_model(vgg16.output))

#VGG16の特徴抽出を15層までに固定。
for layer in model.layers[:15]:
    layer.trainable = False
model.compile()
→損失関数lossと最適化アルゴリズムoptimizerの設定。
model.fit()
→compileした内容で訓練を実施。
batch_size
→一度の学習に使用するデータ数。
epochs
→訓練用データを繰り返し学習するサイクル数。
verbose
→学習中の表示方法。
0:プログレスバーを表示しない、1:表示する、2:結果のみ表示する。
# 損失関数と最適化関数の設定
model.compile(loss='categorical_crossentropy',
              optimizer=optimizers.SGD(learning_rate=1e-4, momentum=0.9),
              metrics=['accuracy'])

# 訓練を実行する
history = model.fit(X_train, y_train, batch_size=64, epochs=50, validation_data=(X_test, y_test))
3.5 画像分類の結果と出力
あらかじめ正解ラベルとして"猫"="0"、"犬"="1"を割り振っていたので、入力画像の分類が"0"となれば"猫"、"1"となれば"犬"と出力する関数を定義する。
# 画像を受け取り、名称を判別する関数
def pred(img):
    img = cv2.resize(img, (img_size, img_size))
    pred = np.argmax(model.predict(np.array([img])))
    if pred == 0:
        return "cats"
    else:
        return "dogs"
evaluateメソッドにより汎化精度(新規データに対する精度)を算出する。
# 精度の評価
scores = model.evaluate(X_test, y_test, verbose=1)
print('Test loss:', scores[0])
print('Test accuracy:', scores[1])

model.summary()
学習で使用していない新しい画像を読み込ませて、先ほど定義したpred関数で入力画像の分類予測を行う。
# pred関数に写真を渡して分類を予測
path_pred = os.listdir("/content/drive/MyDrive/Seikabutsu/dataset/single_prediction/")
img = cv2.imread("/content/drive/MyDrive/Seikabutsu/dataset/single_prediction/"
                + path_pred [1])
b,g,r = cv2.split(img)
my_img = cv2.merge([r,g,b])
plt.imshow(my_img)
plt.show()
print(pred(img))

# accuracyとlossのグラフを描画
plt.figure(figsize=(12, 6))
plt.subplot(1, 2, 1)
plt.plot(history.history["accuracy"], label="accuracy", ls="-", marker="o")
plt.plot(history.history["val_accuracy"], label="val_accuracy", ls="-", marker="x")
plt.ylabel("accuracy")
plt.xlabel("epoch")
plt.legend(loc="best")

plt.subplot(1, 2, 2)
plt.plot(history.history["loss"], label="loss", ls="-", marker="o")
plt.plot(history.history["val_loss"], label="val_loss", ls="-", marker="x")
plt.ylabel("loss")
plt.xlabel("epoch")
plt.legend(loc="best")

plt.show()
4. 実行結果と考察
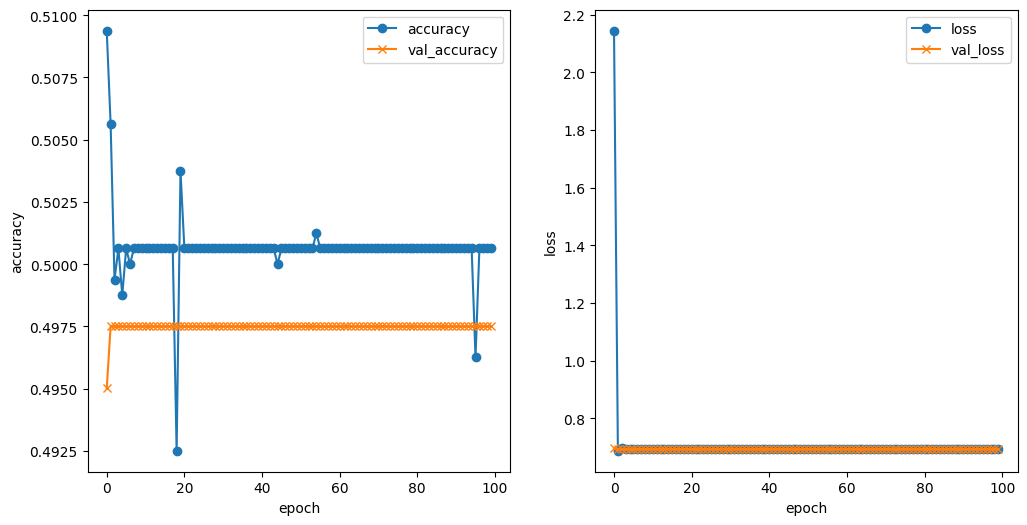
犬と猫それぞれ800枚の学習データから訓練したモデルに対して、"猫"の画像を入力して正しく識別するか確認します。

画像サイズ:50×50
バッチサイズ:32
エポック数:100
正解率:49.8%
判定:dogs(犬)
出力結果
Epoch 100/100
50/50 [==============================] - 1s 23ms/step - loss: 0.6931 - accuracy: 0.5006 - val_loss: 0.6932 - val_accuracy: 0.4975
13/13 [==============================] - 0s 20ms/step - loss: 0.6932 - accuracy: 0.4975
Test loss: 0.6932483911514282
Test accuracy: 0.4975000023841858
mnistの時よりも大きめの50×50の画像サイズで学習を行なったところ、出力結果は49.8%と低く、判定も間違っていたためハイパーパラメータの見直しが必要となりました。
学習に使用した元画像を見ると、対象が映っている画像の面積が小さいものもあったため、画像サイズを大きくすることでより特徴の抽出がされやすくなるのではないかと考えました。
尚、アイデミーの先輩方の記事を拝見したところ、Gitの容量制限があるとのことなので、
サイズが大きすぎない100×100の画像で学習を実行してみます。
画像サイズ:100×100
バッチサイズ:32
エポック数:100
正解率:89.2%
判定:cats(猫)
出力結果
Epoch 100/100
50/50 [==============================] - 2s 49ms/step - loss: 0.0026 - accuracy: 0.9987 - val_loss: 1.3701 - val_accuracy: 0.8925
13/13 [==============================] - 0s 34ms/step - loss: 1.3701 - accuracy: 0.8925
Test loss: 1.3701164722442627
Test accuracy: 0.8924999833106995
model.summary()
=================================================================
 input_3 (InputLayer)        [(None, 100, 100, 3)]     0

 block1_conv1 (Conv2D)       (None, 100, 100, 64)      1792

 block1_conv2 (Conv2D)       (None, 100, 100, 64)      36928

 block1_pool (MaxPooling2D)  (None, 50, 50, 64)        0

 block2_conv1 (Conv2D)       (None, 50, 50, 128)       73856

 block2_conv2 (Conv2D)       (None, 50, 50, 128)       147584

 block2_pool (MaxPooling2D)  (None, 25, 25, 128)       0

 block3_conv1 (Conv2D)       (None, 25, 25, 256)       295168

 block3_conv2 (Conv2D)       (None, 25, 25, 256)       590080

 block3_conv3 (Conv2D)       (None, 25, 25, 256)       590080

 block3_pool (MaxPooling2D)  (None, 12, 12, 256)       0

 block4_conv1 (Conv2D)       (None, 12, 12, 512)       1180160

 block4_conv2 (Conv2D)       (None, 12, 12, 512)       2359808

 block4_conv3 (Conv2D)       (None, 12, 12, 512)       2359808

 block4_pool (MaxPooling2D)  (None, 6, 6, 512)         0

 block5_conv1 (Conv2D)       (None, 6, 6, 512)         2359808

 block5_conv2 (Conv2D)       (None, 6, 6, 512)         2359808

 block5_conv3 (Conv2D)       (None, 6, 6, 512)         2359808

 block5_pool (MaxPooling2D)  (None, 3, 3, 512)         0

 sequential_4 (Sequential)   (None, 2)                 1188194

=================================================================
Total params: 15,902,882
Trainable params: 8,267,618
Non-trainable params: 7,635,264
_________________________________________________________________
学習させる画像サイズを100×100に変更したところ、正解率が89.9%に上がって判定も正しく行われていたため、学習画像のサイズを大きくしたことが効果的だったことが分かりました。
出力結果のVal_accについて、エポック数が10を超えた辺りから正解率が横ばいになり始めたため、設定するエポック数は12程度でよいのではないかと思いました。
上記以外に正解率を向上させる要因として、
①学習画像の枚数を増減させる。
②学習モデルの層の数を追加/削減する。
③学習モデルの最適化アルゴリズムを変更する。
④バッチサイズを変更する。
といったものが考えられるため、今後の課題として取り組みたいと思います。
5. 製作したアプリ
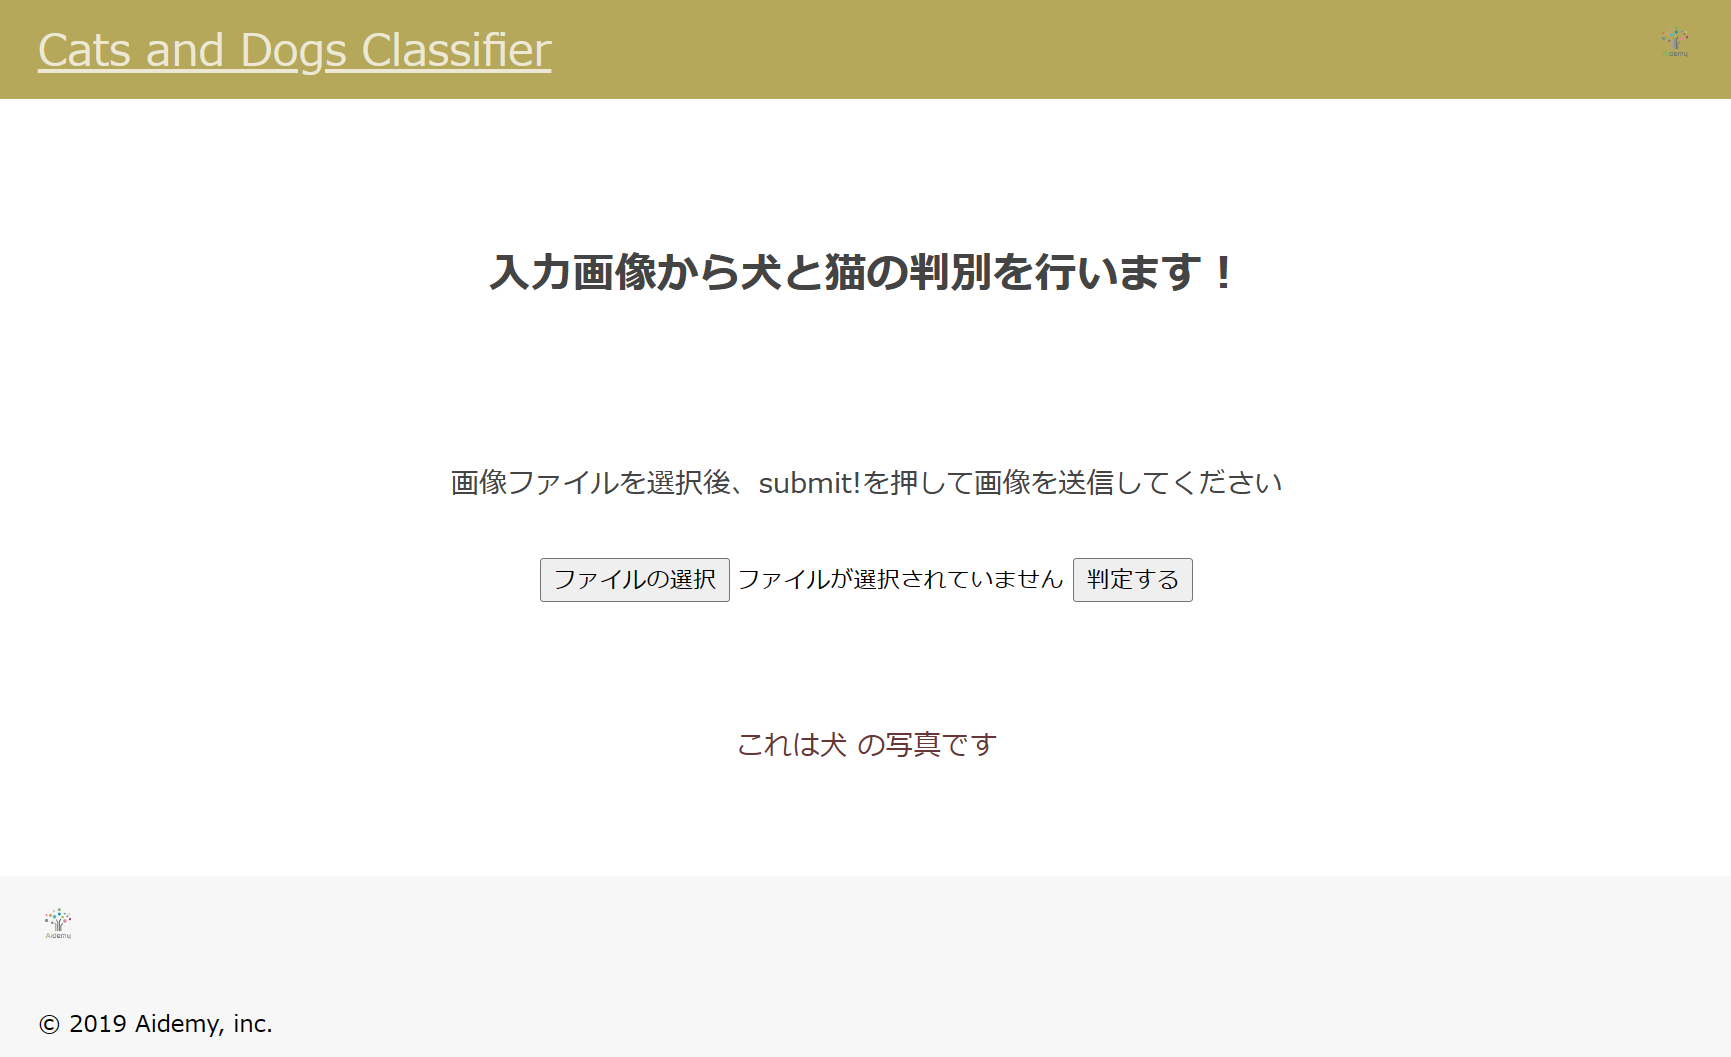
完成したアプリがこちらになります。
画像を送信すると、犬か猫を判定してくれます。
Cats-and-Dogs-Classifier

以下はデプロイの際に手間取った所です。
次のようなエラー文が表示されました。
ValueError: Unknown optimizer: Custom>SGD
どうやら最適化アルゴリズムのSGDが認識されていないようでした。
kerasのリファレンスを確認したところ、
from keras import optimizers

model = Sequential()
model.add(Dense(64, kernel_initializer='uniform', input_shape=(10,)))
model.add(Activation('tanh'))
model.add(Activation('softmax'))

sgd = optimizers.SGD(lr=0.01, decay=1e-6, momentum=0.9, nesterov=True)
model.compile(loss='mean_squared_error', optimizer=sgd)
となっており、「optimizers.SGD(lr=~」のところは合っていることを確認しました。
SGDが認識されていないエラーの話だったので、試しにライブラリのインポート部分「from keras import optimizers」をプログラムに追加したところ、無事にデプロイすることが
できました。
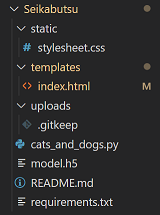
最後に、ファイル構成と最終版のソースコードを載せておきます。

cats_and_dogs.ipynb (Google Colaboratoryで実行)
# ライブラリのインポート
import os
import cv2
import numpy as np
import matplotlib.pyplot as plt
from tensorflow.keras.utils import to_categorical
from tensorflow.keras.layers import Dense, Dropout, Flatten, Input
from tensorflow.keras.applications.vgg16 import VGG16
from tensorflow.keras.models import Model, Sequential
from tensorflow.keras import optimizers
from google.colab import files
from keras import optimizers

# Googleドライブのファイルパスを指定する。
path_cats = os.listdir("/content/drive/MyDrive/Seikabutsu/dataset/cats_1000/")
path_dogs = os.listdir("/content/drive/MyDrive/Seikabutsu/dataset/dogs_1000/")

# 画像を格納するリストの作成
img_cats = []
img_dogs = []

# 各カテゴリの画像サイズを変換してリストに保存
img_size = 100 # 画像サイズ:100×100
for i in range(len(path_cats)):
    img = cv2.imread("/content/drive/MyDrive/Seikabutsu/dataset/cats_1000/"
                     + path_cats[i])
    b,g,r = cv2.split(img)
    img = cv2.merge([r,g,b])
    img = cv2.resize(img, (img_size,img_size))
    img_cats.append(img)

for i in range(len(path_dogs)):
    img = cv2.imread("/content/drive/MyDrive/Seikabutsu/dataset/dogs_1000/"
                     + path_dogs[i])
    b,g,r = cv2.split(img)
    img = cv2.merge([r,g,b])
    img = cv2.resize(img, (img_size,img_size))
    img_dogs.append(img)

# 犬と猫の画像を一つのリストに集約、及び正解ラベルを設定する。
X = np.array(img_cats + img_dogs)
y = np.array([0]*len(img_cats)  # 0:cats
           + [1]*len(img_dogs)) # 1:dogs

#ラベルをランダムに並び変える。
rand_index = np.random.permutation(np.arange(len(X)))
X = X[rand_index]
y = y[rand_index]

# 学習データを80%、検証データを20%に分割する。
X_train = X[:int(len(X)*0.8)]
y_train = y[:int(len(y)*0.8)]
X_test = X[int(len(X)*0.8):]
y_test = y[int(len(y)*0.8):]

# 正解ラベルをone-hotの形にする。
y_train = to_categorical(y_train)
y_test = to_categorical(y_test)

input_tensor = Input(shape=(img_size, img_size, 3))
vgg16 = VGG16(include_top=False, weights='imagenet', input_tensor=input_tensor)

# モデルの定義
top_model = Sequential()
top_model.add(Flatten(input_shape=vgg16.output_shape[1:]))
top_model.add(Dense(128, activation='relu'))
top_model.add(Dropout(rate=0.5))
top_model.add(Dense(32, activation='relu'))
top_model.add(Dropout(rate=0.5))
top_model.add(Dense(2, activation='softmax'))

model = Model(inputs=vgg16.input, outputs=top_model(vgg16.output))

for layer in model.layers[:15]:
    layer.trainable = False

model.compile(loss='categorical_crossentropy',
              optimizer=optimizers.SGD(learning_rate=1e-4, momentum=0.9),
              metrics=['accuracy'])

history = model.fit(X_train, y_train, batch_size=32, epochs=100, validation_data=(X_test, y_test))

# 画像を受け取り、名称を判別する関数
def pred(img):
    img = cv2.resize(img, (img_size, img_size))
    pred = np.argmax(model.predict(np.array([img])))
    if pred == 0:
        return "cats"
    else:
        return "dogs"

# 精度の評価
scores = model.evaluate(X_test, y_test, verbose=1)
print('Test loss:', scores[0])
print('Test accuracy:', scores[1])

model.summary()

# pred関数に写真を渡して分類を予測
path_pred = os.listdir("/content/drive/MyDrive/Seikabutsu/dataset/single_prediction/")
img = cv2.imread("/content/drive/MyDrive/Seikabutsu/dataset/single_prediction/"
                + path_pred [0])
b,g,r = cv2.split(img)
my_img = cv2.merge([r,g,b])
plt.imshow(my_img)
plt.show()
print(pred(img))

# accuracyとlossのグラフを描画
plt.figure(figsize=(12, 6))
plt.subplot(1, 2, 1)
plt.plot(history.history["accuracy"], label="accuracy", ls="-", marker="o")
plt.plot(history.history["val_accuracy"], label="val_accuracy", ls="-", marker="x")
plt.ylabel("accuracy")
plt.xlabel("epoch")
plt.legend(loc="best")

plt.subplot(1, 2, 2)
plt.plot(history.history["loss"], label="loss", ls="-", marker="o")
plt.plot(history.history["val_loss"], label="val_loss", ls="-", marker="x")
plt.ylabel("loss")
plt.xlabel("epoch")
plt.legend(loc="best")

plt.show()

# resultsディレクトリを作成
result_dir = 'results'
if not os.path.exists(result_dir):
    os.mkdir(result_dir)

# 重みを保存
model.save(os.path.join(result_dir, 'model.h5'))
files.download( '/content/results/model.h5' )
cats_and_dogs.py (Visual Studio Codeで実行)
import os
from flask import Flask, request, redirect, render_template, flash
from werkzeug.utils import secure_filename
from tensorflow.keras.models import Sequential, load_model
from tensorflow.keras.preprocessing import image

import numpy as np


classes = ["猫","犬"]
image_size = 100

UPLOAD_FOLDER = "uploads"
ALLOWED_EXTENSIONS = set(['png', 'jpg', 'jpeg', 'gif']) # アップロードを許可する拡張子

app = Flask(__name__)

def allowed_file(filename):
    return '.' in filename and filename.rsplit('.', 1)[1].lower() in ALLOWED_EXTENSIONS

model = load_model('./model.h5')#学習済みモデルをロード


@app.route('/', methods=['GET', 'POST'])
def upload_file():
    if request.method == 'POST':
        if 'file' not in request.files:
            flash('ファイルがありません')
            return redirect(request.url)
        file = request.files['file']
        if file.filename == '':
            flash('ファイルがありません')
            return redirect(request.url)
        if file and allowed_file(file.filename):
            filename = secure_filename(file.filename)
            file.save(os.path.join(UPLOAD_FOLDER, filename))
            filepath = os.path.join(UPLOAD_FOLDER, filename)

            #受け取った画像を読み込み、np形式に変換
            img = image.load_img(filepath, target_size=(image_size,image_size))
            img = image.img_to_array(img)
            data = np.array([img])
            #変換したデータをモデルに渡して予測する
            result = model.predict(data)[0]
            predicted = result.argmax()
            pred_answer = "これは" + classes[predicted] + " の写真です"

            return render_template("index.html",answer=pred_answer) # index.html側に犬猫の判定情報を渡す

    return render_template("index.html",answer="")

"""
# 自PCでのチェック用
if __name__ == "__main__":
    app.run()
"""

# Render公開用
if __name__ == "__main__":
    port = int(os.environ.get('PORT', 8080))
    app.run(host ='0.0.0.0',port = port)
index.html
<!DOCTYPE html>
<html lang="ja">
<head>
<meta charset="UTF-8">
<meta name="viewport" content="width=device-width, initial-scale=1.0">
<meta http-equiv="X-UA-Compatible" content="ie=edge">
<title>Cats and Dogs Classifier</title>
<link rel="stylesheet" href="./static/stylesheet.css">
</head>
<body>
<header>
<img class="header_img" src="https://aidemyexstorage.blob.core.windows.net/aidemycontents/1621500180546399.png" alt="Aidemy">
<a class="header-logo" href="#">Cats and Dogs Classifier</a>
</header>
<div class="main">
<h2> 入力画像から犬と猫の判別を行います!</h2>
<p>画像ファイルを選択後、submit!を押して画像を送信してください</p>
<form method="POST" enctype="multipart/form-data">
<input class="file_choose" type="file" name="file">
<input class="btn" value="submit!" type="submit">
</form>
<div class="answer">{{answer}}</div>
</div>
<footer>
<img class="footer_img" src="https://aidemyexstorage.blob.core.windows.net/aidemycontents/1621500180546399.png" alt="Aidemy">
<small>© 2019 Aidemy, inc.</small>
</footer>
</body>
</html>
stylesheet.css
header {
    background-color: #b5a85b;
    height: 60px;
    margin: -8px;
    display: flex;
    flex-direction: row-reverse;
    justify-content: space-between;
}

.header-logo {
    color: #ffffffbd;
    font-size: 25px;
    margin: 15px 25px;
}

.header_img {
    height: 25px;
    margin: 15px 25px;
}

.main {
    height: 370px;
}

h2 {
    color: #444444;
    margin: 90px 0px;
    text-align: center;
}

p {
    color: #444444;
    margin: 70px 0px 30px 0px;
    text-align: center;
}

.answer {
    color: #683636;
    margin: 70px 0px 30px 0px;
    text-align: center;
}

form {
    text-align: center;
}

footer {
    background-color: #F7F7F7;
    height: 110px;
    margin: -8px;
    position: relative;
}

.footer_img {
    height: 25px;
    margin: 15px 25px;
}

small {
    margin: 15px 25px;
    position: absolute;
    left: 0;
    bottom: 0;
}
requirements.txt
absl-py==0.9.0
astor==0.8.1
bleach==3.1.5
bottle==0.12.18
click==7.1.2
certifi==2020.6.20
chardet==3.0.4
flask==2.0.1
future==0.18.2
gast==0.3.3
grpcio==1.31.0
gunicorn==20.0.4
h5py==2.10.0
html5lib==1.1
itsdangerous==2.0
idna==2.10
Jinja2==3.0.1
line-bot-sdk==1.16.0
Markdown==3.2.2
MarkupSafe==2.0
numpy==1.18.0
oauthlib==3.1.0
pillow==7.2.0
protobuf==3.12.4
PyYAML==5.4.1
python-dotenv==0.14.0
requests==2.25.1
scipy==1.4.1
six==1.15.0
tensorboard==2.3.0
tensorflow-cpu==2.3.0
termcolor==1.1.0
urllib3==1.26.5
Werkzeug==2.0.0
6. おわりに
成果物の作成にかけられる時間があまり残っていなかったため、全ての要因は検証できませんでしたが、パラメータの調整によって正解率を89.9%まで上げることが出来ました。
Python初心者であった私がCNNを使ってプログラムを作成できるようになったのも、Aidemyさんの教材やチューターさんのご支援あってのことです。本当にありがとうございました。
これまで学んできたことを活かして、色んな課題に取り組んでいきたいと思います。
ここまで御覧いただきありがとうございました。

