Firstly, what is Firebase? - まず、Firebaseとは何ですか?
Firebase is essentially a backend development service, or "BAAS" which is short for (Backend As A Service). Using Firebase enables you to have an online server 24/7, avoid writing backend code for a server, assists with managing a Database and much more.
Some of the other services which Firebase provides are:
Authentication, Cloud Storage, Realtime Database, Performance Monitoring and Analysis, Cloud Messaging and MORE!!
We will be including some of the Firebase services in the production of the カリトケ Application.
The success of Mobile Applications is its usage , engagement and retention of users . Googles Firebase is a service which assists with maintaining these three main qualities with several of its services.
Note: Majority of Firebase services make extensive use of Javascript.
Firebaseはバックエンド開発サービス。「BAAS」、つまり(Backend As A Service)と言うサービスです。Firebaseを使うことには多くの利点があります。どこでも、いつでも、24/7で使えるオンラインサーバ稼働させることができ、自分でバックエンドコード書けなくでも使えるサービス、データベースの管理などを支援することができなど。
Firebaseが提供するその他のサービスのいくつかは次のとおりです。
認証、クラウドストレージ、リアルタイムデータベース、パフォーマンスモニタリングと分析、クラウドメッセージング、 等,等,等,等 !!
Firebaseサービスのいくつかをカリトケの制作に含める予定です。
携帯アプリの 成功 と言うのは、使用、エンゲージメント、ユーザーの保持です。GoogleのFirebaseはこれらの3つの主要な特質をいくつかのサービスで維持するのを手助けするサービスです。
メモ:Firebaseサービスの多くは、Javascriptを大量に使用しています。
About Realtime Database - リアルタイムデータベースについて
In this article, I want to write about the basics getting started with using its Realtime Database features.
There are many benefits in making use of Realtime Database features, the access is secure and can be accessed from client-side code. The Data is kept consistent locally, and even when offline , realtime events will still be active and update the online Database with efficient merging automatically. One of the best things about it is, NO SQL! No need to struggle with writing difficult SQL, as database operations are executed with simplified querying system.
この記事では、Realtime Databaseの機能を使い始める際の基礎について説明します。
リアルタイムデータベース機能を利用することで多くの利点があります!データはローカルで一貫性が保たれます。オフラインでも、リアルタイムイベントはアクティブであり(イベントが合ったら、すぐに応答が出来ます)、データーアクセスは安全です。 そして、 NO SQL です! 困難なSQLを書くのに苦労する必要はありません。データベース操作は単純なクエリシステムで実行されるためです。
Implementing Realtime Database Basics - ベーシックの実装方法
Just 3 easy steps:
- Integrate the Firebase SDKs (Firebase SDKの統合)
- Create Realtime References (参照の作成)
- Set Data & Listen for changes (データー設定するとリスナーを作る)
1. Integrate the Firebase SDKs (Firebase SDKの統合)
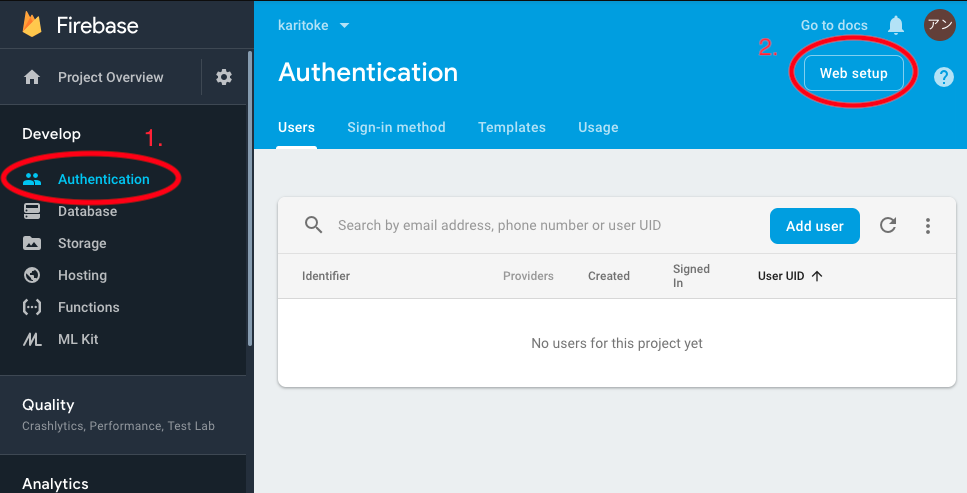
Integrating or adding Firebase is very simple. You can just input the provided reference from the Authentication section of the Firebase Console.
Firebaseの統合または追加は非常に簡単です。Firebaseコンソールの「Authentication」から必要のレファレンスが提供されています!

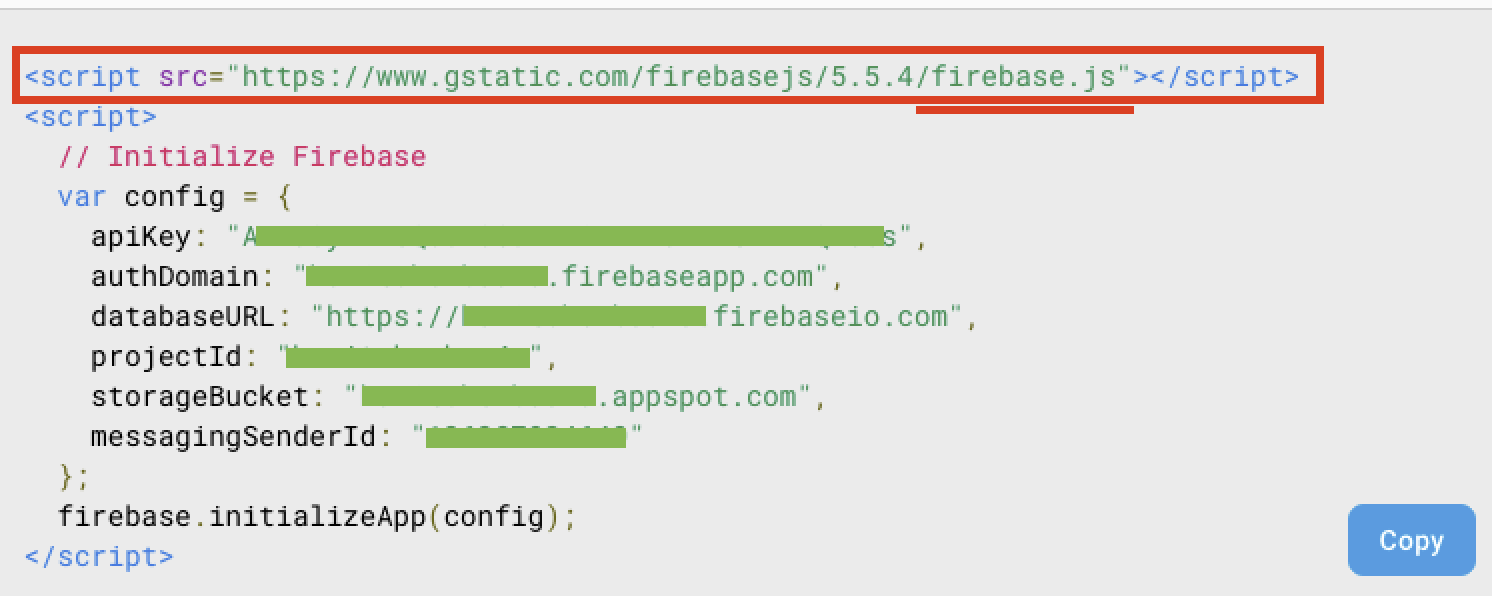
The provided copy and paste is for ALL services, however, we only need the Database service.
提供されたコピー&ペーストはすべてのサービス用ですが、データベースサービスだけが必要です。
// This imports all Firebase services - これはFirebaseの全部のサービス
<script src="https://www.gstatic.com/firebasejs/5.5.4/firebase.js"></script>
However, we will only be using Realtime Database services so the imported src should be as follows: should be replaced with:
// This imports only requested service "/firebase-service_you_want.js>"
// これはいるサービスだけを使います "/firebase-使うサービス.js>"
<script src="https://www.gstatic.com/firebasejs/5.5.4/firebase-app.js"></script>
<script src="https://www.gstatic.com/firebasejs/5.5.4/firebase-database.js"></script>
<script>
  // Initialize Firebase
  var config = {
    apiKey: "Axxxxxxxxxxxxxxxxxxxxxxxxxxxxxxxxxxxxxxxxxs",
    authDomain: "プロジェクトの名前.firebaseapp.com",
    databaseURL: "https://プロジェクトの名前.firebaseio.com",
    projectId: "プロジェクトの名前",
    storageBucket: "プロジェクトの名前.appspot.com",
    messagingSenderId: "1234567890"
  };
  firebase.initializeApp(config);
</script>
You now have Firebase as part of your project. However, we should only initialize Firebase only once, so it may be good to wrap the initialization with a check.
Firebaseはプロジェクト入っています。しかし、初期化をするのは一回だけするはずなので、初期化する時チェックした方がいいかも知りません。
if (!firebase.apps.length) {
  firebase.initializeApp(config);
}
2. Create Realtime References (参照の作成)
Now that we have Firebase services properly included in our WEB application, we need to connect our database so that we can collect information in Realtime.
さー、FirebaseサービスがWEBアプリケーションに適切に組み込まれたので、リアルタイムで情報を収集できるようにデータベースを接続する必要があります。
// We declare a reference to the database. データベースへの参照を作ります。
// This references an object under the root directory
// これは、ルートディレクトリの下のオブジェクトを参照しています
const dbReference = firebase.database().ref().child('object');
The line until firebase.database().ref() is a reference to the root:// directory, and the .child() of that is the next "Collection" or "Document". The Firebase Database is made entirely of Collections of Documents and Documents with information. Furthermore, the path will always alternate between Collection and Document when searching for information from the Database.
root://Collection/Document/Collection/Document/Collection/Document
参照のfirebase.database().ref()まではデーターベースのルートディレクトリ(root://)です、そして.child()は次の「コレクション」か「ドキュメント」です。Firebaseのデーターベースは全て「コレクション」と「ドキュメント」交互で進んでいます。「コレクション」は多くの「ドキュメント」が入っています。そして「ドキュメント」は多くの情報が入っています。情報調べる時、Firebaseのデーターベースのパースはいつも「コレクション」から「ドキュメント」か「ドキュメント」から「コレクション」になります。
root://コレクション/ドキュメント/コレクション/ドキュメント/コレクション/ドキュメント/
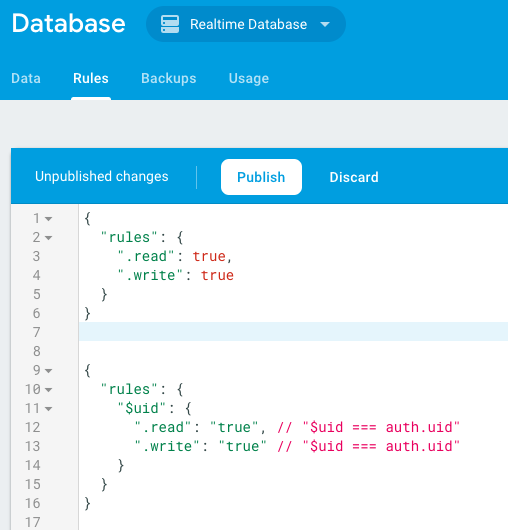
We can store information ONLY inside Documents. However, before we store information, we must have access permission to the database, otherwise, we won't be able to see any results! We can find these inside of the "Rules" tab within the Firebase Console.
「ドキュメント」の中に だけ 、情報は保存出来ます。データー保存する前に、アクセス許可が必要なんです!無かったら、結果とか何も見えません。この許可はFirebaseのコンソルの中で「Rules 」の中に変更が出来ます。
I have put in some examples, but essentially within each section of the database, you can assign permission to write or read and even assign certain uid's to be able to read or write. You can also validate data and more, but we can learn about that next time. For now, let's set the rules as true so that we can test the database.
私はいくつかの例を行使したが、本質的にデータベースの各セクション内に、書き込まれたり読取りの権限を割り付けれるし、皆に許可も付けれます。バリデーションなども、この中に出来ますがそれは後で見ましょう。とりあえずRuleの中に、テストの為に全部trueにしましょう。
{
  "rules": {
    ".read": "true",
    ".write": "true"
  }
}
3. Set Data & Listen for changes (データー設定するとリスナーを作る)
Now that we have access to Firebase, and a link to the Database, we can use simple Javascript to collect information in Realtime from the database.
今Firebaseの繋ぎが出来たし、データーベースに繋げたし、簡単なJavascriptを使って、リアルタイムで情報を取りましょう。
// 1 - Initiate Firebase
if (!firebase.apps.length) {
  firebase.initializeApp(config);
}

// Get Elements (This is for showing to HTML, HTMLに表す為に
const htmlElement = document.getElementById('object');

// 2 - Database Reference. データベースへの参照。
const dbReference = firebase.database().ref().child('object');
// 3 - Collect information from the database!
dbReference.on('value', snap => console.log(snap.val())); // Respond when anything in the OBJECT changes
dbReference.on('child_added', snap => console.log(snap.val())); // Respond when child is added
dbReference.on('child_changed', snap => console.log(snap.val())); // Respond when child is changed
dbReference.on('child_removed', snap => console.log(snap.val())); // Respond when child is removed
This example shows how information is obtained in Realtime and logs it to the console. .oncreates a listener, that is alerted when a change has happened. The first argument tells what to listen for, and the second argument is a "snapshot" which provides a 'key' and allows you to an action or run a function. snap.val() is the information, and snap.key would be the key it is assigned to. Additionally, within the val('xxxx') we can ask for a specific block of information. In this example, we print out the value of the snapshot whenever something happens to the database object, when information is added to the child, when information is changed within the children of the object and when a child is removed from the object.
この例は、どうやってリアルタイムで情報を取ってコンソルにログで書いています。.onがリスナーを作っています、情報が変更をしたり、.onが知らせています。一番目のパラメータはどうなリスナーを作る。二番目のパラメータが「スナップショット」と言う情報です。「スナップショット」の中には「スナップショットキー」と「スナップショットデーター」が入っています。snap.keyとsnap.val()を使ったら、この情報が取れます。さらにval('xxxxx')の中に特定の情報ブロックを要求することができます!この例がobjectが変わる時情報を取っているし、childが追加する時情報を取っているし、childが変更が合った時情報を取っているし、childが消す時情報を取っています。
// Display information to htmlElement when child is added to the database
dbReference.on('child_added', snap => {
  htmlElement.innerText = JSON.stringify(snap.val(), null, spacing);
})
Now that we know how to collect the information from the database in Realtime, we can run some methods or functions whenever we receive some new information. For the example above, we are displaying the information inside of an html element whenever a new child or new data is added to our database!
これで、リアルタイムでデータベースから情報を収集する方法が出来てい流ので、情報を貰う時にmethodとかfunctionなどの中にその情報が使えます。上記の例では、新しいchildが追加したら、htmlElement の中に情報を表しています!
You can test it by changing the data directly inside of the Firebase console, or by sending information to the database. For Karitoke, we will send information in various methods, so I will talk about that next time!
This article is only about the basics of collecting Realtime data from Firebase and getting started.
Firebaseコンソールの内部で直接データを変更してテストすることが出来る、そしてアプリからデーターベース情報も送ったらテストが出来ます。カリトケの為に色々な情報送る方法があるので、今度話しましょう。
この記事では、Firebaseからのリアルタイムデータの収集と開始についての基礎についてのみ説明だけです。
Thanks for reading. I hope my Japanese isn't too strange and difficult to understand. >.<
私の日本語が可笑しくて、わかりにくい部分もあるかもしりませんが、読んでくれてありがとうございます。

