画像の表示を出し分けする
前回の続きです。
Cloudinaryを使って画像の保存と表示を進めます。Youtube記事である場合は、サムネイル画像の表示ができるようにします。
下準備
まずはアカウントを作りましょう。
ログインすると、Media Libraryの画面になります。
Assetsのタブを選ぶと、すでにいくつかサンプル画像が用意されているので、ひとまずこれでテストしてみます。
画像を選択し、URLをコピーします。Public IDも確認しておきます。
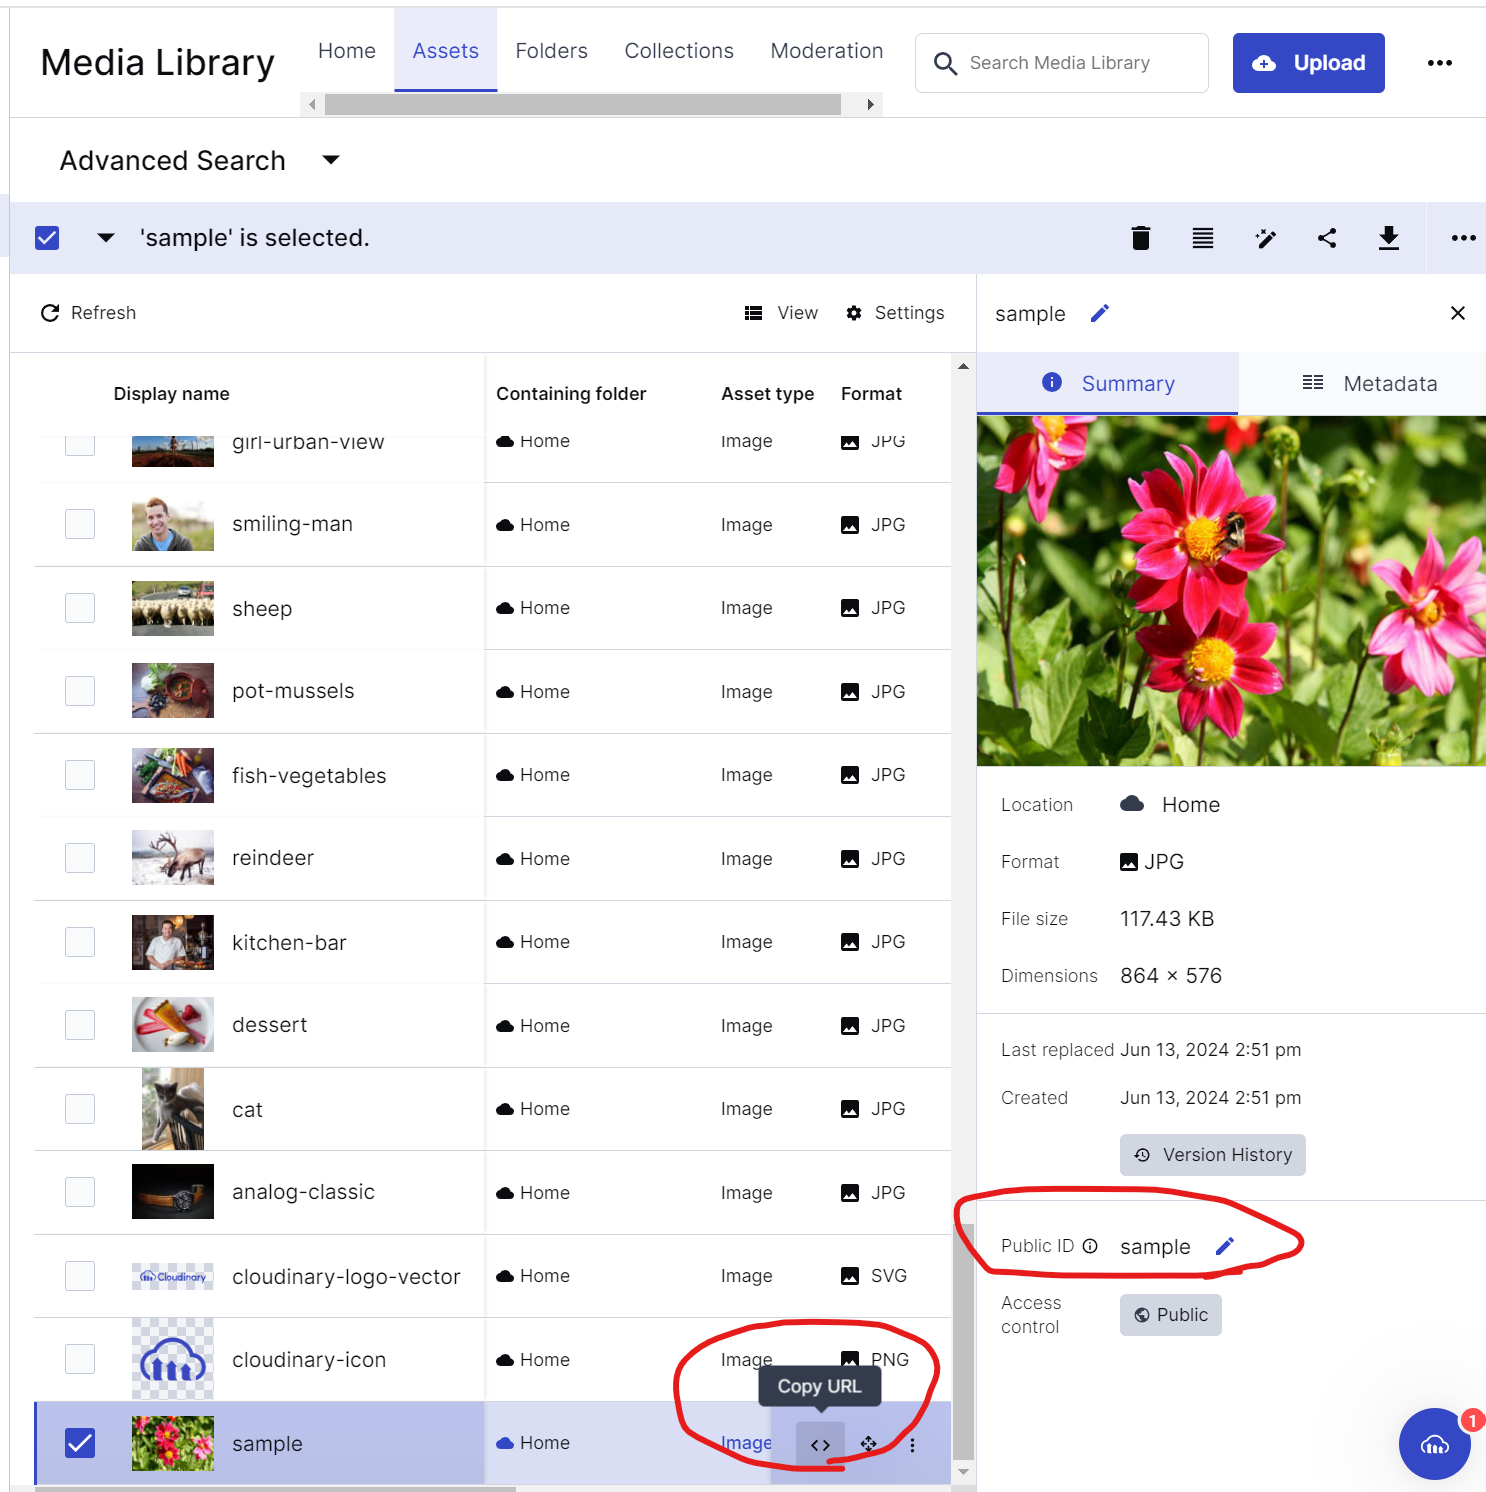
テストデータを準備し、imgUrlに画像URL、imgPublicIdにCloudinaryの画像のPublic IDを転記します。
外部サイトの画像をNext.jsで使うために
Next.jsではセキュリティの観点から、許可されたホストから配信されている画像のみを表示することになっています。
詳細は以下を御覧ください。
ということで、next.config.jsにCloudinaryからの画像を表示するよう設定します。
/** @type {import('next').NextConfig} */
const nextConfig = {
+  images: {
+    remotePatterns: [
+      {
+        protocol: 'https',
+        hostname: 'res.cloudinary.com',
+        pathname: '/<Cloudinaryのクラウド名(Product environment cloud name)>/**',
+      },
+    ],
+  },
};

export default nextConfig;
Cloudinaryのクラウド名は、画像URLからも確認できます。これでCloudinaryの自分のアカウントの画像のみ許可を出せました。
これで、Cloudinaryの画像が表示されるようになりました。
CldImageコンポーネント
CloudinaryはNext.jsのImageコンポーネントの機能を拡張した、独自のCldImageコンポーネントを提供しています。
それにより高度な画像操作に活用することができます。管理画面ではあまり恩恵はありませんが、後々使えるよう導入します。
パッケージインストール
アプリフォルダで、以下のコマンドを実行します。
npm install next-cloudinary
環境変数の設定
.env.localファイルを作成し、以下の記述を追加します。
NEXT_PUBLIC_CLOUDINARY_CLOUD_NAME="<Your Cloud Name>"
<Your Cloud Name>(クラウド名)は、next.config.jsのpathnameで設定したものと同様です。
.envと.env.local
どちらのファイルも開発環境・本番環境において読み込まれる環境変数を設定できますが、.env*.localはデフォルトで.gitignoreによって隠されるファイルです。
環境変数で外部に公開したくない値は.env.local, それ以外は.envに設定するとよいです。
※今回はDBをDockerでローカル環境に立てているので、DB系の環境変数は.envに入れています。外部DBを利用する場合や各種APIキーなどは.env*.localに隠すのが無難でしょう。
https://nextjs.org/docs/app/building-your-application/configuring/environment-variables
ソースコード書き換え
Imageコンポーネントから CldImageコンポーネントに差し替えします。
import Image from "next/image";
import styles from "./reviewCard.module.css";
import Link from "next/link";
import { ReviewWithProductId } from "@/app/types";
+ import { CldImage } from "next-cloudinary";

//中略

export default function ReviewCard({review, onDeleteReview } : Props) {

    return (

    //中略

                {/* THUMBNAIL */}
                <div className={styles.imageContainer}>
-                   <Image
-                       src={review.imgUrl || "/img/placehold_500_300.png"}
+                   <CldImage
+                       src={review.imgPublicId || "/img/placehold_500_300.png"}
                        alt="サムネイル画像"
                        fill
                        sizes="150px"
                        quality={50}
                        className={styles.thumbnail}/>
                </div>

                <div className={styles.textContainer}>

    //中略
CldImageコンポーネントを使う場合は、next.config.mjsの記載は不要になります。
Imageコンポーネントでも使えるよう残しておいても構いませんし、消してしまっても大丈夫です。
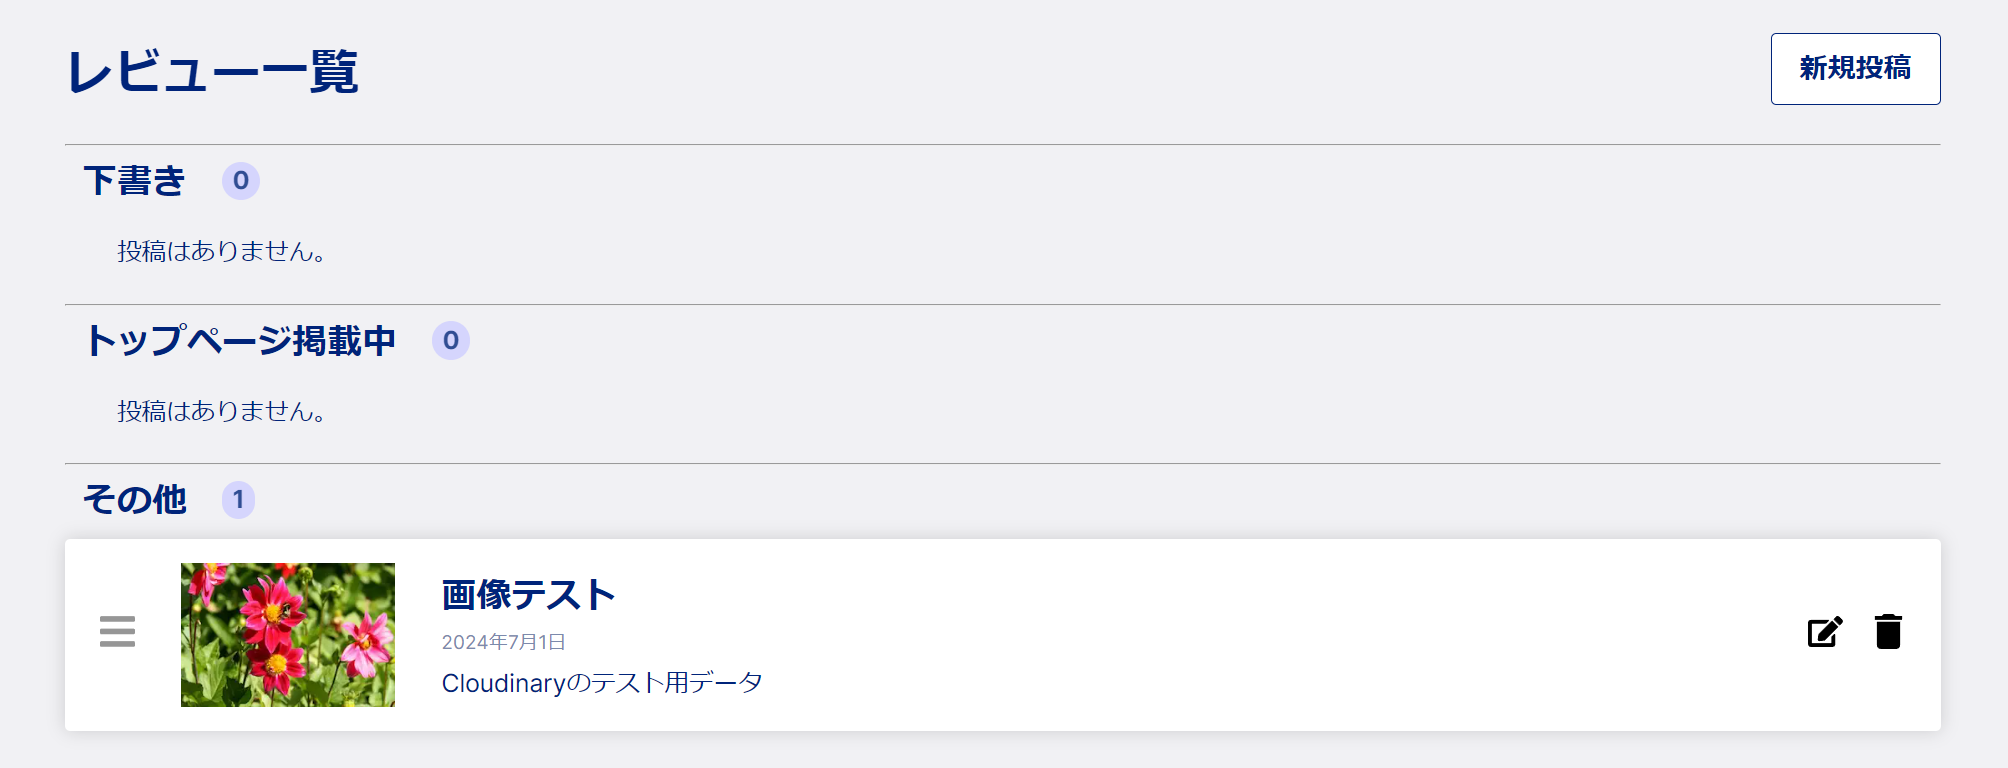
これで、Public IDを使って画像の表示ができるようになりました。
Youtube記事の出し分け
今回のプロジェクトでのレビュー記事は、自分でサムネイル画像をアップロードする通常記事と、Youtube動画を掲載するYoutube記事の2種類があります。
どちらの記事かは、Reviewテーブルに持たせているisYoutubeフラグで管理します。Youtube記事の場合は、動画のサムネイル画像を取得することにします。
リファクタリング
ReviewCardコンテナの該当部分ですが、ロジックを足すと複雑になりますので別のコンテナに切り出そうと思います。
import Image from "next/image";
import styles from "./reviewCard.module.css";
import Link from "next/link";
import { ReviewWithProductId } from "@/app/types";
import { CldImage } from "next-cloudinary";
+ import ReviewThumbnail from "../ReviewThumbnail/ReviewThumbnail";

//中略

export default function ReviewCard({review, onDeleteReview } : Props) {

    return (

    //中略

                {/* THUMBNAIL */}
+                <ReviewThumbnail review={ review } />
-                <div className={styles.imageContainer}>
-                    <CldImage
-                        src={review.imgPublicId || "/img/placehold_500_300.png"}
-                        alt="サムネイル画像"
-                        fill
-                        sizes="150px"
-                        quality={50}
-                        className={styles.thumbnail}/>
-                </div>

                <div className={styles.textContainer}>

    //中略
import { ReviewWithProductId } from "@/app/types";
import {CldImage} from 'next-cloudinary';
import styles from "./ReviewThumbnail.module.css";

interface Props {
    review : ReviewWithProductId
}

export default function ReviewThumbnail({review} : Props) {

    return (
        <div className={styles.imageContainer}>
            <CldImage
                src={review.imgPublicId || "/img/placehold_500_300.png"}
                alt="サムネイル画像"
                fill
                sizes="150px"
                quality={50}
                className={styles.thumbnail}/>
        </div>
    )
}
CSS
.imageContainer {
  position: relative;
  margin: 4px;
  min-height: 110px;
}

.thumbnail{
  object-fit: contain;
}
reviewCard.module.cssの該当部分は消しておいてください。
Youtube記事の分岐
それでは、記事の分岐ロジックを考えていきます。
今回は、isYoutubeのフラグON/OFFで分岐させますが、下書き記事のような不完全なデータも同じロジックを使いたいので、もう少し細かく条件設定していきます。
ReviewテーブルでYoutubeや画像に関わるカラムは以下です。
-
isYoutube: Youtube記事かどうかのフラグ -
youtubeId:isYoutubeがTRUEの場合に、YoutubeのビデオIDを記録します(動画URLの watch?v= の後の部分) -
imgUrl: サムネイル画像のURL -
imgPublicId: Cloudinaryの画像である場合は、そのPublic IDを記録します
Youtube記事の場合、動画のサムネイル画像はYoutubeのビデオIDを利用して取得するので、サムネイル表示はyoutubeIdが記録されていることが必須です。
ビデオIDは動画URLから取得する必要があるので、下書き状態で記事の参照URLが記載なしの場合はダミー画像などを表示する必要があります。このあたりが分岐のポイントになります。
今後実装する予定のレビュー投稿機能で、Cloudinary, Youtubeそれぞれサムネイル画像のURLを計算して、どちらもimgUrlに記録するという手法も考えられます。
しかし、分岐の判断をする材料や投稿時の計算ロジックが増えてしまうので、今回はimgUrlをDBに持たせない方針で実装してみたいと思います。
テストデータはこんな感じで用意してみました。

Youtubeのサムネイル画像URLは、以下の形式になります。
https://img.youtube.com/vi/${youtubeId}/0.jpg
外部ホストから配信される画像になりますので、next.config.mjsを以下の通り更新しましょう。
/** @type {import('next').NextConfig} */
const nextConfig = {
+  images: {
+    remotePatterns: [
+      {
+        protocol: 'https',
+        hostname: 'img.youtube.com',
+      },
+    ],
+  },
};

export default nextConfig;
import { ReviewWithProductId } from "@/app/types";
import {CldImage} from 'next-cloudinary';
import styles from "./ReviewThumbnail.module.css";
+ import Image from "next/image";

interface Props {
    review : ReviewWithProductId
}

export default function ReviewThumbnail({review} : Props) {

    return (
        <div className={styles.imageContainer}>

-            <CldImage
-                src={review.imgPublicId || "/img/placehold_500_300.png"}
-                alt="サムネイル画像"
-                fill
-                sizes="150px"
-                quality={50}
-                className={styles.thumbnail}/>

+            {review.isYoutube && review.youtubeId
+                // Youtube article with Youtube video ID
+                ? (<Image
+                    src={`https://img.youtube.com/vi/${review.youtubeId}/0.jpg`}
+                    alt="サムネイル画像"
+                    fill
+                    sizes="150px"
+                    quality={50}
+                    className={styles.thumbnail}/>)
+
+                : review.imgPublicId
+                    // Blog article with Cloudinary Public ID
+                    ? (<CldImage
+                        src={review.imgPublicId}
+                        alt="サムネイル画像"
+                        fill
+                        sizes="150px"
+                        quality={50}
+                        className={styles.thumbnail}/>)
+
+                    // the others (without image)
+                    : (<Image
+                        src="/img/placehold_500_300.png"
+                        alt="サムネイル画像"
+                        fill
+                        sizes="150px"
+                        quality={50}
+                        className={styles.thumbnail}/>) }

        </div>
    )
}
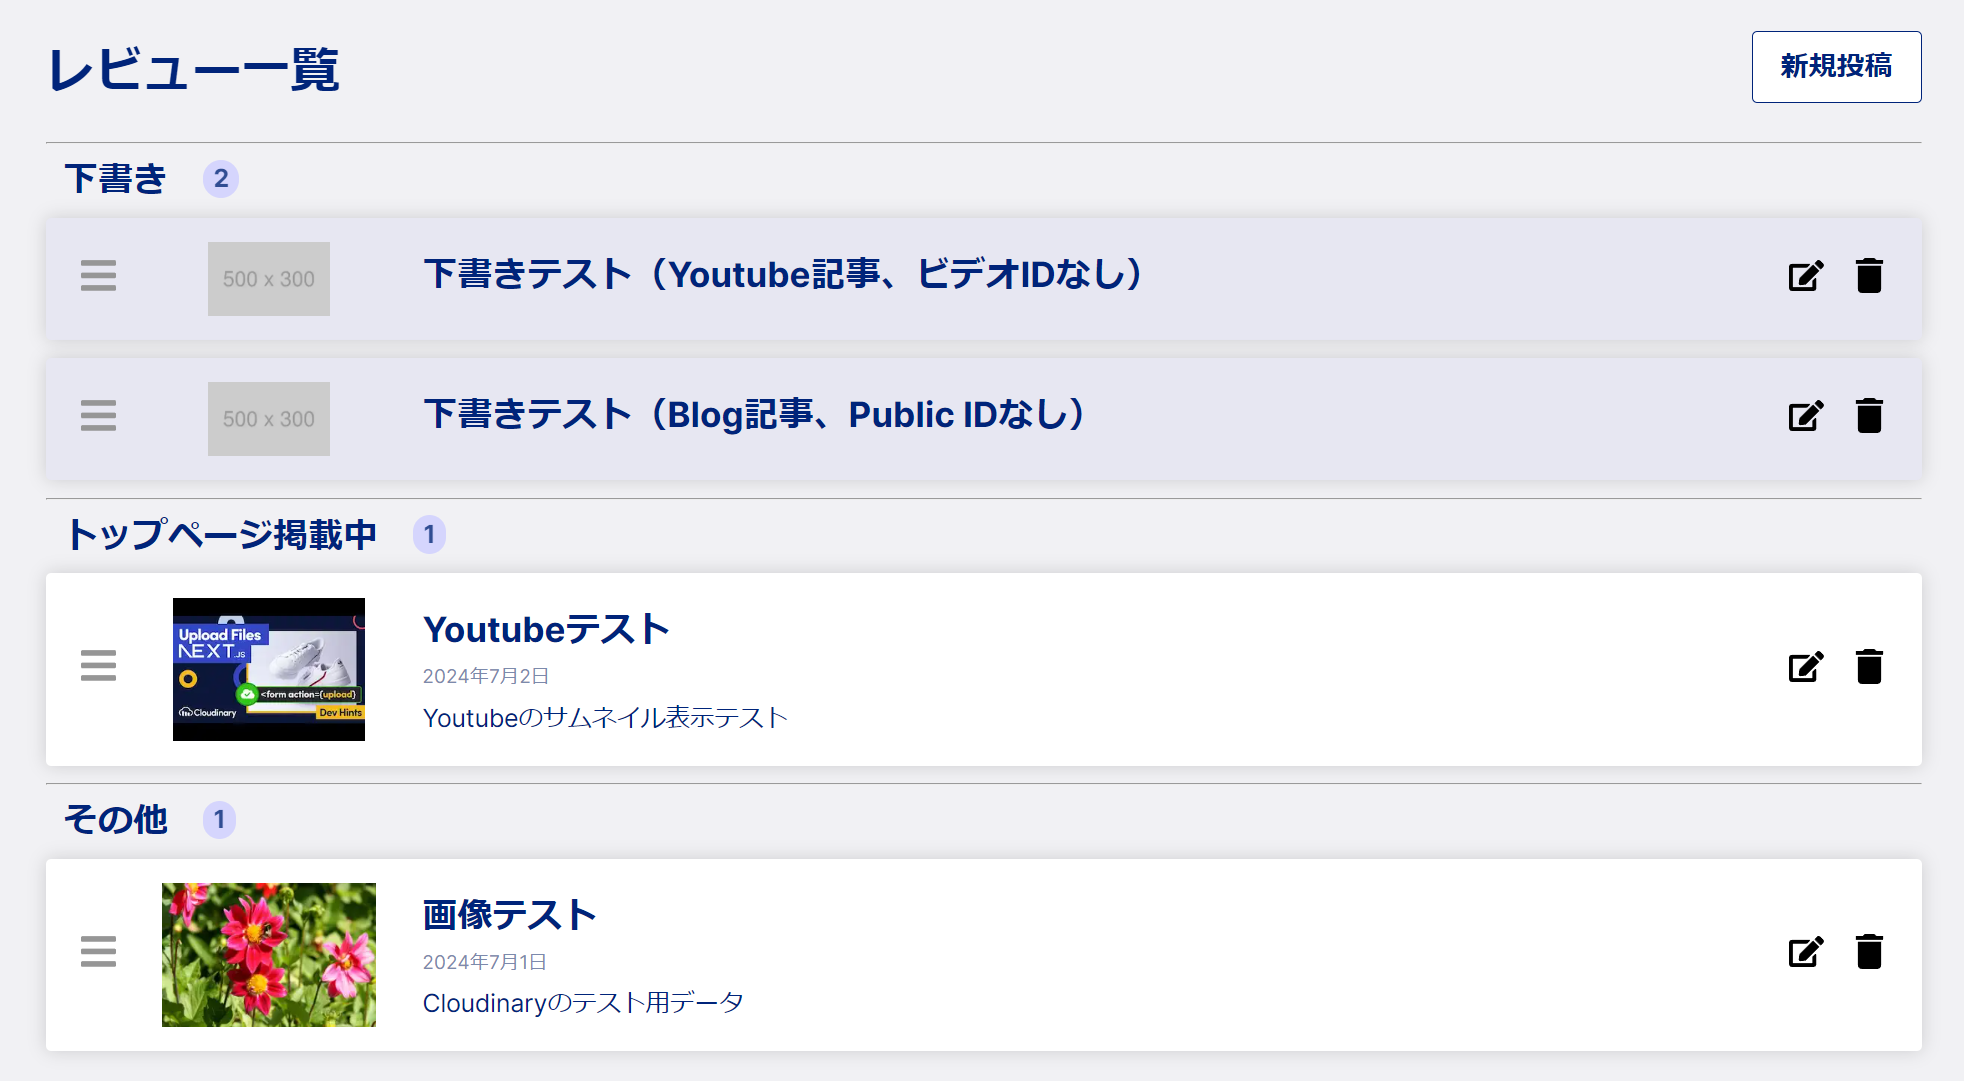
これで、以下の通り画像の出し分けができていることが確認できます。
DBのスキーマ変更
imgUrlは使わない事になりそうなので、DBのスキーマから除外します。
//中略

model Review {
  id          Int       @id @default(autoincrement())
  title       String?   @db.Text
  detail      String?   @db.Text
  url         String?   @db.VarChar(2100)
  isYoutube   Boolean?
  youtubeId   String?   @db.VarChar(30)
  articleDate DateTime? @db.DateTime(0) // Based on UTC time locale
- imgUrl      String?   @db.VarChar(2100)
  imgPublicId String?   @db.VarChar(40)
  displayTop  Boolean?
  isDraft     Boolean?
  createdAt   DateTime @default(now()) @db.DateTime(0)
  updatedAt   DateTime @updatedAt @db.DateTime(0)
  products    Product[]
}

//中略
スキーマを変更したら、DBに同期させます。
npx prisma db push
これでカラムが変更されました。
次回
すこーし、リファクタリングをしたい気持ちが高まってきました。