この投稿でインストールするもの
- Apache (apache2)
- PHP 8.3 ( Apache PHP Module )
- MySQL 8.0 以上
- WordPress 最新バージョン ( 2025/8/22 現在: ver 6.8.2 )
- WordPress 6.6 の Prerequisite は MySQL 8.0 以上。
前提
Apache バーチャルホストを使用するため、Windows 側と別のネットワーク (WSL) の IP アドレスで Web サーバーを構築する
- 127.0.0.1 や localhost でなければなんでもいい。
- たしか WordPress の公式ページに127.0.0.1 や localhost は マルチサイトホストのドメイン (ServerName) に使えないと書いてある。
概要
現在 AWS にインストールしただけのデフォルトテーマ (Twenty twenty five) の子テーマや、自作テーマをテストするローカル環境を WSL2 上に作る。
- OS: Ubuntu (WSL2)
wsl2が載っているのは Window 11 Home (24H2)
# PowerShell
wsl -d Ubuntu-XX.yy
# Linux shell
sudo apt update
インストール
LAMPをインストールします
Apache と PHP
Apache と Apacheの PHP モジュールをインストール。
- 推奨 (WordPress 6.8)は、PHP 8.3 以上になっています。特に事情がなければ 8.3 のほうがいいかも ( 2025/8/9 現在)
# root に変更
su -

# インストール ( php-cgi はなくてよい→Apacheの PHP モジュールを下記別記事にてインストール)
apt install -y php-cgi php-cli php-mysql apache2

# 確認
php -v
PHP 8.3.6 (cli) (built: Jul 14 2025 18:30:55) (NTS)
設定
Apacheの PHP モジュールのインストールと有効化:
参考:
MySQL
# インストール
sudo apt install mysql-server

#  バージョンの確認。
mysql --version
mysql  Ver 8.0.42-0ubuntu0.24.04.2 for Linux on x86_64 ((Ubuntu))

# mysql を起動
sudo service mysql start
- mysqlのインストールについて、2025/8/10 現在の apt インストールでは 8.0 がデフォルトでインストール。:
sudo apt install mysql-server
なんかごにょごにょ聞いてくるやつ
なんかめんどくさい手順 ( 下記 ) に巻き込まれた挙句、root パスワードは設定しないままいろいろさせられただけだった。 ( ただインストールしたいだけなんやが )
その1: auth ソケット
やりませんって。
sudo mysql_secure_installation

Securing the MySQL server deployment.

Connecting to MySQL using a blank password.

VALIDATE PASSWORD COMPONENT can be used to test passwords
and improve security. It checks the strength of password
and allows the users to set only those passwords which are
secure enough. Would you like to setup VALIDATE PASSWORD component?
# 何のパスワードか分からないし、MySQL のドキュメント意味わからんくて嫌いな人は No でいいんじゃね
Press y|Y for Yes, any other key for No: No
# ごにょごにょごにょ (auth_socket ってなんやねん)
Skipping password set for root as authentication with auth_socket is used by default.
If you would like to use password authentication instead, this can be done with the "ALTER_USER" command.
See https://dev.mysql.com/doc/refman/8.0/en/alter-user.html#alter-user-password-management for more information.
てかなんでこんなの 一つのコマンドにしちゃったわけ?最初にやる必要ある?後でオプションとしてやればええやろ。
- デフォルトで よきに (
auth_socket:不要、匿名ユーザー: 不要、リモート root: 不要、っっって全部せんやろ、普通に ) 計らってくれや、Oracle 殿下。めんどくせぇったらありゃしねぇ。
その2: 匿名ユーザー
えぇ、やりませんとも。
By default, a MySQL installation has an anonymous user,
allowing anyone to log into MySQL without having to have
a user account created for them. This is intended only for
testing, and to make the installation go a bit smoother.
You should remove them before moving into a production
environment.

Remove anonymous users? (Press y|Y for Yes, any other key for No) : No

 ... skipping.
その3: リモート root ログイン : 許可しない
「...」 (イラり)
Normally, root should only be allowed to connect from
'localhost'. This ensures that someone cannot guess at
the root password from the network.

Disallow root login remotely? (Press y|Y for Yes, any other key for No) : y
Success.
その4: ...... (ほんと、笑わせてくれる)
By default, MySQL comes with a database named 'test' that
anyone can access. This is also intended only for testing,
and should be removed before moving into a production
environment.


Remove test database and access to it? (Press y|Y for Yes, any other key for No) : y
 - Dropping test database...
Success.

 - Removing privileges on test database...
Success.
まだあんの?っぜーな。
だれがここでリロードせぇへんねん。
英語読めない人: testテーブルは誰でもアクセスできるので、落とし穴にはまって作成した場合は 下の問いは No とするべき (なら test データベースなんて作らすなよって話ですよね。)
あとで test データベースを消しておけばいいんじゃね?
Reloading the privilege tables will ensure that all changes
made so far will take effect immediately.

Reload privilege tables now? (Press y|Y for Yes, any other key for No) : y
Success.

All done!
参考:
【不要】WSLのIPを固定化
※本章は読み飛ばし推奨:
WSL2は起動のたびにIPが変わる可能性があるため、Windows側の hosts に手動で追加
2025/8/11 追記:
→不要と言うか、いろいろ制約ありなので、やらないことにしました。WSL 側 の IP アドレスで WordPress をホストします。
補足
- ただし、IP アドレスが変動した場合は、接続できなくなる。
下記設定だけでは、http://dev.localにアクセスできないみたいです ( たぶん、Apache 側でも設定が要る ) :
/etc/hosts
# not good one:
127.0.0.1   localhost    dev.local
※ 後日調査 追記予定
※読み飛ばし推奨:
-
必要なこと (ChatGpt)
- Windows 側でも
C:\Windows\System32\drivers\etc\hostsにDNSを追加。 - WSL2は仮想ネットワーク上にあるため、Windows側から
localhost:80でアクセスできないことがあります。対策として、ポートフォワーディング (netsh interface portproxy add v4tov4 listenport=80 listenaddress=0.0.0.0 connectport=80 connectaddress=<WSL2 IP>) やwsl-vpnkitの導入が必要。
- Windows 側でも
-
ほかに試したこと
-
2025/8/11:
Windows Deffender 送信規則内 [Linux用 Window サブシステム],
および 受信規則に 80番ポートを許可するルールを追加。 -
2025/8/13:
wsl.confと自前の/etc/resolve.confで DNSを
8.8.8.8(Google パブリックDNS) に設定。
筆者コメント :
-
resolve.confの設定は、 Proxy, Rewrite で DNSする場合 (←私同様どんな場合だ?って人は、wsl.confはもう一度 true に戻すってかコメントアウトに戻しておくべきかも。) は意味がある。 -
自前の
/etc/resolve.confは不要なら削除し、WSL再起動→自動で生成。
-
-
以下は、任意。
-
WSL2 は Windows ホストとブリッジしているので、たとえば
aptなどでリポジトリを参照するだけの場合、不要です。 -
必要に応じて以下を実行。(Proxy, Rewrite で DNS が必要になる場合 )
-
[network]
generateResolvConf = false
# シャットダウンして上の設定を反映させる
wsl --shutdown
# 上の設定で再び接続
wsl -d Ubuntu-24.04
# 前のやつ消す (WSL初回起動によって作られた設定ファイル)
sudo rm -f /etc/resolv.conf
# 新しい設定ファイルにDNSのネームサーバーを設定
echo "nameserver 8.8.8.8" | sudo tee /etc/resolv.conf
# ただの権限設定
sudo chmod 644 /etc/resolv.conf
Q.え、まって IP アドレス何にしたらいいん? (172.30.0.0/16, 172.18.0.0/16, 172.17.0.0/16, 172.19.0.0/16, はたしてどれや?)
A.どれでもありません(笑)。良い子の皆さんは真似をしないように。
hostname -I
172.30.130.235 172.18.0.1 172.17.0.1 172.19.0.1
→ hostnameを実行しても 、これは左端の172.30.130.235 が WSL2 の仮想 NIC(ホストWindows とのブリッジ)を表していて、あとのは、docker で使うやつらしい ( ChatGpt より )。
これは変わる値なので、無視します。
やったらあかんやつ↓
/etc/hosts
172.18.0.100 dev.local
ただしくは↓
/etc/hosts
127.0.0.1 localhost dev.local
リバースプロキシというらしい (かっけぇ)
WSL2 の IP が変わる問題を回避するには、Apache や Nginx を127.0.0.1で動かし、/etc/hostsでdev.localを127.0.0.1に向ける。/etc/hostsはかつての DNS らしい。オーパーツを現役でも使っているらしい
~~参考: ~~
Linux 豆知識 (Linuc)
ChatGpt いわく:
WSL2 may overwrite
/etc/hostson startup if Windows DNS settings change.
You can disable this behavior by editing/etc/wsl.conf:
[network]
generateHosts = false
WSLは
/etc/hostsを上書きする可能性あります。Windowsの起動に際して、DNSが変更された場合。
/etc/wsl.confを編集して上書きしないようにできます。
私見:
-
マルチサイトホストするなら IPアドレスを Apacheの ホストととして、hostsファイル (WSL2の場合 netplan は無視されるらしい) /netplan (Ubuntu native) をいじらないといけない。 -
WSLの場合は Windows の再起動とかで IP ( DNS ) が変わっちゃうかもしれないので、/etc/wsl.confで WSL2 の標準仕様よりも Linux の/etc/hostsを優先させる。
Apacheの設定
httpd 有効化
systemctl start apache2

systemctl enable apache2
Synchronizing state of apache2.service with SysV service script with /usr/lib/systemd/systemd-sysv-install.
Executing: /usr/lib/systemd/systemd-sysv-install enable apache2
共通 (バーチャルホストをする&しない):
/etc/apache2/ports.conf
-
listen 80などの設定はこっちらしい。
なんかもうすでに書いてあった。
sudo head -n 10 /etc/apache2/ports.conf
# If you just change the port or add more ports here, you will likely also
# have to change the VirtualHost statement in
# /etc/apache2/sites-enabled/000-default.conf

Listen 80

<IfModule ssl_module>
        Listen 443
</IfModule>
バーチャルホストの 設定
諸々の設定は、/etc/apache2/sites-available/wordpress.conf に設定を書く。
例:
sudo cp /etc/apache2/sites-available/000-default.conf /etc/apache2/sites-available/wordpress.conf
1)DocumentRoot などの設定。
<VirtualHost *:80>
        # The ServerName directive sets the request scheme, hostname and port that
        # the server uses to identify itself. This is used when creating
        # redirection URLs. In the context of virtual hosts, the ServerName
        # specifies what hostname must appear in the request's Host: header to
        # match this virtual host. For the default virtual host (this file) this
        # value is not decisive as it is used as a last resort host regardless.
        # However, you must set it for any further virtual host explicitly.
        #ServerName www.example.com
        ServerAdmin webmaster@localhost
        DocumentRoot /var/www/wordpress

        <Directory /var/www/wordpress>
            Require all granted
        </Directory>
        # Available loglevels: trace8, ..., trace1, debug, info, notice, warn,
        # error, crit, alert, emerg.
        # It is also possible to configure the loglevel for particular
        # modules, e.g.
        #LogLevel info ssl:warn

        ErrorLog ${APACHE_LOG_DIR}/wordpress_error.log
        CustomLog ${APACHE_LOG_DIR}/wordpress_access.log combined

        # For most configuration files from conf-available/, which are
        # enabled or disabled at a global level, it is possible to
        # include a line for only one particular virtual host. For example the
        # following line enables the CGI configuration for this host only
        # after it has been globally disabled with "a2disconf".
        #Include conf-available/serve-cgi-bin.conf

</VirtualHost>
-
ServerAdmin webmaster@localhost
(デフォルト)
:ちゃんとした email アドレスにしといたら問題とか連絡くるらしい
→ 000-default.conf コピーしたら 元から ServerAdmin webmaster@localhost になってましたので、そのまま放置。
-
DocumentRoot /var/www/html
(デフォルト)
:もとからなってた。(22.04、24.04らへんからバーチャルホストがデフォなん?) -
ErrorLog ${APACHE_LOG_DIR}/error.log
(デフォルト)
:/var/log/apache2/error.log -
CustomLog ${APACHE_LOG_DIR}/access.log
:/var/log/apache2/access.log
2) WordPress用の設定 - `AllowOverride` - たしか、WordPress マルチサイトホストの設定で、`AllowOverride All`と `.htaccess` の設置が必要。たぶん後で出てくる
例:
    <Directory /var/www/html>
+       AllowOverride All
        Require all granted
    </Directory>
- バーチャルホスト設定の有効化
sudo a2ensite dev.local
Enabling site dev.local.
To activate the new configuration, you need to run:
  systemctl reload apache2

sudo systemctl reload apache2
hostname -I
172.30.130.235 172.18.0.1 172.17.0.1 172.19.0.1
ブラウザで確認
http://172.30.130.235
参考:
【以下、作成中 & 検証中】
その他
.htaccess
:WordPress用の設定 (あとで)
MariaDB 設定
ユーザー、パスワード、データベースの作成、権限の設定を行います。
root ユーザーのパスワードを設定
インストール後、最初に root ユーザーはパスワード認証によるログインは拒否されました↓
-
mysql_secure_installationを行った時点で、rootユーザーがちゃんと設定されていないのでは?
→やっぱそうでした。
# Login as root with Password (Blank)
mysql -u root -p
Enter password: # Just hit Return/Enter.
ERROR 1698 (28000): Access denied for user 'root'@'localhost'
なので、まずは以下のように rootパスワードの設定が必要。
上のように mysql_secure_install で MySQL インストール後、接続時にパスワード認証が拒否されている可能性があるので、mysql で ALTER USER を使用してデフォルトのプラグインで rootに対してパスワード認証を設定する必要があります。
Example: Specify the password as cleartext; the default plugin is used:
.bashALTER USER 'root'@'localhost' IDENTIFIED BY 'password';
# パスワードなしでログイン
sudo mysql -u root
[sudo] password for username:
Welcome to the MySQL monitor.  Commands end with ; or \g.
Your MySQL connection id is 14
Server version: 8.0.43-0ubuntu0.24.04.1 (Ubuntu)

Copyright (c) 2000, 2025, Oracle and/or its affiliates.

Oracle is a registered trademark of Oracle Corporation and/or its
affiliates. Other names may be trademarks of their respective
owners.

Type 'help;' or '\h' for help. Type '\c' to clear the current input statement.

mysql>

# デフォルトのプラグインでrootをパスワード認証
mysql> ALTER USER 'root'@'localhost' IDENTIFIED BY 'password';
Query OK, 0 rows affected (0.15 sec)
参考 ( 公式 ) :
補足: すみません、mysql_secure_installation で見逃してました。ちゃんと書いてた↓
Skipping password set for root as authentication
with auth_socket is used by default.

訳: 「``root`` のパスワード、設定せずに進むね ! デフォルトで auth_socket 認証が使われます 」

If you would like to use
password authentication instead,
this can be done with the "ALTER_USER" command.

訳: 「かわりにパスワード認証したいんなら、
``ALTER_USER`` コマンドで出来るから。」

See https://dev.mysql.com/doc/refman/8.0/en/alter-user.html#alter-user-password-management
for more information.

訳: 「詳しくは URLのリンク先を見て !」
インストール時に auth_socket を使用するようにすれば、インストール後に ALTER_USER で root ユーザにパスワード設定する必要はないのかも? ( やっていないのでわかりません)
詳しくは↓
https://dev.mysql.com/doc/refman/8.0/en/alter-user.html#alter-user-password-management
文句: 大体なんやねん auth_socket って ( 2回目 )。まさか root ユーザーと関係あるとは思わんやん?
そんなん初心者つぶしやん。まぁ、すべてが初心者を想定してないからってのはわかるんだけど。実際ソケットって認証に一般的に使われてんのか?
WordPress のデータベースを設定
以下を実行:
# rootユーザーでログイン
sudo mysql -u root -p
Enter password:
Welcome to the MySQL monitor.  Commands end with ; or \g.
Your MySQL connection id is 17
Server version: 8.0.43-0ubuntu0.24.04.1 (Ubuntu)

Copyright (c) 2000, 2025, Oracle and/or its affiliates.

Oracle is a registered trademark of Oracle Corporation and/or its
affiliates. Other names may be trademarks of their respective
owners.

Type 'help;' or '\h' for help. Type '\c' to clear the current input statement.

# MySQL 全体の管理者のアカウントを作成
mysql> CREATE USER "<adminusername>"@"localhost" IDENTIFIED BY "<password>";

# データベースを作成。
CREATE DATABASE <databasename>;

# MySQL 全体の管理者ユーザーに管理者特権を与える
# # 8.0 から `GRANT` で `IDENTIFIED BY` できない
mysql> GRANT ALL PRIVILEGES ON <databasename>.* TO "<adminusername>"@"localhost";

# 権限の設定を変更 (反映)
mysql> FLUSH PRIVILEGES;
Query OK, 0 rows affected (0.01 sec)

# root からログアウト
mysql> EXIT
Bye
# rootに代わるユーザーでログインしてみる
mysql -u <adminusername> -p
Enter password:
Welcome to the MySQL monitor. Commands end with ; or \\g.
Your MySQL connection id is 5340 to server version: x.xx.xx

Type 'help;' or '\\h' for help. Type '\\c' to clear the buffer.

mysql> EXIT
Bye
今回は、AWS (本番環境) と動きが変わってもいけないので、クラウド (AWS) 側の設定をローカル (WSL) でもコピー (右倣え) します。
-
管理者権限を持つユーザー は 以下の 2つ作成 (
root以外のユーザーを最低1つ作成)-
adminusername( MySQL 全体の管理者 ) -
【任意】
wordpressusername( WordPress 用の管理者 ) -
adminusername=wordpressusernameでもいい。
-
-
【任意】一般ユーザー
username
補足:
-
<>付きの `adminusername` とかは、実際の名前におきかえます ( `<>` じたいは不要なので入力しない )
-
<>付きの
wordpressusernameは WordPress のデータベース管理者特権を与えたいユーザー -
CREATE USERはALL PREVILEGESを与えたユーザーでも実行できない。CREATE USERはrootユーザーで 実行する。
【任意】<wordpressusername> を <adminusername> で兼務するなら不要。
# rootユーザーでログイン
sudo mysql -u root -p
Enter password:
Welcome to the MySQL monitor.  Commands end with ; or \g.
Your MySQL connection id is 17
Server version: 8.0.43-0ubuntu0.24.04.1 (Ubuntu)

Copyright (c) 2000, 2025, Oracle and/or its affiliates.

Oracle is a registered trademark of Oracle Corporation and/or its
affiliates. Other names may be trademarks of their respective
owners.

# 【任意】WordPress 用の管理者ユーザー を作成
mysql> CREATE USER '<wordpressusername>'@'localhost' IDENTIFIED BY "<password>";

# 【任意】WordPressusernameに管理者特権を与える (`username`や`root`以外)
mysql> GRANT ALL PRIVILEGES ON <databasename>.* TO '<wordpressusername>'@'localhost';
Query OK, 0 rows affected (0.00 sec)

# 【任意】管理者特権をもたない一般ユーザーを作成 (WordPress 用)
mysql> CREATE USER '<username>'@'localhost' IDENTIFIED BY "<password>";

# 【任意】適切な一般ユーザーの権限を付与
mysql> GRANT XXXXXXXXXX ON <databasename>.* TO '<username>'@'localhost';

# 【任意】権限の設定を変更 (反映)
mysql> FLUSH PRIVILEGES;
Query OK, 0 rows affected (0.01 sec)
なお公式 :( ローカライズ下手すぎる。チョクヤク、ワカリニクイ ):
mysql admin ってなんやねん、とつっこみをいれたい。MySQL 管理者 ( MySQLのユーザー名: adminusername ) ってことかな。
- たぶん (データベース)
システムの root ユーザー( =RDBMS の root ユーザー, 文中「root」, which is not Linux System User ) でいじるのは楽だけど、なるべくやめてねってこと。
- Linux システムの root ユーザーじゃなくても MySQL root ユーザーは使用できる (
sudo mysql -u root) ので、RDBMS の root ユーザーのことかと。
コマンドの解説です。
「root」もまたadminusername ですが、mysql admin としては一般のアカウントを使用したほうが安全です。システムの root ユーザーで “mysql” コマンドを入力せずに済みます。避けられる場合は常に root ユーザーの使用を避けるほうが権限を奪取される可能性を減らせます。使用する名前は mysqladmin を使用してデータベース管理者として割り当てた名前です。
【任意】SELinux を無効化
とりあえず。
#/etc/selinux/config
SELINUX=disabled   #disabledに修正します
# SELinux を無効にしてシステムを再起動
rpm -q grubby
grubby-8.40-51.amzn2023.0.4.x86_64
sudo grubby --update-kernel ALL --args selinux=0
sudo reboot
WordPress
WordPress インストール。
最新のパッケージをダウンロードします。
wget https://wordpress.org/latest.tar.gz
tar -xzvf latest.tar.gz
初期設定 (通常インストール)
とりあえず通常タイプのインストールを行い、あとでマルチサイト構成にします。
※ 設定ファイルの内容は、下記リンク先を参照 :
下のコードは基本的な設定のみです。
ログとかは必要な追加オプションに加えて、 php.ini を実行時にオーバーライドするなど、手を加える必要があります。この投稿では触れません。とりあえずインストールできる設定までにしておこうと思います。
/** The name of the database for WordPress */
define( 'DB_NAME', 'your-db-name' );    // 例: define( 'DB_NAME', 'wordpress_blog' );

/** Database username */
define( 'DB_USER', 'your-db-username' );

/** Database password */
define( 'DB_PASSWORD', 'xxxxxx' );

/** Database hostname */
define( 'DB_HOST', 'localhost' );

/** Database charset to use in creating database tables. */
define( 'DB_CHARSET', 'utf8' );

/** The database collate type. Don't change this if in doubt. */
define( 'DB_COLLATE', '' );

/* データベーステーブルの先頭に配置される値です。
データベースのプレフィックスとしてwp_以外のものを使用する場合は、
この値を変更してください。
通常、マルチサイト機能のように、複数の WordPress ブログを
同じデータベースにインストールする場合に、この値を変更します。*/
$table_prefix = 'dev2025_';

/*
 * For developers: WordPress debugging mode.
 *
 * Change this to true to enable the display of notices during development.
 * It is strongly recommended that plugin and theme developers use WP_DEBUG
 * in their development environments. */
define( 'WP_DEBUG', true );

/* Add any custom values between this line and the "stop editing" line. */
// Dynamically set WP_SITEURL and WP_HOME based on $_SERVER[‘HTTP_HOST’]
define( 'WP_SITEURL', 'http://' . $_SERVER['HTTP_HOST'] );
define( 'WP_HOME', 'http://' . $_SERVER['HTTP_HOST'] );
// To enable multi sites, set 'true'
define( 'WP_ALLOW_MULTISITE', true );
/*
WordPress 5.2 introduced Recovery Mode which displays error message instead of white screen when plugins causes fatal error.

The site is experiencing technical difficulties. Please check your site admin email inbox for instructions.

White screens and PHP error messages are not displayed to users any more.
But in a development environment, if you want to enable WP_DEBUG_DISPLAY (In Qiita Author's comment: WP_DEBUG & WP_DEBUG_LOG as well),
you have to disable recovery mode by set true
*/
define( 'WP_DISABLE_FATAL_ERROR_HANDLER', true ); // 5.2 and later
/* That's all, stop editing! Happy publishing. */
参考:
インストール
WSL内 のローカルのディレクトリに、ダウンロードした WordPress ( 編集した設定ファイルを含む ) をコピーしてインストール
sudo cp -r ~/wordpress/. /var/www/wordpress/
以下の URL にアクセスして、インストールスクリプトを流します。ブラウザのメッセージ通りに進めて、インストールは完了です。
http://xx.xx.xx.xx/wp-admin/install.php
マルチサイト化
とりあえずバックアップ ( WSL 上の Wordpress を バックアップディレクトリに cp するだけ ) 。
sudo cp -r /var/www/wordpress/. /mnt/d/Users/cinem/Documents/backups/wordpress/
pretty パーマリンク
WordPress にログイン し、左のメニューから [Settings ] - "Permalinks" > [Common Settings] >Permalink structure のチェックボックスを確認:
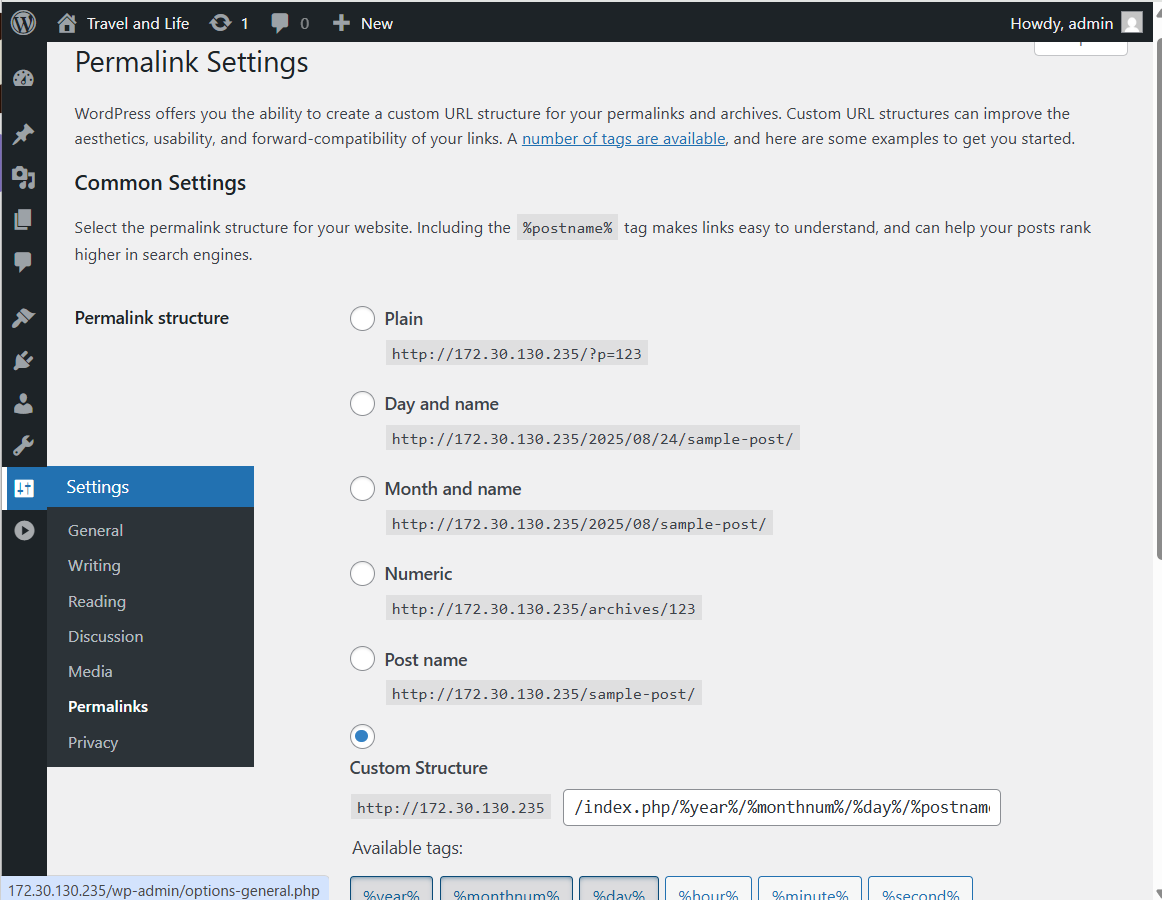
- Custom Structure にチェックが入っていること。
パーマリンクの設定値:
http://172.30.130.235/index.php/%year%/%monthnum%/%day%/%postname%/
プラグインは無効化しておく
インストール直後の状態では、"Akismet Anti-spam: Spam Protection" と "Hello Dolly" というプラグインがインストールされていましたが、有効化されていませんでしたのでスルー。
マルチサイトを許可
以下を追加。 (インストール時に設定済み)
/* Multisite */
define( 'WP_ALLOW_MULTISITE', true );
......
....
/* That's all, stop editing! Happy blogging. */
ネットワークの設定
WordPress にログイン し、左のメニューから [Tools ] > "Network Setup"
- 以下の設定になっていた。(画面に出てきた設定値)
1)ドメインではなく、サブディレクトリにインストールする:
Sub-directory Installation
Because your installation is in a directory, the sites in your WordPress network must use sub-directories.
2)ただしくIPアドレスが表示されている:
Server Address
The internet address of your network will be 172.30.130.235.
hostname -I
172.30.130.235 172.18.0.1 172.19.0.1 172.17.0.1
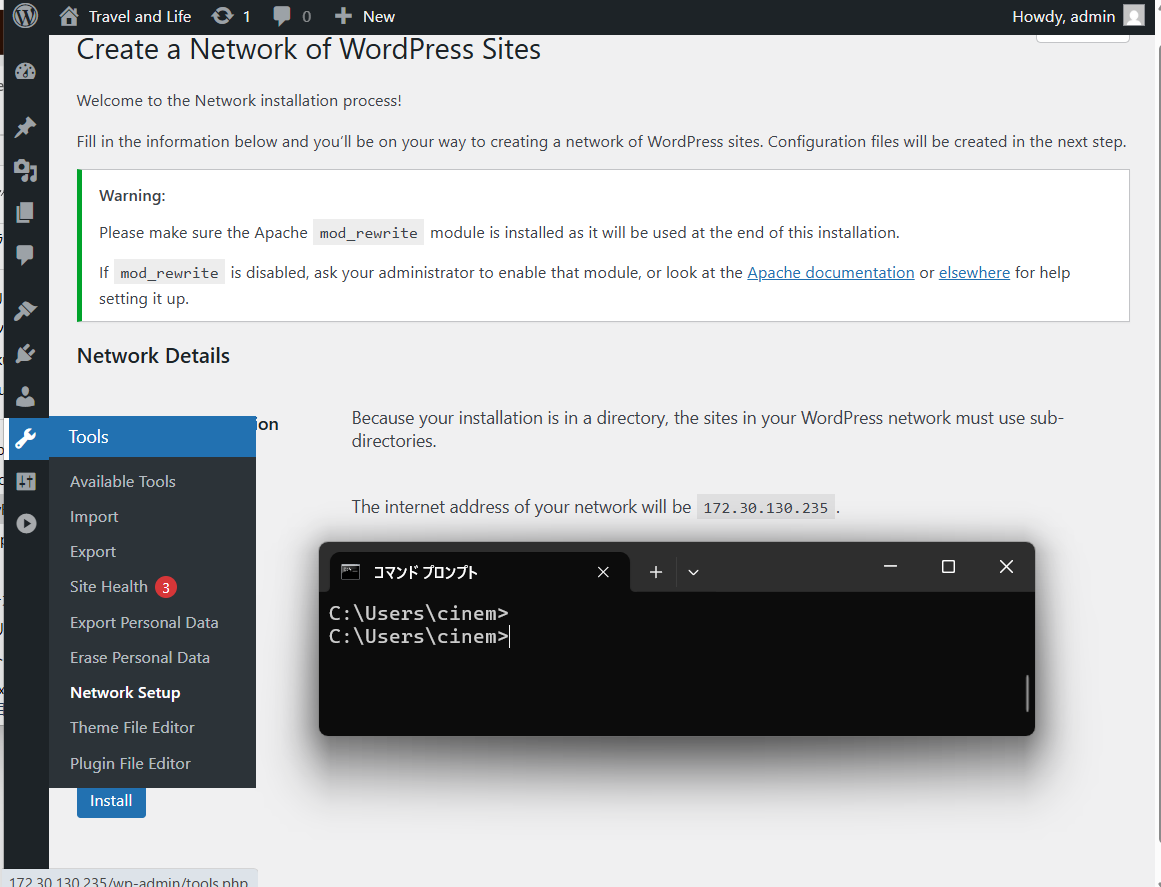
mod_rewrite の有効化
画面のメッセージにしたがう。(以下で確認)
# mod_rewrite が mods-available (モジュールのロードと設定を行うための設定ファイル) に存在することを確認する
sudo cat -n /etc/apache2/mods-available/rewrite.load | grep LoadModule
     1  LoadModule rewrite_module /usr/lib/apache2/modules/mod_rewrite.so

# インストールによって自動的に有効化するが、一応実行
sudo a2enmod rewrite
Enabling module rewrite.
To activate the new configuration, you need to run:
  systemctl restart apache2

# 再起動
sudo systemctl restart apache2
Install ボタンをクリック。
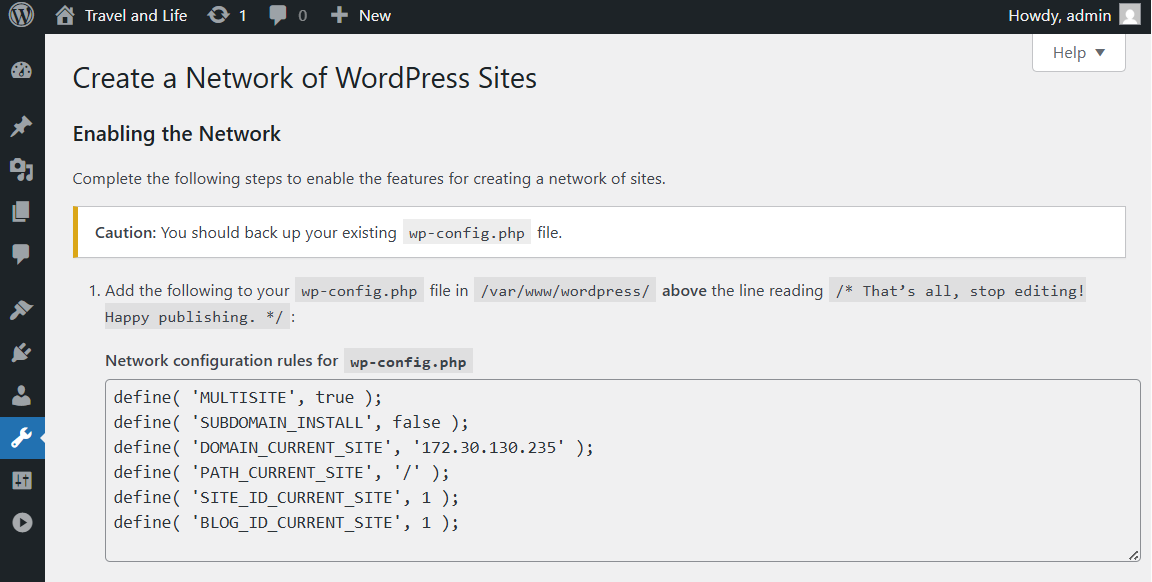
設定ファイル
cd /var/www/wordpress

# 権限設定
whoami
username

sudo chown -R username:username /var/www/wordpress
以下のコードを追加。
// Multi site network configuration
define( 'MULTISITE', true );
define( 'SUBDOMAIN_INSTALL', false );
define( 'DOMAIN_CURRENT_SITE', $_SERVER['HTTP_HOST'] );
define( 'PATH_CURRENT_SITE', '/' );
define( 'SITE_ID_CURRENT_SITE', 1 );
define( 'BLOG_ID_CURRENT_SITE', 1 );
/* That's all, stop editing! Happy publishing. */
DOMAIN_CURRENT_SITE の $_SERVER['HTTP_HOST'] は、WSL の IP が変わってもいいように、PHP の関数で IP アドレスを取得するようにしました。
.htaccess の作成
cd /var/www/wordpress

touch .htaccess
RewriteEngine On
RewriteRule .* - [E=HTTP_AUTHORIZATION:%{HTTP:Authorization}]
RewriteBase /
RewriteRule ^index\.php$ - [L]

# add a trailing slash to /wp-admin
RewriteRule ^([_0-9a-zA-Z-]+/)?wp-admin$ $1wp-admin/ [R=301,L]

RewriteCond %{REQUEST_FILENAME} -f [OR]
RewriteCond %{REQUEST_FILENAME} -d
RewriteRule ^ - [L]
RewriteRule ^([_0-9a-zA-Z-]+/)?(wp-(content|admin|includes).*) $2 [L]
RewriteRule ^([_0-9a-zA-Z-]+/)?(.*\.php)$ $2 [L]
RewriteRule . index.php [L]
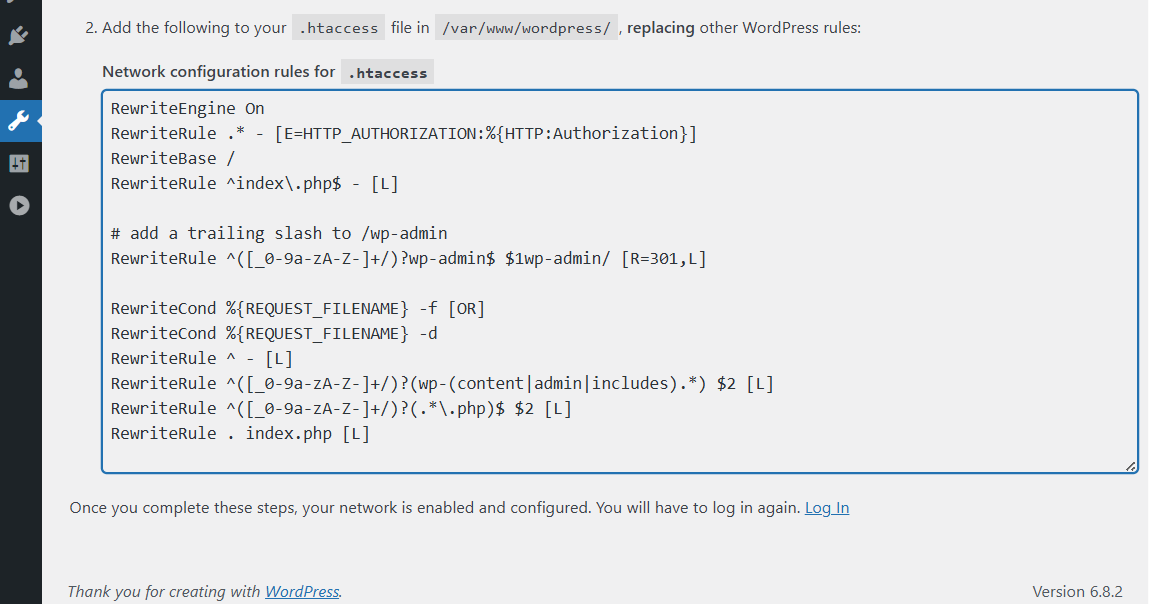
再ログインして完了。