0. はじめに
yarnって何?
npmと互換性のあるパッケージマネージャーです。
パッケージマネージャーとはnode.jsのライブラリやパッケージを管理することができるツールです。
使用することで使いたいライブラリの導入や削除が楽になったり、パッケージ同士の依存関係を管理することができます。
yarnはnpmと互換性があるため既存のpackege.jsonがそのまま使えるというのはとても良い点です。
【yarn公式サイト】
この記事を書こうと思った経緯
「yarnが良い」と噂話に飛びついた私みたいな人は気軽にbrewでインストールコマンド叩いて死んじゃうと思ったので、この記事を書くことにしました
この記事を読むのに向いている人
・yarnって何?の人
・firebaseで開発させろやの人
・npm使ってて、yarnに乗り換えようかと考えてる人
・既にmacのローカルでnode.jsの開発をしている人
・macのローカルでnodebrewを使ってnodeのバージョン管理してる人
1. yarnのインストール方法
例のごとくbrewでインストールします
他にも方法がありますが、yarnの公式ページから参考にしてください
nodeが既に入ってる人向け
brewでインストールするときに--without-nodeを使って依存関係を外す
$ brew install yarn --without-node

==> Downloading https://yarnpkg.com/downloads/1.6.0/yarn-v1.6.0.tar.gz
==> Downloading from https://github.com/yarnpkg/yarn/releases/download/v1.6.0/yarn-v1.6.0.tar.gz
######################################################################## 100.0%
🍺  /usr/local/Cellar/yarn/1.6.0: 14 files, 4.1MB, built in 8 seconds
.bash_profileにpathを書き込む
# yarn PATH
export PATH=/usr/local/:Cellar/yarn/1.6.0:$PATH
確認のためversionコマンド
$ yarn --version
1.6.0
これで余計なものはインストールされずyarnだけインストールされます
使えるようになったので笑顔![]()
nodeが入ってない人向け
こちらもbrewでインストールします
$ brew install yarn

==> Installing dependencies for yarn: icu4c, node
==> Installing yarn dependency: icu4c
==> Downloading https://homebrew.bintray.com/bottles/icu4c-62.1.high_sierra.bottle.tar.gz
######################################################################## 100.0%
==> Pouring icu4c-62.1.high_sierra.bottle.tar.gz
==> Caveats
This formula is keg-only, which means it was not symlinked into /usr/local,
because macOS provides libicucore.dylib (but nothing else).

If you need to have this software first in your PATH run:
  echo 'export PATH="/usr/local/opt/icu4c/bin:$PATH"' >> ~/.bash_profile
  echo 'export PATH="/usr/local/opt/icu4c/sbin:$PATH"' >> ~/.bash_profile

For compilers to find this software you may need to set:
    LDFLAGS:  -L/usr/local/opt/icu4c/lib
    CPPFLAGS: -I/usr/local/opt/icu4c/include
For pkg-config to find this software you may need to set:
    PKG_CONFIG_PATH: /usr/local/opt/icu4c/lib/pkgconfig

==> Summary
🍺  /usr/local/Cellar/icu4c/62.1: 250 files, 67.3MB
==> Installing yarn dependency: node
==> Downloading https://homebrew.bintray.com/bottles/node-10.6.0.high_sierra.bottle.tar.gz
######################################################################## 100.0%
==> Pouring node-10.6.0.high_sierra.bottle.tar.gz
==> Caveats
Bash completion has been installed to:
  /usr/local/etc/bash_completion.d
==> Summary
🍺  /usr/local/Cellar/node/10.6.0: 6,793 files, 59.9MB
==> Installing yarn
==> Downloading https://yarnpkg.com/downloads/1.7.0/yarn-v1.7.0.tar.gz
==> Downloading from https://github.com/yarnpkg/yarn/releases/download/v1.7.0/yarn-v1.7.0.tar.gz
######################################################################## 100.0%
🍺  /usr/local/Cellar/yarn/1.7.0: 14 files, 4.2MB, built in 6 seconds
これでインストールされるものは以下の3つでした。
yarn - 入れたいやつ
node - node.js
icu4c - 何これ…
icu4cって何???ってなったので調べてみました。
icu4cとは
icu4というのはIBM製のライブラリで、正式にはInternational Components for Unicodeというものです。
これは文字化けを正しい文字コードに変換するためのライブラリでした。
C/C++版は語尾にcがつき、Java版は語尾にjがつくようです。
【ICU公式サイト】
For compilers to find this software you may need to set:
コンパイラで使いたいならPATHに書いとけって言われたので素直に従います
.bash_profileにpathを書き込む
# icu4c PATH
export PATH="/usr/local/opt/icu4c/bin:$PATH
export PATH="/usr/local/opt/icu4c/sbin:$PATH

# yarn PATH
export PATH=/usr/local/:Cellar/yarn/1.7.0:$PATH
確認のためversionコマンド
$ yarn --version
1.7.0
これで使えるようになったので笑顔![]()
インストールまとめ
--without-nodeを使うと楽なんですが、yarnのversion違くね?ってなりました
version upがしたい場合は$ brew upgrade yarn --without-nodeでup gradeできるようですが
ここでも--without-nodeを使わないとicu4cとかnodeもインストールされてしまうようなので注意してください
2. nodeのバージョンアップ
必須というわけでもないのですが、せっかくなのでバージョンアップ![]()
nodebrew使ってる人向け
installコマンドはソースからコンパイルするため非常に遅いのでinstall-binaryを使った方がいいです。
(久しぶりにnodebrewいじって苦しんだのは内緒)
# installコマンド
$ nodebrew install-binary <version>
$ nodebrew install-binary stable # 安定版
$ nodebrew install-binary latest  # 最新版

# バージョン指定コマンド
$ nodebrew use [version指定]

# 確認
$ nodebrew list
v8.9.3
v9.3.0
v10.6.0

current: v10.6.0
nodebrew使ってない人
homebrewでupgradeしてください
# installコマンド
$ brew install node

# 確認
$ node --version
v10.6.0
3. Firebaseアプリを作っちゃう
-1. yarnを使ってfirebase tools(CLIツール)のインストール
firebaseの公式ではnpmを使ってインストールする方法しか書かれていなかったのですが、探したらyarnでもインストールできる方法を見つけました
プロジェクトごとにインストールするの面倒だと思ったのでglobalインストールすることにしました
人それぞれだと思うのでお好きにどうぞ
$ yarn global add firebase-tools

yarn global v1.7.0
(node:18938) [DEP0005] DeprecationWarning: Buffer() is deprecated due to security and usability issues. Please use the Buffer.alloc(), Buffer.allocUnsafe(), or Buffer.from() methods instead.
[1/4] 🔍  Resolving packages...
[2/4] 🚚  Fetching packages...
[3/4] 🔗  Linking dependencies...
[4/4] 📃  Building fresh packages...
success Installed "firebase-tools@3.19.3" with binaries:
      - firebase
✨  Done in 22.55s.
logがめっちゃ可愛いやないかーい![]()
ちなみにlocalインストールはこっち$ yarn add firebase-tools
-2. プロジェクトフォルダ作ってFirebaseにログイン
作業するのにプロジェクトフォルダを作ってfirebaseログインコマンド叩きます
$ cd [作業用フォルダに移動(任意の場所でいいです)]
$ mkdir [好きな名前で]
$ cd [作成したディレクトリの中]
$ firebase login

? Allow Firebase to collect anonymous CLI usage and error reporting information? (Y/n)←レポート送るか聞かれるのでお好きにy or n

Visit this URL on any device to log in:
(省略)
Waiting for authentication...
ブラウザが勝手にログイン画面を表示します
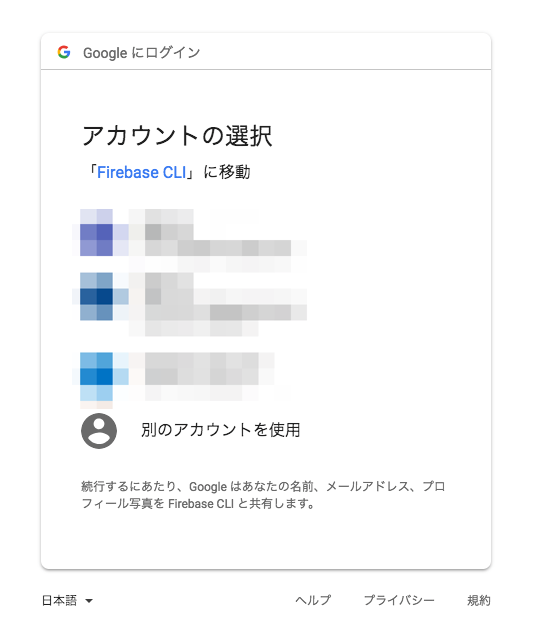
ログインするアカウントを選択する
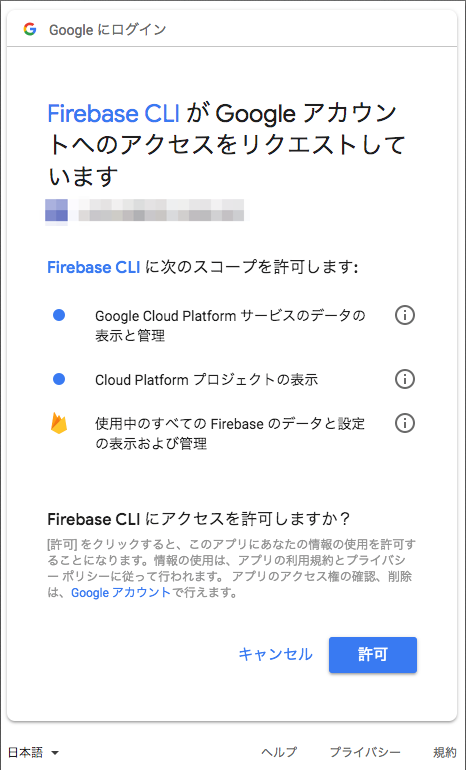
許可をする
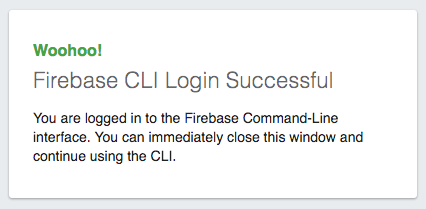
ログイン完了![]()
ターミナルの方を確認するとログインできてました
Visit this URL on any device to log in:
(省略)
Waiting for authentication...

✔  Success! Logged in as [ログインしたアカウント名]
-3. 初期設定(慣れてないと結構長く感じるよ)
-1. アプリの種類を選択
ログインしたあとはそのまま初期設定でinitコマンドを叩いて、どんなアプリにするのか選択する
複数選択可能で、スペースキーで選択してエンター![]() (タンッ)
(タンッ)
今回はサンプルプロジェクトなのでHosting(静的ページ)を選びました
$ firebase init

     🔥🔥🔥🔥🔥🔥🔥🔥 🔥🔥🔥🔥 🔥🔥🔥🔥🔥🔥🔥🔥  🔥🔥🔥🔥🔥🔥🔥🔥 🔥🔥🔥🔥🔥🔥🔥🔥     🔥🔥🔥     🔥🔥🔥🔥🔥🔥  🔥🔥🔥🔥🔥🔥🔥🔥
     🔥🔥        🔥🔥  🔥🔥     🔥🔥 🔥🔥       🔥🔥     🔥🔥  🔥🔥   🔥🔥  🔥🔥       🔥🔥
     🔥🔥🔥🔥🔥🔥    🔥🔥  🔥🔥🔥🔥🔥🔥🔥🔥  🔥🔥🔥🔥🔥🔥   🔥🔥🔥🔥🔥🔥🔥🔥  🔥🔥🔥🔥🔥🔥🔥🔥🔥  🔥🔥🔥🔥🔥🔥  🔥🔥🔥🔥🔥🔥
     🔥🔥        🔥🔥  🔥🔥    🔥🔥  🔥🔥       🔥🔥     🔥🔥 🔥🔥     🔥🔥       🔥🔥 🔥🔥
     🔥🔥       🔥🔥🔥🔥 🔥🔥     🔥🔥 🔥🔥🔥🔥🔥🔥🔥🔥 🔥🔥🔥🔥🔥🔥🔥🔥  🔥🔥     🔥🔥  🔥🔥🔥🔥🔥🔥  🔥🔥🔥🔥🔥🔥🔥🔥

You're about to initialize a Firebase project in this directory:

  /Users/[macのユーザ名]/workspace/firebase-app/test-app

? Which Firebase CLI features do you want to setup for this folder? Press Space to select features, then Enter to confirm your choi
ces.
 ◯ Database: Deploy Firebase Realtime Database Rules
 ◯ Firestore: Deploy rules and create indexes for Firestore
 ◯ Functions: Configure and deploy Cloud Functions
❯◉ Hosting: Configure and deploy Firebase Hosting sites
 ◯ Storage: Deploy Cloud Storage security rules
-2. プロジェクトの設定
プロジェクトの選択しろって言ってくるので[create a new project]を選択してエンター![]() (タンッ)
(タンッ)
? Which Firebase CLI features do you want to setup for this folder? Press Space to select features, then Enter to confirm your choices.
Hosting: Configure and deploy Firebase Hosting sites

=== Project Setup

First, let's associate this project directory with a Firebase project.
You can create multiple project aliases by running firebase use --add,
but for now we'll just set up a default project.

? Select a default Firebase project for this directory:
  [don't setup a default project]
  test-project (test-project-ee29b)
❯ [create a new project]
-3. hostingの設定
publicディレクトリを作って良いか聞かれます
ルートディレクトリに使うものを選ぶのでしょうが、使いたいディレクトリ名がある場合は指定します
今回はテストサンプルなのでそのままpublicでエンターしました
? Select a default Firebase project for this directory: [create a new project]

=== Hosting Setup

Your public directory is the folder (relative to your project directory) that
will contain Hosting assets to be uploaded with firebase deploy. If you
have a build process for your assets, use your build's output directory.

? What do you want to use as your public directory? (public)
-4. SPAの設定
Single Page Applicationか聞かれます
流行りなのでSPAを選択してみます
yでエンター
? What do you want to use as your public directory? public
? Configure as a single-page app (rewrite all urls to /index.html)? (y/N) Yes

✔  Wrote public/index.html

i  Writing configuration info to firebase.json...
i  Writing project information to .firebaserc...

✔  Firebase initialization complete!

Project creation is only available from the Firebase Console
Please visit https://console.firebase.google.com to create a new project, then run firebase use --add
-5. pc側での設定
Project creation is only available from the Firebase Console
(翻訳:コンソールでしかプロジェクトは作れないよ!)
Please visit https://console.firebase.google.com to create a new project, then run firebase use --add
(翻訳:コンソールに行ってプロジェクト作ってきてね、そしたらfirebase use --addコマンド叩いてね)
コンソールで作ったプロジェクトを選択して、aliasを名付けします
$ firebase use --add
? Which project do you want to add? test-project-ee29b
? What alias do you want to use for this project? (e.g. staging) staging

Created alias staging for test-project-ee29b.
Now using alias staging (test-project-ee29b)

# 確認
$ ls -al
total 16

-rw-r--r--  1 [user-name]  staff   59  7 16 01:46 .firebaserc
-rw-r--r--  1 [user-name]  staff  236  7 16 01:37 firebase.json
drwxr-xr-x  3 [user-name]  staff   96  7 16 01:37 public
完了![]()
-6. PC側での実行(ローカル実行)
# ローカルサーバを立ち上げる
$ firebase serve

=== Serving from '/Users/[user-name]/workspace/firebase-app/test-app'...

i  hosting: Serving hosting files from: public
✔  hosting: Local server: http://localhost:5000
ブラウザからhttp://localhost:5000に接続
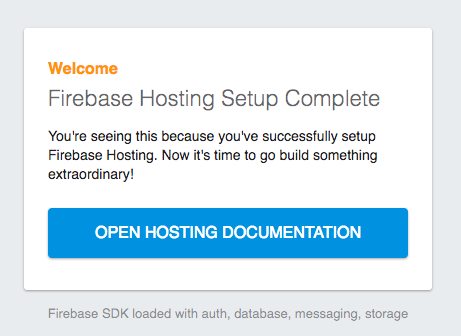
表示された〜![]()
![]()
![]()
i  hosting: Serving hosting files from: public
✔  hosting: Local server: http://localhost:5000

127.0.0.1 - - [15/Jul/2018:16:57:00 +0000] "GET / HTTP/1.1" 200 3505 "-" "Mozilla/5.0 (Macintosh; Intel Mac OS X 10_13_5) AppleWebKit/537.36 (KHTML, like Gecko) Chrome/67.0.3396.99 Safari/537.36"
ログも出てた〜![]()
ctrl+cでサーバ停止は万国共通です
[おまけ]
ローカル実行はfirebase.jsonがあるところじゃないとできないようです
プロジェクトフォルダの中でfirebase serveコマンドを打ちましょう
-7. firebaseにデプロイして確認
ワンコマンドでFinish![]()
$ firebase deploy

=== Deploying to 'test-project-ee29b'...

i  deploying hosting
i  hosting: preparing public directory for upload...
✔  hosting: 1 files uploaded successfully

✔  Deploy complete!

Project Console: https://console.firebase.google.com/project/test-project-ee29b/overview
Hosting URL: https://test-project-ee29b.firebaseapp.com
与えられたURLのhttps://test-project-ee29b.firebaseapp.comに接続するとPCのlocalhostで表示されたものと同じものが出てきます(当たり前)

これで完了です![]()
4. まとめ
javascriptでwebアプリを作ることも多くなってきたので、環境づくりを含めてやってみました
yarnはnpmと比べて色々と捗るみたいです
タスクランナーとか、実際のアプリ開発どないすんねんって話はまた別の機会にやりたいと思います
もっと良い方法とか知ってる方がいたら是非コメントください〜![]()