はじめに
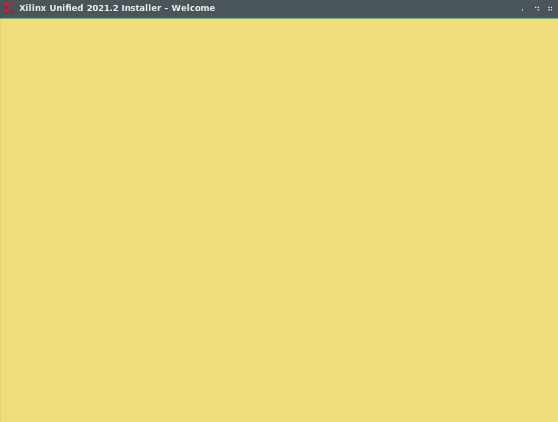
先日、Xilinx社のFPGA開発ツールであるVitisをKVM上のUbuntu20.04LTSにインストールすることを試みました。しかし、webインストーラを起動すると、下記のような黄色い画面(インストーラが正常起動しない状態)が表示されてしまいました。
このように、Vitisインストーラが正常に起動しない場合があります。
その場合は、コマンドラインベースでのVitisインストールが代替策となります。
参考文献
以下のサイトを参考にしました。ありがとうございます。
https://msyksphinz.hatenablog.com/entry/2016/09/09/020000
対象読者
・FPGAを用いた開発に関心のある方
・FPGAを用いた開発の経験がある方
本記事の目的
読者の方にコマンドラインベースでのVitisインストール方法を知っていただくこと
フルインストーラのダウンロード
Xilinx社のページからフルインストーラをダウンロードします。
尚、ダウンロードする際には、Xilinxのアカウントが必要となります。
バージョン2021.2の容量は72GB程度あるため、ダウンロードに時間がかかります。
夜中にダウンロードを開始して朝を待ちます。
コマンドラインベースでのVitisインストール
ダウンロードした圧縮ファイルを解凍し、フォルダ内にあるxsetupを用いてコマンドラインベースでのインストールを開始します。
下記のコマンドでconfig用のファイルを生成します。
sudo ./xsetup -b ConfigGen
Running in batch mode...
Copyright (c) 1986-2020 Xilinx, Inc.  All rights reserved.

INFO : Log file location - /root/.Xilinx/xinstall/xinstall_1591318833338.log
Select a Product from the list:
1. Vitis
2. Vivado
3. On-Premises Install for Cloud Deployments
4. BootGen
5. Lab Edition
6. Hardware Server
7. Documentation Navigator (Standalone)

Please choose: 1 ← Vitisを選択

INFO : Config file available at /root/.Xilinx/install_config.txt. Please use -c <filename> to point to this install configuration.
Config file available...とあるため、/root/.Xilinx/install_config.txtを編集します。
今回は、install directoryを/opt/Xilinxに変更し、それ以外はそのままとしました。
その後、以下のコマンドでインストーラを起動し、インストールを実行します。
sudo ./xsetup --agree XilinxEULA,3rdPartyEULA --batch Install --config /root/.Xilinx/install_config.txt
まとめ
コマンドラインベースでのVitisインストール方法を紹介しました。