はじめに
ラズパイに接続されたカメラ映像のWebストリーミングアプリケーションを作成しました。
また、取得した画像フレームから眠気検知を同時に行っています。
本記事のソースコードは以下に置いています。
https://github.com/AkitoArai709/RaspiSmartCamera-WebStreaming
環境
- Raspberry Pi 4 Model B
- Camera Module V2 For raspberry pi
- Python : 3.7.3
- flask : 1.0.2
- opencv : 4.5.1.48
- dlib : 19.22.0
- imutils : 0.5.4
- scipy : 1.6.2
- greenlet : 1.0.0
システム構成
ラズパイに接続されたカメラ映像から画像フレームを取得して、OpenCVとDlibを使用して顔検出と眠気検知を行い、眠気検知の結果を描画した画像フレームをFlaskを使ってローカルネットワーク上でWebストリーミングを行います。
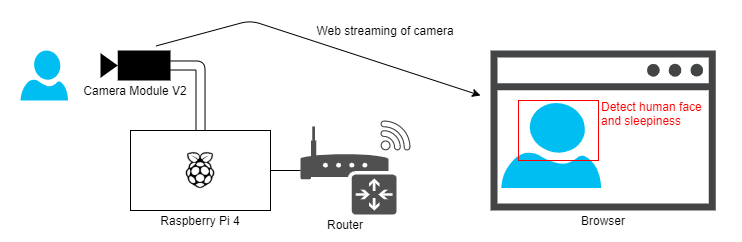
動作デモ
以下のコマンドでアプリを実行します。
python3 src/main.py
アプリ実行後にhttp://xx.xx.xx.xx/streamにアクセスするとWebストリーミングが開始されます。目の大きさによって眠気の検知を行い、眠気を検知すると「Look sleepy!」と表示します。
(※「xx.xx.xx.xx」はラズパイのIPアドレス)

ファイル構成
.
├─ models
│  ├─ dlib ─ shape_predictor_68_face_landmarks.dat
│  └─ opencv ─ haarcascade_frontalface_alt2.xml
└─ src
   ├─ static ─ style.css
   ├─ templates
   │  ├─ index.html
   │  └─ stream.html
   ├─ baseCamera.py
   ├─ buffer.py
   ├─ camera.py
   ├─ cameraEvent.py
   ├─ detectionSleepiness.py
   ├─ main.py
   └─ webStreamingApp.py
FlaskによるWebストリーミング
FlaskとはPython上で動作するウェブアプリケーションのフレームワークで、必要最低限の機能した搭載されていませんが、他フレームワークに比べて動作が軽く簡単に実装が可能です。
main.pyではwebStreamingApp.pyで実装されたWebアプリを読み込んで実行しています。
Webアプリでは/、/stream、/video_feedのアドレスを定義し、/でトップページ、/streamでストリーミングのページを表示します。/video_feedではCameraクラスから画像フレームの取得と表示を行い、ストリーミングページに埋め込んでいます。
# !/usr/bin/env python
from webStreamingApp import webStreaming

def main():
    webStreamingApp = webStreaming()
    webStreamingApp.run(host='0.0.0.0', threaded=True, debug=True)

if __name__ == '__main__':
    main()
import os
from camera import Camera
from flask import Flask, render_template, Response

def webStreaming():
    return app

app = Flask(__name__)

def gen(camera):
    while True:
        frame = camera.get_frame()
        yield (b'--frame\r\n'
               b'Content-Type: image/jpeg\r\n\r\n' + frame + b'\r\n')

@app.route('/')
def index():
    return render_template('index.html')

@app.route('/stream')
def stream():
    return render_template('stream.html')

@app.route('/video_feed')
def video_feed():
    return Response(gen(Camera()),
                    mimetype='multipart/x-mixed-replace; boundary=frame')

@app.context_processor
def add_staticfile():
    def staticfile_cp(fname):
        path = os.path.join(app.root_path, 'static', fname)
        mtime =  str(int(os.stat(path).st_mtime))
        return '/static/' + fname + '?v=' + str(mtime)
    return dict(staticfile=staticfile_cp)
カメラから画像フレームの取得
camera.py、baseCamera.py、cameraEvent.pyにカメラフレームの処理を実装しています。
Cameraクラス
OpenCVによりカメラから画像フレームを取得します。OpenCVによるカメラへのアクセスは排他処理になっており、ブラウザごとにカメラアクセスを行うと、複数ブラウザからアクセスした場合にストリーミングが行われているブラウザ以外は固まってしまいます。そこで、画像フレーム取得処理をstaticmethodで実装することで、各インスタンスで同じ処理を参照するようにしています。
import cv2
from baseCamera import BaseCamera
from detectionSleepiness import DetectionSleepiness

class Camera(BaseCamera):
    tick = 0
    fpsColor = (0, 255, 0)

    infApp = DetectionSleepiness()

    def __init__(self):
        super().__init__()

    @staticmethod
    def frames():
        camera = cv2.VideoCapture(0)
        if not camera.isOpened():
            raise RuntimeError('Could not start camera.')

        while True:
            # read current frame
            _, frame = camera.read()

            frame = Camera.infApp.getDetectResultFrame(frame)
            yield cv2.imencode('.jpg', Camera.__drawingFps(frame))[1].tobytes()

    @staticmethod
    def __drawingFps(frame):
        fps = 0
        if Camera.tick != 0:
            fps = cv2.getTickFrequency() / (cv2.getTickCount() - Camera.tick)
        Camera.tick = cv2.getTickCount()
        return cv2.putText(frame, "FPS:{} ".format(int(fps)),
                    (520, 30), cv2.FONT_HERSHEY_DUPLEX, 1, Camera.fpsColor, 1, cv2.LINE_AA)
BaseCameraクラス
基底クラスにてバックグランドによる画像フレームの取得処理を実行してクラス変数を保持することで、各インスタンスから共通の画像フレームを参照します。また、コンストラクタで起動するスレッドもクラス変数で管理して、処理自体も共通化としています。
import copy
import time
import threading
from abc import abstractmethod
from cameraEvent import CameraEvent

class BaseCamera(object):
    # background thread that reads frames from camera
    thread = None
    # current frame is stored here by background thread
    frame = None
    # time of last client access to the camera
    last_access = 0
    event = CameraEvent()

    def __init__(self):
        if BaseCamera.thread is None:
            BaseCamera.last_access = time.time()

            # start background frame thread
            BaseCamera.thread = threading.Thread(target=self._thread)
            BaseCamera.thread.start()

            # wait until frames are available
            while self.get_frame() is None:
                time.sleep(0)

    def get_frame(self):
        BaseCamera.last_access = time.time()

        # wait for a signal from the camera thread
        BaseCamera.event.wait()
        BaseCamera.event.clear()

        return BaseCamera.frame

    @staticmethod
    @abstractmethod
    def frames():
        raise RuntimeError('Must be implemented by subclasses.')

    @classmethod
    def _thread(cls):
        print('Starting camera thread.')
        frames_iterator = cls.frames()
        for frame in frames_iterator:
            BaseCamera.frame = frame
            BaseCamera.event.set()  # send signal to clients

            # if there hasn't been any clients asking for frames in
            # the last 10 seconds then stop the thread
            if time.time() - BaseCamera.last_access > 10:
                frames_iterator.close()
                print('Stopping camera thread due to inactivity.')
                break
        BaseCamera.thread = None
_threadでは、Cameraクラスで定義したframesメソッドを呼び出して画像フレームの取得とクラス変数への保持を行います。framesメソッドはyieldで画像フレームを返しているため、forループで全て処理するまで動作し続けます。クラス変数への保持後にCameraEventのSetメソッドを呼び出して、get_frameメソッド内のwaitの待機を解放します。このイベント処理によって、カメラフレーム取得処理が終わってから、値を返すようにしています。
(※イベント処理についてはCameraEventクラスにて記述しています。)
保持した画像フレームはget_frameメソッドにて外部モジュールから取得されます。取得時にアクセス時間をlast_accessに保持して一定期間、外部モジュールからの画像フレーム取得がなかった場合にはカメラ処理を停止するようにしています。
CameraEventクラス
このクラスでは、各ブラウザから呼び出されたフレーム表示スレッドの管理と、イベント処理による同期処理を提供します。
import threading
import time
from greenlet import getcurrent as get_ident

class CameraEvent(object):
    def __init__(self):
        self.events = {}

    def wait(self):
        ident = get_ident()
        if ident not in self.events:
            # this is a new client
            # add an entry for it in the self.events dict
            # each entry has two elements, a threading.Event() and a timestamp
            self.events[ident] = [threading.Event(), time.time()]
        return self.events[ident][0].wait()

    def set(self):
        now = time.time()
        remove = []
        for ident, event in self.events.items():
            if not event[0].isSet():
                # if this client's event is not set, then set it
                # also update the last set timestamp to now
                event[0].set()
                event[1] = now
            else:
                # if the client's event is already set, it means the client
                # did not process a previous frame
                # if the event stays set for more than 5 seconds, then assume
                # the client is gone and remove it
                if now - event[1] > 5:
                    remove.append(ident)

        for ident in remove:
            del self.events[ident]

    def clear(self):
        self.events[get_ident()][0].clear()
waitメソッドでは呼び出されたスレッドのID毎にthreading.Event()取得してself.eventsに格納し、Eventのwaitメソッドを呼び出します。このwaitはEventのsetメソッドが呼び出されるまで処理を待機させます。
setでは待機状態のEventについて、Eventのsetメソッドを呼び出して待機状態の解放を行います。また、非待機状態のイベントが一定時間経過した場合に、管理していたEventの削除を行います。
眠気検知
DetectionSleepinessクラスにて画像フレームから顔検出と目の大きさによる眠気検知を行います。検知にはCV系処理ライブラリのOpenCVとDlibを使用します。それぞれライブラリで使用する処理モデルについては、modelsフォルダに配置しています。
import cv2
import dlib
from buffer import Buffer
from imutils import face_utils
from scipy.spatial import distance

class DetectionSleepiness:
    def __init__(self):
        # Learning result model file path
        self.faceCascadePath = "./models/opencv/haarcascade_frontalface_alt2.xml"
        self.faceLandmarksPath = "./models/dlib/shape_predictor_68_face_landmarks.dat"

        # Learning model
        self.faceCascade = cv2.CascadeClassifier(self.faceCascadePath)
        self.faceLandmarksCascade = dlib.shape_predictor(self.faceLandmarksPath)

        # Drawing color
        self.faceColor = (255, 255, 255)
        self.msgColor = (0, 0, 255)

        # Minimum buffer size required for detection sleepiness
        self.bufferSize = 50
        self.requiredBufferSize = 30
        self.SleepinessEARThreshold = 0.58

        # EAR buffer
        # Using for detection sleepiness
        self.EARbuffer = Buffer(self.bufferSize)

    def getDetectResultFrame(self, frame):
        frame, _ = self.__detection(frame, True)
        return frame

    def isSleepy(self, frame):
        _, ret = self.__detection(frame, False)
        return ret

    def __detection(self, frame, isDrawing):
        isSleepy = None
        # detect person face
        rect = self.faceCascade.detectMultiScale(frame,
                    scaleFactor=1.11, minNeighbors=3, minSize=(200, 200))

        if len(rect) > 0:
            # resize to face size
            # convert frame to dlib rectangle
            resizedFace = self.__resizeFace(frame, rect)
            faceDlibRectangle = dlib.rectangle(0, 0, resizedFace.shape[1], resizedFace.shape[0])

            # caltulation EAR
            # detect sleepiness
            left_EAR, right_EAR = self.__getEARs(resizedFace, faceDlibRectangle)
            isSleepy = self.__detectSleepiness(left_EAR, right_EAR)

            # drawing result
            if isDrawing:
                # drawing a square around the face
                x, y, w, h = rect[0,:]
                cv2.rectangle(frame, (x, y), (x+w, y+h), self.faceColor)
                # drawing left & right EAR(eyes aspect ratio)
                cv2.putText(frame,"leftEAR:{}".format(round(left_EAR,2)),
                        (10,30), cv2.FONT_HERSHEY_DUPLEX, 1, self.msgColor, 1, 1)
                cv2.putText(frame,"rightEAR:{}".format(round(right_EAR,2)),
                        (220,30), cv2.FONT_HERSHEY_DUPLEX, 1, self.msgColor, 1, 1)
                # drawing sleepiness result
                if isSleepy:
                    cv2.putText(frame,"Look sleepy!",
                        (10,70), cv2.FONT_HERSHEY_DUPLEX, 1, self.msgColor, 1, 1)
        else:
            # extract the contents of the buffer if it is not detected
            self.EARbuffer.pop()

        return frame, isSleepy

    def __detectSleepiness(self, left_EAR, right_EAR):
        ret = True
        self.EARbuffer.push(left_EAR + right_EAR)
        if self.EARbuffer.size() >= self.requiredBufferSize and \
            self.EARbuffer.getAvg() > self.SleepinessEARThreshold:
            ret = False

        return ret

    def __getEARs(self, frame, face):
        rect = self.faceLandmarksCascade(frame, face)
        rect = face_utils.shape_to_np(rect)

        left_EAR = self.__calcEAR(rect[42:48])
        right_EAR = self.__calcEAR(rect[36:42])

        return left_EAR, right_EAR

    def __calcEAR(self, eye):
        A = distance.euclidean(eye[1], eye[5])
        B = distance.euclidean(eye[2], eye[4])
        C = distance.euclidean(eye[0], eye[3])
        eye_ear = (A + B) / (2.0 * C)
        return round(eye_ear, 3)

    def __resizeFace(self, frame, range):
        # Since the face detection range is small, increase the range.
        x, y, w, h = range[0,:]
        w -= 10
        y += 10
        h += 10
        w += 10
        face = frame[y :(y + h), x :(x + w)]
        scale = 480 / h
        return cv2.resize(face, dsize=None, fx=scale, fy=scale)
眠気検知には以下の論文を参考に目の高さと幅との間のアスペクト比(EAR)を計算して、直近30個以上のEAR値の平均値から眠気を判定を行います。

引用元:Real-Time Eye Blink Detection using Facial Landmarks
DetectionSleepinessはAPIとして、getDetectResultFrameメソッドとisSleepyメソッドを提供しています。getDetectResultFrameメソッドでは引数から受け取った画像フレームに対して眠気判定を行った結果を描画した画像フレームを返し、isSleepyメソッドでは眠気判定結果のみを返します。
(※isSleepyメソッドは使用していませんが、別のプロジェクトで使用することを想定して用意しています。)
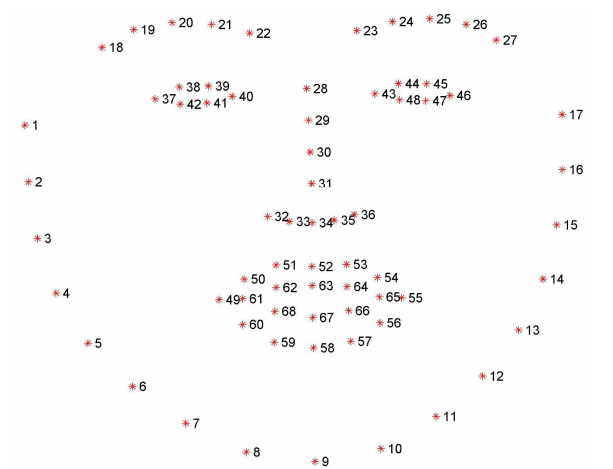
眠気検知のためまず、カメラから取得した画像フレームからOpenCVライブラリのself.faceCascade.detectMultiScaleから顔の検出を行います。検出結果から、顔の部分のみを切り抜きてリサイズした画像を使用してDlibライブラリのself.faceLandmarksCascadeから顔のランドマークを検出して37~48の目の部分のみを利用してEARを計算します。リサイズすることで、判定する顔の大きさを統一してカメラからの距離による判定のブレを削減しています。
顔のランドマークとは、瞳孔、鼻の先など、顔の輪郭のマッピングデータのことを指します。以下の68点の37~48が目の部分になります。
眠気の検知として以下のパラメータを定義しています。bufferSizeはEAR値を格納するバッファサイズ、requiredBufferSizeは眠気判定の計算に必要なEAR値の最低サイズ、SleepinessEARThresholdは眠気判定の閾値となっています。自身の目の大きさによってSleepinessEARThresholdのパラメータを調整して下さい。
(※現状は結構判定が厳しめなパラメータとなっています。)
self.bufferSize = 50
self.requiredBufferSize = 30
self.SleepinessEARThreshold = 0.58
最後に
ラズパイでリアルタイムな画像処理による眠気検知とWebストリーミングアプリケーションを作成することが出来ました。今回作成した眠気検知モジュールを使用して別のアプリケーションを作成しようと思っています。
(※何を作成するかはまだ未定。。。)
参考サイト
以下の情報を参考にさせていただきました。
FlaskとOpenCVでカメラ画像をストリーミングして複数ブラウザでアクセスする
眠気を判定!目のまばたき検知をDlibとOpenCVを組み合わせて数十行で作る
Real-Time Eye Blink Detection using Facial Landmarks