はじめに
Web Componentsで作成するCustom Elementsを動的に配置した時に、それぞれのElementの値が更新されないという問題に直面しました。解決するのが少しだけ大変でしたので、解決策を共有したいと思います。英語が読める人は「参考」の先のリンクを参照してもらえると、この内容について詳しく知ることが出来ると思います(日本語のページもたくさんあります)。
やりたいこと
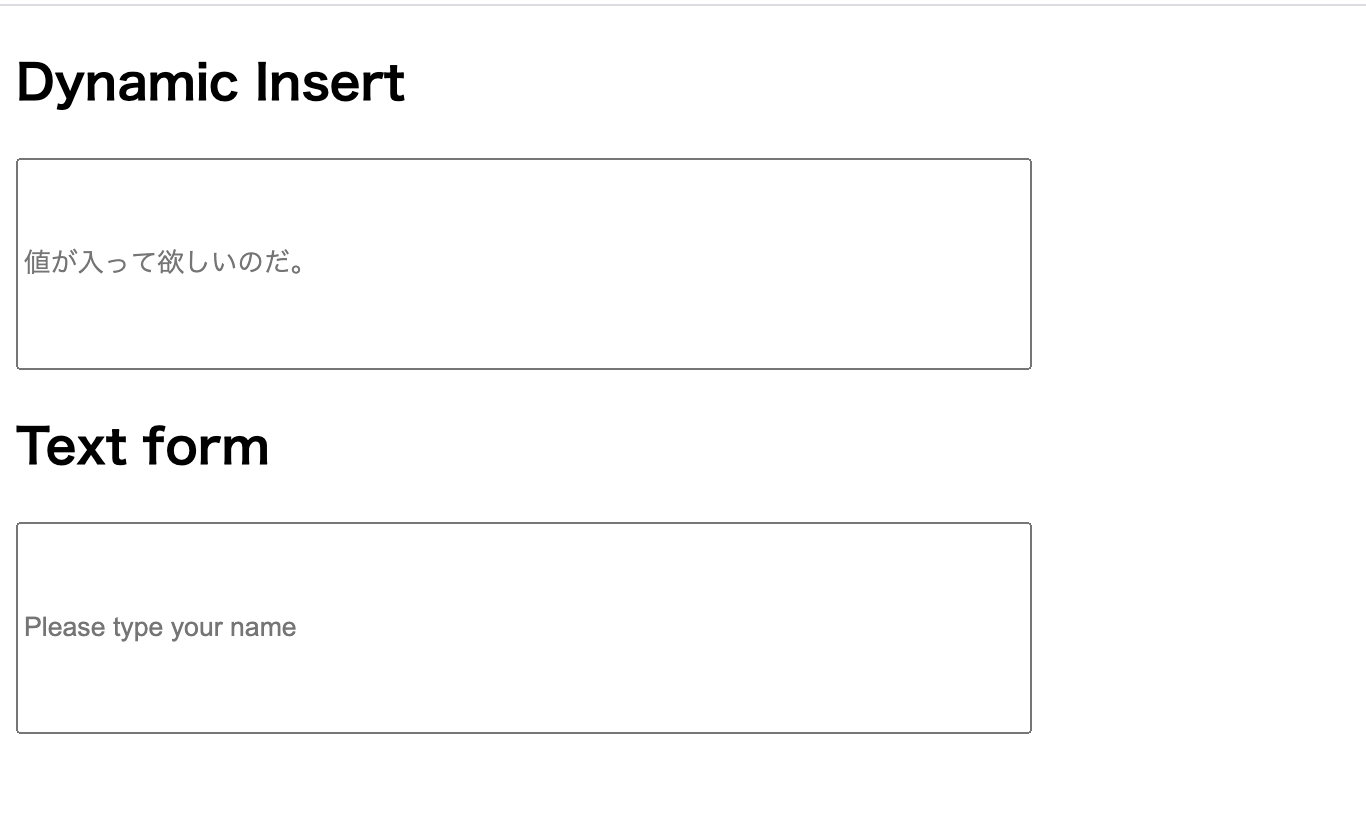
自分で作成したCustom Elementsを、ウェブページに動的に配置する際に、Elementの属性(attribute)に値を入れると、Elementの描画の挙動が変わって欲しい。ざっくりいうと以下のコードがその下に貼り付ける画像のように動いて欲しい。
コード(こんな感じで動いて欲しい!)
<!DOCTYPE html>
<html lang='en'>

<head>
  <meta http-equiv='Content-Type' content='text/html; charset=UTF-8'>
  <script type="text/javascript" src="./example-template.js" defer></script>
  <script type="text/javascript" src="./index.js" defer></script>
  </script>
  <!-- Custom Elementを引っ張ってくる "defer" を書かないと動かない  -->
  <title>custom elements example</title>
</head>

<body>
  <div id="parent">
    <!-- ここに動的にcustom elementsを入れたい -->
  </div>
  <!-- Custom Elementの利用。nameTitleとplaceHolderは作成した新しい属性(Attribute) -->
  <example-template name_title="Text form" plac="Please type your name"></example-template>

</body>

</html>
var parentEle = document.getElementById("parent");
var childElement = document.createElement('example-template');
childElement.setAttribute('name_title', 'Dynamic Insert');
childElement.setAttribute('plac', "値が入って欲しいのだ。");
parentEle.appendChild(childElement);
動作イメージ(こんな感じで動いて欲しい!)

ぶち当たった問題
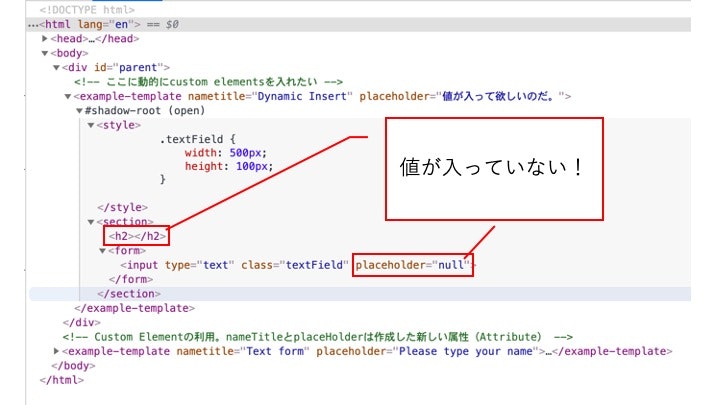
ところが、index.htmlのjavascriptを書いただけでは、このように動かないんですね、実際にどうなっているかというと、以下みたいな感じです。Text formという最初からbodyに入っているElementは正しく想定どおりに描画されていますが、動的に入れたElementは正しく描画されません。具体的には、属性に入れた値がきちんと入っていないですね。
動作結果(ちゃんと動かないよ!)

ちなみに、この時の生成されているHTMLはこんな感じです。Chromeの検証で引っ張ってきています。

解決方法
解決するには、実はcustom elementの方にコードを書かないといけません。何が問題かと言いますと、作成したcustom elemetがattributeの変更を検出して、値を入れるということができていないんですね。そのため、attributeが変化したことを検出して(attributeChangedCallback)、値を入れないといけないんです。実際に書いたコードは以下です。コメントに説明を入れています。
class ExampleTemplate extends HTMLElement {
    constructor() {
        // superは必ず一番最初に呼び出される。
        super();
        // これより下にCustom Elementに関する記述を行う

        //shadow rootの作成。これが今回の一番上のノード(ルート)
        const shadow = this.attachShadow({ mode: 'open' });

        // 今回はひとまとまりをsectionで包む
        const wrapper = document.createElement('section');

        //* Sectionの下に並べるElementsの情報を入れていく *//
        // h2タグ(タイトル)
        const subtitle = document.createElement('h2');
        subtitle.setAttribute('class', 'subTitle');
        const titleSub = this.getAttribute('name_title');    // nameTitleというAttributeの値を取得
        subtitle.textContent = titleSub;                    // nameTitleの値をh2タグで表示

        // form & input (テキストフィールド)
        const formF = document.createElement('form');
        const textField = document.createElement('input');

        textField.setAttribute('type', 'text');             // inputのtype指定
        textField.setAttribute('class', 'textField');       // classをtextFieldに
        const contents = this.getAttribute('plac');  // placというAttributeの値を取得
        textField.setAttribute('placeholder', contents);    // input(type=text)のplaceholderにplacの値を代入
        formF.appendChild(textField);                       // formの下にtextFieldをネストする

        // Shadow domにCSSを適用する
        const style = document.createElement('style');
        console.log(style.isConnected);
        style.textContent = `
        .textField {
            width: 500px;
            height: 100px;
        }
        `;                                                  //今回はtextFieldの幅と高さを指定した。

        // shadow domを一番上にして、上で作ったものをネストしていく
        // shadow |- style
        //        |- wrapper |- subtitle
        //                   |- formF
        shadow.appendChild(style);
        shadow.appendChild(wrapper);
        wrapper.appendChild(subtitle);
        wrapper.appendChild(formF);
    }

    // Attributeが変更された時に行う処理の定義
    static get observedAttributes() { return ["name_title", "plac"] };    //"nameTitle"と"plac"が変わることを監視させる

    // observedAttributesで監視しているattributeが変わったら呼ばれる関数、attrに呼ばれたattribute名、newValには新しく入った値が入る
    attributeChangedCallback(attr, oldVal, newVal) {

        //このconsoleはデバッグ用
        console.log('my-el attribute changed', attr);
        console.log('new value is ', newVal);

        //attrの値によって分ける
        if (attr === 'name_title') {            // attrがname_titleのとき
            // Create title holder
            this.shadowRoot.querySelector('.subTitle').textContent = newVal;    //.subTitleのtextContentにnewVal(入力値)を入れる
        } else if (attr === 'plac') {
            // Create description holder
            this.shadowRoot.querySelector('.textField').setAttribute('placeholder', newVal);    //.textField(input element)にnewVal(入力値)を入れる
        }
    }
}
// 新しいElementの定義
customElements.define('example-template', ExampleTemplate);
参考
[1] Using custom elements, MDN Web Doc
[2] Eric Bidelman, カスタム要素 v1: 再利用可能なウェブ コンポーネント, Google Developers
[3] Custom elements, javascript.info
[4] HTML Living Standard