はじめに
Google Cloud Platform (GCP) の Google Compute Engine ( GCE )インスタンスを使用して、Let's EncryptのSSL証明書の発行を、WEBサーバを構築せずにDNS認証で行ってみた自分の備簿録を兼ねた投稿です。ドメインはお名前.comで取得しました。
1.GCE インスタンスを作成する
本記事では、CentOS7を選択しました。インスタンス作成方法は省略します。
GCP公式サイトに記載されています。
2.外部IPアドレスを静的にする
外部IPアドレスをエフェメラルから静的に変更します。DNSサーバに登録しますので、静的IPアドレスにします。
3.ドメインを取得する
お名前.comで取得しました。ドメインの取得方法はこの辺りに記載あり。ドメイン取得後、DNSのAレコードに静的IPアドレスを登録します。
4.Let's Encryptをインストールする
Certbotのインストール方法は省略します。
(公式のCertbot クライアントのインストールに記載あり。)
5.証明書を発行する
Certbotのインストール後、以下のコマンドを実行します。("XXXXXXX.xxx"は環境による)
certbot certonly --manual -d XXXXXXX.xxx --preferred-challenges dns
実行すると以下のような画面になりますので進めます。
最後にEnterキーを押せと表示されますが、ここではEnterキーは押さず止めます。
Saving debug log to /var/log/letsencrypt/letsencrypt.log
Starting new HTTPS connection (1): acme-v01.api.letsencrypt.org

-------------------------------------------------------------------------------
Would you be willing to share your email address with the Electronic Frontier
Foundation, a founding partner of the Let's Encrypt project and the non-profit
organization that develops Certbot? We'd like to send you email about EFF and
our work to encrypt the web, protect its users and defend digital rights.
-------------------------------------------------------------------------------
(Y)es/(N)o: N (*1)
Obtaining a new certificate
Performing the following challenges:
DNS-01 challenge for XXXXXXX.xxx (*2)

-------------------------------------------------------------------------------
Please deploy a DNS TXT record under the name
_acme-challenge.XXXXXXX.xxx with the following value:

XOXOXOXOXOXOXOXOXOXOXOXOXOXOXOXOXOXOXOXOXOX (*3)

Once this is deployed,
-------------------------------------------------------------------------------
Press Enter to Continue ★まだEnter押してはいけない!!★

(*1) どっちでもよい
(*2) "XXXXXXX.xxx"は実際のドメインが表示される。
(*3) コマンド実行毎に変わるので、やり直す際には注意
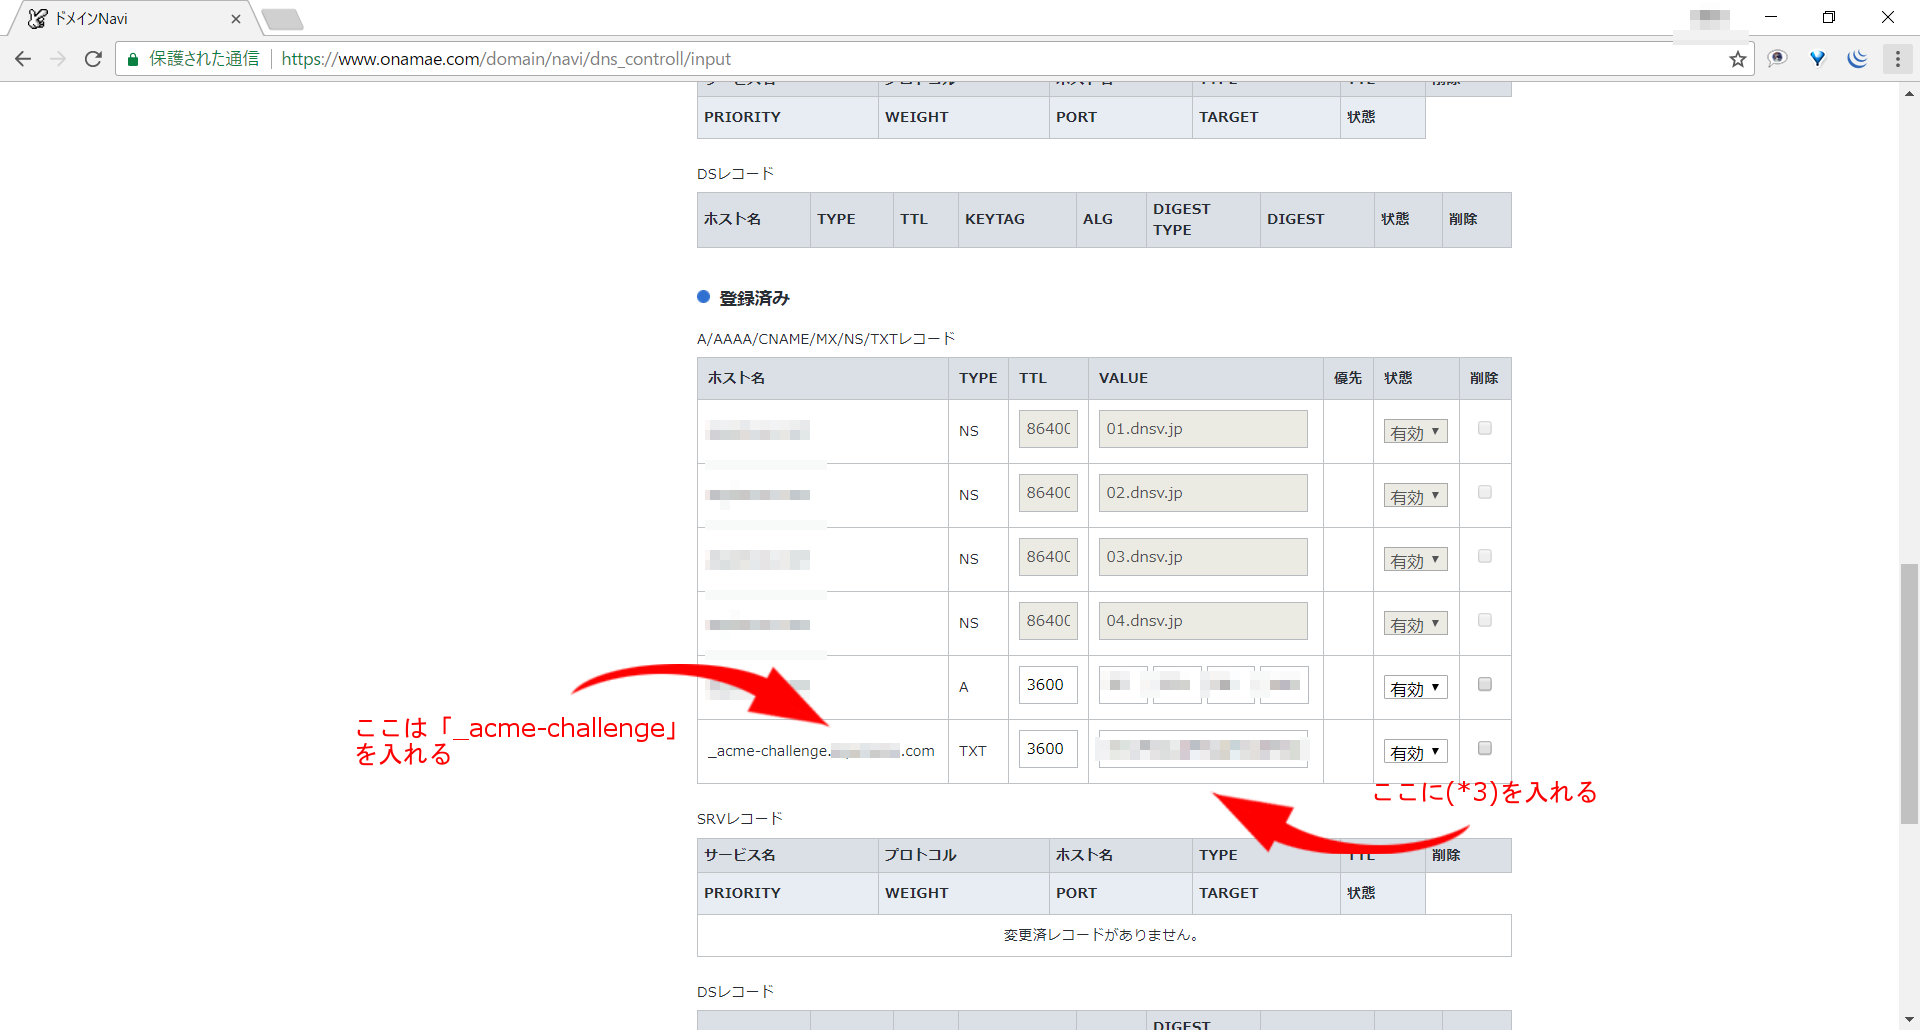
6.DNSサーバのTXTレコードに上記の値を設定する
Enterキーを押す前に、DNSサーバにTXTレコードを登録します。
(以下の画像は、お名前.comの設定例)
 |
|---|
7.認証させる(5の続き)
5でEnter待ちしていたスクリプトをEnterして次に進みます。
「Congratulations!・・・」が出力されれば完了です。
Waiting for verification...
Resetting dropped connection: acme-v01.api.letsencrypt.org
Cleaning up challenges
Generating key (2048 bits): /etc/letsencrypt/keys/0000_key-certbot.pem
Creating CSR: /etc/letsencrypt/csr/0000_csr-certbot.pem

IMPORTANT NOTES:
 - Congratulations! Your certificate and chain have been saved at
   /etc/letsencrypt/live/XXXXXXX.xxx/fullchain.pem. Your cert will
   expire on 20XX-XX-XX. To obtain a new or tweaked version of this
   certificate in the future, simply run certbot again. To
   non-interactively renew *all* of your certificates, run "certbot
   renew"
   ・・・云々・・・
8.証明書等ファイルの確認
以下のように、ドメイン名のディレクトリが/etc/letsencrypt/live/の下に作成され、証明書ファイル(のリンク)が格納されていることを確認します。ディレクトリが存在すれば完了です。
[root@XXXXXXX ~]# ls -l /etc/letsencrypt/live/XXXXXXX.xxx/
total 4
lrwxrwxrwx. 1 root root  37 Mar 25 16:02 cert.pem -> ../../archive/XXXXXXX.xxx/cert1.pem
lrwxrwxrwx. 1 root root  38 Mar 25 16:02 chain.pem -> ../../archive/XXXXXXX.xxx/chain1.pem
lrwxrwxrwx. 1 root root  42 Mar 25 16:02 fullchain.pem -> ../../archive/XXXXXXX.xxx/fullchain1.pem
lrwxrwxrwx. 1 root root  40 Mar 25 16:02 privkey.pem -> ../../archive/XXXXXXX.xxx/privkey1.pem
-rw-r--r--. 1 root root 543 Mar 25 16:02 README
9.証明書の更新
Let's Encryptは3ヶ月で期限が切れますので、SSL証明書更新を行う必要があります。証明書の更新はDNS認証でも特に通常と変わりなくcertbotコマンドを使用することでできます。(DNSを使用するのは新規発行時の検証のみです。)
(例) 通常の更新
sudo certbot renew
(例) 強制更新
sudo certbot renew --force-renewal
自動更新したい場合は、cronに登録しましょう。